
User Manual (ENGLISH)
Page 1
EA5_0040605_F8 SGH-p777 Series PORTABLE Tri-Mode TELEPHONE User Guide Please read this manual before operating your phone, and keep it for future reference.
EA5_0040605_F8 SGH-p777 Series PORTABLE Tri-Mode TELEPHONE User Guide Please read this manual before operating your phone, and keep it for future reference.

User Manual (ENGLISH)
Page 2
...: 1601 E. You may not infringe or otherwise violate the rights secured by or which is otherwise the property of Samsung or its respective suppliers relating to the SAMSUNG Phone, including but is a registered trademark of Samsung Electronics America, Inc. All applicable rights of authorship. and its suppliers. Moreover, you agree that you . No title...
...: 1601 E. You may not infringe or otherwise violate the rights secured by or which is otherwise the property of Samsung or its respective suppliers relating to the SAMSUNG Phone, including but is a registered trademark of Samsung Electronics America, Inc. All applicable rights of authorship. and its suppliers. Moreover, you agree that you . No title...

User Manual (ENGLISH)
Page 5
... Voice Mail Box 12 Accessing Your Voice Mail 13 Changing the Voice Mail Number 13 Section 2: Understanding Your Phone 15 Features of Your Phone 16 Front View of Your Phone 17 Rear View of Your Phone 18 Keys 18 Icons 21 Section 3: Call Functions 23 Making a Call 24 Answering a Call 25 Adjusting the Call...
... Voice Mail Box 12 Accessing Your Voice Mail 13 Changing the Voice Mail Number 13 Section 2: Understanding Your Phone 15 Features of Your Phone 16 Front View of Your Phone 17 Rear View of Your Phone 18 Keys 18 Icons 21 Section 3: Call Functions 23 Making a Call 24 Answering a Call 25 Adjusting the Call...

User Manual (ENGLISH)
Page 6
... New Messages 79 Viewing Messages 80 Delete All 86 Settings 87 Memory Status 92 Section 8: Changing Your Settings 95 Sound Settings 96 Display Settings 99 Phone Settings 101 Connection Settings 104 Time & Date 106 Network Services 108 Infrared Activate 115 Security 117 Reset Settings 121 Section 9: Multimedia 123 Using the Camera...
... New Messages 79 Viewing Messages 80 Delete All 86 Settings 87 Memory Status 92 Section 8: Changing Your Settings 95 Sound Settings 96 Display Settings 99 Phone Settings 101 Connection Settings 104 Time & Date 106 Network Services 108 Infrared Activate 115 Security 117 Reset Settings 121 Section 9: Multimedia 123 Using the Camera...

User Manual (ENGLISH)
Page 7
...and Safety Information ... 165 Health and Safety Information 166 Consumer Information on Wireless Phones 168 Road Safety 178 Operating Environment 180 Using Your Phone Near Other Electronic Devices ..........180 Potentially Explosive Environments 182 Emergency Calls 183 FCC ...Notice and Cautions 184 Other Important Safety Information 185 Product Performance 186 Section 13: Warranty Information 191 Standard Limited Warranty 192 Intellectual Property Statement 198 Samsung...
...and Safety Information ... 165 Health and Safety Information 166 Consumer Information on Wireless Phones 168 Road Safety 178 Operating Environment 180 Using Your Phone Near Other Electronic Devices ..........180 Potentially Explosive Environments 182 Emergency Calls 183 FCC ...Notice and Cautions 184 Other Important Safety Information 185 Product Performance 186 Section 13: Warranty Information 191 Standard Limited Warranty 192 Intellectual Property Statement 198 Samsung...

User Manual (ENGLISH)
Page 9
Section 1 Section 1: Getting Started Topics Covered • Activating your phone • Setting Up Voice Mail • Customer Support • Understanding this User Manual This section allows you to start using your phone by activating your service, setting up your voice mail, contacting customer support, or getting an understanding of how this manual is put together. Section 1: Getting Started 5
Section 1 Section 1: Getting Started Topics Covered • Activating your phone • Setting Up Voice Mail • Customer Support • Understanding this User Manual This section allows you to start using your phone by activating your service, setting up your voice mail, contacting customer support, or getting an understanding of how this manual is put together. Section 1: Getting Started 5

User Manual (ENGLISH)
Page 10
... you subscribe to a cellular network, you are provided with your subscription details, such as your SIM card out of the phone and hold it in the following instructions: Installing the SIM Card Note: The plug-in SIM card loaded with a plug-in SIM card and its ... by scratches or bending, so be careful when handling, inserting, or removing the card. To Install the SIM card, use the following illustration. With the phone turned off, remove the battery as shown. 6 To install the SIM card: 1. Slide the battery lock toward the top of reach from small children. Lift...
... you subscribe to a cellular network, you are provided with your subscription details, such as your SIM card out of the phone and hold it in the following instructions: Installing the SIM Card Note: The plug-in SIM card loaded with a plug-in SIM card and its ... by scratches or bending, so be careful when handling, inserting, or removing the card. To Install the SIM card, use the following illustration. With the phone turned off, remove the battery as shown. 6 To install the SIM card: 1. Slide the battery lock toward the top of reach from small children. Lift...

User Manual (ENGLISH)
Page 11
To remove the SIM card, slide it upwards, as shown, so that the card locks into the phone. 3. Make sure the gold colored contacts of the socket. Section 1: Getting Started 7 Slide the SIM card into the SIM card socket so that the card socket, as shown, and take it out of the card face into position. Section 1 Activating Your Phone 2.
To remove the SIM card, slide it upwards, as shown, so that the card locks into the phone. 3. Make sure the gold colored contacts of the socket. Section 1: Getting Started 7 Slide the SIM card into the SIM card socket so that the card socket, as shown, and take it out of the card face into position. Section 1 Activating Your Phone 2.

User Manual (ENGLISH)
Page 12
Section 1 4. Press the battery down until it clicks into place. Replace the battery so that the battery is properly installed before switching on the end align with the slots at the bottom of the phone. 5. Make sure that the tabs on the power. 8
Section 1 4. Press the battery down until it clicks into place. Replace the battery so that the battery is properly installed before switching on the end align with the slots at the bottom of the phone. 5. Make sure that the tabs on the power. 8

User Manual (ENGLISH)
Page 13
... local Samsung dealer for the first time. A discharged battery recharges fully in position on the phone, plug the connector of the travel charger into the jack at the bottom of the phone. With the battery in approximately 200 minutes. Section 1 Activating Your Phone Charging the Battery Your phone is charging, but this causes the phone to...
... local Samsung dealer for the first time. A discharged battery recharges fully in position on the phone, plug the connector of the travel charger into the jack at the bottom of the phone. With the battery in approximately 200 minutes. Section 1 Activating Your Phone Charging the Battery Your phone is charging, but this causes the phone to...
User Manual (ENGLISH)
Page 14
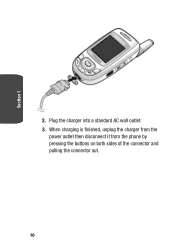
Plug the charger into a standard AC wall outlet. 3. When charging is finished, unplug the charger from the power outlet then disconnect it from the phone by pressing the buttons on both sides of the connector and pulling the connector out. 10 Section 1 2.
Plug the charger into a standard AC wall outlet. 3. When charging is finished, unplug the charger from the power outlet then disconnect it from the phone by pressing the buttons on both sides of the connector and pulling the connector out. 10 Section 1 2.

User Manual (ENGLISH)
Page 15
Section 1: Getting Started 11 Section 1 Activating Your Phone Note: You must unplug the charger before removing the battery from the phone during charging, otherwise, the phone could be damaged. In this case, your phone will turn off automatically. Low Battery Indicator When the battery is too low, the phone turns off the backlight to conserve the remaining battery power. When the battery level is weak and only a few minutes of talk time remain, a warning tone sounds and a pop-up message repeats at regular intervals on the display.
Section 1: Getting Started 11 Section 1 Activating Your Phone Note: You must unplug the charger before removing the battery from the phone during charging, otherwise, the phone could be damaged. In this case, your phone will turn off automatically. Low Battery Indicator When the battery is too low, the phone turns off the backlight to conserve the remaining battery power. When the battery level is weak and only a few minutes of talk time remain, a warning tone sounds and a pop-up message repeats at regular intervals on the display.
User Manual (ENGLISH)
Page 16
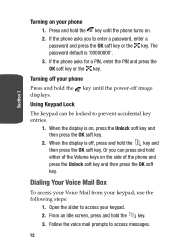
.... From an Idle screen, press and hold the key and then press the OK soft key. If the phone asks for a PIN, enter the PIN and press the OK soft key or the key. Using Keypad Lock... The keypad can press and hold the key until the phone turns on , press the Unlock soft key and then press the OK soft key. 2. When the display is ...'00000000'. 3. Dialing Your Voice Mail Box To access your Voice Mail from your phone Press and hold either of the phone and press the Unlock soft key and then press the OK soft key. Follow the voice ...
.... From an Idle screen, press and hold the key and then press the OK soft key. If the phone asks for a PIN, enter the PIN and press the OK soft key or the key. Using Keypad Lock... The keypad can press and hold the key until the phone turns on , press the Unlock soft key and then press the OK soft key. 2. When the display is ...'00000000'. 3. Dialing Your Voice Mail Box To access your Voice Mail from your phone Press and hold either of the phone and press the Unlock soft key and then press the OK soft key. Follow the voice ...
User Manual (ENGLISH)
Page 17
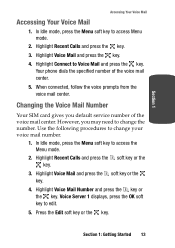
... mode. 2. Highlight Voice Mail and press the key. 4. However, you default service number of the voice mail center. 5. Highlight Connect to access Menu mode. 2. Your phone dials the specified number of the voice mail center. Changing the Voice Mail Number Your SIM card gives you may need to change the number...
... mode. 2. Highlight Voice Mail and press the key. 4. However, you default service number of the voice mail center. 5. Highlight Connect to access Menu mode. 2. Your phone dials the specified number of the voice mail center. Changing the Voice Mail Number Your SIM card gives you may need to change the number...

User Manual (ENGLISH)
Page 19
Section 2: Understanding Your Phone 15 Section 2 Section 2: Understanding Your Phone Topics Covered • Features of Your Phone • Front and Rear View of Your Phone • Command Keys • Understanding the Display Screen This section outlines some key features of your phone. It also displays the screen and the icons that will are displayed when the phone is in use.
Section 2: Understanding Your Phone 15 Section 2 Section 2: Understanding Your Phone Topics Covered • Features of Your Phone • Front and Rear View of Your Phone • Command Keys • Understanding the Display Screen This section outlines some key features of your phone. It also displays the screen and the icons that will are displayed when the phone is in use.

User Manual (ENGLISH)
Page 20
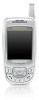
The following list outlines a few of Your Phone Your phone is lightweight, easy-to features and options. • Instant Messaging capability • Multimedia capability including Camera, MP3 Player, Record Audio and Java Games. • Personal Assistant feature provides Calendar, To Do List, Alarm, Calculator, and Currency Exchange. 16 Section 2 Features of the features included in your phone. User friendly, menu driven access to -use and offers many significant features.
The following list outlines a few of Your Phone Your phone is lightweight, easy-to features and options. • Instant Messaging capability • Multimedia capability including Camera, MP3 Player, Record Audio and Java Games. • Personal Assistant feature provides Calendar, To Do List, Alarm, Calculator, and Currency Exchange. 16 Section 2 Features of the features included in your phone. User friendly, menu driven access to -use and offers many significant features.

User Manual (ENGLISH)
Page 21
Front View of Your Phone Front View of Your Phone Section 2 Section 2: Understanding Your Phone 17
Front View of Your Phone Front View of Your Phone Section 2 Section 2: Understanding Your Phone 17

User Manual (ENGLISH)
Page 22
Performs the functions indicated by the screen text on the bottom line of the display. 2. (on the left side of Your Phone Keys The following list correlates to the from and rear illustrations. 1. Adjusts the earpiece volume during the call. In Idle mode, adjusts the keypad tone volume. In Menu mode, scrolls through the menu options. 18 Section 2 Rear View of the phone) Adjusts the ringer volume when the phone is ringing.
Performs the functions indicated by the screen text on the bottom line of the display. 2. (on the left side of Your Phone Keys The following list correlates to the from and rear illustrations. 1. Adjusts the earpiece volume during the call. In Idle mode, adjusts the keypad tone volume. In Menu mode, scrolls through the menu options. 18 Section 2 Rear View of the phone) Adjusts the ringer volume when the phone is ringing.

User Manual (ENGLISH)
Page 23
Keys 3. In Idle mode, recalls the last number dialed or received when held down . The microphone used during phone calls and voice memo recordings. 8. Also switches the phone on or off when held down . 10. Deletes characters from the display. In Idle mode, launches the WAP... (Wireless Application Protocol) browser. Section 2: Understanding Your Phone 19 Section 2 In Menu mode, returns you have entered. 4. Enters numbers, letters, and some special characters. 5. In Menu mode, selects ...
Keys 3. In Idle mode, recalls the last number dialed or received when held down . The microphone used during phone calls and voice memo recordings. 8. Also switches the phone on or off when held down . 10. Deletes characters from the display. In Idle mode, launches the WAP... (Wireless Application Protocol) browser. Section 2: Understanding Your Phone 19 Section 2 In Menu mode, returns you have entered. 4. Enters numbers, letters, and some special characters. 5. In Menu mode, selects ...

User Manual (ENGLISH)
Page 24
... turned on page 36. The headset jack is used to listen to audio from your favorite menu options directly. The earpiece used to access your phone. 14. In Idle mode, allows you push. 12. The infrared sensor is used to the previous menu level and the Right key selects the highlighted...
... turned on page 36. The headset jack is used to listen to audio from your favorite menu options directly. The earpiece used to access your phone. 14. In Idle mode, allows you push. 12. The infrared sensor is used to the previous menu level and the Right key selects the highlighted...


