
User Manual (ENGLISH)
Page 1
Printed in Korea GH68-05357A English 08/2004 UCDH1._wbe317_080404.d9 SGH-e317 Portable Digital Telephone User Manual Please read this manual before operating your phone, and keep it for future reference.
Printed in Korea GH68-05357A English 08/2004 UCDH1._wbe317_080404.d9 SGH-e317 Portable Digital Telephone User Manual Please read this manual before operating your phone, and keep it for future reference.
User Manual (ENGLISH)
Page 2
... as defined below, owned by the Intellectual Property. No title to or ownership in the Intellectual Property is otherwise the property of Samsung or its suppliers. All applicable rights of , reverse engineer, decompile, disassemble, or otherwise attempt to , inventions (patentable or unpatentable...not (and will not attempt to) modify, prepare derivative works of the Intellectual Property shall remain with SAMSUNG and its respective suppliers relating to the SAMSUNG Phone, including but is proprietary to you. Intellectual Property includes, but not limited to, accessories, parts, or...
... as defined below, owned by the Intellectual Property. No title to or ownership in the Intellectual Property is otherwise the property of Samsung or its suppliers. All applicable rights of , reverse engineer, decompile, disassemble, or otherwise attempt to , inventions (patentable or unpatentable...not (and will not attempt to) modify, prepare derivative works of the Intellectual Property shall remain with SAMSUNG and its respective suppliers relating to the SAMSUNG Phone, including but is proprietary to you. Intellectual Property includes, but not limited to, accessories, parts, or...
User Manual (ENGLISH)
Page 5
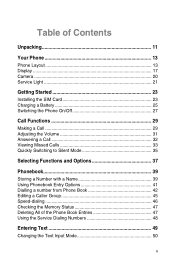
... 13 Display 17 Camera 20 Service Light 21 Getting Started 23 Installing the SIM Card 23 Charging a Battery 25 Switching the Phone On/Off 27 Call Functions 29 Making a Call 29 Adjusting the Volume 31 Answering a Call 32 Viewing Missed Calls 33 Quickly Switching to Silent...Phonebook 39 Storing a Number with a Name 39 Using Phonebook Entry Options 41 Dialling a number from Phone Book 42 Editing a Caller Group 45 Speed-dialing 46 Checking the Memory Status 47 Deleting All of the Phone Book Entries 47 Using the Service Dialing Numbers 48 Entering Text 49 Changing the Text Input...
... 13 Display 17 Camera 20 Service Light 21 Getting Started 23 Installing the SIM Card 23 Charging a Battery 25 Switching the Phone On/Off 27 Call Functions 29 Making a Call 29 Adjusting the Volume 31 Answering a Call 32 Viewing Missed Calls 33 Quickly Switching to Silent...Phonebook 39 Storing a Number with a Name 39 Using Phonebook Entry Options 41 Dialling a number from Phone Book 42 Editing a Caller Group 45 Speed-dialing 46 Checking the Memory Status 47 Deleting All of the Phone Book Entries 47 Using the Service Dialing Numbers 48 Entering Text 49 Changing the Text Input...
User Manual (ENGLISH)
Page 8
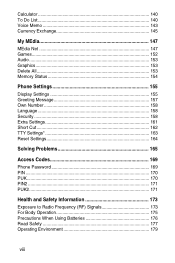
...Voice Memo 143 Currency Exchange 145 My MEdia 147 MEdia Net 147 Games 152 Audio 153 Graphics 153 Delete All 153 Memory Status 154 Phone Settings 155 Display Settings 155 Greeting Message 157 Own Number 158 Language 158 Security 158 Extra Settings 161 Short Cut 162 TTY Settings ...163 Reset Settings 164 Solving Problems 165 Access Codes 169 Phone Password 169 PIN ...170 PUK...170 PIN2 171 PUK2 171 Health and Safety Information 173 Exposure to Radio Frequency (RF) Signals 173 For...
...Voice Memo 143 Currency Exchange 145 My MEdia 147 MEdia Net 147 Games 152 Audio 153 Graphics 153 Delete All 153 Memory Status 154 Phone Settings 155 Display Settings 155 Greeting Message 157 Own Number 158 Language 158 Security 158 Extra Settings 161 Short Cut 162 TTY Settings ...163 Reset Settings 164 Solving Problems 165 Access Codes 169 Phone Password 169 PIN ...170 PUK...170 PIN2 171 PUK2 171 Health and Safety Information 173 Exposure to Radio Frequency (RF) Signals 173 For...
User Manual (ENGLISH)
Page 9
Electronic Devices 179 Potentially Explosive Environments 181 Emergency Calls 181 Other Important Safety Information 182 Care and Maintenance 183 Acknowledging Special Precautions and the FCC and Industry Canada Notice 184 Appendix A: CERTIFICATION INFORMATION (SAR 187 Appendix B: Guide to Safe and Responsible Wireless Phone Use 191 Appendix C: Consumer Update on Wireless Phones 195 Standard Limited Warranty 205 Glossary 211 Index 217 ix
Electronic Devices 179 Potentially Explosive Environments 181 Emergency Calls 181 Other Important Safety Information 182 Care and Maintenance 183 Acknowledging Special Precautions and the FCC and Industry Canada Notice 184 Appendix A: CERTIFICATION INFORMATION (SAR 187 Appendix B: Guide to Safe and Responsible Wireless Phone Use 191 Appendix C: Consumer Update on Wireless Phones 195 Standard Limited Warranty 205 Glossary 211 Index 217 ix
User Manual (ENGLISH)
Page 13
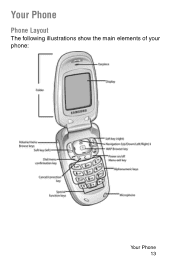
Your Phone Phone Layout The following illustrations show the main elements of your phone: Your Phone 13
Your Phone Phone Layout The following illustrations show the main elements of your phone: Your Phone 13
User Manual (ENGLISH)
Page 14
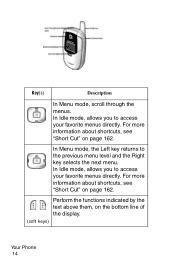
In Idle mode, allows you to access your favorite menus directly. For more information about shortcuts, see "Short Cut" on page 162. For more information about shortcuts, see "Short Cut" on the bottom line of the display. (soft keys) Your Phone 14 In Menu mode, the Left key returns to access your favorite menus directly. Perform the functions indicated by the text above them, on page 162. Key(s) Description In Menu mode, scroll through the menus. In Idle mode, allows you to the previous menu level and the Right key selects the next menu.
In Idle mode, allows you to access your favorite menus directly. For more information about shortcuts, see "Short Cut" on page 162. For more information about shortcuts, see "Short Cut" on the bottom line of the display. (soft keys) Your Phone 14 In Menu mode, the Left key returns to access your favorite menus directly. Perform the functions indicated by the text above them, on page 162. Key(s) Description In Menu mode, scroll through the menus. In Idle mode, allows you to the previous menu level and the Right key selects the next menu.

User Manual (ENGLISH)
Page 15
... Key(s) Description (Continued) In Idle mode, launches the WAP (Wireless Application Protocol) browser. When held down in the phone or SIM memory. Makes or answers a call . When held down . In Menu mode, returns to Idle mode. Ends a call . In menu mode, selects the highlighted ...
... Key(s) Description (Continued) In Idle mode, launches the WAP (Wireless Application Protocol) browser. When held down in the phone or SIM memory. Makes or answers a call . When held down . In Menu mode, returns to Idle mode. Ends a call . In menu mode, selects the highlighted ...
User Manual (ENGLISH)
Page 16
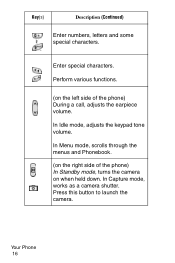
Perform various functions. (on when held down. In Idle mode, adjusts the keypad tone volume. In Capture mode, works as a camera shutter. Press this button to launch the camera. Your Phone 16 Enter special characters. In Menu mode, scrolls through the menus and Phonebook. (on the right side of the phone) In Standby mode, turns the camera on the left side of the phone) During a call, adjusts the earpiece volume. Key(s) Description (Continued) Enter numbers, letters and some special characters.
Perform various functions. (on when held down. In Idle mode, adjusts the keypad tone volume. In Capture mode, works as a camera shutter. Press this button to launch the camera. Your Phone 16 Enter special characters. In Menu mode, scrolls through the menus and Phonebook. (on the right side of the phone) In Standby mode, turns the camera on the left side of the phone) During a call, adjusts the earpiece volume. Key(s) Description (Continued) Enter numbers, letters and some special characters.
User Manual (ENGLISH)
Page 17
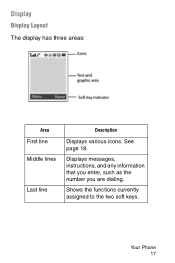
Display Display Layout The display has three areas: Area First line Middle lines Last line Description Displays various icons. Your Phone 17 Displays messages, instructions, and any information that you enter, such as the number you are dialing. Shows the functions currently assigned to the two soft keys. See page 18.
Display Display Layout The display has three areas: Area First line Middle lines Last line Description Displays various icons. Your Phone 17 Displays messages, instructions, and any information that you enter, such as the number you are dialing. Shows the functions currently assigned to the two soft keys. See page 18.

User Manual (ENGLISH)
Page 18
Displays when the Call Forwarding feature is outside your network area and are connected to ring at a specified time. Appears when a call is gray, you are outside the network area. Icons Icon Description Shows the received signal strength. Appears when you set an alarm to the GPRS network. Appears when a call is activated. Your Phone 18 If this icon is in progress. Appears when a new text message is received. The greater the number of bars, the better the signal. Appears when you are restricted to emergency calls only.
Displays when the Call Forwarding feature is outside your network area and are connected to ring at a specified time. Appears when a call is gray, you are outside the network area. Icons Icon Description Shows the received signal strength. Appears when you set an alarm to the GPRS network. Appears when a call is activated. Your Phone 18 If this icon is in progress. Appears when a new text message is received. The greater the number of bars, the better the signal. Appears when you are restricted to emergency calls only.
User Manual (ENGLISH)
Page 19
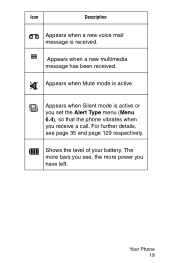
Appears when Silent mode is received. Your Phone 19 The more power you have left. Icon Description Appears when a new voice mail message is active or you set the Alert Type menu (Menu 6.4), so that the phone vibrates when you receive a call. Appears when a new multimedia message has been received. Shows the level of your battery. For further details, see , the more bars you see page 35 and page 129 respectively. Appears when Mute mode is active.
Appears when Silent mode is received. Your Phone 19 The more power you have left. Icon Description Appears when a new voice mail message is active or you set the Alert Type menu (Menu 6.4), so that the phone vibrates when you receive a call. Appears when a new multimedia message has been received. Shows the level of your battery. For further details, see , the more bars you see page 35 and page 129 respectively. Appears when Mute mode is active.
User Manual (ENGLISH)
Page 20
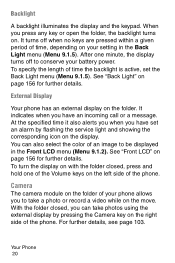
... on page 156 for further details. It indicates when you have an incoming call or a message. Camera The camera module on the folder of the phone. At the specified time it also alerts you when you have set the Back Light menu (Menu 9.1.5). You can take a photo or record a video... folder closed , press and hold one minute, the display turns off when no keys are pressed within a given period of the phone. Your Phone 20 External Display Your phone has an external display on the right side of time, depending on page 156 for further details. When you can also select the...
... on page 156 for further details. It indicates when you have an incoming call or a message. Camera The camera module on the folder of the phone. At the specified time it also alerts you when you have set the Back Light menu (Menu 9.1.5). You can take a photo or record a video... folder closed , press and hold one minute, the display turns off when no keys are pressed within a given period of the phone. Your Phone 20 External Display Your phone has an external display on the right side of time, depending on page 156 for further details. When you can also select the...
User Manual (ENGLISH)
Page 21
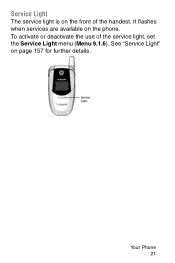
Service Light The service light is on page 157 for further details. See "Service Light" on the front of the service light, set the Service Light menu (Menu 9.1.6). Your Phone 21 To activate or deactivate the use of the handest. It flashes when services are available on the phone.
Service Light The service light is on page 157 for further details. See "Service Light" on the front of the service light, set the Service Light menu (Menu 9.1.6). Your Phone 21 To activate or deactivate the use of the handest. It flashes when services are available on the phone.
User Manual (ENGLISH)
Page 23
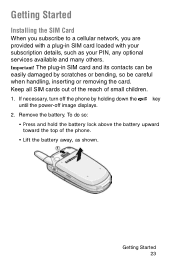
If necessary, turn off the phone by scratches or bending, so be easily damaged by holding down the key until the power-off image displays. 2. The plug-in SIM card loaded ...with your PIN, any optional services available and many others. Getting Started 23 Important! Keep all SIM cards out of the reach of the phone. • Lift the battery away, as your subscription details, such as shown. To do so: • Press and hold the battery lock above the battery...
If necessary, turn off the phone by scratches or bending, so be easily damaged by holding down the key until the power-off image displays. 2. The plug-in SIM card loaded ...with your PIN, any optional services available and many others. Getting Started 23 Important! Keep all SIM cards out of the reach of the phone. • Lift the battery away, as your subscription details, such as shown. To do so: • Press and hold the battery lock above the battery...
User Manual (ENGLISH)
Page 24
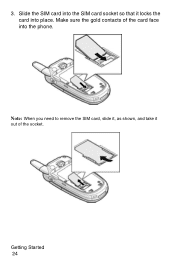
Note: When you need to remove the SIM card, slide it, as shown, and take it locks the card into the phone. Getting Started 24 Make sure the gold contacts of the socket. Slide the SIM card into the SIM card socket so that it out of the card face into place. 3.
Note: When you need to remove the SIM card, slide it, as shown, and take it locks the card into the phone. Getting Started 24 Make sure the gold contacts of the socket. Slide the SIM card into the SIM card socket so that it out of the card face into place. 3.
User Manual (ENGLISH)
Page 25
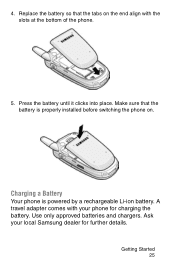
A travel adapter comes with the slots at the bottom of the phone. 5. Getting Started 25 Make sure that the tabs on . Use only approved batteries and chargers. Ask your phone for further details. 4. Replace the battery so that the battery is powered by a rechargeable Li-ion battery. Press the battery until it clicks into place. Charging a Battery Your phone is properly installed before switching the phone on the end align with your local Samsung dealer for charging the battery.
A travel adapter comes with the slots at the bottom of the phone. 5. Getting Started 25 Make sure that the tabs on . Use only approved batteries and chargers. Ask your phone for further details. 4. Replace the battery so that the battery is powered by a rechargeable Li-ion battery. Press the battery until it clicks into place. Charging a Battery Your phone is properly installed before switching the phone on the end align with your local Samsung dealer for charging the battery.
User Manual (ENGLISH)
Page 26
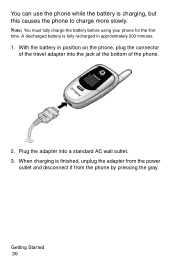
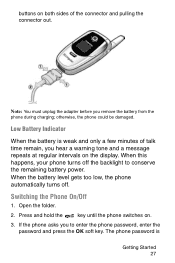
Note: You must fully charge the battery before using your phone for the first time. A discharged battery is fully recharged in position on the phone, plug the connector of the phone. 2. Plug the adapter into the jack at the bottom of the travel adapter into a standard AC wall outlet. 3. When charging is charging, but this causes the phone to charge more slowly. You can use the phone while the battery is finished, unplug the adapter from the power outlet and disconnect it from the phone by pressing the gray Getting Started 26 With the battery in approximately 200 minutes. 1.
Note: You must fully charge the battery before using your phone for the first time. A discharged battery is fully recharged in position on the phone, plug the connector of the phone. 2. Plug the adapter into the jack at the bottom of the travel adapter into a standard AC wall outlet. 3. When charging is charging, but this causes the phone to charge more slowly. You can use the phone while the battery is finished, unplug the adapter from the power outlet and disconnect it from the phone by pressing the gray Getting Started 26 With the battery in approximately 200 minutes. 1.
User Manual (ENGLISH)
Page 27
... on . 3. When the battery level gets too low, the phone automatically turns off the backlight to enter the phone password, enter the password and press the OK soft key. When this happens, your phone turns off . The phone password is weak and only a few minutes of the connector and... pulling the connector out. Switching the Phone On/Off 1. Press and hold the key until the phone switches on the display. Low Battery Indicator When the battery is Getting Started 27 otherwise, the phone could be damaged. buttons on both sides of talk time remain...
... on . 3. When the battery level gets too low, the phone automatically turns off the backlight to enter the phone password, enter the password and press the OK soft key. When this happens, your phone turns off . The phone password is weak and only a few minutes of the connector and... pulling the connector out. Switching the Phone On/Off 1. Press and hold the key until the phone switches on the display. Low Battery Indicator When the battery is Getting Started 27 otherwise, the phone could be damaged. buttons on both sides of talk time remain...
User Manual (ENGLISH)
Page 28
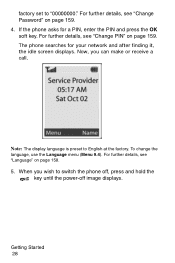
To change the language, use the Language menu (Menu 9.4). Now, you wish to English at the factory. When you can make or receive a call. The phone searches for a PIN, enter the PIN and press the OK soft key. For further details, see "Language" on page 158. 5. Getting Started 28 Note: The ...display language is preset to switch the phone off, press and hold the key until the power-off image displays. For further details, see "Change PIN" on page 159. 4. If the...
To change the language, use the Language menu (Menu 9.4). Now, you wish to English at the factory. When you can make or receive a call. The phone searches for a PIN, enter the PIN and press the OK soft key. For further details, see "Language" on page 158. 5. Getting Started 28 Note: The ...display language is preset to switch the phone off, press and hold the key until the power-off image displays. For further details, see "Change PIN" on page 159. 4. If the...


