User Manual (user Manual) (ver.1.00) (English)
Page 3
...1.12 Connecting to the Computer (SF-531P only) --------- 1.14 Plugging In the Power 1.15 Loading Paper 1.15 Installing the Toner Cartridge 1.18 Setting the Date and Time 1.20 Setting Your Fax Number and Name 1.21 Testing the Machine 1.21 Using Save Modes... 1.22 2 Installing Samsung Software (SF-531P only) Samsung SmarThru About Samsung SmarThru Software 2.1 Installing Software System Requirements 2.3 Installing the Samsung Software 2.4 Configuring the Fax Gate on Your PC 2.6 Configuring the Internet Gate on Your...
...1.12 Connecting to the Computer (SF-531P only) --------- 1.14 Plugging In the Power 1.15 Loading Paper 1.15 Installing the Toner Cartridge 1.18 Setting the Date and Time 1.20 Setting Your Fax Number and Name 1.21 Testing the Machine 1.21 Using Save Modes... 1.22 2 Installing Samsung Software (SF-531P only) Samsung SmarThru About Samsung SmarThru Software 2.1 Installing Software System Requirements 2.3 Installing the Samsung Software 2.4 Configuring the Fax Gate on Your PC 2.6 Configuring the Internet Gate on Your...
User Manual (user Manual) (ver.1.00) (English)
Page 6
... 5.1 Clearing Memory 5.1 Cleaning the OPC Drum 5.2 Adjusting Shading 5.2 Setting the Machine to be Checked by Phone --------- 5.3 Sending Toner Low Information to the Service Company 5.3 Cleaning the Machine 5.4 Managing the Toner Cartridge 5.7 Automatic Document Feeder Rubber Pad Replacement 5.10 6 Troubleshooting Clearing Paper Jams 6.1 LCD Error Messages 6.5 Fax Problems 6.7 General...a document • Copying a document • Working with a scanned image • Recognizing a scanned image as text • How to use additional features using the Samsung SmarThru 2 program IV
... 5.1 Clearing Memory 5.1 Cleaning the OPC Drum 5.2 Adjusting Shading 5.2 Setting the Machine to be Checked by Phone --------- 5.3 Sending Toner Low Information to the Service Company 5.3 Cleaning the Machine 5.4 Managing the Toner Cartridge 5.7 Automatic Document Feeder Rubber Pad Replacement 5.10 6 Troubleshooting Clearing Paper Jams 6.1 LCD Error Messages 6.5 Fax Problems 6.7 General...a document • Copying a document • Working with a scanned image • Recognizing a scanned image as text • How to use additional features using the Samsung SmarThru 2 program IV
User Manual (user Manual) (ver.1.00) (English)
Page 11
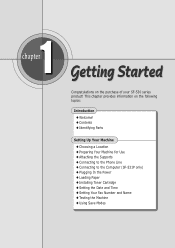
This chapter provides information on the purchase of your SF-530 series product! N Contents N Identifying Parts Setting Up Your Machine N Choosing a Location N Preparing Your Machine for Use N Attaching the Supports N Connecting to the Phone Line N Connecting to the Computer (SF-531P only) N Plugging In the Power N Loading Paper N Installing Toner Cartridge N Setting the Date and Time N Setting Your Fax Number and Name N Testing the Machine N Using Save Modes 1chapter Congratulations on the following topics: Introduction N Welcome!
This chapter provides information on the purchase of your SF-530 series product! N Contents N Identifying Parts Setting Up Your Machine N Choosing a Location N Preparing Your Machine for Use N Attaching the Supports N Connecting to the Phone Line N Connecting to the Computer (SF-531P only) N Plugging In the Power N Loading Paper N Installing Toner Cartridge N Setting the Date and Time N Setting Your Fax Number and Name N Testing the Machine N Using Save Modes 1chapter Congratulations on the following topics: Introduction N Welcome!
User Manual (user Manual) (ver.1.00) (English)
Page 14
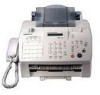
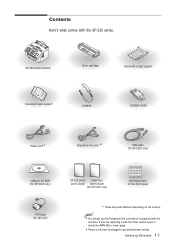
... machine. Notes: • You should be AWG #26 or lower gage. • Power cord must be plugged in grounded power socket. SF-530 series machine Toner cartridge Document output support Document input support Handset Handset cradle Power cord * Telephone line cord * USB cable (for SF-531P only) software CD-ROM (for... SF-531P only) TAM Lead (for UK only) SF-530 series SmarThru User's Guide User's Guide (for SF-531P only) One-touch label for the front panel *: These may look different depending on the country. Getting Started 1.3
... machine. Notes: • You should be AWG #26 or lower gage. • Power cord must be plugged in grounded power socket. SF-530 series machine Toner cartridge Document output support Document input support Handset Handset cradle Power cord * Telephone line cord * USB cable (for SF-531P only) software CD-ROM (for... SF-531P only) TAM Lead (for UK only) SF-530 series SmarThru User's Guide User's Guide (for SF-531P only) One-touch label for the front panel *: These may look different depending on the country. Getting Started 1.3
User Manual (user Manual) (ver.1.00) (English)
Page 17
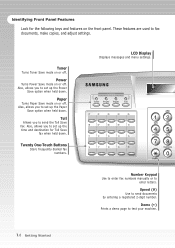
...Demo ABC 2 JKL 5 TUV 8 Symbols 0 Number Keypad Use to enter fax numbers manually or to fax documents, make copies, and adjust settings. Toner Turns Toner Save mode on the front panel. These features are used to enter letters. Also, allows you to set up the Paper Save option when held.... Demo ( ) Prints a demo page to send documents by entering a registered 2-digit number. Power Turns Power Save mode on or off. Twenty One-Touch Buttons Store frequently dialled fax numbers. Paper Turns Paper Save mode on or off . Speed (#) Use to test your machine. 1.6 Getting Started...
...Demo ABC 2 JKL 5 TUV 8 Symbols 0 Number Keypad Use to enter fax numbers manually or to fax documents, make copies, and adjust settings. Toner Turns Toner Save mode on the front panel. These features are used to enter letters. Also, allows you to set up the Paper Save option when held.... Demo ( ) Prints a demo page to send documents by entering a registered 2-digit number. Power Turns Power Save mode on or off. Twenty One-Touch Buttons Store frequently dialled fax numbers. Paper Turns Paper Save mode on or off . Speed (#) Use to test your machine. 1.6 Getting Started...
User Manual (user Manual) (ver.1.00) (English)
Page 29
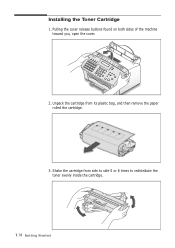
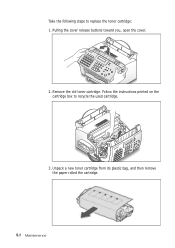
Pulling the cover release buttons found on both sides of the machine toward you, open the cover. 2. Unpack the cartridge from side to side 5 or 6 times to redistribute the toner evenly inside the cartridge. 1.18 Getting Started Installing the Toner Cartridge 1. Shake the cartridge from its plastic bag, and then remove the paper rolled the cartridge. 3.
Pulling the cover release buttons found on both sides of the machine toward you, open the cover. 2. Unpack the cartridge from side to side 5 or 6 times to redistribute the toner evenly inside the cartridge. 1.18 Getting Started Installing the Toner Cartridge 1. Shake the cartridge from its plastic bag, and then remove the paper rolled the cartridge. 3.
User Manual (user Manual) (ver.1.00) (English)
Page 33
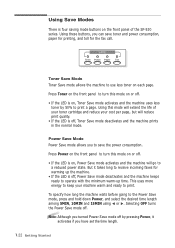
...receive incoming faxes for the fax call. But it activates if you turned Power Save mode off , Toner Save mode deactivates and the machine prints in the normal mode. This uses more energy to print. ...turns the Power Save mode off . • If the LED is on the front panel of your toner cartridge and reduce your machine warm and ready to keep your cost per page, but will extend the...of the SF-530 series. Note: Although you have set the time length. 1.22 Getting Started Press Toner on the front panel to the Power Save mode, press and hold down Power, and select the ...
...receive incoming faxes for the fax call. But it activates if you turned Power Save mode off , Toner Save mode deactivates and the machine prints in the normal mode. This uses more energy to print. ...turns the Power Save mode off . • If the LED is on the front panel of your toner cartridge and reduce your machine warm and ready to keep your cost per page, but will extend the...of the SF-530 series. Note: Although you have set the time length. 1.22 Getting Started Press Toner on the front panel to the Power Save mode, press and hold down Power, and select the ...
User Manual (user Manual) (ver.1.00) (English)
Page 102
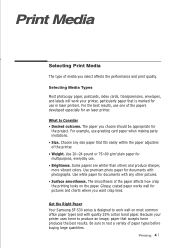
...of the papers developed especially for an laser printer. The paper you want crisp lines. Use premium photo paper for multipurpose, everyday use one of media you select affects the performance and print quality. Get the Right Paper Your Samsung SF-530 series is marked for ...printer. • Weight. Selecting Media Types Most photocopy paper, postcards, index cards, transparencies, envelopes, and labels will work your printer uses toner to produce an image, paper that is designed to Consider • Desired outcome. Choose any other pictures. • Surface smoothness. For example,...
...of the papers developed especially for an laser printer. The paper you want crisp lines. Use premium photo paper for multipurpose, everyday use one of media you select affects the performance and print quality. Get the Right Paper Your Samsung SF-530 series is marked for ...printer. • Weight. Selecting Media Types Most photocopy paper, postcards, index cards, transparencies, envelopes, and labels will work your printer uses toner to produce an image, paper that is designed to Consider • Desired outcome. Choose any other pictures. • Surface smoothness. For example,...
User Manual (user Manual) (ver.1.00) (English)
Page 103
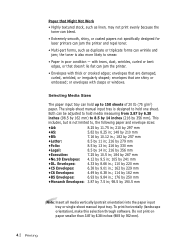
... Not Work • Highly textured stock, such as linen, may not print evenly because the toner can bleed. • Extremely smooth, shiny, or coated papers not specifically designed for laser printers can jam the printer and repel toner. • Multi-part forms, such as duplicate or triplicate forms can hold up to 150...by 6.38 inches (98.5 by 241 mm •DL. envelopes that are shiny or embossed; envelopes that doesn't lie flat can be adjusted to hold one sheet. The single-sheet manual input tray is also more likely to hold media measuring from 3.87 by 6.38 inches (98.5 by 162 mm) to...
... Not Work • Highly textured stock, such as linen, may not print evenly because the toner can bleed. • Extremely smooth, shiny, or coated papers not specifically designed for laser printers can jam the printer and repel toner. • Multi-part forms, such as duplicate or triplicate forms can hold up to 150...by 6.38 inches (98.5 by 241 mm •DL. envelopes that are shiny or embossed; envelopes that doesn't lie flat can be adjusted to hold one sheet. The single-sheet manual input tray is also more likely to hold media measuring from 3.87 by 6.38 inches (98.5 by 162 mm) to...
User Manual (user Manual) (ver.1.00) (English)
Page 109
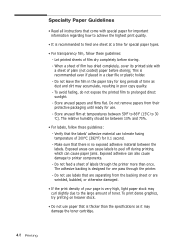
...heavier stock. • Do not use . - Do not leave the film in the paper tray for long periods of time as it may damage the toner cartridge. 4.8 Printing Specialty Paper Guidelines • Read all instructions that come with a sheet of plain (not coated) paper before storing. - Do not ... holder. - When a sheet of film has dried completely, cover its printed side with special paper for important information regarding how to feed one pass through the printer more than the specifications as dust and dirt may curl slightly due to peel off during printing, which can cause paper...
...heavier stock. • Do not use . - Do not leave the film in the paper tray for long periods of time as it may damage the toner cartridge. 4.8 Printing Specialty Paper Guidelines • Read all instructions that come with a sheet of plain (not coated) paper before storing. - Do not ... holder. - When a sheet of film has dried completely, cover its printed side with special paper for important information regarding how to feed one pass through the printer more than the specifications as dust and dirt may curl slightly due to peel off during printing, which can cause paper...
User Manual (user Manual) (ver.1.00) (English)
Page 112
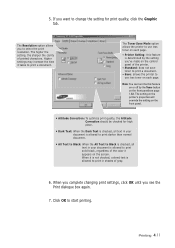
...Printing 4.11 5. When it is not checked, colored text is allowed to print solid black, regardless of the printer. • Standard: does not save toner to print a document. • Save: allows the printer to print a document. Click OK to print in your document is allowed to start printing. ...If you 've made on the control panel of the color it takes to use less toner on the front panel. • Altitude Correction: To optimize print quality, the Altitude Correction should be checked for print quality, click the ...
...Printing 4.11 5. When it is not checked, colored text is allowed to print solid black, regardless of the printer. • Standard: does not save toner to print a document. • Save: allows the printer to print a document. Click OK to print in your document is allowed to start printing. ...If you 've made on the control panel of the color it takes to use less toner on the front panel. • Altitude Correction: To optimize print quality, the Altitude Correction should be checked for print quality, click the ...

User Manual (user Manual) (ver.1.00) (English)
Page 127
5chapter This chapter provides suggestions for high-quality and economical operating and information for Maintenance N Clearing Memory N Cleaning the OPC Drum N Adjusting Shading N Setting the Machine to be checked by Phone N Sending Toner Low Information to the Service Company N Cleaning the Machine N Managing the Toner Cartridge N Automatic Document Feeder Rubber Pad Replacement The topics included in this chapter are: N Guidelines for maintaining the toner cartridge and the machine.
5chapter This chapter provides suggestions for high-quality and economical operating and information for Maintenance N Clearing Memory N Cleaning the OPC Drum N Adjusting Shading N Setting the Machine to be checked by Phone N Sending Toner Low Information to the Service Company N Cleaning the Machine N Managing the Toner Cartridge N Automatic Document Feeder Rubber Pad Replacement The topics included in this chapter are: N Guidelines for maintaining the toner cartridge and the machine.
User Manual (user Manual) (ver.1.00) (English)
Page 129
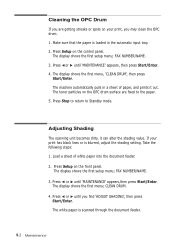
... sure that the paper is loaded in a sheet of white paper into the document feeder. 2. The machine automatically pulls in the automatic input tray. 2. The toner particles on the OPC drum surface are getting streaks or spots on your print has black lines or is scanned through the document feeder. 5.2 Maintenance
... sure that the paper is loaded in a sheet of white paper into the document feeder. 2. The machine automatically pulls in the automatic input tray. 2. The toner particles on the OPC drum surface are getting streaks or spots on your print has black lines or is scanned through the document feeder. 5.2 Maintenance
User Manual (user Manual) (ver.1.00) (English)
Page 130
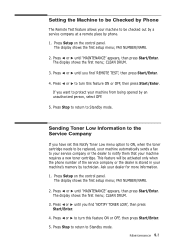
... Press ➛¤or ❿ until 'MAINTENANCE' appears, then press Start/Enter. Maintenance 5.3 Press ➛ or ❿ until you find 'NOTIFY TONER LOW', then press Start/Enter. 4. Press Setup on the control panel. The display shows the first menu; If you have set this feature ON or... OFF, then press Start/Enter. Sending Toner Low Information to be checked out by a service company at a remote place by an unauthorized person, select OFF. 5. The display shows ...
... Press ➛¤or ❿ until 'MAINTENANCE' appears, then press Start/Enter. Maintenance 5.3 Press ➛ or ❿ until you find 'NOTIFY TONER LOW', then press Start/Enter. 4. Press Setup on the control panel. The display shows the first menu; If you have set this feature ON or... OFF, then press Start/Enter. Sending Toner Low Information to be checked out by a service company at a remote place by an unauthorized person, select OFF. 5. The display shows ...
User Manual (user Manual) (ver.1.00) (English)
Page 131
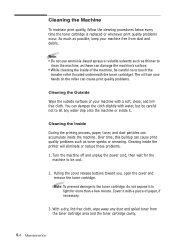
...minute. Note: To prevent damage to touch the transfer roller (located underneath the toner cartridge). Cleaning the Machine To maintain print quality, follow the cleaning procedures below every time the toner cartridge is replaced or whenever print quality problems occur. Cleaning inside the machine. ..., as these can accumulate inside the printer will eliminate or reduce these problems. 1. Cleaning the Inside During the printing process, paper, toner, and dust particles can damage the machine's surface. • While cleaning the inside it. Note: • Do not use ammonia...
...minute. Note: To prevent damage to touch the transfer roller (located underneath the toner cartridge). Cleaning the Machine To maintain print quality, follow the cleaning procedures below every time the toner cartridge is replaced or whenever print quality problems occur. Cleaning inside the machine. ..., as these can accumulate inside the printer will eliminate or reduce these problems. 1. Cleaning the Inside During the printing process, paper, toner, and dust particles can damage the machine's surface. • While cleaning the inside it. Note: • Do not use ammonia...
User Manual (user Manual) (ver.1.00) (English)
Page 134
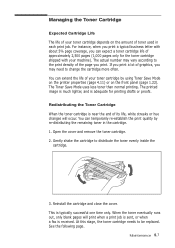
... or hue changes will print when a print job is sent, or when a fax is typically successful one time only. You can expect a toner cartridge life of graphics, you can temporarily re-establish the print quality by using Toner Save Mode on the printer properties (page 4.11) or on the amount of your machine).
... or hue changes will print when a print job is sent, or when a fax is typically successful one time only. You can expect a toner cartridge life of graphics, you can temporarily re-establish the print quality by using Toner Save Mode on the printer properties (page 4.11) or on the amount of your machine).
User Manual (user Manual) (ver.1.00) (English)
Page 135
Pulling the cover release buttons toward you, open the cover. 2. Unpack a new toner cartridge from its plastic bag, and then remove the paper rolled the cartridge. 5.8 Maintenance Remove the old toner cartridge. Take the following steps to recycle the used cartridge. 3. Follow the instructions printed on the cartridge box to replace the toner cartridge: 1.
Pulling the cover release buttons toward you, open the cover. 2. Unpack a new toner cartridge from its plastic bag, and then remove the paper rolled the cartridge. 5.8 Maintenance Remove the old toner cartridge. Take the following steps to recycle the used cartridge. 3. Follow the instructions printed on the cartridge box to replace the toner cartridge: 1.
User Manual (user Manual) (ver.1.00) (English)
Page 136
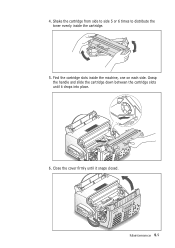
Find the cartridge slots inside the cartridge. 5. Close the cover firmly until it snaps closed. Maintenance 5.9 Grasp the handle and slide the cartridge down between the cartridge slots until it drops into place. 6. 4. Shake the cartridge from side to side 5 or 6 times to distribute the toner evenly inside the machine, one on each side.
Find the cartridge slots inside the cartridge. 5. Close the cover firmly until it snaps closed. Maintenance 5.9 Grasp the handle and slide the cartridge down between the cartridge slots until it drops into place. 6. 4. Shake the cartridge from side to side 5 or 6 times to distribute the toner evenly inside the machine, one on each side.
User Manual (user Manual) (ver.1.00) (English)
Page 141
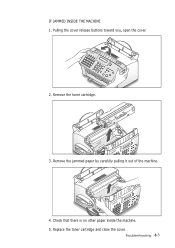
IF JAMMED INSIDE THE MACHINE 1. Check that there is no other paper inside the machine. 5. Replace the toner cartridge and close the cover. Pulling the cover release buttons toward you, open the cover. 2. Remove the toner cartridge. 3. Remove the jammed paper by carefully pulling it out of the machine. 4. Troubleshooting 6.3
IF JAMMED INSIDE THE MACHINE 1. Check that there is no other paper inside the machine. 5. Replace the toner cartridge and close the cover. Pulling the cover release buttons toward you, open the cover. 2. Remove the toner cartridge. 3. Remove the jammed paper by carefully pulling it out of the machine. 4. Troubleshooting 6.3

User Manual (user Manual) (ver.1.00) (English)
Page 143
There occurs a problem in the feeder. Recording paper has jammed inside the unit, or the toner cartridge is not securely latched. If failure persists, wait an hour or so for the line to clear, then try again. Or, turn the ECM ... loaded. The remote machine has not answered after more memory becomes available, or split the transmission into more than one -touch or speed dial location you tried to it back in the LSU (Laser Scanning Unit). Unplug the power cord and plug it clicks in . Press down on page 3.2. Unplug the power...
There occurs a problem in the feeder. Recording paper has jammed inside the unit, or the toner cartridge is not securely latched. If failure persists, wait an hour or so for the line to clear, then try again. Or, turn the ECM ... loaded. The remote machine has not answered after more memory becomes available, or split the transmission into more than one -touch or speed dial location you tried to it back in the LSU (Laser Scanning Unit). Unplug the power cord and plug it clicks in . Press down on page 3.2. Unplug the power...


