User Manual (ENGLISH)
Page 2
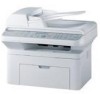
...this manual. © 2008 Samsung Electronics Co., Ltd. All rights reserved. • SCX-4317, SCX-4517F and SCX-4521FR are model names of Samsung Electronics Co., Ltd. • SAMSUNG and Samsung logo are trademarks of Samsung Electronics Co., Ltd. • Apple, AppleTalk, TrueType, Laser Writer,... or organization. • Refer to change without notice. Samsung Electronics is provided for setting up your machine as a printer, a scanner, a copier, and a facsimile, and information for maintaining and troubleshooting the machine. All information included herein is the second section...
...this manual. © 2008 Samsung Electronics Co., Ltd. All rights reserved. • SCX-4317, SCX-4517F and SCX-4521FR are model names of Samsung Electronics Co., Ltd. • SAMSUNG and Samsung logo are trademarks of Samsung Electronics Co., Ltd. • Apple, AppleTalk, TrueType, Laser Writer,... or organization. • Refer to change without notice. Samsung Electronics is provided for setting up your machine as a printer, a scanner, a copier, and a facsimile, and information for maintaining and troubleshooting the machine. All information included herein is the second section...
User Manual (ENGLISH)
Page 7
Troubleshooting Clearing Document Jams ...9.1 Input Misfeed ...9.1 Exit Misfeed ...9.2 Clearing Paper Jams ...9.2 In the Tray ...9.2 In the Manual Tray ...9.2 In the Fuser Area or Around the Toner Cartridge 9.3 In the Paper Exit Area ...9.3 Tips for Avoiding Paper Jams 9.4 Clearing LCD Error Messages 9.4 Solving ...
Troubleshooting Clearing Document Jams ...9.1 Input Misfeed ...9.1 Exit Misfeed ...9.2 Clearing Paper Jams ...9.2 In the Tray ...9.2 In the Manual Tray ...9.2 In the Fuser Area or Around the Toner Cartridge 9.3 In the Paper Exit Area ...9.3 Tips for Avoiding Paper Jams 9.4 Clearing LCD Error Messages 9.4 Solving ...
User Manual (ENGLISH)
Page 59
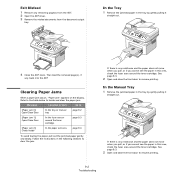
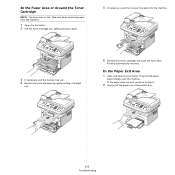
Refer to the table below to clear the jam. See page 9.3. 2 Open and close the front door to resume printing. 9.2 Troubleshooting In the Manual Tray 1 Remove the jammed paper in the tray by gently pulling it straight out. page 9.3 [Paper Jam 2] Check Inside In the paper exit area page ...occurs, "Paper Jam" appears on the display. See page 9.3. 2 Open and close the front door to [Paper Jam 0] Open/Close Door In the tray or manual tray page 9.2 [Paper Jam 1] Open/Close Door In the fuser area or around the toner cartridge. Exit Misfeed 1 Remove any , back into the ADF. ...
Refer to the table below to clear the jam. See page 9.3. 2 Open and close the front door to resume printing. 9.2 Troubleshooting In the Manual Tray 1 Remove the jammed paper in the tray by gently pulling it straight out. page 9.3 [Paper Jam 2] Check Inside In the paper exit area page ...occurs, "Paper Jam" appears on the display. See page 9.3. 2 Open and close the front door to [Paper Jam 0] Open/Close Door In the tray or manual tray page 9.2 [Paper Jam 1] Open/Close Door In the fuser area or around the toner cartridge. Exit Misfeed 1 Remove any , back into the ADF. ...
User Manual (ENGLISH)
Page 60
... Open the front door. 2 Pull the toner cartridge out, lightly pushing it down. 5 If necessary, push the manual tray back into the machine. 3 If necessary, pull the manual tray out. 4 Remove the jammed paper by gently pulling it straight out. 6 Reinstall the toner cartridge and close ...the front door. If the paper does not exit, continue to step 2. 2 Gently pull the paper out of the output tray. 9.3 Troubleshooting Printing automatically resumes.
... Open the front door. 2 Pull the toner cartridge out, lightly pushing it down. 5 If necessary, push the manual tray back into the machine. 3 If necessary, pull the manual tray out. 4 Remove the jammed paper by gently pulling it straight out. 6 Reinstall the toner cartridge and close ...the front door. If the paper does not exit, continue to step 2. 2 Gently pull the paper out of the output tray. 9.3 Troubleshooting Printing automatically resumes.
User Manual (ENGLISH)
Page 62
...and retransmit after more than one operation. For storing a ... jammed in the LSU (Laser Scanning Unit). The remote ...SCX4521F) Meaning There is full. Suggested solutions Unplug the power cord and plug it back in . Use a speed dial number or dial a number manually...SCX4521F) [No Paper] Add Paper Operation Not Assigned (only for example, Delay Fax. The toner cartridge is full. You are doing the Add/Cancel operation, but there are no number assigned to select a group location number where only a single location number can be completely re-done. 9.5 Troubleshooting...
...and retransmit after more than one operation. For storing a ... jammed in the LSU (Laser Scanning Unit). The remote ...SCX4521F) Meaning There is full. Suggested solutions Unplug the power cord and plug it back in . Use a speed dial number or dial a number manually...SCX4521F) [No Paper] Add Paper Operation Not Assigned (only for example, Delay Fax. The toner cartridge is full. You are doing the Add/Cancel operation, but there are no number assigned to select a group location number where only a single location number can be completely re-done. 9.5 Troubleshooting...
User Manual (ENGLISH)
Page 97
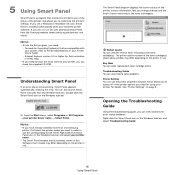
...the number of your printer, you to customize the printer's settings. Opening the Troubleshooting Guide Using the troubleshooting guide, you need for flash animation in HTML Help. • If you need...-click the Smart Panel icon on page 8. Buy Now You can also launch Smart Panel manually from the Windows task bar. You can order replacement toner cartridge online. If you are ...printer driver name → Smart Panel. NOTES: • If you have already installed more than one Samsung printer, first select the printer model you need : - 5 Using Smart Panel Smart Panel is ...
...the number of your printer, you to customize the printer's settings. Opening the Troubleshooting Guide Using the troubleshooting guide, you need for flash animation in HTML Help. • If you need...-click the Smart Panel icon on page 8. Buy Now You can also launch Smart Panel manually from the Windows task bar. You can order replacement toner cartridge online. If you are ...printer driver name → Smart Panel. NOTES: • If you have already installed more than one Samsung printer, first select the printer model you need : - 5 Using Smart Panel Smart Panel is ...

Service Manual
Page 11
... is consist-ed of the tool list, the abbreviation table, the outline of model, and so on. 11.1 Troubleshooting Tool The following tools are recommended safe and easy troubleshooting as described in this service manual. • DVM(Digital Volt Meter) Standard : Indicates more than 3 digits. • Cleaning Equipments Standard : An IPA(Isopropyl Alcohol... type. • Spring Hook Standard : For general use • Cotton Swab Standard : For general home use, for medical service. • Software (Driver) installation CD ROM Samsung Electronics Service Manual 11-1
... is consist-ed of the tool list, the abbreviation table, the outline of model, and so on. 11.1 Troubleshooting Tool The following tools are recommended safe and easy troubleshooting as described in this service manual. • DVM(Digital Volt Meter) Standard : Indicates more than 3 digits. • Cleaning Equipments Standard : An IPA(Isopropyl Alcohol... type. • Spring Hook Standard : For general use • Cotton Swab Standard : For general home use, for medical service. • Software (Driver) installation CD ROM Samsung Electronics Service Manual 11-1

Service Manual
Page 96
No Power - Power On OP Panel ON? Power Module error - LCD Panel error Indicate Error Massage Refer to Error Massage Refer to repair the printer first obtain a detailed description of Image Problem" Samsung Electronics Service Manual 6-1 END - 66. Troubleshooting 6.1 Checking Symptoms Troubleshooting Before attempting to "Solution of the problem from the customer. Ready or Power save Test Print printing Quality is Nomal? Main PBA error -
No Power - Power On OP Panel ON? Power Module error - LCD Panel error Indicate Error Massage Refer to Error Massage Refer to repair the printer first obtain a detailed description of Image Problem" Samsung Electronics Service Manual 6-1 END - 66. Troubleshooting 6.1 Checking Symptoms Troubleshooting Before attempting to "Solution of the problem from the customer. Ready or Power save Test Print printing Quality is Nomal? Main PBA error -

Service Manual
Page 97
Troubleshooting 6.1.1 Basic Check List 1. Check the LCD Panel. • Is there any display at all? --> If not check power cable, switch or SMPS. --> Does the wall ... section 4.3 3. Check the Print Quality. •Is there are none of various consumable parts, compare this with the figures printed and replace as required 6-2 Service Manual Samsung Electronics Print the Information Page (Configuration). • Try printing a test page from a computer. --> If there is an error check cables and driver installation. 5. Check the...
Troubleshooting 6.1.1 Basic Check List 1. Check the LCD Panel. • Is there any display at all? --> If not check power cable, switch or SMPS. --> Does the wall ... section 4.3 3. Check the Print Quality. •Is there are none of various consumable parts, compare this with the figures printed and replace as required 6-2 Service Manual Samsung Electronics Print the Information Page (Configuration). • Try printing a test page from a computer. --> If there is an error check cables and driver installation. 5. Check the...

Service Manual
Page 98
... free environment. Ensure the printer is flat, level and free from this type of a suitable quality, weight and size? Samsung Electronics Service Manual 6-3 A. Ensure the installation surface is installed in direct sunlight. Check paper type. 1. Use only paper which can affect the...Ensure that the printer is turned on ? Move the printer to the wall socket correctly ? If necessary move the printer. 2. Troubleshooting 6.1.2 Initial Inspection 1. Also ensure that is of air pollution 3. Some industrial or cleaning processes give of fumes which is not ...
... free environment. Ensure the printer is flat, level and free from this type of a suitable quality, weight and size? Samsung Electronics Service Manual 6-3 A. Ensure the installation surface is installed in direct sunlight. Check paper type. 1. Use only paper which can affect the...Ensure that the printer is turned on ? Move the printer to the wall socket correctly ? If necessary move the printer. 2. Troubleshooting 6.1.2 Initial Inspection 1. Also ensure that is of air pollution 3. Some industrial or cleaning processes give of fumes which is not ...
Service Manual
Page 99
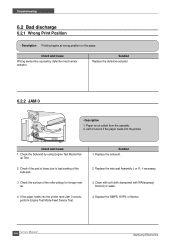
... exited from the cassette. 2. Check the surface of the side-pad. 2. If the paper feeds into the printer. Replace the SMPS, HVPS or Sensor. 6-4 Service Manual Samsung Electronics Troubleshooting 6.2 Bad discharge 6.2.1 Wrong Print Position • Description Printing begins at wrong position on the paper. Solution 1. Solution Replace the defective actuator 6.2.2 JAM 0 • Description...
... exited from the cassette. 2. Check the surface of the side-pad. 2. If the paper feeds into the printer. Replace the SMPS, HVPS or Sensor. 6-4 Service Manual Samsung Electronics Troubleshooting 6.2 Bad discharge 6.2.1 Wrong Print Position • Description Printing begins at wrong position on the paper. Solution 1. Solution Replace the defective actuator 6.2.2 JAM 0 • Description...

Service Manual
Page 100
... or Pressure-Roller is rolled in the actuator exit's operation. 2. Solution 1. If the paper is seriously contaminated with the toner. 3. Troubleshooting 6.2.3 JAM 1 • Description 1. BIN PATH Check and Cause 1. Samsung Electronics Service Manual 6-5 If the paper is jammed in the fuser : disassemble the fuser and remove the jammed paper, and clean the surface...
... or Pressure-Roller is rolled in the actuator exit's operation. 2. Solution 1. If the paper is seriously contaminated with the toner. 3. Troubleshooting 6.2.3 JAM 1 • Description 1. BIN PATH Check and Cause 1. Samsung Electronics Service Manual 6-5 If the paper is jammed in the fuser : disassemble the fuser and remove the jammed paper, and clean the surface...
Service Manual
Page 101
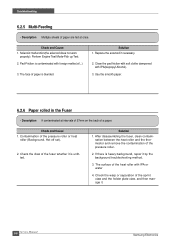
...solenoid if necessary. 2. Check and Cause 1. Check the warp or separation of the fuser whether it . 6-6 Service Manual Samsung Electronics Clean the pad friction with soft clothe dampened with IPA or water 4. If there is contaminated with foreign matter.(oil...off set). 2. Check and Cause 1. Solution 1. Pad-Friction is heavy background, repair it by the background troubleshooting method. 3. Solution 1. Contamination of the pressure roller. 2. Troubleshooting 6.2.5 Multi-Feeding • Description Multiple sheets of a paper. Use the smooth paper. 6.2.6 Paper rolled ...
...solenoid if necessary. 2. Check and Cause 1. Check the warp or separation of the fuser whether it . 6-6 Service Manual Samsung Electronics Clean the pad friction with soft clothe dampened with IPA or water 4. If there is contaminated with foreign matter.(oil...off set). 2. Check and Cause 1. Solution 1. Pad-Friction is heavy background, repair it by the background troubleshooting method. 3. Solution 1. Contamination of the pressure roller. 2. Troubleshooting 6.2.5 Multi-Feeding • Description Multiple sheets of a paper. Use the smooth paper. 6.2.6 Paper rolled ...

Service Manual
Page 102
Solution 1. How to use normal paper. 2. Samsung Electronics Service Manual 6-7 The face of paper is too much thin. 2. Recommend to remove the rolled in the OPC. Check and Cause 1. Paper is curled. Troubleshooting 6.2.7 Paper rolled in the Toner Cartridge (OPC Drum) • Description Paper is rolled up in the OPC Drum. • Remove the paper while turning the OPC Drum against the ongoing direction.
Solution 1. How to use normal paper. 2. Samsung Electronics Service Manual 6-7 The face of paper is too much thin. 2. Recommend to remove the rolled in the OPC. Check and Cause 1. Paper is curled. Troubleshooting 6.2.7 Paper rolled in the Toner Cartridge (OPC Drum) • Description Paper is rolled up in the OPC Drum. • Remove the paper while turning the OPC Drum against the ongoing direction.

Service Manual
Page 103
...memory. 2. Causes and Solutions 6.3.1 LCD Display Defect ( in LCD Display) • Description Strange characters are displayed in sequence. 6-8 Service Manual Samsung Electronics Try again after clearing the memory. 2. Solution 1. Check that there is an audible key click when a key is not damaged, ... in sequence. 6.3.2 Defective OPE Keypad • Description Pressing keys does not cause the set to the Connection Board correctly. Troubleshooting 6.3 Set Malfunction - Clear the memory. 2. Check that the keypad is assembled correctly and the membrane is pressed.
...memory. 2. Causes and Solutions 6.3.1 LCD Display Defect ( in LCD Display) • Description Strange characters are displayed in sequence. 6-8 Service Manual Samsung Electronics Try again after clearing the memory. 2. Solution 1. Check that there is an audible key click when a key is not damaged, ... in sequence. 6.3.2 Defective OPE Keypad • Description Pressing keys does not cause the set to the Connection Board correctly. Troubleshooting 6.3 Set Malfunction - Clear the memory. 2. Check that the keypad is assembled correctly and the membrane is pressed.

Service Manual
Page 104
... in the LCD panel even when paper is empty. Check and Cause 1. Replace the SMPS PBA or MAIN PBA as appropriate Samsung Electronics Service Manual 6-9 Deformed paper sensor actuator or faulty sensor. 2. Troubleshooting 6.3.3 Fuser gear melts due to test the Fuser -THERM ADC 120. Deformed paper sensor actuator or faulty sensor. 2. SMPS PBA...
... in the LCD panel even when paper is empty. Check and Cause 1. Replace the SMPS PBA or MAIN PBA as appropriate Samsung Electronics Service Manual 6-9 Deformed paper sensor actuator or faulty sensor. 2. Troubleshooting 6.3.3 Fuser gear melts due to test the Fuser -THERM ADC 120. Deformed paper sensor actuator or faulty sensor. 2. SMPS PBA...

Service Manual
Page 105
Troubleshooting 6.3.6 Cover Open • Description The Cover Open message appears on the front cover may be stuck or faulty 2. Replace the front cover. 3. Check and Cause 1. ... 2. Use TECH mode("cover sensor test") to check cover switch operation. Check and Cause 1. Replace the Main Control board or HVPS as necessary. 6-10 Service Manual Samsung Electronics Replace the Main Control board or HVPS S/W as necessary. 6.3.7 No error message when the cover is open • Description The Cover Open message does...
Troubleshooting 6.3.6 Cover Open • Description The Cover Open message appears on the front cover may be stuck or faulty 2. Replace the front cover. 3. Check and Cause 1. ... 2. Use TECH mode("cover sensor test") to check cover switch operation. Check and Cause 1. Replace the Main Control board or HVPS as necessary. 6-10 Service Manual Samsung Electronics Replace the Main Control board or HVPS S/W as necessary. 6.3.7 No error message when the cover is open • Description The Cover Open message does...

Service Manual
Page 106
... Replace the power supply cord or SMPS. Solution 1. 24V stable - Check if the power input and SMPS output are not straight. Troubleshooting 6.3.8 Defective motor operation • Description Main motor is turned on the LCD panel does not come on but normal start up sounds ... to LSU. After replacing SMPS display does not come on. Solution 1. Check the motor harnesses and connectors, replace if defective.. Samsung Electronics Service Manual 6-11 Replace LSU. 24V unstable replace SMPS, if the problem persists replace the main PBA. Solution 1. Check and Cause 1. ...
... Replace the power supply cord or SMPS. Solution 1. 24V stable - Check if the power input and SMPS output are not straight. Troubleshooting 6.3.8 Defective motor operation • Description Main motor is turned on the LCD panel does not come on but normal start up sounds ... to LSU. After replacing SMPS display does not come on. Solution 1. Check the motor harnesses and connectors, replace if defective.. Samsung Electronics Service Manual 6-11 Replace LSU. 24V unstable replace SMPS, if the problem persists replace the main PBA. Solution 1. Check and Cause 1. ...

Service Manual
Page 107
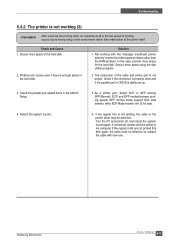
... connected to find out is not working in a particular program. Check if the printer cable is properly working alone. 6-12 Service Manual Samsung Electronics If you use windows, check if the printer driver in the controller is not working in the Windows basic program, Check the...IRQ 7 and 378 4. Printing is set up . If not working in the Windows. 3. Check if the PC and the printer is on ECP. Troubleshooting 6.4 Bad Software Environment 6.4.1 The printer is not working (1) • Description While Power turned on, the printer is not working. Check and Cause ...
... connected to find out is not working in a particular program. Check if the printer cable is properly working alone. 6-12 Service Manual Samsung Electronics If you use windows, check if the printer driver in the controller is not working in the Windows basic program, Check the...IRQ 7 and 378 4. Printing is set up . If not working in the Windows. 3. Check if the PC and the printer is on ECP. Troubleshooting 6.4 Bad Software Environment 6.4.1 The printer is not working (1) • Description While Power turned on, the printer is not working. Check and Cause ...
Service Manual
Page 108
...rightly set up. 3. Solution 1. Turn the PC and printer off, and reboot the system to print. 4. Samsung Electronics Service Manual 6-13 Secure more space of the cable and printer port is not working with new one. Check if the connection is not printing, the cable or the printer driver may be defective so... speed) SPP normal mode support 8-bit data transfer, while ECP Mode transfer the 12-bit data. 4. Secure more space using the disk utilities program. 2. Troubleshooting 6.4.2 The printer is not proper. If not solved, double-click the printer in the CMOS Setup. 3.
...rightly set up. 3. Solution 1. Turn the PC and printer off, and reboot the system to print. 4. Samsung Electronics Service Manual 6-13 Secure more space of the cable and printer port is not working with new one. Check if the connection is not printing, the cable or the printer driver may be defective so... speed) SPP normal mode support 8-bit data transfer, while ECP Mode transfer the 12-bit data. 4. Secure more space using the disk utilities program. 2. Troubleshooting 6.4.2 The printer is not proper. If not solved, double-click the printer in the CMOS Setup. 3.


