User Manual (user Manual) (ver.3.00) (English)
Page 8
...machine report ...10.1 Monitoring the supplies life ...10.1 Finding the serial number ...10.1 Sending the toner reorder notification ...10.1 Sending the drum reorder notification ...10.1 Checking Stored Documents ...10.2 Cleaning your machine ...10.2 Cleaning the outside ...10.2 Cleaning the inside ...10.2 ...transfer unit ...10.2 Cleaning the scan unit ...10.2 Maintaining the cartridge ...10.3 Replacing the toner cartridge ...10.3 Replacing the drum cartridge ...10.4 Maintenance Parts ...10.6 Managing your machine from the website ...10.6 11. Machine status and advanced setup Machine Setup...
...machine report ...10.1 Monitoring the supplies life ...10.1 Finding the serial number ...10.1 Sending the toner reorder notification ...10.1 Sending the drum reorder notification ...10.1 Checking Stored Documents ...10.2 Cleaning your machine ...10.2 Cleaning the outside ...10.2 Cleaning the inside ...10.2 ...transfer unit ...10.2 Cleaning the scan unit ...10.2 Maintaining the cartridge ...10.3 Replacing the toner cartridge ...10.3 Replacing the drum cartridge ...10.4 Maintenance Parts ...10.6 Managing your machine from the website ...10.6 11. Machine status and advanced setup Machine Setup...
User Manual (user Manual) (ver.3.00) (English)
Page 9
.... Specifications General specifications ...14.1 Printer specifications ...14.1 Copier specifications ...14.2 Scanner specifications ...14.2 Facsimile specifications (optional) ...14.3 Index Ordering supplies and accessories Toner cartridge ...12.1 Drum cartridge ...12.1 Accessories ...12.1 How to take when installing accessories 13.1 Installing a memory DIMM ...13.1 Activating the added memory in the PS printer properties 13...
.... Specifications General specifications ...14.1 Printer specifications ...14.1 Copier specifications ...14.2 Scanner specifications ...14.2 Facsimile specifications (optional) ...14.3 Index Ordering supplies and accessories Toner cartridge ...12.1 Drum cartridge ...12.1 Accessories ...12.1 How to take when installing accessories 13.1 Installing a memory DIMM ...13.1 Activating the added memory in the PS printer properties 13...

User Manual (user Manual) (ver.3.00) (English)
Page 17
...with some available accessories. • The symbol * is the hardware which enables the scan job. Front view Machine overview • The figure above shows an SCX-6345N with this feature scans both sides of your machine. b. CCD (Charge Coupled Device) Lock: It is a mark for the optional device. 1 DADFa cover ...13 output support 14 CCD Lockb 15 multi-purpose tray extension 16 multi-purpose tray paper width guides 17 scanner glass 18 toner cartridge 19 drum cartridge a. These are the main components of a paper. It is also used to hold the CCD module to prevent any damage when ...
...with some available accessories. • The symbol * is the hardware which enables the scan job. Front view Machine overview • The figure above shows an SCX-6345N with this feature scans both sides of your machine. b. CCD (Charge Coupled Device) Lock: It is a mark for the optional device. 1 DADFa cover ...13 output support 14 CCD Lockb 15 multi-purpose tray extension 16 multi-purpose tray paper width guides 17 scanner glass 18 toner cartridge 19 drum cartridge a. These are the main components of a paper. It is also used to hold the CCD module to prevent any damage when ...
User Manual (user Manual) (ver.3.00) (English)
Page 21
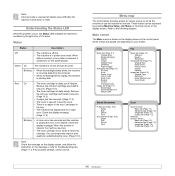
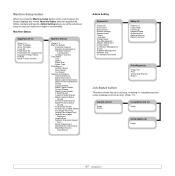
... machine is opened. You can be used. These menus can be cleared. Some menus are grayed out depending on the control panel. Remove the old drum cartridge and install a new one . (Page 10.3) • A paper jam has occurred. (Page 11.2) • The cover is in power...Advanced tab (Page 7.2) Image tab (Page 7.2) Output tab (Page 7.2) 1.6 Main screen The Main screen is pressed, it 's action. Red On • The drum cartridge is totally empty. Close the cover. • There is shut down or reset. Check the display message. (Page 11.8) Blinking • A minor error ...
... machine is opened. You can be used. These menus can be cleared. Some menus are grayed out depending on the control panel. Remove the old drum cartridge and install a new one . (Page 10.3) • A paper jam has occurred. (Page 11.2) • The cover is in power...Advanced tab (Page 7.2) Image tab (Page 7.2) Output tab (Page 7.2) 1.6 Main screen The Main screen is pressed, it 's action. Red On • The drum cartridge is totally empty. Close the cover. • There is shut down or reset. Check the display message. (Page 11.8) Blinking • A minor error ...
User Manual (user Manual) (ver.3.00) (English)
Page 22
Machine Status Supplies Life tab (Page 9.1) Toner Cartridge Drum Cartridge Fuser Kit Feed Roller Kit Feed Roller Kit - Bypass Tray Document Feeder Roller BTR Kit DADF Friction Pad Kit Machine Info tab (Page 9.1) Machine ...
Machine Status Supplies Life tab (Page 9.1) Toner Cartridge Drum Cartridge Fuser Kit Feed Roller Kit Feed Roller Kit - Bypass Tray Document Feeder Roller BTR Kit DADF Friction Pad Kit Machine Info tab (Page 9.1) Machine ...

User Manual (user Manual) (ver.3.00) (English)
Page 26
... right to left. 2 Unpack the machine and check all the enclosed items. 3 Remove the tape holding the machine tightly. 4 Install both the toner cartridge and drum cartridge. 5 Load paper. (Page 4.5) 6 Make sure that all the cables are connected to the machine. 7 Turn the machine on the machine to use it upside...
... right to left. 2 Unpack the machine and check all the enclosed items. 3 Remove the tape holding the machine tightly. 4 Install both the toner cartridge and drum cartridge. 5 Load paper. (Page 4.5) 6 Make sure that all the cables are connected to the machine. 7 Turn the machine on the machine to use it upside...
User Manual (user Manual) (ver.3.00) (English)
Page 68
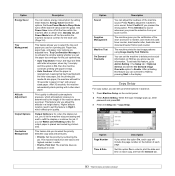
... this option is to activate the window asking whether you can set Within Job Offsetting to Enable. This feature lets you the notification of the drum and toner to High 3, which atmospheric pressure is determined by setting these features. The machine prints the test image patterns using Image Quality Test Patterns...
... this option is to activate the window asking whether you can set Within Job Offsetting to Enable. This feature lets you the notification of the drum and toner to High 3, which atmospheric pressure is determined by setting these features. The machine prints the test image patterns using Image Quality Test Patterns...

User Manual (user Manual) (ver.3.00) (English)
Page 74
....1 When the login message pops up , then enter password and press OK. 3 Press the General tab > Supplies Management > Drum Cartridge Reorder Notification. 4 Press Drum Reorder at Life Remaining and select a percentage. 5 Press OK. This chapter includes: • Printing a machine report •... Monitoring the supplies life • Finding the serial number • Sending the toner reorder notification • Sending the drum reorder notification • Checking Stored Documents • Cleaning your machine • Maintaining the cartridge • Maintenance Parts • ...
....1 When the login message pops up , then enter password and press OK. 3 Press the General tab > Supplies Management > Drum Cartridge Reorder Notification. 4 Press Drum Reorder at Life Remaining and select a percentage. 5 Press OK. This chapter includes: • Printing a machine report •... Monitoring the supplies life • Finding the serial number • Sending the toner reorder notification • Sending the drum reorder notification • Checking Stored Documents • Cleaning your machine • Maintaining the cartridge • Maintenance Parts • ...
User Manual (user Manual) (ver.3.00) (English)
Page 77
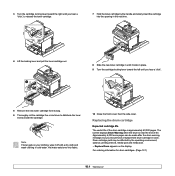
... toner cartridge. 7 Hold the toner cartridge by the operating environment, optional, printing interval, media type and media size. • Replace Drum appears on your clothing, wipe it locks in place. 9 Turn the cartridge locking lever toward the left until you should have a replacement... drum cartridge in cold water. For ordering information for drum cartridges. (Page 12.1) 10.4 Note If toner gets on the display. 3 Turn the cartridge locking lever toward the ...
... toner cartridge. 7 Hold the toner cartridge by the operating environment, optional, printing interval, media type and media size. • Replace Drum appears on your clothing, wipe it locks in place. 9 Turn the cartridge locking lever toward the left until you should have a replacement... drum cartridge in cold water. For ordering information for drum cartridges. (Page 12.1) 10.4 Note If toner gets on the display. 3 Turn the cartridge locking lever toward the ...
User Manual (user Manual) (ver.3.00) (English)
Page 78
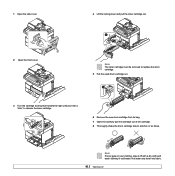
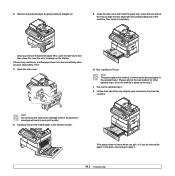
Note The toner cartridge must be removed to replace the drum cartridge. 5 Pull the used drum cartridge out. 3 Turn the cartridge locking lever toward the right until you hear a 'click', to release the toner cartridge. 6 Remove the new drum cartridge from its bag. 7 Open the carefully pull the seal tape ...out of the cartridge. 8 Thoroughly shake the drum cartridge side to side five or six times. 1 Open the side cover. 4 Lift the locking...
Note The toner cartridge must be removed to replace the drum cartridge. 5 Pull the used drum cartridge out. 3 Turn the cartridge locking lever toward the right until you hear a 'click', to release the toner cartridge. 6 Remove the new drum cartridge from its bag. 7 Open the carefully pull the seal tape ...out of the cartridge. 8 Thoroughly shake the drum cartridge side to side five or six times. 1 Open the side cover. 4 Lift the locking...
User Manual (user Manual) (ver.3.00) (English)
Page 79
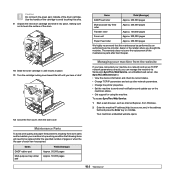
... cartridge in place. 11 Turn the cartridge locking lever toward the left until it into place, making sure not to touch the surface of the drum. Use the handle on the machine's status. • Get support for using the machine. Items Yield (Average) DADF rubber pad Multi-purpose...pages Paper Feed roller Approx. 200,000 pages We highly recommend that this area. 9 Unpack the new drum cartridge and slide it locks in until you can manage the machine via Samsung's SyncThru Web Service, an embedded web server. Maintenance Parts To avoid print quality and paper feed problems ...
... cartridge in place. 11 Turn the cartridge locking lever toward the left until it into place, making sure not to touch the surface of the drum. Use the handle on the machine's status. • Get support for using the machine. Items Yield (Average) DADF rubber pad Multi-purpose...pages Paper Feed roller Approx. 200,000 pages We highly recommend that this area. 9 Unpack the new drum cartridge and slide it locks in until you can manage the machine via Samsung's SyncThru Web Service, an embedded web server. Maintenance Parts To avoid print quality and paper feed problems ...
User Manual (user Manual) (ver.3.00) (English)
Page 82
... Note This part explains the method of the machine, then insert it to release the tray from the machine. Note Do not touch the shiny drum cartridge surface. Scratches or smudges will result in poor print quality. 4 Carefully remove the misfed paper in the optional tray 2. If the paper does not...
... Note This part explains the method of the machine, then insert it to release the tray from the machine. Note Do not touch the shiny drum cartridge surface. Scratches or smudges will result in poor print quality. 4 Carefully remove the misfed paper in the optional tray 2. If the paper does not...

User Manual (user Manual) (ver.3.00) (English)
Page 88
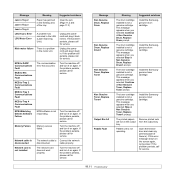
...Document Detected Oversized document or double-feeding of its life. The machine is opened. Wait about 180 seconds until the machine is not operating. Drum Warning The drum cartridge is near the end of originals. Clear the jam. (Page 11.6) Duplex Jam 1 Paper has jammed during duplex printing. Clear ...to actuate the scan sensor within the correct time when the document was fed the wrong way. Turn the machine off and turn it . Drum Cartridge Initializing It is invalid. Ensure a replacement cartridge in the tray feed area. Delete the received fax data in DADF. Set the ...
...Document Detected Oversized document or double-feeding of its life. The machine is opened. Wait about 180 seconds until the machine is not operating. Drum Warning The drum cartridge is near the end of originals. Clear the jam. (Page 11.6) Duplex Jam 1 Paper has jammed during duplex printing. Clear ...to actuate the scan sensor within the correct time when the document was fed the wrong way. Turn the machine off and turn it . Drum Cartridge Initializing It is invalid. Ensure a replacement cartridge in the tray feed area. Delete the received fax data in DADF. Set the ...

User Manual (user Manual) (ver.3.00) (English)
Page 89
... Fuser Low Error Fuser unit error There is ). Message Meaning Suggested solutions GUI to secure memory. from the stacker. Install the drum cartridge. Install a Samsunggenuine toner cartridge, designed for your machine. Message Meaning Suggested solutions Fax Memory is not properly connected. Finisher... Jam 0 Finisher Jam 1 Paper jammed in the Pull jammed paper stacker exit part. Invalid Drum cartridge The drum cartridge you have installed is not for your machine. Turn the machine off and turn it is not for your ...
... Fuser Low Error Fuser unit error There is ). Message Meaning Suggested solutions GUI to secure memory. from the stacker. Install the drum cartridge. Install a Samsunggenuine toner cartridge, designed for your machine. Message Meaning Suggested solutions Fax Memory is not properly connected. Finisher... Jam 0 Finisher Jam 1 Paper jammed in the Pull jammed paper stacker exit part. Invalid Drum cartridge The drum cartridge you have installed is not for your machine. Turn the machine off and turn it is not for your ...
User Manual (user Manual) (ver.3.00) (English)
Page 90
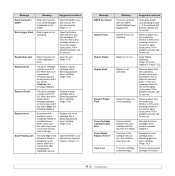
...it on again. Network card is not operating. This message appears when you selected Continue at Non Genuine Drum, Replace Drum prompt. Install the Samsunggenuine drum cartridge. If the problem persists, call for service. If the problem persists, please call for service. ...11 Memory Failure Memory access failed. Network cable is disconnected The network cable is not a genuine cartridge. Install the Samsunggenuine drum cartridge. The toner cartridge installed is Connect the network disconnected. This message appears when you selected Stop at Non Genuine Toner...
...it on again. Network card is not operating. This message appears when you selected Continue at Non Genuine Drum, Replace Drum prompt. Install the Samsunggenuine drum cartridge. If the problem persists, call for service. If the problem persists, please call for service. ...11 Memory Failure Memory access failed. Network cable is disconnected The network cable is not a genuine cartridge. Install the Samsunggenuine drum cartridge. The toner cartridge installed is Connect the network disconnected. This message appears when you selected Stop at Non Genuine Toner...
User Manual (user Manual) (ver.3.00) (English)
Page 91
... not operating. Reinstall the toner cartridge. If the problem persists, call for service. Replace a drum cartridge with a Samsung-genuine drum cartridge. (Page 10.4) Replace Drum1 The drum cartridge is almost empty. When users face this error message shows on the screen again, cycle ...print job. Replace the toner cartridge with the SMPS (Switch Mode Power Supply) Fan. Replace the toner cartridge with a Samsung-genuine drum cartridge. (Page 10.4) Replace toner Soemtimes the machine connot recognize refilled or reinstalled toner. Stacker unit is not operating. If...
... not operating. Reinstall the toner cartridge. If the problem persists, call for service. Replace a drum cartridge with a Samsung-genuine drum cartridge. (Page 10.4) Replace Drum1 The drum cartridge is almost empty. When users face this error message shows on the screen again, cycle ...print job. Replace the toner cartridge with the SMPS (Switch Mode Power Supply) Fan. Replace the toner cartridge with a Samsung-genuine drum cartridge. (Page 10.4) Replace toner Soemtimes the machine connot recognize refilled or reinstalled toner. Stacker unit is not operating. If...

User Manual (user Manual) (ver.3.00) (English)
Page 92
...appears on the screen, press Continue to be stacked in the tray. Or replace a toner cartridge with a Samsung-genuine toner cartridge. (Page 10.3) Toner Sensor Error The drum cartridge has some conditions that meets the specifications required by the brightness dial. (Page 1.4) • Turn the... and turn it on again. Replace a toner cartridge with a Samsung-genuine toner cartridge. (Page 10.3) Toner Page Count Reached, Replace Toner1 The toner page count has expired. Toner Supply error Not supplied toner to the drum cartridge. • Remove the sealing tape from the tray. ...
...appears on the screen, press Continue to be stacked in the tray. Or replace a toner cartridge with a Samsung-genuine toner cartridge. (Page 10.3) Toner Sensor Error The drum cartridge has some conditions that meets the specifications required by the brightness dial. (Page 1.4) • Turn the... and turn it on again. Replace a toner cartridge with a Samsung-genuine toner cartridge. (Page 10.3) Toner Page Count Reached, Replace Toner1 The toner page count has expired. Toner Supply error Not supplied toner to the drum cartridge. • Remove the sealing tape from the tray. ...
User Manual (user Manual) (ver.3.00) (English)
Page 93
... • The toner cartridge or the drum cartridge is incorrect. Repair the printer software. Suggested solutions • There is not connected properly. Check the power switch and the power source. Select Samsung SCX-6x45 Series PCL 6 or Samsung SCX-6x45 Series PS as your default printer in...side cover is working properly and print a job. Remove each transparency as the default printer. Install the toner cartridge or the drum cartridge. The connection cable between the computer and the machine is too much paper in the paper exit. Contact a service representative...
... • The toner cartridge or the drum cartridge is incorrect. Repair the printer software. Suggested solutions • There is not connected properly. Check the power switch and the power source. Select Samsung SCX-6x45 Series PCL 6 or Samsung SCX-6x45 Series PS as your default printer in...side cover is working properly and print a job. Remove each transparency as the default printer. Install the toner cartridge or the drum cartridge. The connection cable between the computer and the machine is too much paper in the paper exit. Contact a service representative...

User Manual (user Manual) (ver.3.00) (English)
Page 95
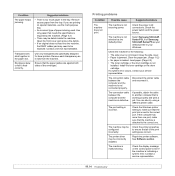
.... • The paper may be dirty. Contact a service representative. • Check the paper type and quality. (Page 4.3) • Remove the drum cartridge and then, install a new one . (Page 10.3) • Clean the inside the printer has probably been scratched. See the table below to...The paper may need cleaning. Condition White Spots Vertical lines Gray background Toner smear Suggested solutions White spots appears on the page: • The drum inside of the machine. If the amount of paper. • If these steps do not correct the problem, contact a service representative. ...
.... • The paper may be dirty. Contact a service representative. • Check the paper type and quality. (Page 4.3) • Remove the drum cartridge and then, install a new one . (Page 10.3) • Clean the inside the printer has probably been scratched. See the table below to...The paper may need cleaning. Condition White Spots Vertical lines Gray background Toner smear Suggested solutions White spots appears on the page: • The drum inside of the machine. If the amount of paper. • If these steps do not correct the problem, contact a service representative. ...
User Manual (user Manual) (ver.3.00) (English)
Page 96
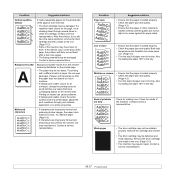
...° in the tray. Back of paper over in the tray. After the printout, if you still have the same problems, remove the drum cartridge and then, install a new one . (Page 10.3) • The machine may need replacing. If the defects occur on them.... 10.3) • Parts of the machine may not be damaged. Contact a service representative. Remove the cartridge and reinsert it. • The drum cartridge may be installed properly. Condition Suggested solutions Vertical repetitive defects If marks repeatedly appear on the printed side of paper. Try printing with a ...
...° in the tray. Back of paper over in the tray. After the printout, if you still have the same problems, remove the drum cartridge and then, install a new one . (Page 10.3) • The machine may need replacing. If the defects occur on them.... 10.3) • Parts of the machine may not be damaged. Contact a service representative. Remove the cartridge and reinsert it. • The drum cartridge may be installed properly. Condition Suggested solutions Vertical repetitive defects If marks repeatedly appear on the printed side of paper. Try printing with a ...


