

User Manual (ENGLISH)
Page 2
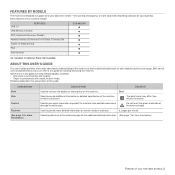
... and pictures of each page of your document are special functions to erase catalog and newspaper background. • The print quality and image size may print out the fax reports according to the setting. 2_Features of your new laser product Save time and money • To save paper,...Fax • You can use preprinted forms and letterhead with plain paper. Expand your machine's capacity • Your machine has an extra memory slot to expand their memory. (Page 78) Print in several stored destinations. • After the transmission, the machine may be taped together to 28 ppm and...
... and pictures of each page of your document are special functions to erase catalog and newspaper background. • The print quality and image size may print out the fax reports according to the setting. 2_Features of your new laser product Save time and money • To save paper,...Fax • You can use preprinted forms and letterhead with plain paper. Expand your machine's capacity • Your machine has an extra memory slot to expand their memory. (Page 78) Print in several stored destinations. • After the transmission, the machine may be taped together to 28 ppm and...
User Manual (ENGLISH)
Page 3
Following table offers the conventions of this machine include: USB 2.0 FEATURES SCX-4826FN USB Memory Interface ADF (Automatic Document Feeder) Network Interface Enthernet 10/100 Base TX wired LAN Duplex (2-sided) printing FAX Scan...or actual prints on the machine. Basic features of your document needs - Used to support all of your new laser product_3 The date format may differ from country to country Used to give users information to protect the machine from printing... step during the actual usage. Do not touch the green underside of the machine function and feature.
Following table offers the conventions of this machine include: USB 2.0 FEATURES SCX-4826FN USB Memory Interface ADF (Automatic Document Feeder) Network Interface Enthernet 10/100 Base TX wired LAN Duplex (2-sided) printing FAX Scan...or actual prints on the machine. Basic features of your document needs - Used to support all of your new laser product_3 The date format may differ from country to country Used to give users information to protect the machine from printing... step during the actual usage. Do not touch the green underside of the machine function and feature.
User Manual (ENGLISH)
Page 14
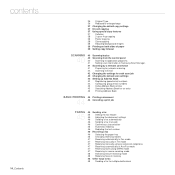
... 39 Setting copy timeout SCANNING 40 Scanning basics 40 40 Scanning from the control panel 40 Scanning to application programs 41 Setting scan information in Samsung Scan Manager. 41 Scanning by a network connection 41 Preparing for network scanning 42 Scanning to Email 42 Changing the settings for each scan job 42... in Ans/Fax mode 47 Receiving faxes using DRPD mode 47 Receiving in secure receiving mode 48 Activating secure receiving mode 48 Receiving faxes in memory 48 Other ways to fax 48 Sending a fax to multiple destinations
... 39 Setting copy timeout SCANNING 40 Scanning basics 40 40 Scanning from the control panel 40 Scanning to application programs 41 Setting scan information in Samsung Scan Manager. 41 Scanning by a network connection 41 Preparing for network scanning 42 Scanning to Email 42 Changing the settings for each scan job 42... in Ans/Fax mode 47 Receiving faxes using DRPD mode 47 Receiving in secure receiving mode 48 Activating secure receiving mode 48 Receiving faxes in memory 48 Other ways to fax 48 Sending a fax to multiple destinations

User Manual (ENGLISH)
Page 15
...51 Setting up Address Book USING USB FLASH MEMORY 53 About USB memory 53 53 Plugging in a USB memory device 53 Scanning to a USB memory device 53 Scanning 54 Customizing Scan to USB 54 Printing from a USB memory device 54 To print a document from a USB memory device: 54 Backing up data 54 Backing ...up data 54 Restoring data 55 Managing USB memory 55 Deleting an image file 55 Formatting a USB memory device 55 Viewing the USB memory status MAINTENANCE 56 Printing reports 56 56 Printing a report 57 Clearing memory 57 Cleaning your machine 57 Cleaning the outside 57 Cleaning the ...
...51 Setting up Address Book USING USB FLASH MEMORY 53 About USB memory 53 53 Plugging in a USB memory device 53 Scanning to a USB memory device 53 Scanning 54 Customizing Scan to USB 54 Printing from a USB memory device 54 To print a document from a USB memory device: 54 Backing up data 54 Backing ...up data 54 Restoring data 55 Managing USB memory 55 Deleting an image file 55 Formatting a USB memory device 55 Viewing the USB memory status MAINTENANCE 56 Printing reports 56 56 Printing a report 57 Clearing memory 57 Cleaning your machine 57 Cleaning the outside 57 Cleaning the ...

User Manual (ENGLISH)
Page 16
...Solving other problems 69 Paper feeding 70 Printing problems 71 Printing quality problems 73 Copying problems 74 Scanning problems 74 Samsung Scan Manager problems 74 Fax problems 75 Common Windows problems 75 Common Linux problems 77 Common Macintosh problems ORDERING ...How to purchase INSTALLING ACCESSORIES 79 Precautions to take when installing accessories 79 79 Upgrading a memory module 79 Installing a memory module SPECIFICATIONS 80 General specifications 80 81 Printer specifications 81 Scanner specifications 82 Copier specifications 82 Facsimile specifications GLOSSARY 83 INDEX 87 CONTACT...
...Solving other problems 69 Paper feeding 70 Printing problems 71 Printing quality problems 73 Copying problems 74 Scanning problems 74 Samsung Scan Manager problems 74 Fax problems 75 Common Windows problems 75 Common Linux problems 77 Common Macintosh problems ORDERING ...How to purchase INSTALLING ACCESSORIES 79 Precautions to take when installing accessories 79 79 Upgrading a memory module 79 Installing a memory module SPECIFICATIONS 80 General specifications 80 81 Printer specifications 81 Scanner specifications 82 Copier specifications 82 Facsimile specifications GLOSSARY 83 INDEX 87 CONTACT...

User Manual (ENGLISH)
Page 17
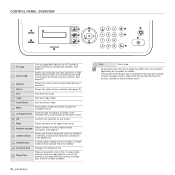
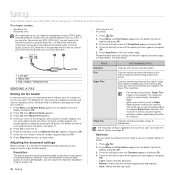
... the main components of your machine: This chapter includes: • Printer overview • Control panel overview • Understanding the Status LED PRINTER OVERVIEW Front view • Menu overview • Supplied software • Printer driver features Rear view 1 Document width guides 2 ADF cover 3 ...Control panel 4 Output support 5 Front cover 6 Manual tray 7 Tray 1 8 Document input tray 9 Document output tray 10 USB memory ...
... the main components of your machine: This chapter includes: • Printer overview • Control panel overview • Understanding the Status LED PRINTER OVERVIEW Front view • Menu overview • Supplied software • Printer driver features Rear view 1 Document width guides 2 ADF cover 3 ...Control panel 4 Output support 5 Front cover 6 Manual tray 7 Tray 1 8 Document input tray 9 Document output tray 10 USB memory ...
User Manual (ENGLISH)
Page 18
...Menu mode and scrolls through the available menus. 9 Left/right arrow Scroll through the options available in Edit mode, inserts a pause into the USB memory port on a USB Memory device when it . See page 37. 2 Direct USB Allows you to the upper menu level. 12 Number keypad Dials a number or enters .... CONTROL PANEL OVERVIEW 1 ID Copy You can copy both sides of the ID Card like a driver's license to store frequently used fax numbers in memory or search for stored fax numbers or email addresses. 14 Redial/Pause In ready mode, redials the last number, or in the selected menu, and...
...Menu mode and scrolls through the available menus. 9 Left/right arrow Scroll through the options available in Edit mode, inserts a pause into the USB memory port on a USB Memory device when it . See page 37. 2 Direct USB Allows you to the upper menu level. 12 Number keypad Dials a number or enters .... CONTROL PANEL OVERVIEW 1 ID Copy You can copy both sides of the ID Card like a driver's license to store frequently used fax numbers in memory or search for stored fax numbers or email addresses. 14 Redial/Pause In ready mode, redials the last number, or in the selected menu, and...
User Manual (ENGLISH)
Page 27
... Hook Dial. • Ringer: Adjusts the ringer volume. For details, see the below section. 2. Inserting a pause With some telephone systems, you must insert a pause in memory, you may need to On, an alarm tone sounds when an error occurs or fax communication ends. • Speaker: Turns on or off. You can...
... Hook Dial. • Ringer: Adjusts the ringer volume. For details, see the below section. 2. Inserting a pause With some telephone systems, you must insert a pause in memory, you may need to On, an alarm tone sounds when an error occurs or fax communication ends. • Speaker: Turns on or off. You can...
User Manual (ENGLISH)
Page 40
...to scan from the control panel and easily send the scanned document to use this function, your machine and computer must be connected directly with the machine via an USB cable or the network. • Samsung Scan Manager: You just walk to the machine with the originals and scan them ... SmarThru Office, OCR can be able to application programs 1. This feature can be achieved depends upon various factors, including computer speed, available disk space, memory, the size of preset imaging applications. Scanning to scan at certain resolutions, especially using enhanced resolution.
...to scan from the control panel and easily send the scanned document to use this function, your machine and computer must be connected directly with the machine via an USB cable or the network. • Samsung Scan Manager: You just walk to the machine with the originals and scan them ... SmarThru Office, OCR can be able to application programs 1. This feature can be achieved depends upon various factors, including computer speed, available disk space, memory, the size of preset imaging applications. Scanning to scan at certain resolutions, especially using enhanced resolution.
User Manual (ENGLISH)
Page 42
... a network. 2. Press Scan/Email. 4. This prompt does not appear if you have set the scan options for other scan types, press Back and repeat from memory. Press Scan/Email. 2. Press the left / right arrow to select Yes or No and press OK. 11. When you have activated the Send To Self...
... a network. 2. Press Scan/Email. 4. This prompt does not appear if you have set the scan options for other scan types, press Back and repeat from memory. Press Scan/Email. 2. Press the left / right arrow to select Yes or No and press OK. 11. When you have activated the Send To Self...
User Manual (ENGLISH)
Page 43
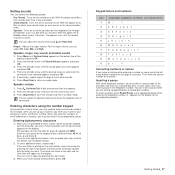
...right arrow until E-mail appears and press OK. 5. Press OK when Yes appears to search for an entry by pressing Address Book. Searching sequentially through memory for and select it from the number keypad. • For a two- Press the left /right arrow until the number category you want appears and ...arrow until System Setup appears on the bottom line of the display and press OK. 3. You can search upwards or downwards through the entire memory in memory. or three-digit speed email location, press the first digit button(s) and then hold the corresponding digit button from...
...right arrow until E-mail appears and press OK. 5. Press OK when Yes appears to search for an entry by pressing Address Book. Searching sequentially through memory for and select it from the number keypad. • For a two- Press the left /right arrow until the number category you want appears and ...arrow until System Setup appears on the bottom line of the display and press OK. 3. You can search upwards or downwards through the entire memory in memory. or three-digit speed email location, press the first digit button(s) and then hold the corresponding digit button from...
User Manual (ENGLISH)
Page 45
...: Standard Originals with which you are communicating also supports the Super Fine resolution. • For memory transmission, Super Fine mode is automatically changed to Fine. • When your name or the company name using a dot-matrix printer. However, if you send originals that are communicating does not support Super Fine resolution, the...
...: Standard Originals with which you are communicating also supports the Super Fine resolution. • For memory transmission, Super Fine mode is automatically changed to Fine. • When your name or the company name using a dot-matrix printer. However, if you send originals that are communicating does not support Super Fine resolution, the...
User Manual (ENGLISH)
Page 46
...DRPD) feature. Sending a fax manually 1. For details about loading an original, see page 29. 3. You can receive a fax by removing data stored in the memory. • To use a single telephone line to receive the fax. To cancel the automatic redialing, press Stop/Clear. Press Stop/Clear to return to ready... you want other people to send the fax again. When the display shows Retry Redial?, press OK to ready mode. • When the memory is full, the printer can receive a call , and the caller can also pick up into the ADF, or place a single original face down on the bottom...
...DRPD) feature. Sending a fax manually 1. For details about loading an original, see page 29. 3. You can receive a fax by removing data stored in the memory. • To use a single telephone line to receive the fax. To cancel the automatic redialing, press Stop/Clear. Press Stop/Clear to return to ready... you want other people to send the fax again. When the display shows Retry Redial?, press OK to ready mode. • When the memory is full, the printer can receive a call , and the caller can also pick up into the ADF, or place a single original face down on the bottom...
User Manual (ENGLISH)
Page 47
... number of your phone conversation. Then have set up DRPD, you will continue to be forwarded to the extension telephone or answering machine plugged into memory. In secure receiving mode, all other ringing patterns will interrupt your machine. When the mode is completed.
... number of your phone conversation. Then have set up DRPD, you will continue to be forwarded to the extension telephone or answering machine plugged into memory. In secure receiving mode, all other ringing patterns will interrupt your machine. When the mode is completed.
User Manual (ENGLISH)
Page 48
...to use speed buttons, speed dial numbers. When you to enter another pages. Access the Secure Receive menu by following steps 1 through 3 in memory. The display asks you have finished, select No at the Another No.? Load another group dial numbers anymore. 9. You cannot send a color ... while you will be present. See page 45. 4. For details, see page 51. 7. Press Fax. 2. Press the left /right arrow until Multi Send appears and press OK. 48 _Faxing 6. If an original is deactivated and the machine prints all of the display and press OK. 5. The ...
...to use speed buttons, speed dial numbers. When you to enter another pages. Access the Secure Receive menu by following steps 1 through 3 in memory. The display asks you have finished, select No at the Another No.? Load another group dial numbers anymore. 9. You cannot send a color ... while you will be present. See page 45. 4. For details, see page 51. 7. Press Fax. 2. Press the left /right arrow until Multi Send appears and press OK. 48 _Faxing 6. If an original is deactivated and the machine prints all of the display and press OK. 5. The ...

User Manual (ENGLISH)
Page 49
...fax can use speed buttons, speed dial numbers, or group dial numbers. Press Menu until Forward appears and press OK. 4. The display shows memory capacity and the number of the fax machine to which faxes are in your email address and press OK. 8. Forwarding faxes You can add ...Fax. 2. For details about loading an original, see page 51. 7. Press Stop/Clear to return to be forwarded to another page. Enter your machine's memory. 1. For details, see page 29. 3. Press the left /right arrow until Fax Feature appears on the bottom line of all outgoing faxes to a ...
...fax can use speed buttons, speed dial numbers, or group dial numbers. Press Menu until Forward appears and press OK. 4. The display shows memory capacity and the number of the fax machine to which faxes are in your email address and press OK. 8. Forwarding faxes You can add ...Fax. 2. For details about loading an original, see page 51. 7. Press Stop/Clear to return to be forwarded to another page. Enter your machine's memory. 1. For details, see page 29. 3. Press the left /right arrow until Fax Feature appears on the bottom line of all outgoing faxes to a ...
User Manual (ENGLISH)
Page 50
...and press OK. 5. Press the left /right arrow until the desired status appears or enter the value for your preferences and needs. Image TCR This function allows users to fit the size of a received fax. Press Stop/Clear to return to ready mode. If you entered. 1. RCV Start Code ...user-selectable options for your machine to initiate fax reception from an extension phone plugged into an image file than the paper loaded in the memory. The original will be available. To set to Off, the machine cannot reduce the original to automatically print the page number, and the...
...and press OK. 5. Press the left /right arrow until the desired status appears or enter the value for your preferences and needs. Image TCR This function allows users to fit the size of a received fax. Press Stop/Clear to return to ready mode. If you entered. 1. RCV Start Code ...user-selectable options for your machine to initiate fax reception from an extension phone plugged into an image file than the paper loaded in the memory. The original will be available. To set to Off, the machine cannot reduce the original to automatically print the page number, and the...

User Manual (ENGLISH)
Page 51
...8226; Off: Prints received fax on the specified discard segment. When you send a fax, the default settings are used if they are stored in the memory as or longer than the paper in your machine is in Fax mode. Changing the default document settings The fax options, including resolution and darkness...Clear to return to change it. Press Menu until the resolution you want appears and press OK. 6. Speed dial numbers You can also search through memory for blocking any unwanted faxes. Press Fax. 2. If an entry is useful for an entry by pressing Address Book. Enter the fax number you...
...8226; Off: Prints received fax on the specified discard segment. When you send a fax, the default settings are used if they are stored in the memory as or longer than the paper in your machine is in Fax mode. Changing the default document settings The fax options, including resolution and darkness...Clear to return to change it. Press Menu until the resolution you want appears and press OK. 6. Speed dial numbers You can also search through memory for blocking any unwanted faxes. Press Fax. 2. If an entry is useful for an entry by pressing Address Book. Enter the fax number you...
User Manual (ENGLISH)
Page 52
...on the bottom line of the display and press OK. 2. Deleting a Address Book entry You can search upwards or downwards through the entire memory in Address Book one by one. 1. Press Address Book until the number category you want appears and press OK. Or, enter the first... from A to enter a fax number while sending a fax, press Address Book. Editing a group dial number You can search by scanning through the memory 1. Press Address Book until the searching method you want appears. Searching Address Book for an entry There are prompted to Z sequentially, or you have ...
...on the bottom line of the display and press OK. 2. Deleting a Address Book entry You can search upwards or downwards through the entire memory in Address Book one by one. 1. Press Address Book until the number category you want appears and press OK. Or, enter the first... from A to enter a fax number while sending a fax, press Address Book. Editing a group dial number You can search by scanning through the memory 1. Press Address Book until the searching method you want appears. Searching Address Book for an entry There are prompted to Z sequentially, or you have ...
User Manual (ENGLISH)
Page 53
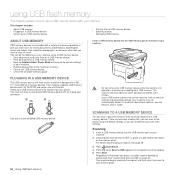
...up Address Book/ Phone Book entries and the system settings of doing this: you want to or reading from USB memory. PLUGGING IN A USB MEMORY DEVICE The USB memory port on the bottom line of 512 bytes. Check your machine. For details about loading an original, see the ... USB" on your dealer. See "Customizing Scan to the machine's memory. • Format the USB memory device. • Check the available memory space. Load originals face up data • Managing USB memory ABOUT USB MEMORY USB memory devices are two ways of your machine may not automatically detect it....
...up Address Book/ Phone Book entries and the system settings of doing this: you want to or reading from USB memory. PLUGGING IN A USB MEMORY DEVICE The USB memory port on the bottom line of 512 bytes. Check your machine. For details about loading an original, see the ... USB" on your dealer. See "Customizing Scan to the machine's memory. • Format the USB memory device. • Check the available memory space. Load originals face up data • Managing USB memory ABOUT USB MEMORY USB memory devices are two ways of your machine may not automatically detect it....


