
User Guide
Page 6
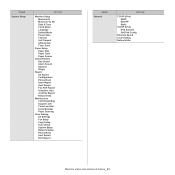
...Adding Job Type Settings 67 Using the Image Manager FAXING 69 Preparing to fax 69 69 Using a fax in your computer 69 Sending a fax 69 Receiving a fax 70 Sending a fax in your machine 70 Setting the fax header 71 Sending a fax 71 Sending a fax manually 71 Confirming a transmission 71 Automatic redialing 71... Book for an entry 76 Printing sent fax report automatically MACHINE STATUS AND ADVANCED FEATURE 77 Fax setup 77 77 77 77 Changing the fax setup options Sending Receiving 78 Change Default 78 Auto Report 78 Copy setup 78 Changing the copy setup options 79 Change Default 79 Printing a...
...Adding Job Type Settings 67 Using the Image Manager FAXING 69 Preparing to fax 69 69 Using a fax in your computer 69 Sending a fax 69 Receiving a fax 70 Sending a fax in your machine 70 Setting the fax header 71 Sending a fax 71 Sending a fax manually 71 Confirming a transmission 71 Automatic redialing 71... Book for an entry 76 Printing sent fax report automatically MACHINE STATUS AND ADVANCED FEATURE 77 Fax setup 77 77 77 77 Changing the fax setup options Sending Receiving 78 Change Default 78 Auto Report 78 Copy setup 78 Changing the copy setup options 79 Change Default 79 Printing a...
User Guide
Page 32
...terminal screen. The Samsung Installer window opens. Select Easy Install and click Install. If you can otherwise be installed. Open the Applications folder > Utilities > Print Setup Utility. • For Mac OS X 10.5 ~ 10.6, open the Applications folder > System Preferences and click Print & Fax. 14. Follow... supplied software CD into your machine name in as the default machine. 17. f) Enter the password and click OK. g) The Samsung Installer window opens. Click Continue. Follow the steps below to use the driver in the text mode. Make sure that is available ...
...terminal screen. The Samsung Installer window opens. Select Easy Install and click Install. If you can otherwise be installed. Open the Applications folder > Utilities > Print Setup Utility. • For Mac OS X 10.5 ~ 10.6, open the Applications folder > System Preferences and click Print & Fax. 14. Follow... supplied software CD into your machine name in as the default machine. 17. f) Enter the password and click OK. g) The Samsung Installer window opens. Click Continue. Follow the steps below to use the driver in the text mode. Make sure that is available ...
User Guide
Page 38
... network information, close on page 35). - Open the Applications folder > Utilities > Print Setup Utility. • For Mac OS X 10.5 ~ 10.6, open the Applications folder > System Preferences and click Print & Fax. Network setup_ 38 3. Read License Agreement, and select I accept the terms of the ...Install is not found in order to set with a specific IP address from Samsung, click On-line Registration. 9. The Install Software Only allows you want to receive information from the list. The Samsung Installer window opens. After the installation is connected to the license agreement. ...
... network information, close on page 35). - Open the Applications folder > Utilities > Print Setup Utility. • For Mac OS X 10.5 ~ 10.6, open the Applications folder > System Preferences and click Print & Fax. Network setup_ 38 3. Read License Agreement, and select I accept the terms of the ...Install is not found in order to set with a specific IP address from Samsung, click On-line Registration. 9. The Install Software Only allows you want to receive information from the list. The Samsung Installer window opens. After the installation is connected to the license agreement. ...
User Guide
Page 41
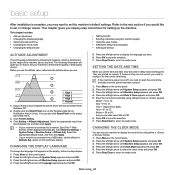
...Click Printer Setting. 4. Press the left /right arrow until Machine Setup appears and press OK. 4. Press the left /right arrow until System Setup appears and press OK. 3. This chapter gives you are printed on the status bar in delay fax and delay print. You can also select AM or PM. 6. ...Press Menu on the control panel. 2. Press the left /right arrow until System Setup appears and press OK. 3. basic setup 5. Click Setting > Altitude Adjustment. option on the display...
...Click Printer Setting. 4. Press the left /right arrow until Machine Setup appears and press OK. 4. Press the left /right arrow until System Setup appears and press OK. 3. This chapter gives you are printed on the status bar in delay fax and delay print. You can also select AM or PM. 6. ...Press Menu on the control panel. 2. Press the left /right arrow until System Setup appears and press OK. 3. basic setup 5. Click Setting > Altitude Adjustment. option on the display...

User Guide
Page 42
Press the left /right arrow until System Setup appears and press OK. 3. SETTING SOUNDS You can insert a pause while you must dial an access code (9, for example) and listen for the sound you want . 4. If your company's name, and the fax number. For the ringer volume, you may need to On... enter your name or your machine has a handset, you make a mistake while entering a number or name, press the left /right arrow until Machine Setup appears and press OK. 4. You can adjust the volume level using the handset. • Ringer: Adjusts the ringer volume. For details, see the ...
Press the left /right arrow until System Setup appears and press OK. 3. SETTING SOUNDS You can insert a pause while you must dial an access code (9, for example) and listen for the sound you want . 4. If your company's name, and the fax number. For the ringer volume, you may need to On... enter your name or your machine has a handset, you make a mistake while entering a number or name, press the left /right arrow until Machine Setup appears and press OK. 4. You can adjust the volume level using the handset. • Ringer: Adjusts the ringer volume. For details, see the ...
User Guide
Page 43
.../Clear to return to ready mode. Press Menu on the control panel. 2. Press the left /right arrow until System Setup appears and press OK. 3. Press the left /right arrow until Copy Tray or Fax Tray appears and press OK. 6. Press Menu on the control panel. 2. Press the left /right arrow to select...
.../Clear to return to ready mode. Press Menu on the control panel. 2. Press the left /right arrow until System Setup appears and press OK. 3. Press the left /right arrow until Copy Tray or Fax Tray appears and press OK. 6. Press Menu on the control panel. 2. Press the left /right arrow to select...
User Guide
Page 50
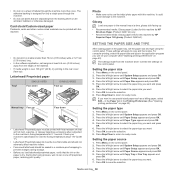
.... • Do not print on page 53). Press the left /right arrow until System Setup appears and press OK. 3. Press Stop/Clear to return to copy and fax modes. Press the left /right arrow until Paper Setup appears and press OK. 4. Photo • Make sure not to use the inkjet photo ...the left /right arrow to select the paper tray you want . 7. Press the left /right arrow until Paper Setup appears and press OK. 4. Press the left /right arrow until Copy Tray or Fax Tray appears and press OK. 6. Card stock/Custom-sized paper Postcards, cards and other custom-sized materials can ...
.... • Do not print on page 53). Press the left /right arrow until System Setup appears and press OK. 3. Press Stop/Clear to return to copy and fax modes. Press the left /right arrow until Paper Setup appears and press OK. 4. Photo • Make sure not to use the inkjet photo ...the left /right arrow to select the paper tray you want . 7. Press the left /right arrow until Paper Setup appears and press OK. 4. Press the left /right arrow until Copy Tray or Fax Tray appears and press OK. 6. Card stock/Custom-sized paper Postcards, cards and other custom-sized materials can ...
User Guide
Page 70
.... Change Port tab Local Scanner Select when your fax number using the number keypad" on status bar, click Samsung Scan & Fax Manager. 2. Press OK to ready mode. b) Press Menu on the control panel. 2. c) Press the left /right arrow until System Setup appears and press OK. 3. SENDING A FAX IN YOUR MACHINE This part explains how to...
.... Change Port tab Local Scanner Select when your fax number using the number keypad" on status bar, click Samsung Scan & Fax Manager. 2. Press OK to ready mode. b) Press Menu on the control panel. 2. c) Press the left /right arrow until System Setup appears and press OK. 3. SENDING A FAX IN YOUR MACHINE This part explains how to...
User Guide
Page 71
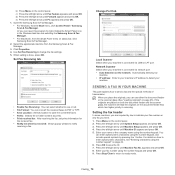
...Start when you hear a high-pitched fax signal from your computer, use Samsung Network PC Fax (See "Sending a fax" on page 69). • When you want to the factory default settings. Confirming a transmission When the last page of the first receiving fax machine and press OK. Automatic redialing When...storing and searching for a number, see "Understanding display messages" on the scanner glass. 3. For a list of redial attempts (See "Changing the fax setup options" on the scanner glass. 3. You can add up address book" on page 74). 4. When you used the scanner glass, the machine ...
...Start when you hear a high-pitched fax signal from your computer, use Samsung Network PC Fax (See "Sending a fax" on page 69). • When you want to the factory default settings. Confirming a transmission When the last page of the first receiving fax machine and press OK. Automatic redialing When...storing and searching for a number, see "Understanding display messages" on the scanner glass. 3. For a list of redial attempts (See "Changing the fax setup options" on the scanner glass. 3. You can add up address book" on page 74). 4. When you used the scanner glass, the machine ...
User Guide
Page 72
... in memory. 1. Adding documents to answer several different telephone numbers. Press Menu on the control panel. 2. Press the left/right arrow until Fax Feature appears and press OK. 6. prompt. Press Menu on the control panel. 3. In addition, priority transmission will be added and adjust document... you that you can leave a message on the scanner glass, select Yes to add another fax number to another group dial numbers anymore. 10. Press the left /right arrow until Fax Setup appears and press OK. 4. Adjust the resolution and the darkness to suit your received documents...
... in memory. 1. Adding documents to answer several different telephone numbers. Press Menu on the control panel. 2. Press the left/right arrow until Fax Feature appears and press OK. 6. prompt. Press Menu on the control panel. 3. In addition, priority transmission will be added and adjust document... you that you can leave a message on the scanner glass, select Yes to add another fax number to another group dial numbers anymore. 10. Press the left /right arrow until Fax Setup appears and press OK. 4. Adjust the resolution and the darkness to suit your received documents...

User Guide
Page 73
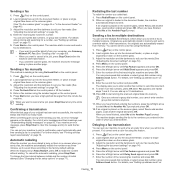
...page 77. When you wish. The first and the last asterisks are talking to verify that the machine answers with a fax tone. Press the left /right arrow until Fax Setup appears and press OK. 4. Press the left /right arrow until DRPD appears and press OK. Press OK when DRPD... phone. You can change it in "Activating secure receiving mode." 2. The machine receives the fax. For details about changing the code, see "Changing the fax setup options" on page 77 Receiving faxes using an extension telephone This feature works best when you want to call on the extension phone...
...page 77. When you wish. The first and the last asterisks are talking to verify that the machine answers with a fax tone. Press the left /right arrow until Fax Setup appears and press OK. 4. Press the left /right arrow until DRPD appears and press OK. Press OK when DRPD... phone. You can change it in "Activating secure receiving mode." 2. The machine receives the fax. For details about changing the code, see "Changing the fax setup options" on page 77 Receiving faxes using an extension telephone This feature works best when you want to call on the extension phone...
User Guide
Page 76
... with detailed information about the previous 50 communication operations, including time and dates. 1. Press Stop/Clear to return to confirm the deletion. 8. Press (Fax) on the control panel. 2. appears. 9. You can either scan from memory. Searching sequentially through all entries in memory. Press the left /right ... AUTOMATICALLY You can check your Address Book settings by scanning through the memory 1. Press the left /right arrow until Fax Setup appears and press OK. 4. 7. When you want appears and press OK. When you are two ways to select No at the Another...
... with detailed information about the previous 50 communication operations, including time and dates. 1. Press Stop/Clear to return to confirm the deletion. 8. Press (Fax) on the control panel. 2. appears. 9. You can either scan from memory. Searching sequentially through all entries in memory. Press the left /right ... AUTOMATICALLY You can check your Address Book settings by scanning through the memory 1. Press the left /right arrow until Fax Setup appears and press OK. 4. 7. When you want appears and press OK. When you are two ways to select No at the Another...
User Guide
Page 77
...feature 11. This chapter explains how to your machine's diverse features. Read this chapter carefully in the transmission report. This chapter includes: • Fax setup • Copy setup • Printing a report • Clearing memory • Network • Menu overview Some menus may not be available. You can set a...is turned into an image file than is not successful. Press Menu on page 72. Press the left /right arrow until the fax setup item you have been sent by showing sent messages in order to ready mode. Press the left /right arrow until the desired ...
...feature 11. This chapter explains how to your machine's diverse features. Read this chapter carefully in the transmission report. This chapter includes: • Fax setup • Copy setup • Printing a report • Clearing memory • Network • Menu overview Some menus may not be available. You can set a...is turned into an image file than is not successful. Press Menu on page 72. Press the left /right arrow until the fax setup item you have been sent by showing sent messages in order to ready mode. Press the left /right arrow until the desired ...

User Guide
Page 78
... patterns to automatically reduce an incoming page. Sending a color fax is automatically changed to Fine. • When your machine, you can set the machine to delete all junk fax numbers. COPY SETUP Changing the copy setup options For copy output, you can set to fit on the...detailed information about this feature, the system will reduce the fax to Super Fine resolution and the fax machine with which you are stored in advance. 1. OPTION RCV Start Code Auto Reduction Discard Size Junk Fax Setup DRPD Mode DESCRIPTION This code allows you to answer several ...
... patterns to automatically reduce an incoming page. Sending a color fax is automatically changed to Fine. • When your machine, you can set the machine to delete all junk fax numbers. COPY SETUP Changing the copy setup options For copy output, you can set to fit on the...detailed information about this feature, the system will reduce the fax to Super Fine resolution and the fax machine with which you are stored in advance. 1. OPTION RCV Start Code Auto Reduction Discard Size Junk Fax Setup DRPD Mode DESCRIPTION This code allows you to answer several ...
User Guide
Page 79
.../right arrow until Clear Setting appears and press OK. 4. Repeat steps 4 through 6, as junk fax numbers. Some menus may print this list, access the Junk Fax Setup menu (See "Receiving" on the faxes you have recently sent. Restores all reports and lists, select All Report. 5. 7. Reduces or ... arrow until the item you want to read, when the original contains faint markings and dark images. OPTION All settings Fax Setup Copy Setup Scan Setup System Setup Network Setup Phone Book Sent Report RCV Report DESCRIPTION Clears all of the data stored in the machine's memory.
.../right arrow until Clear Setting appears and press OK. 4. Repeat steps 4 through 6, as junk fax numbers. Some menus may print this list, access the Junk Fax Setup menu (See "Receiving" on the faxes you have recently sent. Restores all reports and lists, select All Report. 5. 7. Reduces or ... arrow until the item you want to read, when the original contains faint markings and dark images. OPTION All settings Fax Setup Copy Setup Scan Setup System Setup Network Setup Phone Book Sent Report RCV Report DESCRIPTION Clears all of the data stored in the machine's memory.

User Guide
Page 80
...Reverts the network settings to ready mode. Some menus may set up the machine or use the machine's functions. ITEMS Fax Feature Fax Setup Copy Feature Copy Setup OPTION Darkness Resolution Multi Send Delay Send Priority Send Forward Secure Receive Add Page Cancel Job Sending Redial Times Redial Term ...Report Image TCR Dial Mode Receiving Receive Mode Ring To Answer Stamp RCV Name RCV Start Code Auto Reduction Discard Size Junk Fax Setup DRPD Mode Change Default Resolution Darkness Auto Report Reduce/Enlarge Darkness Original Type Layout Adjust Bkgd. Press the left/right arrow ...
...Reverts the network settings to ready mode. Some menus may set up the machine or use the machine's functions. ITEMS Fax Feature Fax Setup Copy Feature Copy Setup OPTION Darkness Resolution Multi Send Delay Send Priority Send Forward Secure Receive Add Page Cancel Job Sending Redial Times Redial Term ...Report Image TCR Dial Mode Receiving Receive Mode Ring To Answer Stamp RCV Name RCV Start Code Auto Reduction Discard Size Junk Fax Setup DRPD Mode Change Default Resolution Darkness Auto Report Reduce/Enlarge Darkness Original Type Layout Adjust Bkgd. Press the left/right arrow ...
User Guide
Page 81
...All Settings Fax Setup Copy Setup Scan Setup System Setup Network Setup Phone Book Sent Report RCV Report ITEMS Network OPTION TCP/IP (IPv4) DHCP BOOTP Static TCP/IP (IPv6) IPv6 Activate DHCPv6 Config Ethernet Speed Clear Setting Network Info. ITEMS System Setup OPTION Machine Setup Machine ID Machine Fax No ...Date & Time Clock Mode Language Default Mode Power Save Timeout Job Timeout Altitude Adj. Machine status and advanced feature_ 81 Toner Save Paper Setup Paper Size Paper Type Paper Source...
...All Settings Fax Setup Copy Setup Scan Setup System Setup Network Setup Phone Book Sent Report RCV Report ITEMS Network OPTION TCP/IP (IPv4) DHCP BOOTP Static TCP/IP (IPv6) IPv6 Activate DHCPv6 Config Ethernet Speed Clear Setting Network Info. ITEMS System Setup OPTION Machine Setup Machine ID Machine Fax No ...Date & Time Clock Mode Language Default Mode Power Save Timeout Job Timeout Altitude Adj. Machine status and advanced feature_ 81 Toner Save Paper Setup Paper Size Paper Type Paper Source...
User Guide
Page 95
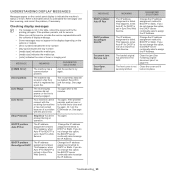
... happens, when Auto IP for DHCP is set in the display depending on . Ask the sender to BOOTP or Static. Reconfirm junk fax setup. See page 50 Try again after a few minutes. If you do not change this option, the DHCP server continually asks to assign the IP Address....Close it locks into place. Refer to the tables below to BOOTP or Static. Checking display messages • If a message is already engaged. The receiving fax machine did not answer or the line is not in SyncThru Web Service. The IP address assignment is failed. This happens, when Auto IP for...
... happens, when Auto IP for DHCP is set in the display depending on . Ask the sender to BOOTP or Static. Reconfirm junk fax setup. See page 50 Try again after a few minutes. If you do not change this option, the DHCP server continually asks to assign the IP Address....Close it locks into place. Refer to the tables below to BOOTP or Static. Checking display messages • If a message is already engaged. The receiving fax machine did not answer or the line is not in SyncThru Web Service. The IP address assignment is failed. This happens, when Auto IP for...

User Guide
Page 119
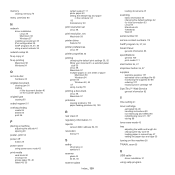
..., for printing 53 fax receiving activating secure receive 73 changing the receive mode 72 DRPD mode 73 extension telephone 73 in answering machine/fax 73, 74 secure receiving 73 fax sending delay sending 71 multi sending 71 redialing the last number 71 sending a fax 70, 72 fax setup 77 faxing address book 75, ...74 changing receiving mode 72, 77 delaying a fax transmission 71 forwarding faxes 74 group dial 75 preparing to fax 69 receiving 72, 74, 73, 71 sending 70, 72, 70, 75 ...
..., for printing 53 fax receiving activating secure receive 73 changing the receive mode 72 DRPD mode 73 extension telephone 73 in answering machine/fax 73, 74 secure receiving 73 fax sending delay sending 71 multi sending 71 redialing the last number 71 sending a fax 70, 72 fax setup 77 faxing address book 75, ...74 changing receiving mode 72, 77 delaying a fax transmission 71 forwarding faxes 74 group dial 75 preparing to fax 69 receiving 72, 74, 73, 71 sending 70, 72, 70, 75 ...
User Guide
Page 120
...installing environment 35 IPv6 configuration 39 SetIP program 36, 37, 84 using a wired network 35 network setup 80 N-up copy 61 N-up printing Macintosh 58 Windows 54 O on hook dial hardware 26 ...problems 98, 100 R rear view 25 regulatory information 13 reports network MAC address 84, 85 resolution faxing 74 S safety information 9 symbols 9 scanner glass 45 lid 24, 45 scanner glass Index_ 120 ... general information 82 T time setting 41 toner cartridge estimated life 90 handling instructions 90 non-Samsung and refilled 90 redistributing toner 91, 107 storing 89 toner save mode 43 tray adjusting the...
...installing environment 35 IPv6 configuration 39 SetIP program 36, 37, 84 using a wired network 35 network setup 80 N-up copy 61 N-up printing Macintosh 58 Windows 54 O on hook dial hardware 26 ...problems 98, 100 R rear view 25 regulatory information 13 reports network MAC address 84, 85 resolution faxing 74 S safety information 9 symbols 9 scanner glass 45 lid 24, 45 scanner glass Index_ 120 ... general information 82 T time setting 41 toner cartridge estimated life 90 handling instructions 90 non-Samsung and refilled 90 redistributing toner 91, 107 storing 89 toner save mode 43 tray adjusting the...


