
User Manual (user Manual) (ver.f10) (English)
Page 6
... Your Phone 15 Closed View of Your Phone 15 Open View of Your Phone (Portrait Mode 17 Command Keys 18 Understanding the Home Screen 20 Icon Glossary 20 Section 3: Call Functions 27 Making a Call 27 Answering a Call 27 Call In-Progress Options 27 Recent Calls 28 Contacts...Voice Commands 33 Section 4: Menu Navigation 41 Menu Navigation 41 Menu Outline 43 Section 5: Understanding Your Contacts 49 Opening Contacts Menu 49 Contacts Icons 49 Adding a Contact 50 Adding Pauses 53 Contact Groups 54 Finding a Contacts Entry 58 Editing an Existing Contact Entry 58 Deleting a Contact...
... Your Phone 15 Closed View of Your Phone 15 Open View of Your Phone (Portrait Mode 17 Command Keys 18 Understanding the Home Screen 20 Icon Glossary 20 Section 3: Call Functions 27 Making a Call 27 Answering a Call 27 Call In-Progress Options 27 Recent Calls 28 Contacts...Voice Commands 33 Section 4: Menu Navigation 41 Menu Navigation 41 Menu Outline 43 Section 5: Understanding Your Contacts 49 Opening Contacts Menu 49 Contacts Icons 49 Adding a Contact 50 Adding Pauses 53 Contact Groups 54 Finding a Contacts Entry 58 Editing an Existing Contact Entry 58 Deleting a Contact...

User Manual (user Manual) (ver.f10) (English)
Page 16
...If the phone is necessary. Open the phone, then press and hold the End/Power key . The internal antenna is completely charged (the battery icon becomes still), unplug the adapter from the charging port cover and replace the charging port cover. Once the phone finds a signal, the time, ... into a standard AC wall outlet. Getting Started 11 Remove the adapter end from the power outlet. See "Warranty Information" on the touch screen may cause the phone to place and receive calls. Using excessive force or a metallic object when pressing on page 168. 3. When the ...
...If the phone is necessary. Open the phone, then press and hold the End/Power key . The internal antenna is completely charged (the battery icon becomes still), unplug the adapter from the charging port cover and replace the charging port cover. Once the phone finds a signal, the time, ... into a standard AC wall outlet. Getting Started 11 Remove the adapter end from the power outlet. See "Warranty Information" on the touch screen may cause the phone to place and receive calls. Using excessive force or a metallic object when pressing on page 168. 3. When the ...
User Manual (user Manual) (ver.f10) (English)
Page 20
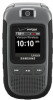
... for VZ NavigatorSM - Bluetooth® Wireless Technology ** **The Convoy™ supports the following illustration shows the main external features of your phone as well as screens and icons that display when the phone is in use. V CAST Music with Night Shot Mode - Speakerphone - Features of features; The Convoy™ does not support...
... for VZ NavigatorSM - Bluetooth® Wireless Technology ** **The Convoy™ supports the following illustration shows the main external features of your phone as well as screens and icons that display when the phone is in use. V CAST Music with Night Shot Mode - Speakerphone - Features of features; The Convoy™ does not support...

User Manual (user Manual) (ver.f10) (English)
Page 25
...view. Roaming: Your phone is outside your phone's display contain icons that indicate feature and function status. Press the number associated with the glossary you cannot use your home area. Understanding the Home Screen The top annunciator line of your home area. While roaming, ...another wireless provider may appear in your display. 20 Icon Glossary The Icon Glossary displays a list of icons that will show in the lower half of the home screen shows icons that indicate network status, battery power, signal strength, connection type and more. When...
...view. Roaming: Your phone is outside your phone's display contain icons that indicate feature and function status. Press the number associated with the glossary you cannot use your home area. Understanding the Home Screen The top annunciator line of your home area. While roaming, ...another wireless provider may appear in your display. 20 Icon Glossary The Icon Glossary displays a list of icons that will show in the lower half of the home screen shows icons that indicate network status, battery power, signal strength, connection type and more. When...

User Manual (user Manual) (ver.f10) (English)
Page 28
Sound: Indicates a sound file. Recent Calls & Contacts Icons Dialed Call: Indicates any outgoing calls made from your phone Received Call: Indicates any received calls that were answered. Work: Indicates the contact... Call: Indicates any received calls that were not answered. Group: Indicates the group contact information. Sound Protected: Indicates a password-protected sound. IM Screen Name: Indicates the screen name chosen for IM messages. Sound in Card: Indicates that a ringtone is on the memory card. Ringtone Protected: Indicates a password-protected ringtone....
Sound: Indicates a sound file. Recent Calls & Contacts Icons Dialed Call: Indicates any outgoing calls made from your phone Received Call: Indicates any received calls that were answered. Work: Indicates the contact... Call: Indicates any received calls that were not answered. Group: Indicates the group contact information. Sound Protected: Indicates a password-protected sound. IM Screen Name: Indicates the screen name chosen for IM messages. Sound in Card: Indicates that a ringtone is on the memory card. Ringtone Protected: Indicates a password-protected ringtone....

User Manual (user Manual) (ver.f10) (English)
Page 33
... of the calls made from your phone. • View Timers: Displays amount of the call was received, dialed, or missed. 1. From the home screen, press for Recent Calls for : Last Call, All Calls, Received Calls, Dialed Calls, Roaming Calls, Transmit Data, Received Data, Total Data, Last ... display theme, Grid menu layout. 1. Directional key up or down to view the Viewing Call History Recent Calls retains information such as the appropriate icon to mute the call . • Duration: The duration of calls are: • Missed: Displays any missed calls. • Received: Displays...
... of the calls made from your phone. • View Timers: Displays amount of the call was received, dialed, or missed. 1. From the home screen, press for Recent Calls for : Last Call, All Calls, Received Calls, Dialed Calls, Roaming Calls, Transmit Data, Received Data, Total Data, Last ... display theme, Grid menu layout. 1. Directional key up or down to view the Viewing Call History Recent Calls retains information such as the appropriate icon to mute the call . • Duration: The duration of calls are: • Missed: Displays any missed calls. • Received: Displays...

User Manual (user Manual) (ver.f10) (English)
Page 34
... key up or down until the desired number is highlighted. 3. Press to call the highlighted number. Or, you view Recent Calls, an icon to enter the highlighted option's sub-menu. Press right soft key for OPEN, then press to call the highlighted number. Press right soft ... If Save to Contacts doesn't appear, that entry is . 4. From the home screen, press . 2. 5. Press to the left of the number indicates the type of call Making Calls Using Call History 1. Call History Icons When you can press for Options to Contacts is already in the contact list. &#...
... key up or down until the desired number is highlighted. 3. Press to call the highlighted number. Or, you view Recent Calls, an icon to enter the highlighted option's sub-menu. Press right soft key for OPEN, then press to call the highlighted number. Press right soft ... If Save to Contacts doesn't appear, that entry is . 4. From the home screen, press . 2. 5. Press to the left of the number indicates the type of call Making Calls Using Call History 1. Call History Icons When you can press for Options to Contacts is already in the contact list. &#...

User Manual (user Manual) (ver.f10) (English)
Page 37
...one number, press the Directional key up or down to call is available for the contact appear in the designated coverage area. - From the home screen, press for MENU ➔ for VIEW. Your phone can roam on the keypad that you want , and press . 32 Roaming occurs when ...you want to acquire service. Home Only - 2. The roaming icon displays when roaming is used to call the number. Press the Directional key up or down to acquire service. - Roaming Options The following roaming options...
...one number, press the Directional key up or down to call is available for the contact appear in the designated coverage area. - From the home screen, press for MENU ➔ for VIEW. Your phone can roam on the keypad that you want , and press . 32 Roaming occurs when ...you want to acquire service. Home Only - 2. The roaming icon displays when roaming is used to call the number. Press the Directional key up or down to acquire service. - Roaming Options The following roaming options...

User Manual (user Manual) (ver.f10) (English)
Page 54
... entry in this field. Home: Enter a home number for the entry in this field. From the home screen, press for the entry in your phone by Verizon Wireless. The icons in this field. Contacts Icons You can assign multiple entries to manage your daily contacts by storing their name and number in this...
... entry in this field. Home: Enter a home number for the entry in this field. From the home screen, press for the entry in your phone by Verizon Wireless. The icons in this field. Contacts Icons You can assign multiple entries to manage your daily contacts by storing their name and number in this...
User Manual (user Manual) (ver.f10) (English)
Page 93
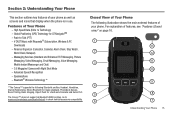
... Twitter • Photobucket • Rate Hotties • Best Mobile Pix • Buzzd • MCARDS! • Search 2. From the home screen, press left soft key for Message ➔ for Email. 2. Chat Join wireless chat rooms from the browser: 1. Press for Chat. Send text messages ...and icons to access Mobile Web Mail. 1. Use the on -screen application specific functions and options to use the Chat applications. 88 Use the on -screen application specific functions and options to use the email applications. ...
... Twitter • Photobucket • Rate Hotties • Best Mobile Pix • Buzzd • MCARDS! • Search 2. From the home screen, press left soft key for Message ➔ for Email. 2. Chat Join wireless chat rooms from the browser: 1. Press for Chat. Send text messages ...and icons to access Mobile Web Mail. 1. Use the on -screen application specific functions and options to use the Chat applications. 88 Use the on -screen application specific functions and options to use the email applications. ...
User Manual (user Manual) (ver.f10) (English)
Page 95
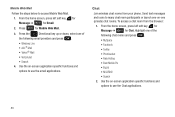
...all Bluetooth OBEX profiles. Note: The menu navigation instructions for Settings & Tools. 2. Note: If Bluetooth is turned on, the Bluetooth icon displays in situations where radio use is turned off the Bluetooth wireless technology. Transfer Object allows sending an OPP - Serial Port Profile * ... turn On or Off. Connectivity Connections (i.e. Turning Bluetooth On or Off When the Bluetooth radio is supported using SPP - From the home screen, press for MENU ➔ for this section uses the default Eclipse display theme, Grid menu layout. 1. Phone Book Access Profiles*. -...
...all Bluetooth OBEX profiles. Note: The menu navigation instructions for Settings & Tools. 2. Note: If Bluetooth is turned on, the Bluetooth icon displays in situations where radio use is turned off the Bluetooth wireless technology. Transfer Object allows sending an OPP - Serial Port Profile * ... turn On or Off. Connectivity Connections (i.e. Turning Bluetooth On or Off When the Bluetooth radio is supported using SPP - From the home screen, press for MENU ➔ for this section uses the default Eclipse display theme, Grid menu layout. 1. Phone Book Access Profiles*. -...

User Manual (user Manual) (ver.f10) (English)
Page 96
...POWER ON?" Bluetooth Settings The Bluetooth wireless technology settings menu provides the ability to pair the devices. Changing Your Settings 91 From the home screen, press for MENU ➔ for a recognized Bluetooth wireless device. 1. Add New Device is shown. The prompt: "PLACE DEVICE YOU ARE... Tools. 2. Press for Options. Highlight Yes to activate or No to be sure to see your accessibility. Once connected the Bluetooth Connected icon appears in the upper half of the display. Press right soft key for Bluetooth Menu. 3. displays. If the default passkey is complete, ...
...POWER ON?" Bluetooth Settings The Bluetooth wireless technology settings menu provides the ability to pair the devices. Changing Your Settings 91 From the home screen, press for MENU ➔ for a recognized Bluetooth wireless device. 1. Add New Device is shown. The prompt: "PLACE DEVICE YOU ARE... Tools. 2. Press for Options. Highlight Yes to activate or No to be sure to see your accessibility. Once connected the Bluetooth Connected icon appears in the upper half of the display. Press right soft key for Bluetooth Menu. 3. displays. If the default passkey is complete, ...
User Manual (user Manual) (ver.f10) (English)
Page 104
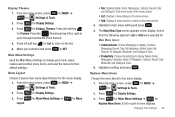
...; Tab: Displays Media Center, Messaging, Contacts, Recent Calls and Settings & Tools menu icons on the menu screen. • List: Displays 9 menu listings on the menu screen. • Grid: Displays 9 menu icons in a matrix on the display. Main Menu Settings Used the Main Menu Settings to change... your selection and press to cycle through thumbnails of icons displays. for Main Menu Settings ➔ for Settings ...
...; Tab: Displays Media Center, Messaging, Contacts, Recent Calls and Settings & Tools menu icons on the menu screen. • List: Displays 9 menu listings on the menu screen. • Grid: Displays 9 menu icons in a matrix on the display. Main Menu Settings Used the Main Menu Settings to change... your selection and press to cycle through thumbnails of icons displays. for Main Menu Settings ➔ for Settings ...

User Manual (user Manual) (ver.f10) (English)
Page 105
...Tools. 2. From the home screen, press for MENU ➔ for Display Settings. 3. Press . Position Menu Items Note: This menu is not available with the selected icon and press . Press for Settings & Tools. The two selected items with the previously selected icon. 6. Menu Fonts 1. Press... the Directional key up or down to the default positions for Main Menu Settings, then Position Menu Items. A list or grid of icons displays. 4. Change the location of menu items 5. Press for Main Menu Settings ➔ for Display Settings. 3. Dial Fonts 1. Select...
...Tools. 2. From the home screen, press for MENU ➔ for Display Settings. 3. Press . Position Menu Items Note: This menu is not available with the selected icon and press . Press for Settings & Tools. The two selected items with the previously selected icon. 6. Menu Fonts 1. Press... the Directional key up or down to the default positions for Main Menu Settings, then Position Menu Items. A list or grid of icons displays. 4. Change the location of menu items 5. Press for Main Menu Settings ➔ for Display Settings. 3. Dial Fonts 1. Select...
User Manual (user Manual) (ver.f10) (English)
Page 120
From the home screen, press for MENU ➔ for USB Mode. 3. Press to return to display the Mobile Device and Identification numbers. 4. Press for Settings & Tools. 2. Phone Info The Phone Info menu allows you to view the software and hardware information, your assigned number, and an icon glossary for your ...USB port of software, PRL, ERI, Browser, Media Center, MSUI, Hardware, MEID, WDC, BREW, and Platform on your computer. From the home screen, press for MENU ➔ for Phone Info. Note: Media Sync Mode will be asked to select the USB mode each time the USB data ...
From the home screen, press for MENU ➔ for USB Mode. 3. Press to return to display the Mobile Device and Identification numbers. 4. Press for Settings & Tools. 2. Phone Info The Phone Info menu allows you to view the software and hardware information, your assigned number, and an icon glossary for your ...USB port of software, PRL, ERI, Browser, Media Center, MSUI, Hardware, MEID, WDC, BREW, and Platform on your computer. From the home screen, press for MENU ➔ for Phone Info. Note: Media Sync Mode will be asked to select the USB mode each time the USB data ...

User Manual (user Manual) (ver.f10) (English)
Page 126
... Settings: - and 1,2,3!) and/or Shutter Sound (Off, Shutter, OK and Melody). - Choose the following options for your photo in full screen or standard screen. - You can create a slide show with selected pictures, move your picture: • Press left soft key for Save to save the picture... the memory card to send the picture as a new picture message. Memory: Allows you to select from : Auto Name Off or On. - Icon Display: Allows you to select the camera's specific light metering area. Press for Erase to the phone's internal memory or a microSD™ memory card...
... Settings: - and 1,2,3!) and/or Shutter Sound (Off, Shutter, OK and Melody). - Choose the following options for your photo in full screen or standard screen. - You can create a slide show with selected pictures, move your picture: • Press left soft key for Save to save the picture... the memory card to send the picture as a new picture message. Memory: Allows you to select from : Auto Name Off or On. - Icon Display: Allows you to select the camera's specific light metering area. Press for Erase to the phone's internal memory or a microSD™ memory card...

User Manual (user Manual) (ver.f10) (English)
Page 127
...options: • Erase: Allows you to erase selected picture files. • Make Slide Show: Allows you to be inserted for My Pictures. 4. From the home screen, press 122 for MENU ➔ for My Pictures. 4. Press for Media Center. 2. The camcorder is now active. Press for Picture & Video. 3. Press ...picture(s) and press for MARK, or press right soft key for Mark All then press left soft key for SAVE. In the MY PICTURES screen, a icon will appear in the upper right corner of the thumbnail view of 18. 1. Make a Slide Show Create a slide show at the "SAVE...
...options: • Erase: Allows you to erase selected picture files. • Make Slide Show: Allows you to be inserted for My Pictures. 4. From the home screen, press 122 for MENU ➔ for My Pictures. 4. Press for Media Center. 2. The camcorder is now active. Press for Picture & Video. 3. Press ...picture(s) and press for MARK, or press right soft key for Mark All then press left soft key for SAVE. In the MY PICTURES screen, a icon will appear in the upper right corner of the thumbnail view of 18. 1. Make a Slide Show Create a slide show at the "SAVE...

User Manual (user Manual) (ver.f10) (English)
Page 128
... for Picture & Video. 3. Press the Directional key up or down to Camera mode. 3. Select Display All, Partial, No Icons. - Sound Effect: Allows you to stop recording. Online Album Note: You must first setup your Mobile Number and Password. Enter your account ...your online album. Select Off or On - Press for Get New Applications. 4. Highlight Sign In and press . Games 1. From the home screen, press for Games. 3. Press for Media Center. The following categories are now connected to default settings. • Recording Time: Choose from ...
... for Picture & Video. 3. Press the Directional key up or down to Camera mode. 3. Select Display All, Partial, No Icons. - Sound Effect: Allows you to stop recording. Online Album Note: You must first setup your Mobile Number and Password. Enter your account ...your online album. Select Off or On - Press for Get New Applications. 4. Highlight Sign In and press . Games 1. From the home screen, press for Games. 3. Press for Media Center. The following categories are now connected to default settings. • Recording Time: Choose from ...
User Manual (user Manual) (ver.f10) (English)
Page 150
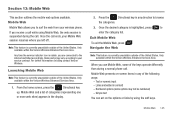
... billing contact Verizon Wireless. Once the call . Rates and prices vary according to enter the category list. Mobile Web presents on-screen items in the display. 2. Any time the service indicator icon is highlighted, press to your wireless phone. Press the Directional key in content) - Only available within the Verizon Wireless Enhanced..., some options may not be numbered) - Mobile Web Mobile Web allows you are connected to surf the web from your service contract. From the home screen, press the Directional key up. When you left off.
... billing contact Verizon Wireless. Once the call . Rates and prices vary according to enter the category list. Mobile Web presents on-screen items in the display. 2. Any time the service indicator icon is highlighted, press to your wireless phone. Press the Directional key in content) - Only available within the Verizon Wireless Enhanced..., some options may not be numbered) - Mobile Web Mobile Web allows you are connected to surf the web from your service contract. From the home screen, press the Directional key up. When you left off.

User Manual (user Manual) (ver.f9) (English)
Page 28
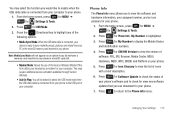
From the home screen, press and hold the Pound key ( # ) until PHONE SET TO VIBRATE ONLY appears in the display. 2. From the home screen, press the Volume key ( ) up or down to adjust the ringer volume to vibrate 1. Setting ringtone to the desired setting. 2. The vibrate icon appears above the Left Soft key, indicating that your phone is set to SET. Press to vibrate for incoming calls. 28 THE BASICS The Basics Adjusting ringtone volume 1.
From the home screen, press and hold the Pound key ( # ) until PHONE SET TO VIBRATE ONLY appears in the display. 2. From the home screen, press the Volume key ( ) up or down to adjust the ringer volume to vibrate 1. Setting ringtone to the desired setting. 2. The vibrate icon appears above the Left Soft key, indicating that your phone is set to SET. Press to vibrate for incoming calls. 28 THE BASICS The Basics Adjusting ringtone volume 1.


