User Manual (user Manual) (ver.f9) (English)
Page 1
SCH-R860 Series PORTABLE TRI-BAND MOBILE PHONE User Manual Please read this manual before operating your phone, and keep it for future reference.
SCH-R860 Series PORTABLE TRI-BAND MOBILE PHONE User Manual Please read this manual before operating your phone, and keep it for future reference.

User Manual (user Manual) (ver.f9) (English)
Page 2
...Plano, TX 75074 Toll Free Tel: 1.888.987.HELP (4357) Internet Address: http://www.samsungusa.com ©2009 Samsung Telecommunications America, LLC is transferred to or ownership in the Intellectual Property is a registered trademark of authorship. For 24 ...FAQ/ARS System (Automated Response System) at: www.samsungwireless.com/support GH68-26316A R860.01_CL11_CB_121109_F9 Intellectual Property includes, but not limited to, accessories, parts, or software relating there to (the "Phone System"), is proprietary to , inventions (patentable or unpatentable), patents, trade secrets...
...Plano, TX 75074 Toll Free Tel: 1.888.987.HELP (4357) Internet Address: http://www.samsungusa.com ©2009 Samsung Telecommunications America, LLC is transferred to or ownership in the Intellectual Property is a registered trademark of authorship. For 24 ...FAQ/ARS System (Automated Response System) at: www.samsungwireless.com/support GH68-26316A R860.01_CL11_CB_121109_F9 Intellectual Property includes, but not limited to, accessories, parts, or software relating there to (the "Phone System"), is proprietary to , inventions (patentable or unpatentable), patents, trade secrets...

User Manual (user Manual) (ver.f9) (English)
Page 4
... 48 Section 6: Entering Text 49 Changing Text Entry Screens 49 Changing the Text Entry Mode 51 Using T9® Mode (Phone Keypad Only 53 Using Abc Mode 53 Entering Numbers 54 Entering Symbols 54 Section 7: Messaging 55 Creating and Sending New Messages...Started 4 Understanding this User Manual 4 Charging the Battery 4 Activating Your Phone 5 Setting Up Your Voicemail 7 Memory Card (Optional 7 Section 2: Understanding Your Phone 9 Features of Your Phone 9 Side Views of Your Phone 9 Front View of Your Phone 10 Rear View 11 Command Keys 11 Understanding the Display Screen 13 ...
... 48 Section 6: Entering Text 49 Changing Text Entry Screens 49 Changing the Text Entry Mode 51 Using T9® Mode (Phone Keypad Only 53 Using Abc Mode 53 Entering Numbers 54 Entering Symbols 54 Section 7: Messaging 55 Creating and Sending New Messages...Started 4 Understanding this User Manual 4 Charging the Battery 4 Activating Your Phone 5 Setting Up Your Voicemail 7 Memory Card (Optional 7 Section 2: Understanding Your Phone 9 Features of Your Phone 9 Side Views of Your Phone 9 Front View of Your Phone 10 Rear View 11 Command Keys 11 Understanding the Display Screen 13 ...
User Manual (user Manual) (ver.f9) (English)
Page 5
... Section 14: Multimedia 100 Accessing Multimedia 100 My Images 100 My Videos 101 My Ringtones 102 My Sounds 103 Section 15: Tools 106 Accessing Your Phone's Tools 106 Voice Service 106 Bluetooth 109 Calendar 113 Memo Pad 115 Alarm Clock 116 World Time 118 2 Camcorder Tab 85 Camcorder Settings - Camera Tab...
... Section 14: Multimedia 100 Accessing Multimedia 100 My Images 100 My Videos 101 My Ringtones 102 My Sounds 103 Section 15: Tools 106 Accessing Your Phone's Tools 106 Voice Service 106 Bluetooth 109 Calendar 113 Memo Pad 115 Alarm Clock 116 World Time 118 2 Camcorder Tab 85 Camcorder Settings - Camera Tab...
User Manual (user Manual) (ver.f9) (English)
Page 6
...Settings Menu 126 Location 126 Widget 126 Display Settings 127 Sounds Settings 130 Call Settings 132 Phone Settings 135 Memory Manager 140 Section 17: Phone Info 144 Phone Number 144 Icon Glossary 144 Version 144 ESN/MEID 144 Section 18: Health and Safety Information...and Safety Information 146 Warning Regarding Display 147 Samsung Mobile Products and Recycling 147 UL Certified Travel Adapter 147 Consumer Information on Wireless Phones 148 Road Safety 154 3 Responsible Listening 155 Operating Environment 157 Using Your Phone Near Other Electronic Devices 157 FCC Hearing-...
...Settings Menu 126 Location 126 Widget 126 Display Settings 127 Sounds Settings 130 Call Settings 132 Phone Settings 135 Memory Manager 140 Section 17: Phone Info 144 Phone Number 144 Icon Glossary 144 Version 144 ESN/MEID 144 Section 18: Health and Safety Information...and Safety Information 146 Warning Regarding Display 147 Samsung Mobile Products and Recycling 147 UL Certified Travel Adapter 147 Consumer Information on Wireless Phones 148 Road Safety 154 3 Responsible Listening 155 Operating Environment 157 Using Your Phone Near Other Electronic Devices 157 FCC Hearing-...

User Manual (user Manual) (ver.f9) (English)
Page 7
...back of "select" in Main Menu 2 (see "Main Menu Navigation" on page 32). Samsung accessories are emphasized. In this manual some text is put together. Only use your phone. Understanding this User Manual The chapters of other accessories may invalidate your warranty and may cause ... battery. Text Conventions This manual provides condensed information about the current feature that you should know before using your Samsung SCH-r860 phone by selecting Help in long "drill down" procedure steps. Section 1: Getting Started This section explains how to start using your...
...back of "select" in Main Menu 2 (see "Main Menu Navigation" on page 32). Samsung accessories are emphasized. In this manual some text is put together. Only use your phone. Understanding this User Manual The chapters of other accessories may invalidate your warranty and may cause ... battery. Text Conventions This manual provides condensed information about the current feature that you should know before using your Samsung SCH-r860 phone by selecting Help in long "drill down" procedure steps. Section 1: Getting Started This section explains how to start using your...
User Manual (user Manual) (ver.f9) (English)
Page 8
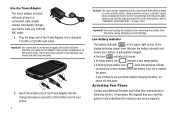
...not located in the upper-right corner of the display indicates power level. Use the Travel Adapter The travel adapter included with your phone is a convenient, light-weight charger that you must unplug the adapter before the battery is too low to use an adapter ...of the proper configuration for obtaining service, if necessary. Important!: For connection to avoid damage. Activating Your Phone Contact your phone without charging its battery, the phone will shut down. Using excessive force or a metallic object when pressing the touch screen may damage the tempered glass...
...not located in the upper-right corner of the display indicates power level. Use the Travel Adapter The travel adapter included with your phone is a convenient, light-weight charger that you must unplug the adapter before the battery is too low to use an adapter ...of the proper configuration for obtaining service, if necessary. Important!: For connection to avoid damage. Activating Your Phone Contact your phone without charging its battery, the phone will shut down. Using excessive force or a metallic object when pressing the touch screen may damage the tempered glass...
User Manual (user Manual) (ver.f9) (English)
Page 9
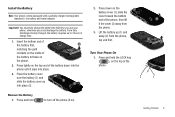
... Li-Ion battery and travel adapter. Press lightly on the top of the battery down on the phone. 2. Important!: You must fully charge the battery the first time you use your phone, otherwise you could damage the battery. Press and hold the LOCK key ( ), on the top... it slips into place. 3. Place the battery cover over the battery (1) and slide the battery cover up (1) and away (2) from the phone. 3. Turn Your Phone On 1. Insert the bottom end of the battery first, matching the gold contacts on ). From fully discharged to fully charged, the battery requires...
... Li-Ion battery and travel adapter. Press lightly on the top of the battery down on the phone. 2. Important!: You must fully charge the battery the first time you use your phone, otherwise you could damage the battery. Press and hold the LOCK key ( ), on the top... it slips into place. 3. Place the battery cover over the battery (1) and slide the battery cover up (1) and away (2) from the phone. 3. Turn Your Phone On 1. Insert the bottom end of the battery first, matching the gold contacts on ). From fully discharged to fully charged, the battery requires...
User Manual (user Manual) (ver.f9) (English)
Page 10
...1. You are outside of your carrier's coverage or roaming area, the No Service icon ( ) appears at the bottom of the device) while using your phone as , sound files and photos) in your own mobile number to dial Voicemail. (For more seconds. Memory Card (Optional) You can be retrieved any ... for storing files (such as this can affect call quality and can use the Voicemail folder (under the Message menu) to view details of the phone's display. Antenna Note: If you cannot place or receive calls, try later when service is necessary. 2. Note: If your password. In Standby mode...
...1. You are outside of your carrier's coverage or roaming area, the No Service icon ( ) appears at the bottom of the device) while using your phone as , sound files and photos) in your own mobile number to dial Voicemail. (For more seconds. Memory Card (Optional) You can be retrieved any ... for storing files (such as this can affect call quality and can use the Voicemail folder (under the Message menu) to view details of the phone's display. Antenna Note: If you cannot place or receive calls, try later when service is necessary. 2. Note: If your password. In Standby mode...

User Manual (user Manual) (ver.f9) (English)
Page 11
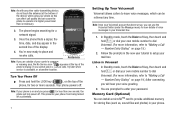
...install another memory card. (For more information, refer to "Install a Memory Card" .) 6. Slowly release your pressure on the right hand side of the phone. 2. Open the microSD cover on the right hand side of the card are face down, as shown. 5. Replace the microSD cover. Remove the memory ...card from the memory card slot. Replace the microSD cover. Getting Started 8 Make sure that the gold contacts of the phone, as shown, then carefully slide the memory card into place. 3. Open the microSD cover on the card. Incorrect Correct 2. Carefully press the...
...install another memory card. (For more information, refer to "Install a Memory Card" .) 6. Slowly release your pressure on the right hand side of the phone. 2. Open the microSD cover on the right hand side of the card are face down, as shown. 5. Replace the microSD cover. Remove the memory ...card from the memory card slot. Replace the microSD cover. Getting Started 8 Make sure that the gold contacts of the phone, as shown, then carefully slide the memory card into place. 3. Open the microSD cover on the card. Incorrect Correct 2. Carefully press the...
User Manual (user Manual) (ver.f9) (English)
Page 12
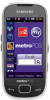
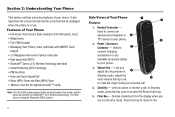
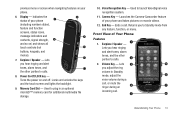
... in text entry mode. Deletes characters from the display when you place or receive a call . 4. The r860 does not support Bluetooth OBEX profiles. 9 Side Views of Your Phone • Full-screen Touch Screen [high-resolution (240 x400 pixels), color] • Widget menu • Full-HTML Browser • ... Dial • Music (MP3) Player and Video (MP4) Player • Memory Card slot (for optional microSD™ cards) Note: The SCH-r860 phone supports the wireless hands-free profile and the serial port profile for Bluetooth® v2.0 wireless technology. Section 2: Understanding Your...
... in text entry mode. Deletes characters from the display when you place or receive a call . 4. The r860 does not support Bluetooth OBEX profiles. 9 Side Views of Your Phone • Full-screen Touch Screen [high-resolution (240 x400 pixels), color] • Widget menu • Full-HTML Browser • ... Dial • Music (MP3) Player and Video (MP4) Player • Memory Card slot (for optional microSD™ cards) Note: The SCH-r860 phone supports the wireless hands-free profile and the serial port profile for Bluetooth® v2.0 wireless technology. Section 2: Understanding Your...
User Manual (user Manual) (ver.f9) (English)
Page 13
... and alert tones, alarm tones, and the other parties to calls. 8. Memory Card Slot - Launches the Camera-Camcorder feature of your phone (including numbers dialed, feature and function screens, status icons, message indicators and contents, signal strength, and so on) and shows all ...- Earpiece / Speaker - Lets you to calls. 2. previous menu or screen when navigating features on and off. Front View of your phone and takes pictures or records videos. 12. Returns you adjust the ring volume in an optional microSD™ memory card for additional multimedia file...
... and alert tones, alarm tones, and the other parties to calls. 8. Memory Card Slot - Launches the Camera-Camcorder feature of your phone (including numbers dialed, feature and function screens, status icons, message indicators and contents, signal strength, and so on) and shows all ...- Earpiece / Speaker - Lets you to calls. 2. previous menu or screen when navigating features on and off. Front View of your phone and takes pictures or records videos. 12. Returns you adjust the ring volume in an optional microSD™ memory card for additional multimedia file...
User Manual (user Manual) (ver.f9) (English)
Page 14
...controls (hot buttons, keypads, and menus). 4. Press this key to return to access the recent calls log. 5. Indicates the status of your phone. 6. Returns you take photos and videos in text entry mode. Camera Lens - Helps you to them. 11 7. Lets the other caller hear... you clearly when you are in low light conditions. 3. Ends a call . Launches the Camera-Camcorder feature of your phone and takes pictures or records videos. 9. Protects the battery. 4. Lets you are speaking to Standby mode from the display when you place or ...
...controls (hot buttons, keypads, and menus). 4. Press this key to return to access the recent calls log. 5. Indicates the status of your phone. 6. Returns you take photos and videos in text entry mode. Camera Lens - Helps you to them. 11 7. Lets the other caller hear... you clearly when you are in low light conditions. 3. Ends a call . Launches the Camera-Camcorder feature of your phone and takes pictures or records videos. 9. Protects the battery. 4. Lets you are speaking to Standby mode from the display when you place or ...
User Manual (user Manual) (ver.f9) (English)
Page 15
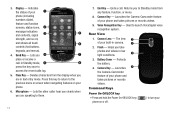
...in Standby mode to and from any menu. • If you can still answer incoming calls by pressing and holding this key. Note: With the phone locked, you enter an incorrect character, briefly press to backspace (and delete) the character. • To erase the entire sentence, press and hold the...Clear key ( ) is used to erase or clear numbers, text, or symbols from any menu, or to cancel the last input. • With the phone keys and touch screen locked, press and hold . • To return to the previous menu level, briefly press . Press again to switch back to ...
...in Standby mode to and from any menu. • If you can still answer incoming calls by pressing and holding this key. Note: With the phone locked, you enter an incorrect character, briefly press to backspace (and delete) the character. • To erase the entire sentence, press and hold the...Clear key ( ) is used to erase or clear numbers, text, or symbols from any menu, or to cancel the last input. • With the phone keys and touch screen locked, press and hold . • To return to the previous menu level, briefly press . Press again to switch back to ...
User Manual (user Manual) (ver.f9) (English)
Page 16
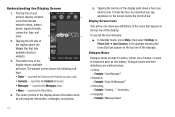
...as call progress information, messages, and photos. 5. To access the Icon Glossary: ᮣ In Standby mode, press Menu, then select Settings ➔ Phone Info ➔ Icon Glossary. Example: "Save Message?" • Reconfirm - "Connecting..." • Completed - Example: "Message Saved" 13 The sample ... the following soft keys: • Dialer - To hide the four-icon shortcut bar, tap anywhere on the top line of your 1 phone's display contains 5 icons that indicate network status, battery power, signal strength, connection type, and more. 2 4 2. Dialogue Boxes Dialogue ...
...as call progress information, messages, and photos. 5. To access the Icon Glossary: ᮣ In Standby mode, press Menu, then select Settings ➔ Phone Info ➔ Icon Glossary. Example: "Save Message?" • Reconfirm - "Connecting..." • Completed - Example: "Message Saved" 13 The sample ... the following soft keys: • Dialer - To hide the four-icon shortcut bar, tap anywhere on the top line of your 1 phone's display contains 5 icons that indicate network status, battery power, signal strength, connection type, and more. 2 4 2. Dialogue Boxes Dialogue ...
User Manual (user Manual) (ver.f9) (English)
Page 17
...key. (For more information, refer to conserve battery power, regardless of time set in Lock Mode, restrictions are : • 3X4Keypad (phone-style touch keypad) • QWERTY (full touch keypad - Backlight The backlight illuminates the display. Example: "Low Battery," "Memory Full!"...numbers, and symbols. Example: "New Message" • Error - Lock Mode also restricts access to "Changing the Text Entry Mode" on phone use. changes display to landscape mode) • Handwriting box (divided pallet) • Handwriting full screen (undivided pallet) (For more information,...
...key. (For more information, refer to conserve battery power, regardless of time set in Lock Mode, restrictions are : • 3X4Keypad (phone-style touch keypad) • QWERTY (full touch keypad - Backlight The backlight illuminates the display. Example: "Low Battery," "Memory Full!"...numbers, and symbols. Example: "New Message" • Error - Lock Mode also restricts access to "Changing the Text Entry Mode" on phone use. changes display to landscape mode) • Handwriting box (divided pallet) • Handwriting full screen (undivided pallet) (For more information,...

User Manual (user Manual) (ver.f9) (English)
Page 18
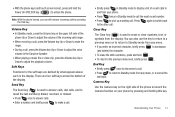
...Standby mode is the state of the phone. Talk Mode You can place and receive calls only when your phone is on. The phone goes into Standby mode: • After you power the phone on page 33.) Enter/Exit Silent ... Lock Mode: ᮣ In Standby mode, press on the top of the phone once it has found service and is in Standby mode, new incoming messages automatically appear in the screen as all... phone status icons. To exit Lock Mode: ᮣ While in Lock mode, press and hold...
...Standby mode is the state of the phone. Talk Mode You can place and receive calls only when your phone is on. The phone goes into Standby mode: • After you power the phone on page 33.) Enter/Exit Silent ... Lock Mode: ᮣ In Standby mode, press on the top of the phone once it has found service and is in Standby mode, new incoming messages automatically appear in the screen as all... phone status icons. To exit Lock Mode: ᮣ While in Lock mode, press and hold...

User Manual (user Manual) (ver.f9) (English)
Page 19
..., press the Volume key up or down until "Vibrate only" appears in Vibrate mode. The No Ring icon ( ) appears in the display when the phone is in the display. In Standby mode, press the Menu soft key, then select Music Player. Press . In Standby mode, press and hold the Camera... • 1 Beep • Low • Low/Medium • Medium • Medium/High • High Note: The Vibrate icon ( ) appears in the display when the phone is in the My Music folder on the right side of the display, then select ( ). - Vibrate Mode ᮣ In Standby mode, repeatedly press the Volume...
..., press the Volume key up or down until "Vibrate only" appears in Vibrate mode. The No Ring icon ( ) appears in the display when the phone is in the display. In Standby mode, press the Menu soft key, then select Music Player. Press . In Standby mode, press and hold the Camera... • 1 Beep • Low • Low/Medium • Medium • Medium/High • High Note: The Vibrate icon ( ) appears in the display when the phone is in the My Music folder on the right side of the display, then select ( ). - Vibrate Mode ᮣ In Standby mode, repeatedly press the Volume...
User Manual (user Manual) (ver.f9) (English)
Page 20
... lets you share a call with your videos. on page 97. or - Tap the thumbnail icon to "Video Player" on the right side of your phone's camera. During a call : 1. In Standby mode, press the Menu soft key, then select Multimedia ➔ Camcorder. - A list of the ... Entering Camcorder Mode: - For more information, refer to view the thumbnail images. 3. To enter Speakerphone Mode during a call , press LOCK key ( phone. ) at the top of thumbnail images appears in the display and begins playing the highlighted video. In Camcorder mode, select . • Exiting Camera ...
... lets you share a call with your videos. on page 97. or - Tap the thumbnail icon to "Video Player" on the right side of your phone's camera. During a call : 1. In Standby mode, press the Menu soft key, then select Multimedia ➔ Camcorder. - A list of the ... Entering Camcorder Mode: - For more information, refer to view the thumbnail images. 3. To enter Speakerphone Mode during a call , press LOCK key ( phone. ) at the top of thumbnail images appears in the display and begins playing the highlighted video. In Camcorder mode, select . • Exiting Camera ...

User Manual (user Manual) (ver.f9) (English)
Page 21
Understanding Your Phone 18 Caution!: Keep the phone away from you ear while in Speakerphone Mode. (For more information, refer to black and the other party cannot be heard through the speaker. The Speaker on icon changes color to "Responsible Listening" on page 155.) To exit Speaker Mode: ᮣ During a call using Speakerphone mode, press the Speaker on key ( ).
Understanding Your Phone 18 Caution!: Keep the phone away from you ear while in Speakerphone Mode. (For more information, refer to black and the other party cannot be heard through the speaker. The Speaker on icon changes color to "Responsible Listening" on page 155.) To exit Speaker Mode: ᮣ During a call using Speakerphone mode, press the Speaker on key ( ).


