
User Manual
Page 1
SCH-R820 MOBILE PHONE User Manual Please read this manual before operating your phone and keep it for future reference. GH68_3XXXXA Printed in KoreaXX
SCH-R820 MOBILE PHONE User Manual Please read this manual before operating your phone and keep it for future reference. GH68_3XXXXA Printed in KoreaXX

User Manual
Page 2
... the rights secured by or which is otherwise the property of the Intellectual Property shall remain with SAMSUNG and its respective suppliers relating to the SAMSUNG Phone, including but is transferred to you will not (and will not attempt to) modify, prepare ...Samsung and protected under the open source licenses. THE DESIGN, CONDITION OR QUALITY OF THE PRODUCT; To obtain the source code covered under federal laws, state laws, and international treaty provisions. OR COMPLIANCE OF THE PRODUCT WITH THE REQUIREMENTS OF ANY LAW, RULE, SPECIFICATION OR CONTRACT PERTAINING SCH...
... the rights secured by or which is otherwise the property of the Intellectual Property shall remain with SAMSUNG and its respective suppliers relating to the SAMSUNG Phone, including but is transferred to you will not (and will not attempt to) modify, prepare ...Samsung and protected under the open source licenses. THE DESIGN, CONDITION OR QUALITY OF THE PRODUCT; To obtain the source code covered under federal laws, state laws, and international treaty provisions. OR COMPLIANCE OF THE PRODUCT WITH THE REQUIREMENTS OF ANY LAW, RULE, SPECIFICATION OR CONTRACT PERTAINING SCH...

User Manual
Page 4
... under license. Go to vod.divx.com for more information on how to complete your registration. To obtain your files into DivX videos. Samsung is designed with this phone, refers to convert your registration code, locate the DivX VOD section in Japan and other marks are wholly owned by DivX, LLC, a subsidiary...
... under license. Go to vod.divx.com for more information on how to complete your registration. To obtain your files into DivX videos. Samsung is designed with this phone, refers to convert your registration code, locate the DivX VOD section in Japan and other marks are wholly owned by DivX, LLC, a subsidiary...

User Manual
Page 7
Table of Contents Section 1: Getting Started 5 Understanding this User Manual 5 Setting Up Your Phone 6 TTY Mode 11 Turning Your Phone On 11 Voicemail 12 Your Google™ Account 13 Roaming 13 Securing Your Phone 14 System Tutorial 14 Turning Your Phone Off 14 Removing the Battery 15 Removing the SIM Card 15 Memory Card 15... 41 Section 4: Entering Text 42 Screen QWERTY Keyboards 42 Screen Keyboard Types 43 Changing the Keyboard Type 43 Using the Swype Keyboard 43 Using the Samsung Keypad 46 1
Table of Contents Section 1: Getting Started 5 Understanding this User Manual 5 Setting Up Your Phone 6 TTY Mode 11 Turning Your Phone On 11 Voicemail 12 Your Google™ Account 13 Roaming 13 Securing Your Phone 14 System Tutorial 14 Turning Your Phone Off 14 Removing the Battery 15 Removing the SIM Card 15 Memory Card 15... 41 Section 4: Entering Text 42 Screen QWERTY Keyboards 42 Screen Keyboard Types 43 Changing the Keyboard Type 43 Using the Swype Keyboard 43 Using the Samsung Keypad 46 1

User Manual
Page 10
... 143 Search 143 Locale and text 144 Voice input and output 147 Accessibility 148 Accessory 149 Date and time 149 About phone 150 Section 13: Health and Safety Information 151 Exposure to Radio Frequency (RF) Signals . . . 151 Specific Absorption Rate (SAR) Certification Information... 156 FCC Part 15 Information to User 157 4 Commercial Mobile Alerting System (CMAS) .158 Smart Practices While Driving 158 Battery Use and Safety 159 Samsung Mobile Products and Recycling . . . .161 UL Certified Travel Charger 162 Display / Touch-Screen 163 GPS & AGPS 163 Emergency Calls 164 Care ...
... 143 Search 143 Locale and text 144 Voice input and output 147 Accessibility 148 Accessory 149 Date and time 149 About phone 150 Section 13: Health and Safety Information 151 Exposure to Radio Frequency (RF) Signals . . . 151 Specific Absorption Rate (SAR) Certification Information... 156 FCC Part 15 Information to User 157 4 Commercial Mobile Alerting System (CMAS) .158 Smart Practices While Driving 158 Battery Use and Safety 159 Samsung Mobile Products and Recycling . . . .161 UL Certified Travel Charger 162 Display / Touch-Screen 163 GPS & AGPS 163 Emergency Calls 164 Care ...

User Manual
Page 11
...guide, beginning on your voicemail account. Also included is near the back of your phone. Section 1: Getting Started This section allows you should know before using your Samsung SCH-R820 phone by installing the SIM and microSD cards, installing and charging the battery, activating your ...service, and setting up your phone, and any changes to use your phone. Unless stated otherwise, instructions in longer, or ...
...guide, beginning on your voicemail account. Also included is near the back of your phone. Section 1: Getting Started This section allows you should know before using your Samsung SCH-R820 phone by installing the SIM and microSD cards, installing and charging the battery, activating your ...service, and setting up your phone, and any changes to use your phone. Unless stated otherwise, instructions in longer, or ...

User Manual
Page 12
... card. Important! Important! The plug-in SIM card information and its contacts can be easily damaged by scratching or bending, so be installed for your phone to a 4G LTE cellular network, you are provided with a plug-in SIM card loaded with your...
... card. Important! Important! The plug-in SIM card information and its contacts can be easily damaged by scratching or bending, so be installed for your phone to a 4G LTE cellular network, you are provided with a plug-in SIM card loaded with your...

User Manual
Page 13
The SIM card provided with your phone is not inserted correctly, the phone cannot make an LTE connection with it clicks into place. Note: If the SIM card is matched with the network. Incorrect Installing the Memory Card ... not function if transferred to any other device. Incorrect Getting Started 7 Important! Ⅲ Make sure the gold contacts of the SIM card face into the phone, then carefully slide the SIM card into the SIM card socket (as shown), pushing gently until the card locks into place.
The SIM card provided with your phone is not inserted correctly, the phone cannot make an LTE connection with it clicks into place. Note: If the SIM card is matched with the network. Incorrect Installing the Memory Card ... not function if transferred to any other device. Incorrect Getting Started 7 Important! Ⅲ Make sure the gold contacts of the SIM card face into the phone, then carefully slide the SIM card into the SIM card socket (as shown), pushing gently until the card locks into place.

User Manual
Page 14
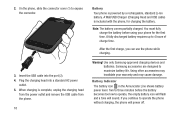
Remove the battery cover. (For more information, see "Removing the battery cover".) 2. Installing the battery cover Ⅲ Align the cover (1) and press it firmly into place (2), making sure it snaps into place. Push down on the bottom of the battery (2) until it snaps into the phone (1), aligning the gold contacts on the battery with the gold contacts in the phone. Insert the battery into place at the corners. 8 Installing the Battery 1.
Remove the battery cover. (For more information, see "Removing the battery cover".) 2. Installing the battery cover Ⅲ Align the cover (1) and press it firmly into place (2), making sure it snaps into place. Push down on the bottom of the battery (2) until it snaps into the phone (1), aligning the gold contacts on the battery with the gold contacts in the phone. Insert the battery into place at the corners. 8 Installing the Battery 1.

User Manual
Page 15
Connect the USB cable to 4 hours of charge time. You must fully charge the battery before using your phone from any 120/ 220 VAC outlet. A fully discharged battery requires up to the charging head. Note: The battery comes partially charged. Getting Started 9 Charging the Battery Your phone comes with a Wall/USB Charger (Charging Head and USB cable) to rapidly charge your phone for the first time. After the first charge, you can use the phone while charging. 1.
Connect the USB cable to 4 hours of charge time. You must fully charge the battery before using your phone from any 120/ 220 VAC outlet. A fully discharged battery requires up to the charging head. Note: The battery comes partially charged. Getting Started 9 Charging the Battery Your phone comes with a Wall/USB Charger (Charging Head and USB cable) to rapidly charge your phone for the first time. After the first charge, you can use the phone while charging. 1.
User Manual
Page 16
... partially charged. You must fully charge the battery before the battery becomes too low to maximize battery life. Use only Samsung-approved charging devices and batteries. On the phone, slide the connector cover (1) to 4 hours of charge time. A fully discharged battery requires up to expose the ... power outlet and remove the USB cable from the phone. 10 Battery Your phone is included with the phone, for the first time. Plug the charging head into the port (2). 4. If you can use the phone while charging. Samsung accessories are designed to operate, the empty battery icon...
... partially charged. You must fully charge the battery before the battery becomes too low to maximize battery life. Use only Samsung-approved charging devices and batteries. On the phone, slide the connector cover (1) to 4 hours of charge time. A fully discharged battery requires up to expose the ... power outlet and remove the USB cable from the phone. 10 Battery Your phone is included with the phone, for the first time. Plug the charging head into the port (2). 4. If you can use the phone while charging. Samsung accessories are designed to operate, the empty battery icon...

User Manual
Page 17
...Notification alerts. Power/Lock key for three While powering on page 128. TTY Mode Your phone is located along the bottom back of the phone. Turning Your Phone On Ⅲ Press and hold the seconds. Note: Your phone's internal antenna is fully TTY-compatible, allowing you 'll need to enable TTY Mode.... doing so may affect call quality or cause the phone to "TTY mode" on , the phone connects with a TTY device, you to connect a TTY device to the phone's headset jack. Do not block the antenna; Getting Started 11 For more information, refer to operate...
...Notification alerts. Power/Lock key for three While powering on page 128. TTY Mode Your phone is located along the bottom back of the phone. Turning Your Phone On Ⅲ Press and hold the seconds. Note: Your phone's internal antenna is fully TTY-compatible, allowing you 'll need to enable TTY Mode.... doing so may affect call quality or cause the phone to "TTY mode" on , the phone connects with a TTY device, you to connect a TTY device to the phone's headset jack. Do not block the antenna; Getting Started 11 For more information, refer to operate...

User Manual
Page 18
... 3. Swipe across the screen. Touch Home ➔ Phone. 2. Displaying Your Phone Number Ⅲ Touch Home ➔ Menu ➔ Settings ➔ About phone ➔ Status. Voicemail All unanswered calls to your phone are sent to voicemail, even if your phone is turned off, so you'll want to set ...record a greeting. Follow the automated instructions to set up your voicemail and personal greeting as soon as you activate your phone number from any touch-tone phone. The Home screen appears. If needed, Press the Power/Lock key on the upper right side to manage voicemail....
... 3. Swipe across the screen. Touch Home ➔ Phone. 2. Displaying Your Phone Number Ⅲ Touch Home ➔ Menu ➔ Settings ➔ About phone ➔ Status. Voicemail All unanswered calls to your phone are sent to voicemail, even if your phone is turned off, so you'll want to set ...record a greeting. Follow the automated instructions to set up your voicemail and personal greeting as soon as you activate your phone number from any touch-tone phone. The Home screen appears. If needed, Press the Power/Lock key on the upper right side to manage voicemail....

User Manual
Page 19
Your Google™ Account Your new phone uses your computer, use an Internet browser to navigate to http://google.com/accounts. 2. From your Google account to acquire service on other compatible digital ... applications. Tap Next to sign in if you already have a Google account. Follow the on your phone can set up a connection with your phone for more information, refer to reset it: 1. Roaming When you should set your phone's roaming behavior. (For more information about your Google Account Password A Google account password is active...
Your Google™ Account Your new phone uses your computer, use an Internet browser to navigate to http://google.com/accounts. 2. From your Google account to acquire service on other compatible digital ... applications. Tap Next to sign in if you already have a Google account. Follow the on your phone can set up a connection with your phone for more information, refer to reset it: 1. Roaming When you should set your phone's roaming behavior. (For more information about your Google Account Password A Google account password is active...
User Manual
Page 20
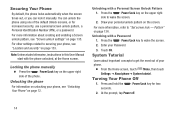
... in this User Manual start with a Personal Screen Unlock Pattern 1. System Tutorial Learn about creating and enabling a Screen unlock pattern, see "Unlocking Your Phone" on page 133. Press the Power/Lock key on the screen. You can lock it manually. Touch OK. Securing Your... Phone By default, the phone locks automatically when the screen times out, or you can unlock the phone using one of the default Unlock screens, or for two 2. Draw your Password. 3. Unlocking with a Password...
... in this User Manual start with a Personal Screen Unlock Pattern 1. System Tutorial Learn about creating and enabling a Screen unlock pattern, see "Unlocking Your Phone" on page 133. Press the Power/Lock key on the screen. You can lock it manually. Touch OK. Securing Your... Phone By default, the phone locks automatically when the screen times out, or you can unlock the phone using one of the default Unlock screens, or for two 2. Draw your Password. 3. Unlocking with a Password...

User Manual
Page 21
... Removing the SIM Card Ⅲ To remove the SIM card, slide it away from a CD or purchased using the phone) on a memory card. Memory Card Your phone includes a removable microSD™ memory card, for storage of music, pictures, and other files, and supports optional microSD™...; or microSDHC™ memory cards of the phone (2). Remove the battery cover. (For more information, refer to 32GB capacity. (For information...
... Removing the SIM Card Ⅲ To remove the SIM card, slide it away from a CD or purchased using the phone) on a memory card. Memory Card Your phone includes a removable microSD™ memory card, for storage of music, pictures, and other files, and supports optional microSD™...; or microSDHC™ memory cards of the phone (2). Remove the battery cover. (For more information, refer to 32GB capacity. (For information...

User Manual
Page 22
..., refer to "Installing the battery cover" on page 6.) 3. Removing a Memory Card Important! From the Home screen, touch Menu, then touch Settings ➔ SD card and phone storage ➔ Unmount SD card. 2. Gently press on the memory card, unmount the card before removing it pops out from the...
..., refer to "Installing the battery cover" on page 6.) 3. Removing a Memory Card Important! From the Home screen, touch Menu, then touch Settings ➔ SD card and phone storage ➔ Unmount SD card. 2. Gently press on the memory card, unmount the card before removing it pops out from the...

User Manual
Page 23
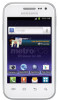
... Wi-Fi 802.11 b/g/n - Mobile Instant Messenger (IM) - Bluetooth 3.0 (For more information, refer to 32 GB capacity) (A microSD Memory Card is included with your phone, including keys, displays, and icons. Email - Features • 3.65-inch (486x320 pixel) HVGA full-screen touch screen • High Speed Data [EVDO 1x - Wireless Modem ...
... Wi-Fi 802.11 b/g/n - Mobile Instant Messenger (IM) - Bluetooth 3.0 (For more information, refer to 32 GB capacity) (A microSD Memory Card is included with your phone, including keys, displays, and icons. Email - Features • 3.65-inch (486x320 pixel) HVGA full-screen touch screen • High Speed Data [EVDO 1x - Wireless Modem ...

User Manual
Page 24
... to display the Home screen. Search Key: Touch to launch Search, to search your voice to other parties in a call , Proximity sensor detects that the phone is set to Automatic brightness. (For more information, refer to save battery power. 8. Camera Lens: Take photos or record videos. Home Key: Touch to launch...
... to display the Home screen. Search Key: Touch to launch Search, to search your voice to other parties in a call , Proximity sensor detects that the phone is set to Automatic brightness. (For more information, refer to save battery power. 8. Camera Lens: Take photos or record videos. Home Key: Touch to launch...

User Manual
Page 25
USB Power/Accessory Port: Plug in headphones. 2. With the phone on or off. During calls or music playback, press to power your phone and blank or waken the display. 3 Understanding Your Phone 19 Power/Lock Key: Press and hold to adjust volume. Press to plug in a USB cable for charging or to lock your phone on , press to sync music and files. 4. Side Views 1 2 1. 3.5mm Headset Jack: allows you to mute the ringtone of an incoming call. 4 3. Volume Key: From a Home screen, press to adjust Master Volume.
USB Power/Accessory Port: Plug in headphones. 2. With the phone on or off. During calls or music playback, press to power your phone and blank or waken the display. 3 Understanding Your Phone 19 Power/Lock Key: Press and hold to adjust volume. Press to plug in a USB cable for charging or to lock your phone on , press to sync music and files. 4. Side Views 1 2 1. 3.5mm Headset Jack: allows you to mute the ringtone of an incoming call. 4 3. Volume Key: From a Home screen, press to adjust Master Volume.


