
User Manual (ENGLISH)
Page 1
Samsung Messager™ (SCH-r450 Series) PORTABLE TRI-BAND MOBILE PHONE User Manual Please read this manual before operating your phone, and keep it for future reference.
Samsung Messager™ (SCH-r450 Series) PORTABLE TRI-BAND MOBILE PHONE User Manual Please read this manual before operating your phone, and keep it for future reference.

User Manual (ENGLISH)
Page 2
...All applicable rights of authorship. and its suppliers. Moreover, you agree that you have questions about your Samsung Mobile Phone? No title to or ownership in the Intellectual Property is not limited to you. For 24 hour ...R450.04_BF13_CB_061708_F1 You may not infringe or otherwise violate the rights secured by or which is proprietary to create source code from the software. Lookout Drive 1000 Klein St. Intellectual Property includes, but not limited to, accessories, parts, or software relating there to (the "Phone System"), is otherwise the property of Samsung...
...All applicable rights of authorship. and its suppliers. Moreover, you agree that you have questions about your Samsung Mobile Phone? No title to or ownership in the Intellectual Property is not limited to you. For 24 hour ...R450.04_BF13_CB_061708_F1 You may not infringe or otherwise violate the rights secured by or which is proprietary to create source code from the software. Lookout Drive 1000 Klein St. Intellectual Property includes, but not limited to, accessories, parts, or software relating there to (the "Phone System"), is otherwise the property of Samsung...

User Manual (ENGLISH)
Page 4
... Shortcuts 31 Navigate Using a Shortcut 32 1 Section 5: Entering Text 33 Built-in QWERTY Keypad 33 Changing the Text Entry Mode 33 Using T9® Mode (Phone Keypad Only 34 Using Abc Mode 35 Entering Numbers 35 Entering Symbols 36 Section 6: Understanding Your Contacts 37 Contacts 37 Finding a Contacts Entry 38 Adding... 43 Speed Dial 45 Contacts Groups 46 Deleting a Contacts Entry 49 Metro411 49 Memory Info 49 Section 7: @metro 50 Accessing @metro (Mobile Shop 50 Section 8: Messaging 53 Types of Messages 53 Create and Send Text...
... Shortcuts 31 Navigate Using a Shortcut 32 1 Section 5: Entering Text 33 Built-in QWERTY Keypad 33 Changing the Text Entry Mode 33 Using T9® Mode (Phone Keypad Only 34 Using Abc Mode 35 Entering Numbers 35 Entering Symbols 36 Section 6: Understanding Your Contacts 37 Contacts 37 Finding a Contacts Entry 38 Adding... 43 Speed Dial 45 Contacts Groups 46 Deleting a Contacts Entry 49 Metro411 49 Memory Info 49 Section 7: @metro 50 Accessing @metro (Mobile Shop 50 Section 8: Messaging 53 Types of Messages 53 Create and Send Text...

User Manual (ENGLISH)
Page 5
... Camera Mode 54 Send Picture Messages in Standby Mode 56 Receive Picture Messages 58 Message Boxes 59 Erase Messages 64 Message Settings 65 Section 9: MetroWEB 68 MetroWEB 68 Launching MetroWEB 68 Using MetroWEB 68 Using Links 69 How MetroWEB Keys... and Safety Information 118 Health and Safety Information 118 Samsung Mobile Products and Recycling 119 UL Certified Travel Adapter 119 Consumer Information on Wireless Phones 120 Road Safety 125 Responsible Listening 127 Operating Environment 128 Using Your Phone Near Other Electronic Devices 129 FCC Hearing-Aid Compatibility ...
... Camera Mode 54 Send Picture Messages in Standby Mode 56 Receive Picture Messages 58 Message Boxes 59 Erase Messages 64 Message Settings 65 Section 9: MetroWEB 68 MetroWEB 68 Launching MetroWEB 68 Using MetroWEB 68 Using Links 69 How MetroWEB Keys... and Safety Information 118 Health and Safety Information 118 Samsung Mobile Products and Recycling 119 UL Certified Travel Adapter 119 Consumer Information on Wireless Phones 120 Road Safety 125 Responsible Listening 127 Operating Environment 128 Using Your Phone Near Other Electronic Devices 129 FCC Hearing-Aid Compatibility ...
User Manual (ENGLISH)
Page 7
..., press the OK key OK to define terms, and more. Important!: You must fully charge the battery the first time you use your phone. The definitions for quick reference to most features begins on page 118. A robust index for these methods are intended to point out important ... quick methods for performing functions related to the subject at hand. • Important: Points out important information about how to use your phone, otherwise you should know before using your SCH-r450 phone by activating your service, setting up your Voicemail, or getting an understanding of "select" in your...
..., press the OK key OK to define terms, and more. Important!: You must fully charge the battery the first time you use your phone. The definitions for quick reference to most features begins on page 118. A robust index for these methods are intended to point out important ... quick methods for performing functions related to the subject at hand. • Important: Points out important information about how to use your phone, otherwise you should know before using your SCH-r450 phone by activating your service, setting up your Voicemail, or getting an understanding of "select" in your...

User Manual (ENGLISH)
Page 8
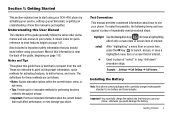
...of the battery down and 4 inward on the bottom of the battery to turn off the phone (if on the phone. 2. Press lightly down into the phone until it slips into place. Samsung accessories are designed to maximize battery life. 1. Press lightly on the battery cover release latch ...(1) and lift the cover (2) up and away from the phone. 3. Remove the Battery 1. Use of the battery cover, down on...
...of the battery down and 4 inward on the bottom of the battery to turn off the phone (if on the phone. 2. Press lightly down into the phone until it slips into place. Samsung accessories are designed to maximize battery life. 1. Press lightly on the battery cover release latch ...(1) and lift the cover (2) up and away from the phone. 3. Remove the Battery 1. Use of the battery cover, down on...
User Manual (ENGLISH)
Page 9
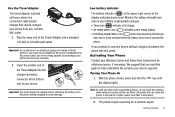
Use the Travel Adapter The travel adapter included with any 120/220 VAC outlet. 1. Activating Your Phone Contact your phone from the phone during charging to operate the phone. Use of your warranty. 2. Insert the smaller end of the Travel Adapter into a standard 120 VAC or 220 VAC ...the large end of the Travel Adapter into the charger/accessory connector at a higher power level than is necessary. 2. The phone begins searching for obtaining service, if necessary. We suggest that rapidly charges your Wireless Carrier and follow their instructions for a network signal.
Use the Travel Adapter The travel adapter included with any 120/220 VAC outlet. 1. Activating Your Phone Contact your phone from the phone during charging to operate the phone. Use of your warranty. 2. Insert the smaller end of the Travel Adapter into a standard 120 VAC or 220 VAC ...the large end of the Travel Adapter into the charger/accessory connector at a higher power level than is necessary. 2. The phone begins searching for obtaining service, if necessary. We suggest that rapidly charges your Wireless Carrier and follow their instructions for a network signal.
User Manual (ENGLISH)
Page 10
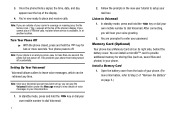
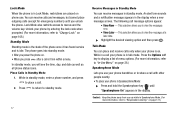
Note: If you are prompted to enter your password. Listen to leave voice messages, which can be retrieved any time. Memory Card (Optional) Your phone has a Memory Card slot on page 5.) Note: Once your Voicemail box. 1. Follow the prompts in your Voicemail account has been set up, you ... press and hold the key for storing files (such as, sound files and photos) in your phone. (For more seconds. You can use the Voicemail folder (under the Message menu) to view details of voice messages in the new user tutorial to Step 2 of "Remove the Battery" on its right side, behind...
Note: If you are prompted to enter your password. Listen to leave voice messages, which can be retrieved any time. Memory Card (Optional) Your phone has a Memory Card slot on page 5.) Note: Once your Voicemail box. 1. Follow the prompts in your Voicemail account has been set up, you ... press and hold the key for storing files (such as, sound files and photos) in your phone. (For more seconds. You can use the Voicemail folder (under the Message menu) to view details of voice messages in the new user tutorial to Step 2 of "Remove the Battery" on its right side, behind...

User Manual (ENGLISH)
Page 11
... memory card slot. 4. Press the memory card into place. 4. If desired, install another memory card. (For more information, refer to Step 2 of your phone. (For more information, refer to "Install a Memory Card" on page 5.) Getting Started 8 Replace the battery cover. label side facing up and smaller end... pointing toward the phone - Remove the memory card from the back of "Remove the Battery" on page 7.) 5. Press the memory card into the slot until the card ...
... memory card slot. 4. Press the memory card into place. 4. If desired, install another memory card. (For more information, refer to Step 2 of your phone. (For more information, refer to "Install a Memory Card" on page 5.) Getting Started 8 Replace the battery cover. label side facing up and smaller end... pointing toward the phone - Remove the memory card from the back of "Remove the Battery" on page 7.) 5. Press the memory card into the slot until the card ...
User Manual (ENGLISH)
Page 12
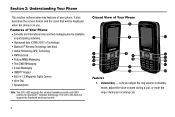
... • PIM Functions • Picture (MMS) Messaging • Text (SMS) Messaging • E-mail Messaging • QWERTY Keypad • Built-in 1.3 Megapixel Digital Camera • Voice Dial • Speakerphone Note: The SCH-r450 supports the wireless handsfree profile and OBEX profiles for Bluetooth® wireless technology. Closed View of Your Phone Features 1. Volume Key - It also describes...
... • PIM Functions • Picture (MMS) Messaging • Text (SMS) Messaging • E-mail Messaging • QWERTY Keypad • Built-in 1.3 Megapixel Digital Camera • Voice Dial • Speakerphone Note: The SCH-r450 supports the wireless handsfree profile and OBEX profiles for Bluetooth® wireless technology. Closed View of Your Phone Features 1. Volume Key - It also describes...

User Manual (ENGLISH)
Page 13
... menus and applications and to calls. 7. Left Soft Key - Speakerphone Key - Use these keys to review your phone, including numbers dialed, feature and function screens, status icons, message indicators, signal strength, and so on your phone. 14. Lets you are in a menu. 9. Navigation Key - Special Function Keys - If you enable/disable speakerphone mode...
... menus and applications and to calls. 7. Left Soft Key - Speakerphone Key - Use these keys to review your phone, including numbers dialed, feature and function screens, status icons, message indicators, signal strength, and so on your phone. 14. Lets you are in a menu. 9. Navigation Key - Special Function Keys - If you enable/disable speakerphone mode...

User Manual (ENGLISH)
Page 14
... the other parties to select the choice indicated at the bottom left corner of Your Phone Features 1. Indicates the status of your phone, including numbers dialed, feature and function screens, status icons, message indicators, signal strength, and so on. 3. Camera / Music Player Key - Launches...the Camera or the Music Player feature of your phone. 18. In standby mode, pressing and holding this key launches VoiceSignal options. soft1 Key - Lets you scroll through menus and applications and to calls. 2. shift Key - Messaging Key - Fn Key - In Standby mode, ...
... the other parties to select the choice indicated at the bottom left corner of Your Phone Features 1. Indicates the status of your phone, including numbers dialed, feature and function screens, status icons, message indicators, signal strength, and so on. 3. Camera / Music Player Key - Launches...the Camera or the Music Player feature of your phone. 18. In standby mode, pressing and holding this key launches VoiceSignal options. soft1 Key - Lets you scroll through menus and applications and to calls. 2. shift Key - Messaging Key - Fn Key - In Standby mode, ...

User Manual (ENGLISH)
Page 15
... Back / Clear Key - In standby mode, press the key once to "TTY Mode" on your phone. (For more information, refer to access the recent call . Speaker Grill - Understanding Your Phone 12 In standby mode, launces the Main Menu. When navigating through menus and applications and to the previous... or screen when navigating features on page 106.) 2. Press this key to return to select the choice indicated at the bottom right corner of Your Phone 1. SEND Key - Ends a call log. 14. soft2 Key - END Key - Headset Connector - Used to navigate through a menu accepts the ...
... Back / Clear Key - In standby mode, press the key once to "TTY Mode" on your phone. (For more information, refer to access the recent call . Speaker Grill - Understanding Your Phone 12 In standby mode, launces the Main Menu. When navigating through menus and applications and to the previous... or screen when navigating features on page 106.) 2. Press this key to return to select the choice indicated at the bottom right corner of Your Phone 1. SEND Key - Ends a call log. 14. soft2 Key - END Key - Headset Connector - Used to navigate through a menu accepts the ...

User Manual (ENGLISH)
Page 16
... menu appears. • When the Right soft key function is Edit, press the Edit key ( OK or ) to take a photo or to create a Picture message. • When the OK key function is Back, press the Back (right) soft key ( or ) to edit a Contact. Lets you position the Camera Lens... to edit a Draft message. 13 Left Soft Key Some functions of your built-in camera. 4. Lets you access your phone. 6. Volume Key - Lets you adjust the ring volume in the display. Camera Lens - Lets you remove the ...
... menu appears. • When the Right soft key function is Edit, press the Edit key ( OK or ) to take a photo or to create a Picture message. • When the OK key function is Back, press the Back (right) soft key ( or ) to edit a Contact. Lets you position the Camera Lens... to edit a Draft message. 13 Left Soft Key Some functions of your built-in camera. 4. Lets you access your phone. 6. Volume Key - Lets you adjust the ring volume in the display. Camera Lens - Lets you remove the ...
User Manual (ENGLISH)
Page 17
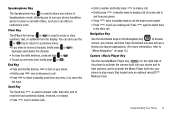
...sub-menus, and lists. Press again to switch back to the other call . Speakerphone Key The Speakerphone key ( ) is used to place your phone in Speakerphone mode, allowing you enter an incorrect character, briefly press or to backspace (and delete) the character. • To erase the entire sentence..., press and hold the End key to turn on your phone. • Briefly press once to disconnect a call with others, such as a shortcut to launch applications. (For more information, refer to "Menu ...
...sub-menus, and lists. Press again to switch back to the other call . Speakerphone Key The Speakerphone key ( ) is used to place your phone in Speakerphone mode, allowing you enter an incorrect character, briefly press or to backspace (and delete) the character. • To erase the entire sentence..., press and hold the End key to turn on your phone. • Briefly press once to disconnect a call with others, such as a shortcut to launch applications. (For more information, refer to "Menu ...

User Manual (ENGLISH)
Page 18
...Dialogue Boxes Dialogue boxes prompt for Icon Glossary. The center portion of situations such as shown here). 3 Display Screen Icons Your SCH-r450 phone can appear on the top line of the display. The sample screen shows that indicate network status, battery power, signal strength, ...you definitions of the icons that can show you of status, or warn of the 3 display shows information such as call progress information, messages, and photos. 3. Understanding the Display Screen 1. Dialogue boxes and their definitions are outlined below. A list appears showing all of the ...
...Dialogue Boxes Dialogue boxes prompt for Icon Glossary. The center portion of situations such as shown here). 3 Display Screen Icons Your SCH-r450 phone can appear on the top line of the display. The sample screen shows that indicate network status, battery power, signal strength, ...you definitions of the icons that can show you of status, or warn of the 3 display shows information such as call progress information, messages, and photos. 3. Understanding the Display Screen 1. Dialogue boxes and their definitions are outlined below. A list appears showing all of the ...

User Manual (ENGLISH)
Page 19
... the key or key, by pressing only the key, or by pressing and holding the key until the phone beeps, for each cycle. "Connecting..." • Completed • Example: "Message Saved" • Information • Example: "New Message" • Error • Example: "System Error!" • Warning • Example: "Low Battery," "Memory Full!" For more information...
... the key or key, by pressing only the key, or by pressing and holding the key until the phone beeps, for each cycle. "Connecting..." • Completed • Example: "Message Saved" • Information • Example: "New Message" • Error • Example: "System Error!" • Warning • Example: "Low Battery," "Memory Full!" For more information...
User Manual (ENGLISH)
Page 20
...until "Speakerphone On" appears in standby mode. In standby mode, you unlock the phone. Press to return to standby mode. 17 Receive Messages in Standby Mode You can place and receive calls only when your phone in Speakerphone Mode: ᮣ Press and hold the Speakerphone key ( ) until...the desired viewing option and then press . Caution!: Keep the phone away from within a menu. An alert tone sounds and a notification message appears in Lock Mode, restrictions are placed on phone use your phone is in standby mode, enter a phone number, and press to menus and the volume key. Lock ...
...until "Speakerphone On" appears in standby mode. In standby mode, you unlock the phone. Press to return to standby mode. 17 Receive Messages in Standby Mode You can place and receive calls only when your phone in Speakerphone Mode: ᮣ Press and hold the Speakerphone key ( ) until...the desired viewing option and then press . Caution!: Keep the phone away from within a menu. An alert tone sounds and a notification message appears in Lock Mode, restrictions are placed on phone use your phone is in standby mode, enter a phone number, and press to menus and the volume key. Lock ...

User Manual (ENGLISH)
Page 21
... Ringer Off • Vibrate • Low • Low/Medium • Medium • Medium/High • High • Vibrate/High 2. Note: Your phone automatically enters Speakerphone Mode when you press a key. • To enter Silent Mode: ᮣ In standby mode, press and hold . "Entering Silent Mode" ...briefly appears in the display. Adjust the Ringer 1. Options are satisfied with the setting, press OK or . Your phone returns to standby mode. • To exit Silent Mode: ᮣ While in Silent mode and standby mode, press and hold until Vibrate...
... Ringer Off • Vibrate • Low • Low/Medium • Medium • Medium/High • High • Vibrate/High 2. Note: Your phone automatically enters Speakerphone Mode when you press a key. • To enter Silent Mode: ᮣ In standby mode, press and hold . "Entering Silent Mode" ...briefly appears in the display. Adjust the Ringer 1. Options are satisfied with the setting, press OK or . Your phone returns to standby mode. • To exit Silent Mode: ᮣ While in Silent mode and standby mode, press and hold until Vibrate...

User Manual (ENGLISH)
Page 22
Music Player Mode Music Player mode lets you activate you can also adjust the resolution and appearance of your phone's camera to play music files loaded onto an optional microSD™ Memory Card. In standby mode, press and hold the Camera key ( ) - Note: For ...; Entering Music Player Mode - Press the key. on the right side of the phone. • Exiting Music Player Mode - Press the key. 19 In Camera mode, you phone's Music Player to take pictures. on the right side of the phone. • Exiting Camera Mode - Note: For more information, refer to "Using Your...
Music Player Mode Music Player mode lets you activate you can also adjust the resolution and appearance of your phone's camera to play music files loaded onto an optional microSD™ Memory Card. In standby mode, press and hold the Camera key ( ) - Note: For ...; Entering Music Player Mode - Press the key. on the right side of the phone. • Exiting Music Player Mode - Press the key. 19 In Camera mode, you phone's Music Player to take pictures. on the right side of the phone. • Exiting Camera Mode - Note: For more information, refer to "Using Your...


