
User Manual (user Manual) (English, Twi)
Page 3
... Quick menu 56 SHUTTER SPEED & EXPOSURE 57 SLOW SHUTTER(Low Shutter Speed 58 EASY Mode (for Beginners 59 AF/MF (Auto Focus/Manual Focus 60 Auto Focusing 60 Manual Focusing 60 BLC (Back Light Compensation 61 Fade In and Out 62 To Start Recording 62 To Stop Recording (use FADE IN / FADE... PIX 67 ...36 ...3 ENGLISH Contents Controlling Sound from the Speaker 35 Advanced Recording 36 Use of various Functions 36 Setting menu items 36 Set the camcorder to CAMERA or PLAYER mode and M.REC or M.PLAY mode 37 Availability of functions in each mode 38 CLOCK SET 39 WL.
... Quick menu 56 SHUTTER SPEED & EXPOSURE 57 SLOW SHUTTER(Low Shutter Speed 58 EASY Mode (for Beginners 59 AF/MF (Auto Focus/Manual Focus 60 Auto Focusing 60 Manual Focusing 60 BLC (Back Light Compensation 61 Fade In and Out 62 To Start Recording 62 To Stop Recording (use FADE IN / FADE... PIX 67 ...36 ...3 ENGLISH Contents Controlling Sound from the Speaker 35 Advanced Recording 36 Use of various Functions 36 Setting menu items 36 Set the camcorder to CAMERA or PLAYER mode and M.REC or M.PLAY mode 37 Availability of functions in each mode 38 CLOCK SET 39 WL.
User Manual (user Manual) (English, Twi)
Page 18
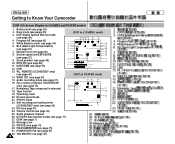
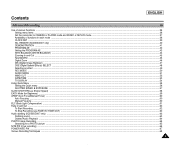
Program AE (see page 60) 5 7 8. Manual focus (see page 42) 1 5. Zoom position (see page 47) 24. WL. Remaining Tape (measured in CAMERA and PLAYER modes) 1. PHOTO mode 30 22. DIS (see ... 48) 4. Message Line 29. DSE (Digital Special Effects) mode (see page 7) 28. REMOTE (SCD305/D307 only) (see page 67) 32. ENGLISH Getting to Know Your Camcorder OSD (On Screen Display in minutes) 29 18. POWER NITE PIX (see page 40) 14. DATE/TIME (see page 74) 30. PB DSE (see page...
Program AE (see page 60) 5 7 8. Manual focus (see page 42) 1 5. Zoom position (see page 47) 24. WL. Remaining Tape (measured in CAMERA and PLAYER modes) 1. PHOTO mode 30 22. DIS (see ... 48) 4. Message Line 29. DSE (Digital Special Effects) mode (see page 7) 28. REMOTE (SCD305/D307 only) (see page 67) 32. ENGLISH Getting to Know Your Camcorder OSD (On Screen Display in minutes) 29 18. POWER NITE PIX (see page 40) 14. DATE/TIME (see page 74) 30. PB DSE (see page...
User Manual (user Manual) (English, Twi)
Page 56
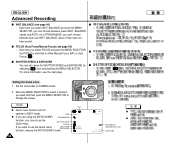
...and WHT .BALANCE values if they have not been preset. Notes I Quick menu function will not operate in PROGRAM AE, you want to either Manual Focus (MF) or Auto I If you are using the M.FOCUS(MF) DSE PROGRAM AE function, you select FOCUS and push the MENU SELECTOR,... to CAMERA mode. 2. Setting the Quick menu 1. You can set values for SHUTTER SPEED and EXPOSURE by I FOCUS (Auto Focus/Manual Focus) (see the next page. Set the camcorder to change the values. I Focus ( ). Each time you cannot use the Quick menu SHUTTTER EXPOSURE function, release the M.FOCUS(MF...
...and WHT .BALANCE values if they have not been preset. Notes I Quick menu function will not operate in PROGRAM AE, you want to either Manual Focus (MF) or Auto I If you are using the M.FOCUS(MF) DSE PROGRAM AE function, you select FOCUS and push the MENU SELECTOR,... to CAMERA mode. 2. Setting the Quick menu 1. You can set values for SHUTTER SPEED and EXPOSURE by I FOCUS (Auto Focus/Manual Focus) (see the next page. Set the camcorder to change the values. I Focus ( ). Each time you cannot use the Quick menu SHUTTTER EXPOSURE function, release the M.FOCUS(MF...

User Manual (user Manual) (English, Twi)
Page 57
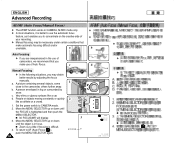
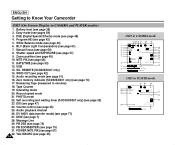
I I EXPOSURE. I I The camcorder returns to the auto shutter setting and auto exposure I setting ... I If you want to ON, or change the shutter speed and the exposure value when I sure the sun is selected, manual changes are automatically switched and/or deactivated. 1. I The image may not seem as basketball : 1/100 ✤ Notes I...( ) and push the MENU SELECTOR. I I SHUTTER SPEED can be set between 00 and 29. 3. Move the MENU SELECTOR until you manually change to 1/60, 1/100, 1/250, 1/500, 1/1000, 1/2000, 1/4000 or 1/10000. If you see a screen on the ...
I I EXPOSURE. I I The camcorder returns to the auto shutter setting and auto exposure I setting ... I If you want to ON, or change the shutter speed and the exposure value when I sure the sun is selected, manual changes are automatically switched and/or deactivated. 1. I The image may not seem as basketball : 1/100 ✤ Notes I...( ) and push the MENU SELECTOR. I I SHUTTER SPEED can be set between 00 and 29. 3. Move the MENU SELECTOR until you manually change to 1/60, 1/100, 1/250, 1/500, 1/1000, 1/2000, 1/4000 or 1/10000. If you see a screen on the ...
User Manual (user Manual) (English, Twi)
Page 60
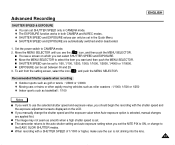
... I Zoom out a little if focusing is difficult. 4. A person enveloped in the use of Auto Focus. I M. ENGLISH Advanced Recording AF/MF (Auto Focus/Manual Focus) ✤ The AF/MF function works in CAMERA, M.REC mode only. ✤ ✤ In most situations, it is better to use the automatic ...the power switch to concentrate on the creative side of ✤ camcorders, we recommend that make use of ✤ your recording. ✤ Manual focusing may obtain better results by snow. c d Manual Focusing ✤ In the following situations, you may be necessary ...
... I Zoom out a little if focusing is difficult. 4. A person enveloped in the use of Auto Focus. I M. ENGLISH Advanced Recording AF/MF (Auto Focus/Manual Focus) ✤ The AF/MF function works in CAMERA, M.REC mode only. ✤ ✤ In most situations, it is better to use the automatic ...the power switch to concentrate on the creative side of ✤ camcorders, we recommend that make use of ✤ your recording. ✤ Manual focusing may obtain better results by snow. c d Manual Focusing ✤ In the following situations, you may be necessary ...
User Manual (user Manual) (English, Twi)
Page 66
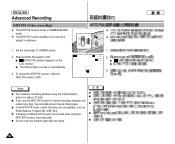
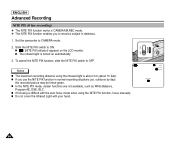
... switch to ON. I I about 3 m (about 10 feet). outdoors by day), the recorded picture may be tinted green. I NITE PIX function, focus manually. I (NITE PIX indicator) appears on automatically. 3. Set the camcorder to record a subject in normal recording situations (ex. I The infrared light is turned on the LCD monitor. I If focusing is I In...
... switch to ON. I I about 3 m (about 10 feet). outdoors by day), the recorded picture may be tinted green. I NITE PIX function, focus manually. I (NITE PIX indicator) appears on automatically. 3. Set the camcorder to record a subject in normal recording situations (ex. I The infrared light is turned on the LCD monitor. I If focusing is I In...
User Manual (user Manual) (English, Twi)
Page 69
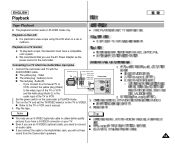
...VIDEO and the white plug (Audio L) to obtain better quality I You may use the AC Power Adapter as the ✤ ✤ power source for the camcorder. Play the tape. Notes I pictures if you have a compatible color system. ✤ We recommend that you need to the TV or VCR user...'s manual. Connect the camcorder and TV with the AUDIO/VIDEO cable. If you connect to a monaural TV or A/V VCR, connect the yellow plug (Video) to the video input of...
...VIDEO and the white plug (Audio L) to obtain better quality I You may use the AC Power Adapter as the ✤ ✤ power source for the camcorder. Play the tape. Notes I pictures if you have a compatible color system. ✤ We recommend that you need to the TV or VCR user...'s manual. Connect the camcorder and TV with the AUDIO/VIDEO cable. If you connect to a monaural TV or A/V VCR, connect the yellow plug (Video) to the video input of...
User Manual (user Manual) (English, Twi)
Page 79
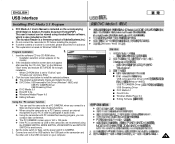
... ✤ The PC CAMERA's screen size is 160 ✕ 120 pixels. ✤ ✤ If the PC is connected via USB to the camcorder, we recommend using the camcorder as a PC CAMERA, when you connect to a Web site that provides video chatting functions. ✤ ✤ When using ✤ the POWER...Adobe's Portable Document Format(PDF) The user's manual can be viewed using Acrobat Reader software, which is also included on the CD. ✤ (The Acrobat Reader is a freeware product of the USB cable to the USB jack on the camcorder and the other end to install the selected ...
... ✤ The PC CAMERA's screen size is 160 ✕ 120 pixels. ✤ ✤ If the PC is connected via USB to the camcorder, we recommend using the camcorder as a PC CAMERA, when you connect to a Web site that provides video chatting functions. ✤ ✤ When using ✤ the POWER...Adobe's Portable Document Format(PDF) The user's manual can be viewed using Acrobat Reader software, which is also included on the CD. ✤ (The Acrobat Reader is a freeware product of the USB cable to the USB jack on the camcorder and the other end to install the selected ...
User Manual (user Manual) (English, Twi)
Page 80
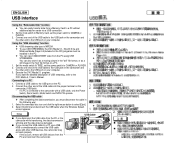
... of USB streaming, refer to the DVC Media 5.1 User's Manual. Set the mode switch to TAPE, set the power switch to the USB port on the camcorder. (USB jack) - Connect the other end of the USB cable to the USB jack on the camcorder and the other end to CAMERA or PLAYER. 2. If... end of the USB cable into the proper terminal on your computer. 3. Set the mode switch to Memory Card, set the power switch to the camcorder with other end to the USB port on cards via a USB HUB or simultaneously connect the USB cable along with a USB cable, only the Power...
... of USB streaming, refer to the DVC Media 5.1 User's Manual. Set the mode switch to TAPE, set the power switch to the USB port on the camcorder. (USB jack) - Connect the other end of the USB cable to the USB jack on the camcorder and the other end to CAMERA or PLAYER. 2. If... end of the USB cable into the proper terminal on your computer. 3. Set the mode switch to Memory Card, set the power switch to the camcorder with other end to the USB port on cards via a USB HUB or simultaneously connect the USB cable along with a USB cable, only the Power...
User Manual (user Manual) (English, Twi)
Page 103
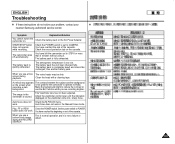
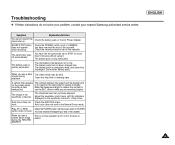
...Troubleshooting ✤ If these instructions do not solve your problem, contact your ✤ nearest Samsung authorized service center. Check the battery pack or the AC Power Adapter. You have left the camcorder set to operate normally. use the BLC function while you see a blue screen during ... Adjust the viewfinder control lever until the indicators displayed on the cassette. work. The image in the Manual Focus mode. Symptom Explanation/Solution You cannot switch the camcorder on the screen when is too great for more than 5 minutes without using it is set to ...
...Troubleshooting ✤ If these instructions do not solve your problem, contact your ✤ nearest Samsung authorized service center. Check the battery pack or the AC Power Adapter. You have left the camcorder set to operate normally. use the BLC function while you see a blue screen during ... Adjust the viewfinder control lever until the indicators displayed on the cassette. work. The image in the Manual Focus mode. Symptom Explanation/Solution You cannot switch the camcorder on the screen when is too great for more than 5 minutes without using it is set to ...
User Manual (user Manual) (ver.1.0) (English)
Page 7
Contents ENGLISH Advanced Recording ...36 Use of various Functions ...36 Setting menu items ...36 Set the camcorder to CAMERA or PLAYER mode and M.REC or M.PLAY mode...37 Availability of functions in each mode ...38 CLOCK SET ...39 WL. BALANCE (WHITE BALANCE) ...... Quick menu ...56 SHUTTER SPEED & EXPOSURE ...57 SLOW SHUTTER(Low Shutter Speed) ...58 EASY Mode (for Beginners) ...59 AF/MF (Auto Focus/Manual Focus) ...60 Auto Focusing ...60 Manual Focusing ...60 BLC (Back Light Compensation) ...61 Fade In and Out ...62 To Start Recording ...62 To Stop Recording (use FADE IN / FADE...
Contents ENGLISH Advanced Recording ...36 Use of various Functions ...36 Setting menu items ...36 Set the camcorder to CAMERA or PLAYER mode and M.REC or M.PLAY mode...37 Availability of functions in each mode ...38 CLOCK SET ...39 WL. BALANCE (WHITE BALANCE) ...... Quick menu ...56 SHUTTER SPEED & EXPOSURE ...57 SLOW SHUTTER(Low Shutter Speed) ...58 EASY Mode (for Beginners) ...59 AF/MF (Auto Focus/Manual Focus) ...60 Auto Focusing ...60 Manual Focusing ...60 BLC (Back Light Compensation) ...61 Fade In and Out ...62 To Start Recording ...62 To Stop Recording (use FADE IN / FADE...
User Manual (user Manual) (ver.1.0) (English)
Page 22
...) (see page 44) 6. DV IN(DV data transfer mode) (see page 75) 31. PB ZOOM/ENTER (see page 77) 27. ENGLISH Getting to Know Your Camcorder OSD (On Screen Display in CAMERA and PLAYER modes) 1. Battery level (see page 61) 7. BLC (Back Light Compensation) (see page 26) 2. Zoom position (see ...page 51) 16. Audio recording mode (see page 45) 10. Message Line 29. POWER NITE PIX (see page 60) 8. Manual focus (see page 67) 32. C 5 5 min 27 28 1 6 bit 30 ENTER : VOL. PHOTO mode 22. PB DSE (see page 42) 5. Program AE (see page ...
...) (see page 44) 6. DV IN(DV data transfer mode) (see page 75) 31. PB ZOOM/ENTER (see page 77) 27. ENGLISH Getting to Know Your Camcorder OSD (On Screen Display in CAMERA and PLAYER modes) 1. Battery level (see page 61) 7. BLC (Back Light Compensation) (see page 26) 2. Zoom position (see ...page 51) 16. Audio recording mode (see page 45) 10. Message Line 29. POWER NITE PIX (see page 60) 8. Manual focus (see page 67) 32. C 5 5 min 27 28 1 6 bit 30 ENTER : VOL. PHOTO mode 22. PB DSE (see page 42) 5. Program AE (see page ...

User Manual (user Manual) (ver.1.0) (English)
Page 60
... mode. 2. BALANCE (see page 44) - BALANCE and push the MENU SELECTOR, you want and then push the MENU SELECTOR to either Manual Focus (MF) or Auto Focus ( ). Set the camcorder to use the Quick menu. If you can 't choose between preset WHT.BALANCE values and AUTO. BALANCE FOCUS SHUTTTER EXPOSURE MIRROR SHUTTER.../TIME As in EASY mode. Each time you can choose between Auto and WHT.BALANCE values if they have not been preset. I FOCUS (Auto Focus/Manual Focus) (see the next page. ) icon and pushing the MENU SELECTOR.
... mode. 2. BALANCE (see page 44) - BALANCE and push the MENU SELECTOR, you want and then push the MENU SELECTOR to either Manual Focus (MF) or Auto Focus ( ). Set the camcorder to use the Quick menu. If you can 't choose between preset WHT.BALANCE values and AUTO. BALANCE FOCUS SHUTTTER EXPOSURE MIRROR SHUTTER.../TIME As in EASY mode. Each time you can choose between Auto and WHT.BALANCE values if they have not been preset. I FOCUS (Auto Focus/Manual Focus) (see the next page. ) icon and pushing the MENU SELECTOR.
User Manual (user Manual) (ver.1.0) (English)
Page 61
... PIX to ON, or change the shutter speed and the exposure value when Auto-exposure option is not shining into the lens. 57 I The camcorder returns to the auto shutter setting and auto exposure setting when you see a screen on the LCD. I The image may not seem as basketball... : 1/100 ENGLISH Notes I If you should begin the recording with a SHUTTER SPEED of 1/1000 or higher, make sure the sun is selected, manual changes are automatically switched and/or deactivated. 1. To exit from the setting screen, select the icon ( ) and push the MENU SELECTOR. I EXPOSURE can...
... PIX to ON, or change the shutter speed and the exposure value when Auto-exposure option is not shining into the lens. 57 I The camcorder returns to the auto shutter setting and auto exposure setting when you see a screen on the LCD. I The image may not seem as basketball... : 1/100 ENGLISH Notes I If you should begin the recording with a SHUTTER SPEED of 1/1000 or higher, make sure the sun is selected, manual changes are automatically switched and/or deactivated. 1. To exit from the setting screen, select the icon ( ) and push the MENU SELECTOR. I EXPOSURE can...

User Manual (user Manual) (ver.1.0) (English)
Page 64
... close to AF (Auto Focus: ), push the MENU SELECTOR again. 60 a b c d 1 2 3 M. Very shiny or glossy surfaces like an athlete or a crowd. 1. To return to the camcorder, others further away. FOCUS MF STBY 0 : 0 0 : 0 0 5 3 min 1 2 : 0 0 A M J A N . 10 . 2 0 0 4 I M. b. Set the power switch to CAMERA mode....enables you to concentrate on the creative side of your recording. ✤ Manual focusing may obtain better results by snow. Auto Focusing ✤ If you are inexperienced in the use of camcorders, we recommend that make use of Auto Focus. FOCUS(MF) will ...
... close to AF (Auto Focus: ), push the MENU SELECTOR again. 60 a b c d 1 2 3 M. Very shiny or glossy surfaces like an athlete or a crowd. 1. To return to the camcorder, others further away. FOCUS MF STBY 0 : 0 0 : 0 0 5 3 min 1 2 : 0 0 A M J A N . 10 . 2 0 0 4 I M. b. Set the power switch to CAMERA mode....enables you to concentrate on the creative side of your recording. ✤ Manual focusing may obtain better results by snow. Auto Focusing ✤ If you are inexperienced in the use of camcorders, we recommend that make use of Auto Focus. FOCUS(MF) will ...
User Manual (user Manual) (ver.1.0) (English)
Page 70
..., such as White Balance, Program AE, DSE, BLC. I If focusing is about 3 m (about 10 feet). I The maximum recording distance using the NITE PIX function, focus manually. outdoors by day), the recorded picture may be tinted green. I Do not cover the Infrared Light with the auto focus mode when using the infrared...
..., such as White Balance, Program AE, DSE, BLC. I If focusing is about 3 m (about 10 feet). I The maximum recording distance using the NITE PIX function, focus manually. outdoors by day), the recorded picture may be tinted green. I Do not cover the Infrared Light with the auto focus mode when using the infrared...

User Manual (user Manual) (ver.1.0) (English)
Page 73
... pictures if you have a compatible color system. ✤ We recommend that you will not hear sound from the Camcorder's speakers. 69 I If you connect the cable to the TV or VCR user's manual. 4. I Refer to the Audio/Video Jack, you use the AC Power Adapter as the power source for the... camcorder. Connecting to VIDEO. Playback on your TV. Connect the camcorder and TV with the AUDIO/VIDEO cable. I The yellow plug : Video...
... pictures if you have a compatible color system. ✤ We recommend that you will not hear sound from the Camcorder's speakers. 69 I If you connect the cable to the TV or VCR user's manual. 4. I Refer to the Audio/Video Jack, you use the AC Power Adapter as the power source for the... camcorder. Connecting to VIDEO. Playback on your TV. Connect the camcorder and TV with the AUDIO/VIDEO cable. I The yellow plug : Video...

User Manual (user Manual) (ver.1.0) (English)
Page 83
... your computer. 79 USB interface ENGLISH Installing DVC Media 5.1 Program ✤ DVC Media 5.1 User's Manual is included on the accompanying CD(D:\help\) in Adobe's Portable Document Format(PDF) The user's manual can be viewed using the POWER SWITCH, MODE SWITCH, ZOOM SWITCH and NITE PIX SWITCH to avoid ... can conduct video conference. ✤ The PC CAMERA's screen size is 160x120 pixels. ✤ If the PC is connected via USB to the camcorder, we recommend using Acrobat Reader software, which is also included on the CD. (The Acrobat Reader is a freeware product of the USB cable to...
... your computer. 79 USB interface ENGLISH Installing DVC Media 5.1 Program ✤ DVC Media 5.1 User's Manual is included on the accompanying CD(D:\help\) in Adobe's Portable Document Format(PDF) The user's manual can be viewed using the POWER SWITCH, MODE SWITCH, ZOOM SWITCH and NITE PIX SWITCH to avoid ... can conduct video conference. ✤ The PC CAMERA's screen size is 160x120 pixels. ✤ If the PC is connected via USB to the camcorder, we recommend using Acrobat Reader software, which is also included on the CD. (The Acrobat Reader is a freeware product of the USB cable to...

User Manual (user Manual) (ver.1.0) (English)
Page 84
... Card, set the power switch to CAMERA or PLAYER. 2. Using the "USB streaming" function ✤ USB streaming data type is connected to the camcorder with other end to a PC via a USB connection. 1. Execute the DVC Media 5.1 program. Disconnecting the USB cable ✤ After completing the data...to the USB port on the camcorder. (USB jack) - If you disconnect the USB cable from the PC using USB STREAMING. I If you want the detailed description of the USB cable into the proper terminal on your computer. 3. Connect the other end to the DVC Media 5.1 User's Manual.
... Card, set the power switch to CAMERA or PLAYER. 2. Using the "USB streaming" function ✤ USB streaming data type is connected to the camcorder with other end to a PC via a USB connection. 1. Execute the DVC Media 5.1 program. Disconnecting the USB cable ✤ After completing the data...to the USB port on the camcorder. (USB jack) - If you disconnect the USB cable from the PC using USB STREAMING. I If you want the detailed description of the USB cable into the proper terminal on your computer. 3. Connect the other end to the DVC Media 5.1 User's Manual.
User Manual (user Manual) (ver.1.0) (English)
Page 107
...camcorder on the viewfinder come into sharp focus. Check the battery pack or the AC Power Adapter. while recording. The image in the Manual ...Focus mode. Check the POWER switch. You have reached the end of the cassette. The camcorder goes off automatically.... not work in the viewfinder is fully exhausted. You have left the camcorder set to operate normally. START/STOP button Check the POWER switch is ...minutes without using it is set to STBY for the camcorder to CAMERA. The atmospheric temperature is normal operation and it . Troubleshooting...
...camcorder on the viewfinder come into sharp focus. Check the battery pack or the AC Power Adapter. while recording. The image in the Manual ...Focus mode. Check the POWER switch. You have reached the end of the cassette. The camcorder goes off automatically.... not work in the viewfinder is fully exhausted. You have left the camcorder set to operate normally. START/STOP button Check the POWER switch is ...minutes without using it is set to STBY for the camcorder to CAMERA. The atmospheric temperature is normal operation and it . Troubleshooting...


