
User Manual (user Manual) (ver.5.0) (English)
Page 1
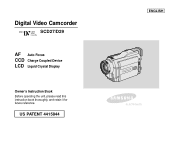
Digital Video Camcorder SCD27/D29 AF Auto Focus CCD Charge Coupled Device LCD Liquid Crystal Display Owner's Instruction Book Before operating the unit, please read this instruction book thoroughly, and retain it for future reference. US PATENT 4415844 ENGLISH ELECTRONICS
Digital Video Camcorder SCD27/D29 AF Auto Focus CCD Charge Coupled Device LCD Liquid Crystal Display Owner's Instruction Book Before operating the unit, please read this instruction book thoroughly, and retain it for future reference. US PATENT 4415844 ENGLISH ELECTRONICS
User Manual (user Manual) (ver.5.0) (English)
Page 7
BALANCE (WHITE BALANCE) ...42 Zooming In and Out with DIGITAL ZOOM ...43 Zooming In and Out ...43 Digital Zoom ...44 DIS (Digital Image Stabilizer) ...45 DSE (Digital Special Effects) SELECT ...46 Selecting an effect ...47 REC MODE ...48 AUDIO MODE ...49 WIND CUT ...50 DATE/TIME ...51 TV DISPLAY ...LCD during PLAY ...34 Controlling Sound from the Speaker ...34 Advanced Recording 35 Use of various Functions ...35 Setting menu items ...35 Set the camcorder to CAMERA or PLAYER mode and M.REC or M.PLAY mode 35 Availability of functions in each mode ...36 CLOCK SET ...37 REMOCON ...38 ...
BALANCE (WHITE BALANCE) ...42 Zooming In and Out with DIGITAL ZOOM ...43 Zooming In and Out ...43 Digital Zoom ...44 DIS (Digital Image Stabilizer) ...45 DSE (Digital Special Effects) SELECT ...46 Selecting an effect ...47 REC MODE ...48 AUDIO MODE ...49 WIND CUT ...50 DATE/TIME ...51 TV DISPLAY ...LCD during PLAY ...34 Controlling Sound from the Speaker ...34 Advanced Recording 35 Use of various Functions ...35 Setting menu items ...35 Set the camcorder to CAMERA or PLAYER mode and M.REC or M.PLAY mode 35 Availability of functions in each mode ...36 CLOCK SET ...37 REMOCON ...38 ...
User Manual (user Manual) (ver.5.0) (English)
Page 15
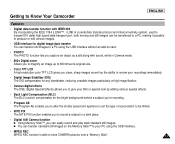
s You can easily record and play back standard still images. Getting to Know Your Camcorder ENGLISH Features • Digital data transfer function with sound, while in Camera mode. • 800x Digital zoom Allows you to magnify an image up to 800 times its original size. &#...Light Compensation (BLC) The BLC function compensates for any handshake, reducing unstable images particularly at high magnification. • Various digital effects The DSE (Digital Special Effects) allows you can transfer standard still images on card. • PHOTO The PHOTO function lets you capture an...
s You can easily record and play back standard still images. Getting to Know Your Camcorder ENGLISH Features • Digital data transfer function with sound, while in Camera mode. • 800x Digital zoom Allows you to magnify an image up to 800 times its original size. &#...Light Compensation (BLC) The BLC function compensates for any handshake, reducing unstable images particularly at high magnification. • Various digital effects The DSE (Digital Special Effects) allows you can transfer standard still images on card. • PHOTO The PHOTO function lets you capture an...
User Manual (user Manual) (ver.5.0) (English)
Page 16
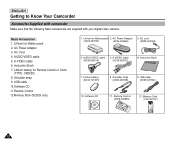
...) 8. USB cable 10.Software CD 11.Remote Control 12.Memory Stick (SCD29 only) 1. ENGLISH Getting to Know Your Camcorder Accessories Supplied with camcorder Make sure that the following basic accessories are supplied with your digital video camera. Lithium Ion Battery pack 2. Lithium battery (AD43-10130H) 8. S-VIDEO cable 6. Lithium Ion Battery pack 2. S-VIDEO cable...
...) 8. USB cable 10.Software CD 11.Remote Control 12.Memory Stick (SCD29 only) 1. ENGLISH Getting to Know Your Camcorder Accessories Supplied with camcorder Make sure that the following basic accessories are supplied with your digital video camera. Lithium Ion Battery pack 2. Lithium battery (AD43-10130H) 8. S-VIDEO cable 6. Lithium Ion Battery pack 2. S-VIDEO cable...
User Manual (user Manual) (ver.5.0) (English)
Page 22
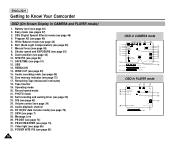
... 13. DV IN (DV data transfer mode) (see page 46) 4. DV 26 1 0 : 0 0 AM J A N . 1 0 , 2 0 0 3 [ 1 1 ] 24 11 ENGLISH Getting to Know Your Camcorder OSD (On Screen Display in CAMERA and PLAYER modes) 1. DSE (Digital Special Effects) mode (see page 76) 27. Tape Counter 19. Message Line 29. NITE PIX (see page 45) 24. DIS...
... 13. DV IN (DV data transfer mode) (see page 46) 4. DV 26 1 0 : 0 0 AM J A N . 1 0 , 2 0 0 3 [ 1 1 ] 24 11 ENGLISH Getting to Know Your Camcorder OSD (On Screen Display in CAMERA and PLAYER modes) 1. DSE (Digital Special Effects) mode (see page 76) 27. Tape Counter 19. Message Line 29. NITE PIX (see page 45) 24. DIS...
User Manual (user Manual) (ver.5.0) (English)
Page 27
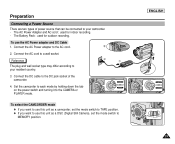
Connect the AC cord to the CAMERA or PLAYER mode. To select the CAMCORDER mode ✤ If you want to use this unit as a camcorder, set the mode switch to MEMORY position. To use this unit as a DSC (Digital Still Camera), set the mode switch to TAPE position. ✤ If you want to ...use the AC Power adapter and DC Cable 1. The AC Power Adapter and AC cord : used for indoor recording. - Reference The plug and wall socket type may differ according to your camcorder. - ENGLISH 23...
Connect the AC cord to the CAMERA or PLAYER mode. To select the CAMCORDER mode ✤ If you want to use this unit as a camcorder, set the mode switch to MEMORY position. To use this unit as a DSC (Digital Still Camera), set the mode switch to TAPE position. ✤ If you want to ...use the AC Power adapter and DC Cable 1. The AC Power Adapter and AC cord : used for indoor recording. - Reference The plug and wall socket type may differ according to your camcorder. - ENGLISH 23...
User Manual (user Manual) (ver.5.0) (English)
Page 46
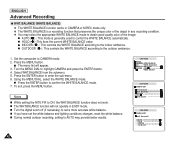
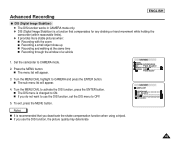
Press the MENU button. Select WHT.BALANCE from the submenu. 5. s Press the ENTER button to enter the sub-menu. 6. s Turn the digital zoom off (if necessary) to obtain good quality color of the object in any recording condition. ✤ You may provide better results. BALANCE D.ZOOM DIS ... mode is a recording function that preserves the unique color of the image. s INDOOR ( ) : This controls the WHITE BALANCE according to the outdoor ambience. 1. Set the camcorder to control the WHITE BALANCE automatically.
Press the MENU button. Select WHT.BALANCE from the submenu. 5. s Press the ENTER button to enter the sub-menu. 6. s Turn the digital zoom off (if necessary) to obtain good quality color of the object in any recording condition. ✤ You may provide better results. BALANCE D.ZOOM DIS ... mode is a recording function that preserves the unique color of the image. s INDOOR ( ) : This controls the WHITE BALANCE according to the outdoor ambience. 1. Set the camcorder to control the WHITE BALANCE automatically.
User Manual (user Manual) (ver.5.0) (English)
Page 48
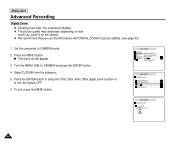
...D.ZOOM DIS DSE SELECT CAM MODE CAMERA SET D . Set the camcorder to turn the feature OFF. 6. CAM MODE INITIAL CAMERA A/V MEMORY VIEWER PROGRAM AE WHT. Press the MENU button. Press the ENTER button to setup the 100x, 200x, 400x, 800x digital zoom function or to CAMERA mode. 2. To exit, press the ...; The picture quality may deteriorate depending on how much you zoom in on the subject. ✤ We recommend that you use the DIS feature with DIGITAL ZOOM for picture stability. (see page 45) 1. ZOOM OFF 100x 200x 400x 800x 44 Select D.ZOOM from the submenu. 5. Turn the MENU DIAL...
...D.ZOOM DIS DSE SELECT CAM MODE CAMERA SET D . Set the camcorder to turn the feature OFF. 6. CAM MODE INITIAL CAMERA A/V MEMORY VIEWER PROGRAM AE WHT. Press the MENU button. Press the ENTER button to setup the 100x, 200x, 400x, 800x digital zoom function or to CAMERA mode. 2. To exit, press the ...; The picture quality may deteriorate depending on how much you zoom in on the subject. ✤ We recommend that you use the DIS feature with DIGITAL ZOOM for picture stability. (see page 45) 1. ZOOM OFF 100x 200x 400x 800x 44 Select D.ZOOM from the submenu. 5. Turn the MENU DIAL...
User Manual (user Manual) (ver.5.0) (English)
Page 49
...function works in CAMERA mode only. ✤ DIS (Digital Image Stabilizer) is a function that you deactivate the shake compensation function when using a tripod. s The DIS menu is recommended that compensates for any shaking or hand movement while holding the camcorder (within reasonable limits). ✤ It provides more stable... MENU button. s If you do not want to ON. BALANCE D.ZOOM DIS DSE SELECT CAM MODE CAMERA SET PROGRAM AE WHT. Set the camcorder to CAMERA and press the ENTER button. Turn the MENU DIAL highlight to CAMERA mode. 2. Notes s It is changed to use the DIS...
...function works in CAMERA mode only. ✤ DIS (Digital Image Stabilizer) is a function that you deactivate the shake compensation function when using a tripod. s The DIS menu is recommended that compensates for any shaking or hand movement while holding the camcorder (within reasonable limits). ✤ It provides more stable... MENU button. s If you do not want to ON. BALANCE D.ZOOM DIS DSE SELECT CAM MODE CAMERA SET PROGRAM AE WHT. Set the camcorder to CAMERA and press the ENTER button. Turn the MENU DIAL highlight to CAMERA mode. 2. Notes s It is changed to use the DIS...
User Manual (user Manual) (ver.5.0) (English)
Page 77
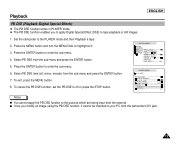
Set the camcorder to enter the sub-menu. 4. Press the ENTER button to the PLAYER mode and then Playback a tape. 2. Press the ENTER button to tape playback or ... PC from the sub-menu and press the ENTER button. 5. Select PB DSE from the camcorder's DV jack. 73 s Once you to apply Digital Special Effect (DSE) to enter the sub-menu. 6. Playback ENGLISH PB DSE (Playback Digital Special Effects) ✤ The PB DSE function works in PLAYER mode. ✤ The PB DSE...
Set the camcorder to enter the sub-menu. 4. Press the ENTER button to the PLAYER mode and then Playback a tape. 2. Press the ENTER button to tape playback or ... PC from the sub-menu and press the ENTER button. 5. Select PB DSE from the camcorder's DV jack. 73 s Once you to apply Digital Special Effect (DSE) to enter the sub-menu. 6. Playback ENGLISH PB DSE (Playback Digital Special Effects) ✤ The PB DSE function works in PLAYER mode. ✤ The PB DSE...
User Manual (user Manual) (ver.5.0) (English)
Page 80
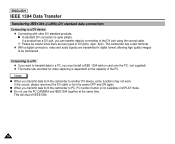
Please be careful since there are transmitted in M.PLAY mode. Notes s When you transmit data from the camcorder to PC, PC function button is not available in digital format, allowing high quality images to be transferred. If this occurs, please reconnect the DV cable or turn the power OFF ... IEEE 1394 Data Transfer Transferring IEEE1394 (i.LINK)-DV standard data connections Connecting to the DV port using the correct cable. !!! This camcorder has a 4pin terminal. ✤ With a digital connection, video and audio signals are two types of the PC. s When you transmit data from the...
Please be careful since there are transmitted in M.PLAY mode. Notes s When you transmit data from the camcorder to PC, PC function button is not available in digital format, allowing high quality images to be transferred. If this occurs, please reconnect the DV cable or turn the power OFF ... IEEE 1394 Data Transfer Transferring IEEE1394 (i.LINK)-DV standard data connections Connecting to the DV port using the correct cable. !!! This camcorder has a 4pin terminal. ✤ With a digital connection, video and audio signals are two types of the PC. s When you transmit data from the...

User Manual (user Manual) (ver.5.0) (English)
Page 82
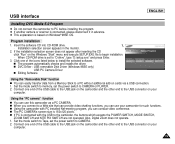
... s Intel® Pentium II™ is a registered trademark of the Intel Corporation. s Windows® is a trademark of the Microsoft® Corporation. ENGLISH USB interface q Transferring a Digital Image through a USB Connection ✤ You can easily transfer a still image from a MEMORY STICK to a PC without additional add-on cards via a USB connection. ✤... image to a PC via a USB connection. ✤ If you transfer data to a PC, you need to install the software (Driver, Editing software) supplied with the camcorder.
... s Intel® Pentium II™ is a registered trademark of the Intel Corporation. s Windows® is a trademark of the Microsoft® Corporation. ENGLISH USB interface q Transferring a Digital Image through a USB Connection ✤ You can easily transfer a still image from a MEMORY STICK to a PC without additional add-on cards via a USB connection. ✤... image to a PC via a USB connection. ✤ If you transfer data to a PC, you need to install the software (Driver, Editing software) supplied with the camcorder.
User Manual (user Manual) (ver.5.0) (English)
Page 83
...the USB cable to the USB jack on your computer. USB interface ENGLISH Installing DVC Media 5.0 Program ✤ Do not connect the camcorder to the USB connector on your computer. 79 Program installation 1. s DVC Driver : USB removable Disk Driver (Windows 98SE only) USB .... Using the "PC camera" function s You can conduct video conference. Also, Digital Zoom does not operate. 1. Installation selection screen appears in advance. ✤ This explanation is set to the USB connector on the camcorder and the other end to "D:drive", type "D:\setup.exe" and press Enter....
...the USB cable to the USB jack on your computer. USB interface ENGLISH Installing DVC Media 5.0 Program ✤ Do not connect the camcorder to the USB connector on your computer. 79 Program installation 1. s DVC Driver : USB removable Disk Driver (Windows 98SE only) USB .... Using the "PC camera" function s You can conduct video conference. Also, Digital Zoom does not operate. 1. Installation selection screen appears in advance. ✤ This explanation is set to the USB connector on the camcorder and the other end to "D:drive", type "D:\setup.exe" and press Enter....
User Manual (user Manual) (ver.5.0) (English)
Page 86
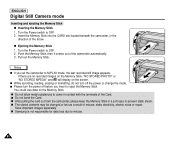
ENGLISH Digital Still Camera mode Inserting and ejecting the Memory Stick q Inserting the Memory Stick 1. s Do not allow metal substances to prevent static shock. Turn the Power switch to misuse. 82 Insert the Memory Stick into the CARD slot located beneath the camcorder, in a soft case to come in ... keep the Memory Stick in the direction of the Card. s The stored contents may be changed or lost as a result of the camcorder automatically. 3. s Samsung is not responsible for data loss due to OFF. 2. Pull out the Memory Stick. and will display on the Memory Stick, "NO STORED...
ENGLISH Digital Still Camera mode Inserting and ejecting the Memory Stick q Inserting the Memory Stick 1. s Do not allow metal substances to prevent static shock. Turn the Power switch to misuse. 82 Insert the Memory Stick into the CARD slot located beneath the camcorder, in a soft case to come in ... keep the Memory Stick in the direction of the Card. s The stored contents may be changed or lost as a result of the camcorder automatically. 3. s Samsung is not responsible for data loss due to OFF. 2. Pull out the Memory Stick. and will display on the Memory Stick, "NO STORED...
User Manual (user Manual) (ver.5.0) (English)
Page 87
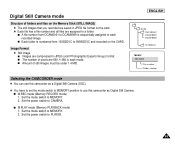
... to a folder. ENGLISH DCIM 100 SSDVC DCAM 0001 DCAM 0002 .... 101SSDVC *MEM/P 000-0000 File number Folder number Selecting the CAMCORDER mode ✤ You can use this camcorder as Digital Still Camera. Set the mode switch to CAMERA. s M.REC mode (Memory RECORD mode) 1. s A file number from 100SSDVC ...to use this camcorder as a Digital Still Camera (DSC). ✤ You have to set the mode switch to MEMORY position to 999SSDVC and recorded on the card. ✤...
... to a folder. ENGLISH DCIM 100 SSDVC DCAM 0001 DCAM 0002 .... 101SSDVC *MEM/P 000-0000 File number Folder number Selecting the CAMCORDER mode ✤ You can use this camcorder as Digital Still Camera. Set the mode switch to CAMERA. s M.REC mode (Memory RECORD mode) 1. s A file number from 100SSDVC ...to use this camcorder as a Digital Still Camera (DSC). ✤ You have to set the mode switch to MEMORY position to 999SSDVC and recorded on the card. ✤...
User Manual (user Manual) (ver.5.0) (English)
Page 89
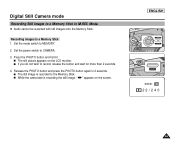
... still image is recording the still image, " " appears on the LCD monitor. Set the power switch to CAMERA. 3. s The still picture appears on the screen. Digital Still Camera mode Recording Still images to a Memory Stick in 2 seconds. s While the camcorder is recorded to a Memory Stick 1.
... still image is recording the still image, " " appears on the LCD monitor. Set the power switch to CAMERA. 3. s The still picture appears on the screen. Digital Still Camera mode Recording Still images to a Memory Stick in 2 seconds. s While the camcorder is recorded to a Memory Stick 1.
User Manual (user Manual) (ver.5.0) (English)
Page 90
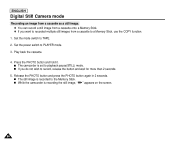
... in 2 seconds. Play back the cassette. 4. s If you want to recorded multiple still images from a cassette to PLAYER mode. 3. s While the camcorder is recorded to record, release the button and wait for more than 2 seconds. 5. s The still image is recording the still image, " " appears ...on the screen. 86 Set the power switch to a Memory Stick, use the COPY function. 1. ENGLISH Digital Still Camera mode Recording an image from a cassette as a still image. ✤ You can record a still image from a cassette onto a Memory Stick. &#...
... in 2 seconds. Play back the cassette. 4. s If you want to recorded multiple still images from a cassette to PLAYER mode. 3. s While the camcorder is recorded to record, release the button and wait for more than 2 seconds. 5. s The still image is recording the still image, " " appears ...on the screen. 86 Set the power switch to a Memory Stick, use the COPY function. 1. ENGLISH Digital Still Camera mode Recording an image from a cassette as a still image. ✤ You can record a still image from a cassette onto a Memory Stick. &#...
User Manual (user Manual) (ver.5.0) (English)
Page 93
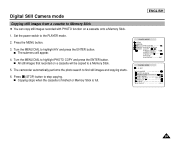
...s The submenu will be copied to highlight PHOTO COPY and press the ENTER button. Turn the MENU DIAL to a Memory Stick. 5. The camcorder automatically performs the photo search to Memory Stick ✤ You can copy still images recorded with PHOTO function on a cassette will appear. 4. ...Press the MENU button. 3. Digital Still Camera mode Copying still images from a cassette to find still images and copying starts. 6. Turn the MENU DIAL to stop copying. Press ...
...s The submenu will be copied to highlight PHOTO COPY and press the ENTER button. Turn the MENU DIAL to a Memory Stick. 5. The camcorder automatically performs the photo search to Memory Stick ✤ You can copy still images recorded with PHOTO function on a cassette will appear. 4. ...Press the MENU button. 3. Digital Still Camera mode Copying still images from a cassette to find still images and copying starts. 6. Turn the MENU DIAL to stop copying. Press ...
User Manual (user Manual) (ver.5.0) (English)
Page 94
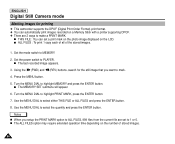
...of all of stored images. 90 s The last recorded image appears. 3. Using the (FWD) and (REV) buttons, search for printing ✤ This camcorder supports the DPOF (Digital Print Order Format) print format. ✤ You can set to 1 or 0. Press the MENU button. 5. Turn the MENU DIAL to highlight MEMORY and... will appear. 6. Use the MENU DIAL to MEMORY. 2. s The ALL FILES option may require extended operation time depending on the LCD. ENGLISH Digital Still Camera mode Marking images for the still image that you setup the PRINT MARK option to ALL FILES, 999 files from the current file...
...of all of stored images. 90 s The last recorded image appears. 3. Using the (FWD) and (REV) buttons, search for printing ✤ This camcorder supports the DPOF (Digital Print Order Format) print format. ✤ You can set to 1 or 0. Press the MENU button. 5. Turn the MENU DIAL to highlight MEMORY and... will appear. 6. Use the MENU DIAL to MEMORY. 2. s The ALL FILES option may require extended operation time depending on the LCD. ENGLISH Digital Still Camera mode Marking images for the still image that you setup the PRINT MARK option to ALL FILES, 999 files from the current file...
User Manual (user Manual) (ver.5.0) (English)
Page 97
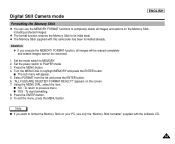
.... Using the MENU DIAL, select the item. To exit the menu, press the MENU button. Digital Still Camera mode ENGLISH Formatting the Memory Stick ✤ You can use only the "Memory Stick formatter" supplied with this camcorder has been formatted already. Turn the MENU DIAL to previous menu s YES : To start formatting...
.... Using the MENU DIAL, select the item. To exit the menu, press the MENU button. Digital Still Camera mode ENGLISH Formatting the Memory Stick ✤ You can use only the "Memory Stick formatter" supplied with this camcorder has been formatted already. Turn the MENU DIAL to previous menu s YES : To start formatting...


