
User Manual (user Manual) (ver.5.0) (English)
Page 3
... SECTION 810-21) GROUND CLAMPS POWER SERVICE GROUNDING ELECTRODE SYSTEM (NEC ART 250, PART H) NEC NATIONAL ELECTRICAL CODE VENTILATION: Slots and openings in the cabinet are not sure of the type of antenna-discharge unit, connection to the operating instructions. 11. This CAMCORDER should be walked on a bed, sofa, rug, or other ) or a 3-wire grounding type plug, a plug having one blade wider than...
... SECTION 810-21) GROUND CLAMPS POWER SERVICE GROUNDING ELECTRODE SYSTEM (NEC ART 250, PART H) NEC NATIONAL ELECTRICAL CODE VENTILATION: Slots and openings in the cabinet are not sure of the type of antenna-discharge unit, connection to the operating instructions. 11. This CAMCORDER should be walked on a bed, sofa, rug, or other ) or a 3-wire grounding type plug, a plug having one blade wider than...
User Manual (user Manual) (ver.5.0) (English)
Page 6
... Connecting a Power Source ...23 To use the AC Power adapter and DC Cable ...23 To select the CAMCORDER mode ...23 Using the Lithium Ion Battery Pack ...24 Charging the Lithium Ion Battery Pack ...24 Table of continuous recording time based on model and battery type ...25 Battery level display ...26 Inserting and Ejecting a Cassette ...27 BASIC Recording 28 Making your First Recording ...28 Record Search (REC SEARCH) ...29 Hints for Stable Image Recording ...30 Recording with the LCD monitor ...30 Recording...
... Connecting a Power Source ...23 To use the AC Power adapter and DC Cable ...23 To select the CAMCORDER mode ...23 Using the Lithium Ion Battery Pack ...24 Charging the Lithium Ion Battery Pack ...24 Table of continuous recording time based on model and battery type ...25 Battery level display ...26 Inserting and Ejecting a Cassette ...27 BASIC Recording 28 Making your First Recording ...28 Record Search (REC SEARCH) ...29 Hints for Stable Image Recording ...30 Recording with the LCD monitor ...30 Recording...
User Manual (user Manual) (ver.5.0) (English)
Page 7
... ...41 WHT. BALANCE (WHITE BALANCE) ...42 Zooming In and Out with DIGITAL ZOOM ...43 Zooming In and Out ...43 Digital Zoom ...44 DIS (Digital Image Stabilizer) ...45 DSE (Digital Special Effects) SELECT ...46 Selecting an effect ...47 REC MODE ...48 AUDIO MODE ...49 WIND CUT ...50 DATE/TIME ...51 TV DISPLAY ...52 Using Quick Menu ...53 Setting the Quick menu ...54 SHUTTER SPEED & EXPOSURE ...55 SLOW SHUTTER(Low Shutter Speed) ...56 EASY Mode (for Beginners) ...57 MF/AF (Manual Focus/Auto Focus) ...58 Auto Focusing ...58 Manual Focusing ...58 BLC...
... ...41 WHT. BALANCE (WHITE BALANCE) ...42 Zooming In and Out with DIGITAL ZOOM ...43 Zooming In and Out ...43 Digital Zoom ...44 DIS (Digital Image Stabilizer) ...45 DSE (Digital Special Effects) SELECT ...46 Selecting an effect ...47 REC MODE ...48 AUDIO MODE ...49 WIND CUT ...50 DATE/TIME ...51 TV DISPLAY ...52 Using Quick Menu ...53 Setting the Quick menu ...54 SHUTTER SPEED & EXPOSURE ...55 SLOW SHUTTER(Low Shutter Speed) ...56 EASY Mode (for Beginners) ...57 MF/AF (Manual Focus/Auto Focus) ...58 Auto Focusing ...58 Manual Focusing ...58 BLC...
User Manual (user Manual) (ver.5.0) (English)
Page 12
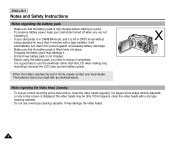
... video heads. 8 It may damage it completely. - ENGLISH Notes and Safety Instructions Notes regarding the Video Head Cleaning - If your camcorder is in STBY mode without being operated for more than the LCD when making long recordings, because the LCD uses up more battery power. * When the battery reaches the end of its life, please contact your camcorder turned off to use a wet-type cleaning cassette. It is left in CAMERA mode, and it . - The batteries...
... video heads. 8 It may damage it completely. - ENGLISH Notes and Safety Instructions Notes regarding the Video Head Cleaning - If your camcorder is in STBY mode without being operated for more than the LCD when making long recordings, because the LCD uses up more battery power. * When the battery reaches the end of its life, please contact your camcorder turned off to use a wet-type cleaning cassette. It is left in CAMERA mode, and it . - The batteries...
User Manual (user Manual) (ver.5.0) (English)
Page 15
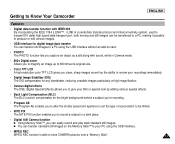
... AE enables you to alter the shutter speed and aperture to suit the type of scene/action to be filmed. • NITE PIX The NITE PIX function enables you to store CAMERA pictures onto a "Memory Stick". 11 Getting to Know Your Camcorder ENGLISH Features • Digital data transfer function with sound, while in a dark place. • Digital Still Camera function s Using Memory Stick™, you can easily record and play back standard still images.
... AE enables you to alter the shutter speed and aperture to suit the type of scene/action to be filmed. • NITE PIX The NITE PIX function enables you to store CAMERA pictures onto a "Memory Stick". 11 Getting to Know Your Camcorder ENGLISH Features • Digital data transfer function with sound, while in a dark place. • Digital Still Camera function s Using Memory Stick™, you can easily record and play back standard still images.
User Manual (user Manual) (ver.5.0) (English)
Page 16
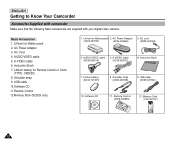
...AC cord (AD39-00076A) 4. S-VIDEO cable (AC39-42001Z) 6. USB cable (AD39-00073A) 10. AC Power Adapter 3. Lithium battery for Remote Control or Clock. (TYPE: CR2025) 8. AC Power Adapter (AD43-00070A) (AD44-00065A) 3. Lithium battery (AD43-10130H) 8. USB cable 10.Software CD 11.Remote Control 12.Memory Stick (SCD29 only) 1. S-VIDEO cable 6. AUDIO/VIDEO cable (AD39-00001A) 5. Shoulder strap (AD63-00202B) 9. Remote Control (AD59-00085A) 12. Instruction Book 7. Shoulder strap 9. Basic Accessories 1. Memory Stick (1109-001221) X2 DISPLAY TIDAMTEE/ SLOW...
...AC cord (AD39-00076A) 4. S-VIDEO cable (AC39-42001Z) 6. USB cable (AD39-00073A) 10. AC Power Adapter 3. Lithium battery for Remote Control or Clock. (TYPE: CR2025) 8. AC Power Adapter (AD43-00070A) (AD44-00065A) 3. Lithium battery (AD43-10130H) 8. USB cable 10.Software CD 11.Remote Control 12.Memory Stick (SCD29 only) 1. S-VIDEO cable 6. AUDIO/VIDEO cable (AD39-00001A) 5. Shoulder strap (AD63-00202B) 9. Remote Control (AD59-00085A) 12. Instruction Book 7. Shoulder strap 9. Basic Accessories 1. Memory Stick (1109-001221) X2 DISPLAY TIDAMTEE/ SLOW...
User Manual (user Manual) (ver.5.0) (English)
Page 22
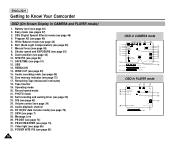
...) 12. DATE/TIME (see pages 57) 3. Record speed mode 21. PHOTO mode 22. Video light (see page 65) 18 OSD in CAMERA mode 23 31 22 21 20 19 1 REC 2 EASY 3 MIRROR M - 0 : 0 0 : 0 0 18 5 5 min 17 6 BLC 16 4 TAPE ! 28 5 1 6 bit 15 7 MF NITE PIX 14 13 SHUTTER P EXPOSURE 12 1 0 : 0 0 AM 32 J A N. 1 0 , 2 0 0 3 11 9 ZOOM 10 EXPOSURE 8 SHUTTER OSD in PLAYER mode 21 20 19 25 SOUND [ 2 ] M - 0 : 0 0 : 0 0 30 PB ZOOM 1.2x...
...) 12. DATE/TIME (see pages 57) 3. Record speed mode 21. PHOTO mode 22. Video light (see page 65) 18 OSD in CAMERA mode 23 31 22 21 20 19 1 REC 2 EASY 3 MIRROR M - 0 : 0 0 : 0 0 18 5 5 min 17 6 BLC 16 4 TAPE ! 28 5 1 6 bit 15 7 MF NITE PIX 14 13 SHUTTER P EXPOSURE 12 1 0 : 0 0 AM 32 J A N. 1 0 , 2 0 0 3 11 9 ZOOM 10 EXPOSURE 8 SHUTTER OSD in PLAYER mode 21 20 19 25 SOUND [ 2 ] M - 0 : 0 0 : 0 0 30 PB ZOOM 1.2x...
User Manual (user Manual) (ver.5.0) (English)
Page 27
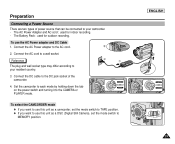
... cord : used for indoor recording. - The Battery Pack : used for outdoor recording. Connect the AC Power adapter to the CAMERA or PLAYER mode. Reference The plug and wall socket type may differ according to your camcorder. - Set the camcorder to each mode by holding down the tab on the power switch and turning it to the AC cord. 2. ENGLISH 23 Connect the DC cable to a wall socket. To use this unit as a DSC (Digital Still Camera), set the mode switch...
... cord : used for indoor recording. - The Battery Pack : used for outdoor recording. Connect the AC Power adapter to the CAMERA or PLAYER mode. Reference The plug and wall socket type may differ according to your camcorder. - Set the camcorder to each mode by holding down the tab on the power switch and turning it to the AC cord. 2. ENGLISH 23 Connect the DC cable to a wall socket. To use this unit as a DSC (Digital Still Camera), set the mode switch...

User Manual (user Manual) (ver.5.0) (English)
Page 28
... Using the Lithium Ion Battery Pack ✤ The amount of the battery pack, always remove it from the camcorder. How often the Zoom function is charging. Reset the battery pack and the DC cable 5. Charging the Lithium Ion Battery Pack 1. s To prevent reduction in the life and capacity of continuous recording time available depends on 75% ~ 90% 90 ~ 100% On for a second Error - Turn the Camera power switch to the camcorder. Blinking time Charging...
... Using the Lithium Ion Battery Pack ✤ The amount of the battery pack, always remove it from the camcorder. How often the Zoom function is charging. Reset the battery pack and the DC cable 5. Charging the Lithium Ion Battery Pack 1. s To prevent reduction in the life and capacity of continuous recording time available depends on 75% ~ 90% 90 ~ 100% On for a second Error - Turn the Camera power switch to the camcorder. Blinking time Charging...
User Manual (user Manual) (ver.5.0) (English)
Page 37
... the (PLAY/STILL) button to the starting point. 4 s To stop the PLAY operation, press the (STOP) button. Press the (REW) button to rewind the tape to start playback. s You can also view the picture on a TV screen, after rewinding is in playback mode. (see page 27) 2 3. ENGLISH 1 2. Open the LCD screen. s The camcorder stops automatically after connecting the camcorder to the PLAYER position. Hold down the power switch tab and turn it to a TV or VCR. (see...
... the (PLAY/STILL) button to the starting point. 4 s To stop the PLAY operation, press the (STOP) button. Press the (REW) button to rewind the tape to start playback. s You can also view the picture on a TV screen, after rewinding is in playback mode. (see page 27) 2 3. ENGLISH 1 2. Open the LCD screen. s The camcorder stops automatically after connecting the camcorder to the PLAYER position. Hold down the power switch tab and turn it to a TV or VCR. (see...
User Manual (user Manual) (ver.5.0) (English)
Page 46
... set the white balance and lighting conditions changes, reset the white balance. BALANCE D.ZOOM DIS DSE SELECT CAM MODE CAMERA SET WHT. Press the ENTER button to control the WHITE BALANCE automatically. To exit, press the MENU button. s Turn the digital zoom off (if necessary) to obtain good quality color of the image. s The menu list will not operate in any recording condition. ✤ You may provide better results. BALANCE (WHITE BALANCE) ✤ The WHITE BALANCE function works in CAMERA or M.REC mode only. ✤ The WHITE BALANCE is generally used...
... set the white balance and lighting conditions changes, reset the white balance. BALANCE D.ZOOM DIS DSE SELECT CAM MODE CAMERA SET WHT. Press the ENTER button to control the WHITE BALANCE automatically. To exit, press the MENU button. s Turn the digital zoom off (if necessary) to obtain good quality color of the image. s The menu list will not operate in any recording condition. ✤ You may provide better results. BALANCE (WHITE BALANCE) ✤ The WHITE BALANCE function works in CAMERA or M.REC mode only. ✤ The WHITE BALANCE is generally used...
User Manual (user Manual) (ver.5.0) (English)
Page 51
... work. Using MENU DIAL, select the DSE mode. BALANCE D.ZOOM DIS DSE SELECT CAM MODE CAMERA SET PROGRAM AE WHT. Notes s While setting the NITE PIX to highlight CAMERA and press the ENTER button. 4. ENGLISH CAM MODE INITIAL CAMERA A/V MEMORY VIEWER PROGRAM AE WHT. Select DSE SELECT from the submenu. 5. s Press the ENTER button to CAMERA mode. 2. s The DSE function will appear. 3. Press the MENU button. Set the camcorder to confirm the DSE mode. 7. Press the ENTER button...
... work. Using MENU DIAL, select the DSE mode. BALANCE D.ZOOM DIS DSE SELECT CAM MODE CAMERA SET PROGRAM AE WHT. Notes s While setting the NITE PIX to highlight CAMERA and press the ENTER button. 4. ENGLISH CAM MODE INITIAL CAMERA A/V MEMORY VIEWER PROGRAM AE WHT. Select DSE SELECT from the submenu. 5. s Press the ENTER button to CAMERA mode. 2. s The DSE function will appear. 3. Press the MENU button. Set the camcorder to confirm the DSE mode. 7. Press the ENTER button...
User Manual (user Manual) (ver.5.0) (English)
Page 52
... you use this camcorder. Turn the MENU DIAL to highlight A/V and press the ENTER button. s The REC MODE toggles between scenes. s LP (long play): This mode permits 90 minutes of recording time with a DVM60 tape. s SP (standard play): This mode permits 60 minutes of recording time with each press. 5. CAM MODE INITIAL CAMERA A/V MEMORY VIEWER REC MODE PHOTO SEARCH COPY AUDIO MODE 12 AUDIO SELECT WIND CUT PB DSE AV IN/OUT OUT 4. s Record using SP mode for best picture and sound...
... you use this camcorder. Turn the MENU DIAL to highlight A/V and press the ENTER button. s The REC MODE toggles between scenes. s LP (long play): This mode permits 90 minutes of recording time with a DVM60 tape. s SP (standard play): This mode permits 60 minutes of recording time with each press. 5. CAM MODE INITIAL CAMERA A/V MEMORY VIEWER REC MODE PHOTO SEARCH COPY AUDIO MODE 12 AUDIO SELECT WIND CUT PB DSE AV IN/OUT OUT 4. s Record using SP mode for best picture and sound...
User Manual (user Manual) (ver.5.0) (English)
Page 58
... WHT.BALANCE values and AUTO. Set the camcorder to either Manual Focus (MF) or Auto Focus ( ). s If you are using the M.FOCUS(MF) function, you can choose between Auto and WHT.BALANCE values it they have not been preset.. Each time you want and then press the ENTER button to select a function you select WHT. Setting the Quick menu 1. ENGLISH Advanced Recording s WHT. BALANCE FOCUS SHUTTTER EXPOSURE MIRROR SHUTTER EXPOSURE STBY 0 : 0 0 : 0 0 WL.REMOTE 1 0 : 0 0 A M J A N . 1 0 . 2 0 0 3 DATE/TIME 54 BALANCE and...
... WHT.BALANCE values and AUTO. Set the camcorder to either Manual Focus (MF) or Auto Focus ( ). s If you are using the M.FOCUS(MF) function, you can choose between Auto and WHT.BALANCE values it they have not been preset.. Each time you want and then press the ENTER button to select a function you select WHT. Setting the Quick menu 1. ENGLISH Advanced Recording s WHT. BALANCE FOCUS SHUTTTER EXPOSURE MIRROR SHUTTER EXPOSURE STBY 0 : 0 0 : 0 0 WL.REMOTE 1 0 : 0 0 A M J A N . 1 0 . 2 0 0 3 DATE/TIME 54 BALANCE and...
User Manual (user Manual) (ver.5.0) (English)
Page 68
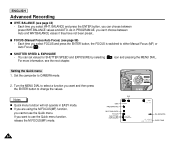
... mode, certain functions are not available, such as White Balance, Program AE, DSE, BLC. 64 s (NITE PIX indicator) appears on automatically. 3. ENGLISH Advanced Recording NITE PIX (0 lux recording) ✤ The NITE PIX function works in CAMERA/M.REC mode. ✤ The NITE PIX function enables you use the NITE PIX function in darkness. 1. s If you to ON. Notes s The maximum recording distance using the infrared light is turned on the LCD...
... mode, certain functions are not available, such as White Balance, Program AE, DSE, BLC. 64 s (NITE PIX indicator) appears on automatically. 3. ENGLISH Advanced Recording NITE PIX (0 lux recording) ✤ The NITE PIX function works in CAMERA/M.REC mode. ✤ The NITE PIX function enables you use the NITE PIX function in darkness. 1. s If you to ON. Notes s The maximum recording distance using the infrared light is turned on the LCD...

User Manual (user Manual) (ver.5.0) (English)
Page 69
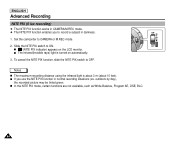
... the SLOW SHUTTER button. 3. outdoors by LCD if you press a SLOW SHUTTER button in state that a NITE PIX switch is turned on. ✤ When you use the POWER NITE PIX function in normal recording situations (ex. The SLOW SHUTTER function enables you to set shutter speed. Advanced Recording ENGLISH POWER NITE PIX ✤ The POWER NITE PIX function works in CAMERA mode. ✤ The POWER NITE PIX function can record a subject more brightly. 4. Set the camcorder to obtain better quality recordings. 65 When using...
... the SLOW SHUTTER button. 3. outdoors by LCD if you press a SLOW SHUTTER button in state that a NITE PIX switch is turned on. ✤ When you use the POWER NITE PIX function in normal recording situations (ex. The SLOW SHUTTER function enables you to set shutter speed. Advanced Recording ENGLISH POWER NITE PIX ✤ The POWER NITE PIX function works in CAMERA mode. ✤ The POWER NITE PIX function can record a subject more brightly. 4. Set the camcorder to obtain better quality recordings. 65 When using...
User Manual (user Manual) (ver.5.0) (English)
Page 83
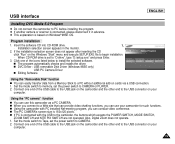
... transfer data from a Memory Stick to the USB connector on cards via a USB connection. 1. s The PC CAMERA's screen size is set the power switch to the USB connector on Windows® 98SE OS. Insert the software CD into CD-ROM drive. 1. - Click one end of the USB cable to the USB jack on the Windows "Start" menu and execute SETUP.EXE file to CAMERA or PLAYER. 2. Set the mode switch to memory, set the power switch to begin installation. - s Using the camcorder with the USB to install the selected software. Connect...
... transfer data from a Memory Stick to the USB connector on cards via a USB connection. 1. s The PC CAMERA's screen size is set the power switch to the USB connector on Windows® 98SE OS. Insert the software CD into CD-ROM drive. 1. - Click one end of the USB cable to the USB jack on the Windows "Start" menu and execute SETUP.EXE file to CAMERA or PLAYER. 2. Set the mode switch to memory, set the power switch to begin installation. - s Using the camcorder with the USB to install the selected software. Connect...
User Manual (user Manual) (ver.5.0) (English)
Page 105
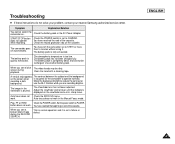
... lens has not been adjusted. work . You have left the camcorder set to CAMERA. ENGLISH 101 Troubleshooting ✤ If these instructions do not solve your problem, contact your nearest Samsung authorized service center. recording a dark Make the background bright to PLAYER. button does not work . The atmospheric temperature is quickly exhausted. The battery pack is not a failure or defect. Clean the head with a cleaning tape. Adjust the viewfinder control lever until the indicators displayed...
... lens has not been adjusted. work . You have left the camcorder set to CAMERA. ENGLISH 101 Troubleshooting ✤ If these instructions do not solve your problem, contact your nearest Samsung authorized service center. recording a dark Make the background bright to PLAYER. button does not work . The atmospheric temperature is quickly exhausted. The battery pack is not a failure or defect. Clean the head with a cleaning tape. Adjust the viewfinder control lever until the indicators displayed...
User Manual (user Manual) (ver.5.0) (English)
Page 106
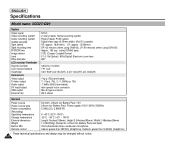
...Video recording system Audio recording system Usable cassette Tape speed Tape recording time FF/REW time Image device Lens Filter diameter LCD monitor/Viewfinder Size/dot number LCD monitor Method Viewfinder Connectors Video output S-video output Audio output DV input/output USB output External mic NTSC 2 rotary heads, Helical scanning system Rotary heads, PCM system Digital video tape (6.35mm width): Mini DV cassette SP: approx. 18.81mm/s LP: approx. 12.56mm/s SP: 60 minutes (when using DVM 60), LP: 90 minutes (when using DVM 60) Approx. 180 sec. (using DVM60 tape) CCD (Charge Coupled Device...
...Video recording system Audio recording system Usable cassette Tape speed Tape recording time FF/REW time Image device Lens Filter diameter LCD monitor/Viewfinder Size/dot number LCD monitor Method Viewfinder Connectors Video output S-video output Audio output DV input/output USB output External mic NTSC 2 rotary heads, Helical scanning system Rotary heads, PCM system Digital video tape (6.35mm width): Mini DV cassette SP: approx. 18.81mm/s LP: approx. 12.56mm/s SP: 60 minutes (when using DVM 60), LP: 90 minutes (when using DVM 60) Approx. 180 sec. (using DVM60 tape) CCD (Charge Coupled Device...

User Manual (user Manual) (ver.5.0) (English)
Page 107
... PROGRAM AE 40 Protection 91 - Q Quick Menu 53 - C Cassette ...27 Cleaning ...97 CLOCK SET 37 Connecting 69 - INDEX ENGLISH - T TV DISPLAY 52 - V Viewfinder 30, 32 - LLCD ...30, 31 - U USB ...77 - Z ZERO MEMORY 72 Zoom ...43, 44 103 AAccessories 12 Audio dubbing 61 AUDIO MODE 49 - H Hand Strap 22 - I - S SHUTTER SPEED 55 Sound ...34 Speaker ...34 Still images 89 - M Memory Stick 81, 85 MF/AF ...58 - BALANCE 42 WIND CUT 50 - Fade...
... PROGRAM AE 40 Protection 91 - Q Quick Menu 53 - C Cassette ...27 Cleaning ...97 CLOCK SET 37 Connecting 69 - INDEX ENGLISH - T TV DISPLAY 52 - V Viewfinder 30, 32 - LLCD ...30, 31 - U USB ...77 - Z ZERO MEMORY 72 Zoom ...43, 44 103 AAccessories 12 Audio dubbing 61 AUDIO MODE 49 - H Hand Strap 22 - I - S SHUTTER SPEED 55 Sound ...34 Speaker ...34 Still images 89 - M Memory Stick 81, 85 MF/AF ...58 - BALANCE 42 WIND CUT 50 - Fade...


