
User Manual (ENGLISH)
Page 40
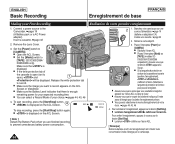
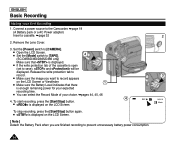
Connect a power source to record. Release the write protection tab to the Camcorder. ➥page 19 (A Battery pack or a AC Power adapter) Insert a cassette. ➥page 32 MERA MERA 2. PLAYE QMUEINCUK PLAYE I Si la languette de protection en PLAYE é... battery power consumption. √ √ √ R R R 0:00:10 60min 2 1. I is displayed. I Set the [Mode] switch to [TAPE]. (SC-D363/D364/ CA D365/D366 only) Make sure that there is open (set to record appears on the ACL Screen. 4 REC G SP To stop recording, press the [Start...
Connect a power source to record. Release the write protection tab to the Camcorder. ➥page 19 (A Battery pack or a AC Power adapter) Insert a cassette. ➥page 32 MERA MERA 2. PLAYE QMUEINCUK PLAYE I Si la languette de protection en PLAYE é... battery power consumption. √ √ √ R R R 0:00:10 60min 2 1. I is displayed. I Set the [Mode] switch to [TAPE]. (SC-D363/D364/ CA D365/D366 only) Make sure that there is open (set to record appears on the ACL Screen. 4 REC G SP To stop recording, press the [Start...

User Manual (ENGLISH)
Page 8
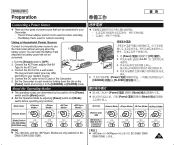
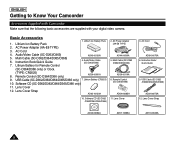
... (CR2025) 10. Software CD (SC-D362 /D363/D364/D365/D366) 2. AC Power Adapter (AA-E8 TYPE) 5. SC-D364/D366 9. Audio/Video Cable (SC-D263/D363) 7. Multi Cable (SC-D362 /D364/D365/D366) 8. Lens Cover 0 3. AC Cord 6. USB Cable (SC-D362 /D363/D364/D365/D366) 12. Lens Cover Strap 1. 2. Lithium Ion Battery Pack 2. Audio/Video Cable (SC-D263/D363) 5. Multi SC-D362/ D364/D365/D366 6. / 7. SC- ENGLISH Getting to Know...
... (CR2025) 10. Software CD (SC-D362 /D363/D364/D365/D366) 2. AC Power Adapter (AA-E8 TYPE) 5. SC-D364/D366 9. Audio/Video Cable (SC-D263/D363) 7. Multi Cable (SC-D362 /D364/D365/D366) 8. Lens Cover 0 3. AC Cord 6. USB Cable (SC-D362 /D363/D364/D365/D366) 12. Lens Cover Strap 1. 2. Lithium Ion Battery Pack 2. Audio/Video Cable (SC-D263/D363) 5. Multi SC-D362/ D364/D365/D366 6. / 7. SC- ENGLISH Getting to Know...
User Manual (ENGLISH)
Page 19
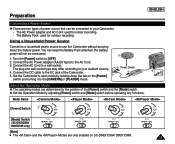
.... Mode Name [Power] Switch [Mode] Switch (SC-D363/D364/ D365/D366 only) PLAY CAM PLAY CAM PLAY PLAY CAM CAM [Note] I D365/ D366 0 CAM CAM CAM SC-D363/ D364/ 19 You can be consumed. 1. Connect the AC Power adapter (AA-E8 Type) to the DC jack of the Camcorder. 5. The AC Power adapter and AC Cord: used for indoor recording. - AA...
.... Mode Name [Power] Switch [Mode] Switch (SC-D363/D364/ D365/D366 only) PLAY CAM PLAY CAM PLAY PLAY CAM CAM [Note] I D365/ D366 0 CAM CAM CAM SC-D363/ D364/ 19 You can be consumed. 1. Connect the AC Power adapter (AA-E8 Type) to the DC jack of the Camcorder. 5. The AC Power adapter and AC Cord: used for indoor recording. - AA...
User Manual (ENGLISH)
Page 34
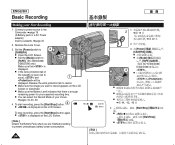
...page 19 (A Battery pack or a AC Power adapter) Insert a cassette. ➥page 32 2. I Make sure the Battery Level indicates that is open (set to prevent unnecessary battery power consumption. [ ] 34 R R R 2 1. ➥ 19 0 0 ➥ 32 2. 0 3. [Power] [CAMERA] 0 I LCD 0 I [Mode] - [TAPE] 0 SC D363/D364/ D365/D366 K 3 0 I PLAYE ... is displayed on the LCD Screen. [ Note ] Detach the Battery Pack when you want to [TAPE]. (SC-D363/D364/ CA D365/D366 only) Make sure that there is displayed on the LCD Screen or Viewfinder. I If the write protection tab...
...page 19 (A Battery pack or a AC Power adapter) Insert a cassette. ➥page 32 2. I Make sure the Battery Level indicates that is open (set to prevent unnecessary battery power consumption. [ ] 34 R R R 2 1. ➥ 19 0 0 ➥ 32 2. 0 3. [Power] [CAMERA] 0 I LCD 0 I [Mode] - [TAPE] 0 SC D363/D364/ D365/D366 K 3 0 I PLAYE ... is displayed on the LCD Screen. [ Note ] Detach the Battery Pack when you want to [TAPE]. (SC-D363/D364/ CA D365/D366 only) Make sure that there is displayed on the LCD Screen or Viewfinder. I If the write protection tab...
User Manual (ENGLISH)
Page 64
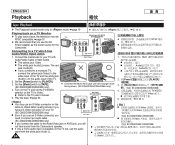
... 97 ✤ We recommend that you use the AC Power adapter as the power source for the Camcorder. I QMUEINCUK PLAYE CAM [ ] I S-Video S-Video 0 SC-D362/D364/ D365/D366 I Audio(L) - Connect the Camcorder to your TV. (SC-D362/D364/D365/D366 only) I Even if you use an S-Video...]. 3. Turn on the TV and set , use the audio cable with the triangle mark facing down. (SC-D362/D364/D365/D366 only) AV Cable TV (SC-D263/D363) AV Camcorder 0 2. [Power] [PLAYER] 0 3. [Mode] [TAPE] 0 SC-D363/D364/ D365/D366 4. TV/VIDEO / Video 0 I 0 5. 0 ➥ 63 [ Notes ] I If you...
... 97 ✤ We recommend that you use the AC Power adapter as the power source for the Camcorder. I QMUEINCUK PLAYE CAM [ ] I S-Video S-Video 0 SC-D362/D364/ D365/D366 I Audio(L) - Connect the Camcorder to your TV. (SC-D362/D364/D365/D366 only) I Even if you use an S-Video...]. 3. Turn on the TV and set , use the audio cable with the triangle mark facing down. (SC-D362/D364/D365/D366 only) AV Cable TV (SC-D263/D363) AV Camcorder 0 2. [Power] [PLAYER] 0 3. [Mode] [TAPE] 0 SC-D363/D364/ D365/D366 4. TV/VIDEO / Video 0 I 0 5. 0 ➥ 63 [ Notes ] I If you...
User Manual (ENGLISH)
Page 86
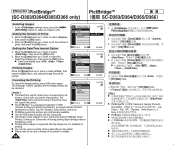
ENGLISH PictBridgeTM PictBridgeTM (SC-D363/D364/D365/D366 only) SC-D363/D364/D365/D366 Selecting Images 1. Move the [Zoom] lever up or down to select the Date/Time display type, then press the [OK] button. Move the [Zoom] ... the [OK] button, and selected image files will be canceled. Turning your Camcorder off during PictBridge Direct Printing. I The PictBridgeTM is supported. I Use the AC power adapter for details. 86 2/46 Num. 02 100-0002 2/46 Off Date Time Date&Time 100-0002 2/46 100-0002 1. In the settings menu, press the...
ENGLISH PictBridgeTM PictBridgeTM (SC-D363/D364/D365/D366 only) SC-D363/D364/D365/D366 Selecting Images 1. Move the [Zoom] lever up or down to select the Date/Time display type, then press the [OK] button. Move the [Zoom] ... the [OK] button, and selected image files will be canceled. Turning your Camcorder off during PictBridge Direct Printing. I The PictBridgeTM is supported. I Use the AC power adapter for details. 86 2/46 Num. 02 100-0002 2/46 Off Date Time Date&Time 100-0002 2/46 100-0002 1. In the settings menu, press the...
User Manual (ENGLISH)
Page 12
... Remote Control (SC-D364/D366 only) or Clock. (TYPE: CR2025) 8. Software CD (SC-D362/D363/D364/D365/D366 only) 11. Basic Accessories 1. AC Cord 4. USB Cable (SC-D362/D363/D364/D365/D366 only) 7. Lens Cover Strap AD43-10130H 10. AC Power Adapter (AA-E8 TYPE) AD44-00090A 5. Multi Cable (SC-D362 /D364/D365/D366) AD39-00119A 8. USB Cable (SC-D362 /D363/D364/D365/D366) AD39...
... Remote Control (SC-D364/D366 only) or Clock. (TYPE: CR2025) 8. Software CD (SC-D362/D363/D364/D365/D366 only) 11. Basic Accessories 1. AC Cord 4. USB Cable (SC-D362/D363/D364/D365/D366 only) 7. Lens Cover Strap AD43-10130H 10. AC Power Adapter (AA-E8 TYPE) AD44-00090A 5. Multi Cable (SC-D362 /D364/D365/D366) AD39-00119A 8. USB Cable (SC-D362 /D363/D364/D365/D366) AD39...
User Manual (ENGLISH)
Page 23
... the AC Power adapter (AA-E8 Type) to the DC jack of the Camcorder. 5. Power Switch 4. Connect the DC cable to the AC Cord. the battery power will not be connected to your resident country. Mode Name [Power] Switch PLAY PLAY PLAY PLAY CAM CAM CAM [Mode] Switch (SC-D363/D364/ D365/D366 ...position of the [Power] switch and the [Mode] switch. ✤ Set the Operation Mode by holding down the tab on SC-D363/ D364/ D365/ D366. Connect the AC Cord to use the Camcorder without worrying about the battery power. Set the Camcorder to each mode by adjusting [Power] switch and...
... the AC Power adapter (AA-E8 Type) to the DC jack of the Camcorder. 5. Power Switch 4. Connect the DC cable to the AC Cord. the battery power will not be connected to your resident country. Mode Name [Power] Switch PLAY PLAY PLAY PLAY CAM CAM CAM [Mode] Switch (SC-D363/D364/ D365/D366 ...position of the [Power] switch and the [Mode] switch. ✤ Set the Operation Mode by holding down the tab on SC-D363/ D364/ D365/ D366. Connect the AC Cord to use the Camcorder without worrying about the battery power. Set the Camcorder to each mode by adjusting [Power] switch and...
User Manual (ENGLISH)
Page 38
... ] Detach the Battery Pack when you are finished recording to [TAPE]. 4 (SC-D363/D364/D365/D366 only) Make sure that there is displayed. Connect a power source to record. Release the write protection tab to the Camcorder. ➥page 19 (A Battery pack or a AC Power adapter) Insert a cassette. ➥page 32 2 2. Set the [Power] switch to...
... ] Detach the Battery Pack when you are finished recording to [TAPE]. 4 (SC-D363/D364/D365/D366 only) Make sure that there is displayed. Connect a power source to record. Release the write protection tab to the Camcorder. ➥page 19 (A Battery pack or a AC Power adapter) Insert a cassette. ➥page 32 2 2. Set the [Power] switch to...

User Manual (ENGLISH)
Page 68
.... ➥page 63 Signal flow Multi Cable ✤ Connect the Multi AV/S jack with the white jack (Audio L). 64 Connect the Camcorder to [TAPE]. (SC-D363/D364/D365/D366 only) 4. I The yellow jack: Video I The white jack: Audio(L)-mono , The red jack: Audio(R) I If you connect the cable to the... (Audio L) to the audio input of the TV. 2. I You may use the AC Power adapter as the power source for the Camcorder. Set the [Power] switch to the TV user's manual. 5. Multi Cable (SC-D362/ D364/D365/D366) Camcorder Connecting to Video. Turn on the TV and set , use the audio ...
.... ➥page 63 Signal flow Multi Cable ✤ Connect the Multi AV/S jack with the white jack (Audio L). 64 Connect the Camcorder to [TAPE]. (SC-D363/D364/D365/D366 only) 4. I The yellow jack: Video I The white jack: Audio(L)-mono , The red jack: Audio(R) I If you connect the cable to the... (Audio L) to the audio input of the TV. 2. I You may use the AC Power adapter as the power source for the Camcorder. Set the [Power] switch to the TV user's manual. 5. Multi Cable (SC-D362/ D364/D365/D366) Camcorder Connecting to Video. Turn on the TV and set , use the audio ...

User Manual (ENGLISH)
Page 90
ENGLISH PictBridgeTM (SC-D363/D364/D365/D366 only) Selecting Images 1. The message "Cancel" appears and the image printing will be printed. I PictBridge supporting printers are not available for printing. I Date/Time display type: , , , Printing Images Move the [Zoom] lever up or down to select , then press the [OK] button. 3. I Use the AC power adapter for details...
ENGLISH PictBridgeTM (SC-D363/D364/D365/D366 only) Selecting Images 1. The message "Cancel" appears and the image printing will be printed. I PictBridge supporting printers are not available for printing. I Date/Time display type: , , , Printing Images Move the [Zoom] lever up or down to select , then press the [OK] button. 3. I Use the AC power adapter for details...


