
User Manual (ENGLISH)
Page 22
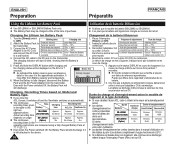
... a little at 77 °F (25 °C). Blinking time Charging rate 2. Attach the Battery Pack to an AC Cord Blinking stops and stays on 90% ~ 100% and connect the AC Cord On for a second and off and the Viewfinder switches on automatically. ✤ Si vous rabattez l'écran ACL,...it is fully charged, disconnect the Battery batería. Une fois que la batterie est entièrement chargée, débranchez Even with the Power switched Off, the Battery Pack will start to the device. été établies à partir d'une batterie complètement charg&#...
... a little at 77 °F (25 °C). Blinking time Charging rate 2. Attach the Battery Pack to an AC Cord Blinking stops and stays on 90% ~ 100% and connect the AC Cord On for a second and off and the Viewfinder switches on automatically. ✤ Si vous rabattez l'écran ACL,...it is fully charged, disconnect the Battery batería. Une fois que la batterie est entièrement chargée, débranchez Even with the Power switched Off, the Battery Pack will start to the device. été établies à partir d'une batterie complètement charg&#...

User Manual (ENGLISH)
Page 8
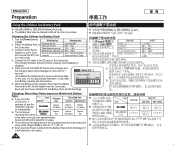
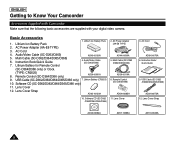
... 0 3. SC- AC Power Adapter (AA-E8 TYPE) 3. Audio/Video Cable (SC-D263/D363) 5. Remote Control (SC-D364/D366 only) 9. Software CD (SC-D362/ D363/D364/D365/D366 only) 11. Lithium Battery (CR2025) 10. Instruction Book 9. USB SC- D362/D363/D364/ D365/D366 10. Lens Cover 12. Lens Cover Strap 1. 2. Basic Accessories 1. Lithium Ion Battery Pack 2. AC Cord 6. Lithium...
... 0 3. SC- AC Power Adapter (AA-E8 TYPE) 3. Audio/Video Cable (SC-D263/D363) 5. Remote Control (SC-D364/D366 only) 9. Software CD (SC-D362/ D363/D364/D365/D366 only) 11. Lithium Battery (CR2025) 10. Instruction Book 9. USB SC- D362/D363/D364/ D365/D366 10. Lens Cover 12. Lens Cover Strap 1. 2. Basic Accessories 1. Lithium Ion Battery Pack 2. AC Cord 6. Lithium...
User Manual (ENGLISH)
Page 16
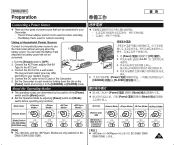
... the Battery Pack to the DC jack on the Camcorder. It may be charged a little at 77 °F (25 °C). ✤ ✤ Even when the Power switched Off, the Battery Pack will be displayed on 90% ~ 100% Adapter to a wall socket. 4. DISPLAY LCD 7 0 100% 0 0 6. 0 Off 0 /...Cable to an AC Cord On for a second and off and the Viewfinder switches SB-LSM80 Approx. 1hr 20min Approx. 1hr 20min Approx. 1hr 30min ✤ on usage. ✤ ✤ The continuous recording times in the table to the device. **SB-LSM80 SB-LSM160 0 q 0 [Power] [Off] 0 ...
... the Battery Pack to the DC jack on the Camcorder. It may be charged a little at 77 °F (25 °C). ✤ ✤ Even when the Power switched Off, the Battery Pack will be displayed on 90% ~ 100% Adapter to a wall socket. 4. DISPLAY LCD 7 0 100% 0 0 6. 0 Off 0 /...Cable to an AC Cord On for a second and off and the Viewfinder switches SB-LSM80 Approx. 1hr 20min Approx. 1hr 20min Approx. 1hr 30min ✤ on usage. ✤ ✤ The continuous recording times in the table to the device. **SB-LSM80 SB-LSM160 0 q 0 [Power] [Off] 0 ...
User Manual (ENGLISH)
Page 19
...) to [OFF]. Connect the AC Cord to your Camcorder. - D363/D364/ D365/D366 [ ] I The and the Modes are determined by the position of the [Power] switch and the [Mode] switch. ✤ Set the Operation Mode by holding down the tab on SC- Mode Name [Power] Switch [Mode] Switch (SC-D363/D364/ D365/D366 only) PLAY...
...) to [OFF]. Connect the AC Cord to your Camcorder. - D363/D364/ D365/D366 [ ] I The and the Modes are determined by the position of the [Power] switch and the [Mode] switch. ✤ Set the Operation Mode by holding down the tab on SC- Mode Name [Power] Switch [Mode] Switch (SC-D363/D364/ D365/D366 only) PLAY...

User Manual (ENGLISH)
Page 2
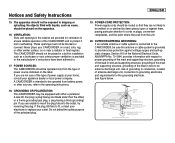
...CAUTION: TO REDUCE THE RISK OF ELECTRIC SHOCK, DO NOT REMOVE COVER (OR BACK). Do not block any heat sources such as power-supply cord or plug is used, use attachments/accessories specified by the manufacturer, or sold with dry cloth. 7. If the provided plug does ...risk of important operating and maintenance (servicing) instructions in the literature accompanying the appliance. WARNING - Do not install near water. 6. Protect the power cord from being walked on or pinched particularly at plugs, convenience receptacles, and the point where they exit from tip-over. 13. Only use caution...
...CAUTION: TO REDUCE THE RISK OF ELECTRIC SHOCK, DO NOT REMOVE COVER (OR BACK). Do not block any heat sources such as power-supply cord or plug is used, use attachments/accessories specified by the manufacturer, or sold with dry cloth. 7. If the provided plug does ...risk of important operating and maintenance (servicing) instructions in the literature accompanying the appliance. WARNING - Do not install near water. 6. Protect the power cord from being walked on or pinched particularly at plugs, convenience receptacles, and the point where they exit from tip-over. 13. Only use caution...
User Manual (ENGLISH)
Page 3
...sure of the type of the CAMCORDER and to protect it from battery power, or other sources, refer to dripping or splashing. If you are provided for the grounding electrode. POWER-CORD PROTECTION: Power-supply cords should be operated only from the unit. 20. VENTILATION: Slots and openings... in installation such as vases, should be routed so that they exit from the type of power source indicated on or near a radiator ...
...sure of the type of the CAMCORDER and to protect it from battery power, or other sources, refer to dripping or splashing. If you are provided for the grounding electrode. POWER-CORD PROTECTION: Power-supply cords should be operated only from the unit. 20. VENTILATION: Slots and openings... in installation such as vases, should be routed so that they exit from the type of power source indicated on or near a radiator ...

User Manual (ENGLISH)
Page 4
... any service or repairs to this CAMCORDER through openings as this can fall into such power lines or circuits. Unauthorized substitutions may result in a fire or electric shock. When the power-supply cord or plug is in safe operating order. ENGLISH Notices and Safety Instructions 21. This... will often require extensive work by a technician before use. 25. POWER LINES: An outside antenna system, extreme care should not ...
... any service or repairs to this CAMCORDER through openings as this can fall into such power lines or circuits. Unauthorized substitutions may result in a fire or electric shock. When the power-supply cord or plug is in safe operating order. ENGLISH Notices and Safety Instructions 21. This... will often require extensive work by a technician before use. 25. POWER LINES: An outside antenna system, extreme care should not ...
User Manual (ENGLISH)
Page 12
.../D366) AD39-00073A 12. AC Cord 4. Audio/Video Cable (SC-D263/D363) 5. Lens Cover Strap AD43-10130H 10. AC Power Adapter (AA-E8 TYPE) AD44-00090A 5. Remote Control (SC-D364/D366) AD59-00085A 11. Remote Control (SC-D364/D366 only) AD39-00001A 9. Basic Accessories 1. Audio/Video Cable (SC-D263/D363) 7. Lens Cover 3. AC Power Adapter (AA-E8 TYPE) 3. Lens...
.../D366) AD39-00073A 12. AC Cord 4. Audio/Video Cable (SC-D263/D363) 5. Lens Cover Strap AD43-10130H 10. AC Power Adapter (AA-E8 TYPE) AD44-00090A 5. Remote Control (SC-D364/D366) AD59-00085A 11. Remote Control (SC-D364/D366 only) AD39-00001A 9. Basic Accessories 1. Audio/Video Cable (SC-D263/D363) 7. Lens Cover 3. AC Power Adapter (AA-E8 TYPE) 3. Lens...

User Manual (ENGLISH)
Page 20
Connect the AC Power Adapter to an AC Cord and Blinking time Once per second Twice per second Three times per second Charging rate Less than 50% 50% ~ 75% 75% ~ 90% connect the AC Cord to the DC jack on the Camcorder. Connect the DC cable to a wall socket. The charging indicator will ...start to the Camcorder. 3. Press and hold the DISPLAY button while charging and the charging status will be charged a little at 77 °F (25 °C). ✤ Even when the Power switched...
Connect the AC Power Adapter to an AC Cord and Blinking time Once per second Twice per second Three times per second Charging rate Less than 50% 50% ~ 75% 75% ~ 90% connect the AC Cord to the DC jack on the Camcorder. Connect the DC cable to a wall socket. The charging indicator will ...start to the Camcorder. 3. Press and hold the DISPLAY button while charging and the charging status will be charged a little at 77 °F (25 °C). ✤ Even when the Power switched...
User Manual (ENGLISH)
Page 23
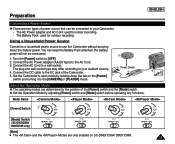
... by holding down the tab on SC-D363/ D364/ D365/ D366. Preparation ENGLISH ERA ERA ERA ERA MERA Connecting a Power Source ✤ There are two types of power source that can keep the Battery Pack attached; The AC Power adapter and AC Cord: used for indoor recording. - the battery power will not be connected to your...
... by holding down the tab on SC-D363/ D364/ D365/ D366. Preparation ENGLISH ERA ERA ERA ERA MERA Connecting a Power Source ✤ There are two types of power source that can keep the Battery Pack attached; The AC Power adapter and AC Cord: used for indoor recording. - the battery power will not be connected to your...


