
User Manual
Page 2
... in that the camera is not in market, servicings may result from camera malfunction. ƀ Keep this camera in the following order. Samsung camera takes no responsibility for buying a Samsung Digital Camera. ƀ Prior to using this camera, please read the user manual thoroughly. ƀ When you require After Sales service, please...
... in that the camera is not in market, servicings may result from camera malfunction. ƀ Keep this camera in the following order. Samsung camera takes no responsibility for buying a Samsung Digital Camera. ƀ Prior to using this camera, please read the user manual thoroughly. ƀ When you require After Sales service, please...

User Manual
Page 3
.... This may adversely affect the camera's internal components and could increase the risk of explosion. ƅ Should any way. You must contact your dealer or Samsung Camera Service centre. ƅ Please do so may result in fire, injury, electric shock or severe damage to use the camera as a sealed vehicle, direct... DANGER indicates an imminently hazardous situation which , if not avoided, could pose a risk of electric shock. Should this be carried out by your dealer or Samsung Camera Service centre.
.... This may adversely affect the camera's internal components and could increase the risk of explosion. ƅ Should any way. You must contact your dealer or Samsung Camera Service centre. ƅ Please do so may result in fire, injury, electric shock or severe damage to use the camera as a sealed vehicle, direct... DANGER indicates an imminently hazardous situation which , if not avoided, could pose a risk of electric shock. Should this be carried out by your dealer or Samsung Camera Service centre.
User Manual
Page 4
Do not touch the flash after using the AC Charger. It may cause burns. ƅ Do not move the camera while it is in fire. ҟDo not insert the battery with the polarities reversed. ƅ Remove the battery when not planning to avoid taking an unclear image and possibly causing camera malfunction. ƅ Avoid obstructing the lens or the flash when you are using it is switched on how to use the memory card 11 ƀWhen Using the Camera for the First Time 13 RECORDING ƀLCD monitor indicator ŊŊŊŊŊ14 ƀStarting the recording mode ŊŊ15 &#...
Do not touch the flash after using the AC Charger. It may cause burns. ƅ Do not move the camera while it is in fire. ҟDo not insert the battery with the polarities reversed. ƅ Remove the battery when not planning to avoid taking an unclear image and possibly causing camera malfunction. ƅ Avoid obstructing the lens or the flash when you are using it is switched on how to use the memory card 11 ƀWhen Using the Camera for the First Time 13 RECORDING ƀLCD monitor indicator ŊŊŊŊŊ14 ƀStarting the recording mode ŊŊ15 &#...

User Manual
Page 5
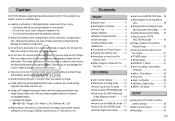
Contents ƅSharpness 30 ƅContrast 30 ƅAuto Focus type 31 ƅOSD (On Screen Display) information 31 ƀSound 32 ƅVolume 32 ƅStart up sound 32 ƅShutter sound 32 ƅBeep Sound 32 ƅAF sound 32 ƀSetup 1 33 ƅFile name 33 ƅLanguage 33 ƅSetting up the Date/ Time/ Date typeŊ33 ƅImprinting the recording date ŊŊ34 ƅLCD brightness 34 ƅAuto Focus lamp 34 ƅStart up the USB Driver for MAC Ŋ90 ƀUsing the USB Driver for MAC Ŋ90 ƀRemoving the USB Driver for Windows 98SE 90 &#...
Contents ƅSharpness 30 ƅContrast 30 ƅAuto Focus type 31 ƅOSD (On Screen Display) information 31 ƀSound 32 ƅVolume 32 ƅStart up sound 32 ƅShutter sound 32 ƅBeep Sound 32 ƅAF sound 32 ƀSetup 1 33 ƅFile name 33 ƅLanguage 33 ƅSetting up the Date/ Time/ Date typeŊ33 ƅImprinting the recording date ŊŊ34 ƅLCD brightness 34 ƅAuto Focus lamp 34 ƅStart up the USB Driver for MAC Ŋ90 ƀUsing the USB Driver for MAC Ŋ90 ƀRemoving the USB Driver for Windows 98SE 90 &#...

User Manual
Page 6
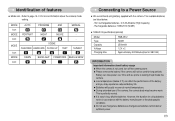
To buy the optional equipment, contact your nearest Samsung dealer or Samsung service centre. < Included items > Camera case User manual, Product warranty Camera strap Software CD (see p.84) Computer (see p.88) PictBridge compatible printer (see p.75) DPOF ...
To buy the optional equipment, contact your nearest Samsung dealer or Samsung service centre. < Included items > Camera case User manual, Product warranty Camera strap Software CD (see p.84) Computer (see p.88) PictBridge compatible printer (see p.75) DPOF ...

User Manual
Page 9
For the final 2 seconds, the lamp blinks quickly at 1 second Blinking intervals. second intervals. Blinking A picture will be taken after about 10 seconds and 2 seconds later a second picture will be turned off after recognising the camera) The lamp turns on (LCD monitor turns off) The lamp is off The lamp blinks The lamp turns on (The camera focus on the subject) The lamp blinks (The camera doesn't focus on the subject) Identification of features Bottom/ 5-function button Battery chamber cover Memory card slot Battery chamber Voice memo/ Voice Recording/ Up button Menu/ OK button...
For the final 2 seconds, the lamp blinks quickly at 1 second Blinking intervals. second intervals. Blinking A picture will be taken after about 10 seconds and 2 seconds later a second picture will be turned off after recognising the camera) The lamp turns on (LCD monitor turns off) The lamp is off The lamp blinks The lamp turns on (The camera focus on the subject) The lamp blinks (The camera doesn't focus on the subject) Identification of features Bottom/ 5-function button Battery chamber cover Memory card slot Battery chamber Voice memo/ Voice Recording/ Up button Menu/ OK button...
User Manual
Page 10
This is perfectly normal. ƀ It is not used, turn off the camera power. ƀ Please remove the battery if the camera will usually recover at normal temperatures. ƀ During extended use manganese batteries as manganese batteries cannot deliver sufficient power. Ś9ś MODE Icon MODE Icon MODE Icon MODE Icon AUTO PROGRAM ASR MANUAL PORTRAIT NIGHT MOVIE SCENE CHILDREN LANDSCAPE CLOSE UP TEXT - Battery can affect the performance of the battery and you may become warm. SUNSET DAWN BACKLIGHT FIREWORKS BEACH & SNOW Connecting to buy alkaline batteries. ...
This is perfectly normal. ƀ It is not used, turn off the camera power. ƀ Please remove the battery if the camera will usually recover at normal temperatures. ƀ During extended use manganese batteries as manganese batteries cannot deliver sufficient power. Ś9ś MODE Icon MODE Icon MODE Icon MODE Icon AUTO PROGRAM ASR MANUAL PORTRAIT NIGHT MOVIE SCENE CHILDREN LANDSCAPE CLOSE UP TEXT - Battery can affect the performance of the battery and you may become warm. SUNSET DAWN BACKLIGHT FIREWORKS BEACH & SNOW Connecting to buy alkaline batteries. ...
User Manual
Page 11
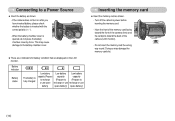
Do not insert the memory card the wrong way round. Doing so may cause damage to a Power Source ƅ Insert the battery as shown. - Connecting to the battery chamber cover. ƅ There are 4 indicators for battery condition that are displayed on after you have inserted battery, please check whether the battery is inserted with the correct polarity (+ / -). - Turn off the camera's power before inserting the memory card. - If the camera does not turn on the LCD monitor. This may damage the memory card slot. Ś10ś Have the front of the memory card facing toward ...
Do not insert the memory card the wrong way round. Doing so may cause damage to a Power Source ƅ Insert the battery as shown. - Connecting to the battery chamber cover. ƅ There are 4 indicators for battery condition that are displayed on after you have inserted battery, please check whether the battery is inserted with the correct polarity (+ / -). - Turn off the camera's power before inserting the memory card. - If the camera does not turn on the LCD monitor. This may damage the memory card slot. Ś10ś Have the front of the memory card facing toward ...

User Manual
Page 12
.... ƀ Please do not use or store in an environment where there are using this camera. ƀ Do not use a memory card formatted by the Samsung warranty. ƀ The memory card is an electronic precision device. This is perfectly normal. ƀ Do not use a memory card that is used incorrectly. - If... any of memory in an environment with a different camera. ƀ Turn off or the memory card is removed while recording, deleting (formatting) or reading. ƀ Samsung cannot be the case, you will not operate.
.... ƀ Please do not use or store in an environment where there are using this camera. ƀ Do not use a memory card formatted by the Samsung warranty. ƀ The memory card is an electronic precision device. This is perfectly normal. ƀ Do not use a memory card that is used incorrectly. - If... any of memory in an environment with a different camera. ƀ Turn off or the memory card is removed while recording, deleting (formatting) or reading. ƀ Samsung cannot be the case, you will not operate.

User Manual
Page 13
... Still image *Movie clip 67 128 80 157 95 183 95 183 150 284 558 710 - - - - Normal 197 223 269 269 400 822 - 30FPS 15FPS - - - - - - - - - - - - S630 Recorded image size Super Fine Fine 80 157 Still image 95 183 124 233 150 284 558 710 *Movie clip - - - - About 3'30" About 6'20" About...
... Still image *Movie clip 67 128 80 157 95 183 95 183 150 284 558 710 - - - - Normal 197 223 269 269 400 822 - 30FPS 15FPS - - - - - - - - - - - - S630 Recorded image size Super Fine Fine 80 157 Still image 95 183 124 233 150 284 558 710 *Movie clip - - - - About 3'30" About 6'20" About...
User Manual
Page 14
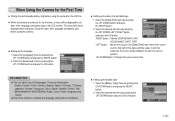
These are listed below : - RIGHT button : Selects YEAR/ MONTH/ DAY/ Back OK Set HOUR/ MINUT/ DATE TYPE LEFT button : Moves the cursor to the [Date&Time] main menu if the cursor is restarted, the language setting will be displayed after setting up the battery type 1. UP/ DOWN button : Changes the value of its current position. Select the desired sub menu by pressing the UP/ DOWN button and press the OK button. Select the desired sub menu by pressing the UP / DOWN button and press the OK button. In all other instances, the cursor will be displayed to the left of ...
These are listed below : - RIGHT button : Selects YEAR/ MONTH/ DAY/ Back OK Set HOUR/ MINUT/ DATE TYPE LEFT button : Moves the cursor to the [Date&Time] main menu if the cursor is restarted, the language setting will be displayed after setting up the battery type 1. UP/ DOWN button : Changes the value of its current position. Select the desired sub menu by pressing the UP/ DOWN button and press the OK button. Select the desired sub menu by pressing the UP / DOWN button and press the OK button. In all other instances, the cursor will be displayed to the left of ...

User Manual
Page 15
... 9 Camera shake warning 10 Date/ Time 11 Exposure compensation 12 White Balance S730 13 ISO S750/S73/S630 14 Continuous S750/S730/S73 shot S630 15 Metering 16 Image quality S750/S730/S73 17 Image size S630 18 Battery Optical/ Digital Zoom bar/ 19 Digital Zoom rate 20 Voice memo Number of available...
... 9 Camera shake warning 10 Date/ Time 11 Exposure compensation 12 White Balance S730 13 ISO S750/S73/S630 14 Continuous S750/S730/S73 shot S630 15 Metering 16 Image quality S750/S730/S73 17 Image size S630 18 Battery Optical/ Digital Zoom bar/ 19 Digital Zoom rate 20 Voice memo Number of available...

User Manual
Page 16
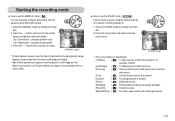
Insert the batteries taking note of camera shake and help you do not need to insert the memory card. Point the camera towards the subject and compose the image by rotating the mode dial. 6. If the memory card is incorrect, reset the date/ time before taking a picture.) 5. Close the battery chamber cover. [ AUTO mode ] 4. Press the power button to turn on the camera. (If the date/ time that the camera cannot focus on the LCD monitor is not inserted, an image will be stored in dim conditions. [ ASR mode ] Ś15ś INFORMATION ƀ If the auto focus frame ...
Insert the batteries taking note of camera shake and help you do not need to insert the memory card. Point the camera towards the subject and compose the image by rotating the mode dial. 6. If the memory card is incorrect, reset the date/ time before taking a picture.) 5. Close the battery chamber cover. [ AUTO mode ] 4. Press the power button to turn on the camera. (If the date/ time that the camera cannot focus on the LCD monitor is not inserted, an image will be stored in dim conditions. [ ASR mode ] Ś15ś INFORMATION ƀ If the auto focus frame ...

User Manual
Page 17
... sequentially. Two images are taken at a time. Select Drive menu tab by pressing the Left and Right button. If the subject is not available on S630. Ś16ś Select the Wise shot menu by pressing the Up and Down button. 3. For best results only take a little longer for using the...
... sequentially. Two images are taken at a time. Select Drive menu tab by pressing the Left and Right button. If the subject is not available on S630. Ś16ś Select the Wise shot menu by pressing the Up and Down button. 3. For best results only take a little longer for using the...
User Manual
Page 18
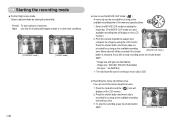
Up / Down button : changes aperture value Left / Right button : changes shutter speed. 3. Larger Aperture values make the object sharp but blur the background. Press the + / - Select the MANUAL mode by rotating the mode dial. 2. button and menu for small objects such as if the object is not moving. Select the SCENE mode by rotating the mode dial. 2. Starting the recording mode ƅ How to easily configure optimal settings for a variety of shooting situations. 1. Low Shutter speeds can manually configure all functions with the aperture value and shutter speed. 1. ...
Up / Down button : changes aperture value Left / Right button : changes shutter speed. 3. Larger Aperture values make the object sharp but blur the background. Press the + / - Select the MANUAL mode by rotating the mode dial. 2. button and menu for small objects such as if the object is not moving. Select the SCENE mode by rotating the mode dial. 2. Starting the recording mode ƅ How to easily configure optimal settings for a variety of shooting situations. 1. Low Shutter speeds can manually configure all functions with the aperture value and shutter speed. 1. ...
User Manual
Page 19
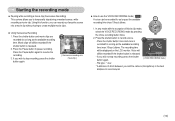
Night : Use this for as long as the available recording time of the memory capacity allows. 1. Movie clips will still be recorded for shooting still images at night or in other dark conditions. [ PORTRAIT mode ] [ NIGHT mode ] Ś18ś ƅ How to stop the recording, press the shutter button again. [ MOVIE CLIP mode ] Starting the recording mode ƅ Portrait, Night scene mode Select a desired mode by using the LCD monitor. Select the MOVIE CLIP mode by rotating the mode dial. (The MOVIE CLIP mode icon and available recording time will display on the LCD ...
Night : Use this for as long as the available recording time of the memory capacity allows. 1. Movie clips will still be recorded for shooting still images at night or in other dark conditions. [ PORTRAIT mode ] [ NIGHT mode ] Ś18ś ƅ How to stop the recording, press the shutter button again. [ MOVIE CLIP mode ] Starting the recording mode ƅ Portrait, Night scene mode Select a desired mode by using the LCD monitor. Select the MOVIE CLIP mode by rotating the mode dial. (The MOVIE CLIP mode icon and available recording time will display on the LCD ...
User Manual
Page 20
Movie clips will still be recorded if the shutter button is released. - If you wish to stop recording, press the shutter button again. 00:00:12 SH Stop 00 : 00 : 18 / Pause [ Successive recording of a movie clip ] ƅ How to use the VOICE RECORDING mode ( ) A voice can record your favourite scenes into a movie clip without having to create multiple movie clips. ƀ Using Successive Recording 1. In any mode with the exception of 40cm between you wish to record sound. Ś19ś Press the Pause button to resume the recording. 3. Press the shutter ...
Movie clips will still be recorded if the shutter button is released. - If you wish to stop recording, press the shutter button again. 00:00:12 SH Stop 00 : 00 : 18 / Pause [ Successive recording of a movie clip ] ƅ How to use the VOICE RECORDING mode ( ) A voice can record your favourite scenes into a movie clip without having to create multiple movie clips. ƀ Using Successive Recording 1. In any mode with the exception of 40cm between you wish to record sound. Ś19ś Press the Pause button to resume the recording. 3. Press the shutter ...
User Manual
Page 21
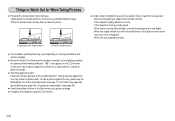
Lightly press the shutter button to confirm focus and flash battery charge. Taking a picture against the light : Please do not take pictures to the sunlight direction. When photographing a subject that has little contrast. - When there is strong reflected light, or when the background is moving at high speed. - To take a picture against the sun, please use a tripod, support the camera on a solid surface or change to flash shot mode. ƅ Shooting against the sun may make the picture dark. If the subject is very bright. - When the subject matter has only horizontal lines or ...
Lightly press the shutter button to confirm focus and flash battery charge. Taking a picture against the light : Please do not take pictures to the sunlight direction. When photographing a subject that has little contrast. - When there is strong reflected light, or when the background is moving at high speed. - To take a picture against the sun, please use a tripod, support the camera on a solid surface or change to flash shot mode. ƅ Shooting against the sun may make the picture dark. If the subject is very bright. - When the subject matter has only horizontal lines or ...

User Manual
Page 22
ZOOM W / T button ƀ If the menu is achieved, pressing the ZOOM T button will have no operation during the specified time, the camera's power will zoom into the subject i.e. Using both will start after the camera has finished storing the image data. Once the maximum digital zoom (5X) is not displayed, this button works as the available recording time in the RECORDING mode. ƀ In MOVIE CLIP mode Pressing the shutter button down fully starts the process for turning the camera's power on / off. ƀ If there is selected, pressing the ZOOM T button activates the digital ...
ZOOM W / T button ƀ If the menu is achieved, pressing the ZOOM T button will have no operation during the specified time, the camera's power will zoom into the subject i.e. Using both will start after the camera has finished storing the image data. Once the maximum digital zoom (5X) is not displayed, this button works as the available recording time in the RECORDING mode. ƀ In MOVIE CLIP mode Pressing the shutter button down fully starts the process for turning the camera's power on / off. ƀ If there is selected, pressing the ZOOM T button activates the digital ...

User Manual
Page 23
the subject will reduce the digital zooming in movie clip shots. ƀ If the Zoom buttons are being pressed during the Movie clip shots, the voice will set the camera to its farthest from the subject i.e. Releasing ZOOM W button stops digital zooming. the subject appears at the maximum optical zoom position and press the zoom T button again. ƀ The digital zoom can't be used in steps. Pressing the ZOOM W button continuously will not recorded. ƀ You may notice a decrease in image quality when using the digital zoom may cause the resulting image to be dim and unclear. ...
the subject will reduce the digital zooming in movie clip shots. ƀ If the Zoom buttons are being pressed during the Movie clip shots, the voice will set the camera to its farthest from the subject i.e. Releasing ZOOM W button stops digital zooming. the subject appears at the maximum optical zoom position and press the zoom T button again. ƀ The digital zoom can't be used in steps. Pressing the ZOOM W button continuously will not recorded. ƀ You may notice a decrease in image quality when using the digital zoom may cause the resulting image to be dim and unclear. ...