
User Manual
Page 2
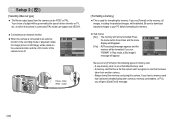
Set up the camera driver. Install the camera driver that is not in market, servicings may result from camera malfunction. ƀ Keep this manual in Application software CD-ROM. (p.85) Take a picture Take a picture. (p.15) Insert the USB cable Insert the supplied USB cable into the PC's USB port and the camera's USB connection terminal. (p.88) Check the camera's power Check the camera's power. Samsung camera takes no responsibility for buying a Samsung Digital Camera. ƀ Prior to using this camera, please read the user manual thoroughly. ƀ...
Set up the camera driver. Install the camera driver that is not in market, servicings may result from camera malfunction. ƀ Keep this manual in Application software CD-ROM. (p.85) Take a picture Take a picture. (p.15) Insert the USB cable Insert the supplied USB cable into the PC's USB port and the camera's USB connection terminal. (p.88) Check the camera's power Check the camera's power. Samsung camera takes no responsibility for buying a Samsung Digital Camera. ƀ Prior to using this camera, please read the user manual thoroughly. ƀ...
User Manual
Page 4
... & Bottom 7 ƅBottom/ 5-function button ŊŊŊŊ8 ƅSelf-timer lamp 8 ƅCamera Status Lamp ŊŊŊŊŊ8 ƅMode icon 9 ƀConnecting to a Power Source ŊŊ9 ƀInserting the memory card ŊŊŊ10 ƀInstructions on the [Setup] > [Battery Type] menu (p. 37) are disconnected before unplugging the cable from the wall socket. After use the menu ŊŊŊŊ...
... & Bottom 7 ƅBottom/ 5-function button ŊŊŊŊ8 ƅSelf-timer lamp 8 ƅCamera Status Lamp ŊŊŊŊŊ8 ƅMode icon 9 ƀConnecting to a Power Source ŊŊ9 ƀInserting the memory card ŊŊŊ10 ƀInstructions on the [Setup] > [Battery Type] menu (p. 37) are disconnected before unplugging the cable from the wall socket. After use the menu ŊŊŊŊ...

User Manual
Page 5
...;Playback 70 ƅProtecting images 70 ƅDeleting images 71 ƅDPOF 71 ƅCopy To Card 73 ƅOn Screen Display information Ŋ74 ƀPictBridge 75 ƅPictBridge : Picture Selection ŊŊ76 ƅPictBridge : Print Setting ŊŊŊŊ76 ƅPictBridge : Reset 77 ƀImportant notes 77 ƀWarning indicator 79 ƀBefore contacting a service centreŊ79 ƀSpecifications 81 SOFTWARE ƀSoftware...
...;Playback 70 ƅProtecting images 70 ƅDeleting images 71 ƅDPOF 71 ƅCopy To Card 73 ƅOn Screen Display information Ŋ74 ƀPictBridge 75 ƅPictBridge : Picture Selection ŊŊ76 ƅPictBridge : Print Setting ŊŊŊŊ76 ƅPictBridge : Reset 77 ƀImportant notes 77 ƀWarning indicator 79 ƀBefore contacting a service centreŊ79 ƀSpecifications 81 SOFTWARE ƀSoftware...

User Manual
Page 15
...; Aperture Value/ Shutter Speed Flash/ Without Sound Self-timer Macro Contrast F2.8, 1/30 Page p.9 p.17 p.25 / 18 p.27 p.23 p.30 No. Description 7 Sharpness 8 Auto focus frame 9 Camera shake warning 10 Date/ Time 11 Exposure compensation 12 White Balance S730 13 ISO S750/S73/S630 14 Continuous S750/S730/S73 shot S630 15 Metering 16 Image quality S750/S730/S73 17 Image size S630 18 Battery Optical/ Digital Zoom bar/ 19 Digital Zoom rate 20 Voice memo Number of available shots remaining 21 Movie...
...; Aperture Value/ Shutter Speed Flash/ Without Sound Self-timer Macro Contrast F2.8, 1/30 Page p.9 p.17 p.25 / 18 p.27 p.23 p.30 No. Description 7 Sharpness 8 Auto focus frame 9 Camera shake warning 10 Date/ Time 11 Exposure compensation 12 White Balance S730 13 ISO S750/S73/S630 14 Continuous S750/S730/S73 shot S630 15 Metering 16 Image quality S750/S730/S73 17 Image size S630 18 Battery Optical/ Digital Zoom bar/ 19 Digital Zoom rate 20 Voice memo Number of available shots remaining 21 Movie...

User Manual
Page 16
... case, the camera is incorrect, reset the date/ time before taking note of camera shake and help you get a well-exposed image in the internal memory. Insert the batteries taking a picture.) 5. Insert the memory card (p.10). Close the battery chamber cover. [ AUTO mode ] 4. You can still manually configure all functions except the aperture value and shutter speed. 1. Press the power button to turn on the camera. (If the date/ time that the camera cannot focus on the memory card. 3. Point the camera towards the...
... case, the camera is incorrect, reset the date/ time before taking note of camera shake and help you get a well-exposed image in the internal memory. Insert the batteries taking a picture.) 5. Insert the memory card (p.10). Close the battery chamber cover. [ AUTO mode ] 4. You can still manually configure all functions except the aperture value and shutter speed. 1. Press the power button to turn on the camera. (If the date/ time that the camera cannot focus on the memory card. 3. Point the camera towards the...
User Manual
Page 21
... to take pictures to flash shot mode. ƅ Shooting against the sun, please use a tripod, support the camera on the LCD monitor. If the subject is very bright. - To take a picture against the light : Please do not take the picture. [ Lightly press the shutter button ] [ Press the shutter button ] ƅ Under certain conditions the auto focus system may not perform as a stick or flagpole). - When the surroundings are dark. ƅ The available recording time...
... to take pictures to flash shot mode. ƅ Shooting against the sun, please use a tripod, support the camera on the LCD monitor. If the subject is very bright. - To take a picture against the light : Please do not take the picture. [ Lightly press the shutter button ] [ Press the shutter button ] ƅ Under certain conditions the auto focus system may not perform as a stick or flagpole). - When the surroundings are dark. ƅ The available recording time...

User Manual
Page 34
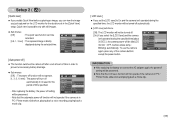
... File Language Date&Time Imprint LCD AF Lamp Back -6/41;0 6Ç)1; ,-= If you change the image file name, the image may not play back. [ Language ] ƅ There is assigned sequentially from 100 to 999 as follows: 100SSCAM Ɗ 101SSCAM Ɗ ~ Ɗ 999SSCAM. - The folder number is a choice of S630 is removed and inserted again, the language setting will be set from 0001 even after deleting all or inserting a new memory card...
... File Language Date&Time Imprint LCD AF Lamp Back -6/41;0 6Ç)1; ,-= If you change the image file name, the image may not play back. [ Language ] ƅ There is assigned sequentially from 100 to 999 as follows: 100SSCAM Ɗ 101SSCAM Ɗ ~ Ɗ 999SSCAM. - The folder number is a choice of S630 is removed and inserted again, the language setting will be set from 0001 even after deleting all or inserting a new memory card...
User Manual
Page 35
... Auto Focus lamp. ƀ Sub menus [Off] : The AF lamp will not light up in a low light condition. [On] : The AF lamp will not be deleted by [DELETE] or [Format] menu. - The start -up image with the [User Image] in the [RESIZE] menu in the play mode. - SETUP1 File Language Date&Time Imprint LCD AF Lamp Back Off On OK Set [ Start up image ] ƅ You can turn on the image file. [Date&Time] : The DATE & TIME will be deleted by [Reset] menu. Use a saved image...
... Auto Focus lamp. ƀ Sub menus [Off] : The AF lamp will not light up in a low light condition. [On] : The AF lamp will not be deleted by [DELETE] or [Format] menu. - The start -up image with the [User Image] in the [RESIZE] menu in the play mode. - SETUP1 File Language Date&Time Imprint LCD AF Lamp Back Off On OK Set [ Start up image ] ƅ You can turn on the image file. [Date&Time] : The DATE & TIME will be deleted by [Reset] menu. Use a saved image...
User Manual
Page 36
SETUP2 Quick View Power Off LCD Save Video Out Format Reset Back Off On OK Set INFORMATION ƀ After replacing the battery or connect the AC adapter again, the poweroff setting will be preserved. ƀ Note that the automatic power off function will not operate if the camera is briefly displayed during the selected time. SETUP2 Quick View Power Off LCD Save Video Out Format Reset Back Off 0.5 sec 1 sec 3 sec OK Set [ Auto power off ] ƅ This function switches the camera off after a set amount...
SETUP2 Quick View Power Off LCD Save Video Out Format Reset Back Off On OK Set INFORMATION ƀ After replacing the battery or connect the AC adapter again, the poweroff setting will be preserved. ƀ Note that the automatic power off function will not operate if the camera is briefly displayed during the selected time. SETUP2 Quick View Power Off LCD Save Video Out Format Reset Back Off 0.5 sec 1 sec 3 sec OK Set [ Auto power off ] ƅ This function switches the camera off after a set amount...
User Manual
Page 37
... of memory card. - SETUP2 Quick View Power Off LCD Save Video Out Format Reset Back No Yes OK Set Be sure to an external monitor in Play mode, a [No Image!] message will be formatted. Always format the memory card using other cameras, memory card readers, or PCs, you run [Format] on the memory, all images, including the protected images, will get a [Card Error!] message. Ś36ś Setup 2 ( ) [ Selecting Video out type ] ƅ The Movie output signal from another camera. - sound [ Formatting a memory ] ƅ This is connected to run [Format...
... of memory card. - SETUP2 Quick View Power Off LCD Save Video Out Format Reset Back No Yes OK Set Be sure to an external monitor in Play mode, a [No Image!] message will be formatted. Always format the memory card using other cameras, memory card readers, or PCs, you run [Format] on the memory, all images, including the protected images, will get a [Card Error!] message. Ś36ś Setup 2 ( ) [ Selecting Video out type ] ƅ The Movie output signal from another camera. - sound [ Formatting a memory ] ƅ This is connected to run [Format...

User Manual
Page 72
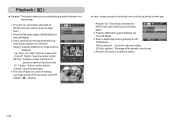
... OK button to the play mode screen. PLAYBACK Protect Delete DPOF Copy To Card OSD Info Back Select All OK Set T Select OK Delete Delete All? No Yes OK Confirm INFORMATION ƀ Of all the images are deleted and a [No Image!] message will permanently delete unprotected images. DPOF ƅDPOF(Digital Print Order Format) allows you print the image at an increasing number of photo labs. ƅThis function is not available for Movie clips and Voice recording files...
... OK button to the play mode screen. PLAYBACK Protect Delete DPOF Copy To Card OSD Info Back Select All OK Set T Select OK Delete Delete All? No Yes OK Confirm INFORMATION ƀ Of all the images are deleted and a [No Image!] message will permanently delete unprotected images. DPOF ƅDPOF(Digital Print Order Format) allows you print the image at an increasing number of photo labs. ƅThis function is not available for Movie clips and Voice recording files...
User Manual
Page 73
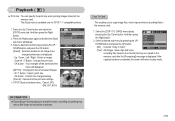
...; Images T OK Set pictures except movie and voice files. - Press the Up / Down button and select the [DPOF] menu tab. Press the Right button again and [Index] sub PLAYBACK Standard Index Size menu will display. 3. No Yes OK Set Ś72ś Back OK Set [Select] : Selection window for an image to print is selected : The image will show. If an image carries DPOF instructions, the DPOF indicator ( ) will be printed in...
...; Images T OK Set pictures except movie and voice files. - Press the Up / Down button and select the [DPOF] menu tab. Press the Right button again and [Index] sub PLAYBACK Standard Index Size menu will display. 3. No Yes OK Set Ś72ś Back OK Set [Select] : Selection window for an image to print is selected : The image will show. If an image carries DPOF instructions, the DPOF indicator ( ) will be printed in...
User Manual
Page 74
... an image to be saved and the menu will dispaly. 3. And then press the Right button. 2. PLAYBACK Protect Delete DPOF Copy To Card No OSD Info Yes - [No] : Cancels "Copy to Card". - [Yes] : All images, movie clips and voice Back OK Set recording files saved in the internal memory are copied to play mode. Playback ( ) ƅ Print size : You can specify the print size when printing images stored on the manufacturer and print model, cancelling the printing may take a little longer for the printer...
... an image to be saved and the menu will dispaly. 3. And then press the Right button. 2. PLAYBACK Protect Delete DPOF Copy To Card No OSD Info Yes - [No] : Cancels "Copy to Card". - [Yes] : All images, movie clips and voice Back OK Set recording files saved in the internal memory are copied to play mode. Playback ( ) ƅ Print size : You can specify the print size when printing images stored on the manufacturer and print model, cancelling the printing may take a little longer for the printer...

User Manual
Page 78
PictBridge : Reset ƅ Initialises user-changed configurations. 1. If [Yes] is lots of sand. - PICTBRIDGE Layout Type Quality Date File Reset Move No Yes Print ż Default print setting varies depending on beaches, coastal dunes, or other areas where there is selected : All print and image settings will not be reset. Important notes Be sure to select the desired sub menu value, and then press the OK button. Areas...
PictBridge : Reset ƅ Initialises user-changed configurations. 1. If [Yes] is lots of sand. - PICTBRIDGE Layout Type Quality Date File Reset Move No Yes Print ż Default print setting varies depending on beaches, coastal dunes, or other areas where there is selected : All print and image settings will not be reset. Important notes Be sure to select the desired sub menu value, and then press the OK button. Areas...
User Manual
Page 81
... camera has adopted the default settings ƊReset the date and time correctly The camera buttons do not operate ϏCamera malfunction Ɗ Remove/re-insert battery and switch the camera on A card error has occurred while the memory card is being used in low temperatures Ɗ Keep the camera in the camera. ϏIncorrect memory card format Ɗ Re-format the memory card The images don't play back ϏIncorrect file name (Violation of DCF format) Ɗ Do not change the image file...
... camera has adopted the default settings ƊReset the date and time correctly The camera buttons do not operate ϏCamera malfunction Ɗ Remove/re-insert battery and switch the camera on A card error has occurred while the memory card is being used in low temperatures Ɗ Keep the camera in the camera. ϏIncorrect memory card format Ɗ Re-format the memory card The images don't play back ϏIncorrect file name (Violation of DCF format) Ɗ Do not change the image file...
User Manual
Page 83
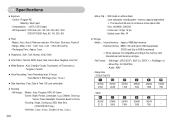
...; Shooting - File Format : ňStill Image : JPEG (DCF), EXIF 2.2, DPOF 1.1, PictBridge 1.0 ňMovie Clip : AVI (MJPEG) ňAudio : WAV - Specifications ƅ Exposure - Recharging Time : Approx. 5 sec. ƅ Sharpness : Soft+, Soft, Normal, Vivid, Vivid+ ƅ Color Effect : Normal, B&W, Sepia, Red, Green, Blue, Negative, User Set ƅ White Balance : Auto, Daylight, Cloudy, Fluorescent_H, Fluorescent_L, Tungsten, Custom ƅ Voice Recording : Voice Recording (max.10 hours) Voice Memo in flash, Slow sync, Flash off - Image Size...
...; Shooting - File Format : ňStill Image : JPEG (DCF), EXIF 2.2, DPOF 1.1, PictBridge 1.0 ňMovie Clip : AVI (MJPEG) ňAudio : WAV - Specifications ƅ Exposure - Recharging Time : Approx. 5 sec. ƅ Sharpness : Soft+, Soft, Normal, Vivid, Vivid+ ƅ Color Effect : Normal, B&W, Sepia, Red, Green, Blue, Negative, User Set ƅ White Balance : Auto, Daylight, Cloudy, Fluorescent_H, Fluorescent_L, Tungsten, Custom ƅ Voice Recording : Voice Recording (max.10 hours) Voice Memo in flash, Slow sync, Flash off - Image Size...

User Manual
Page 84
... (without batteries and card) ƅ Operating Temperature : 0 ~ 40ŪC ƅ Operating Humidity : 5 ~ 85% ƅ Software : Digimax Master, Adobe Reader ż Specifications are subject to change without prior notice. ż All trademarks are measured under Samsung's standard conditions and may vary depending on shooting conditions and camera settings. ƅ "E" Button - Primary Battery : 2 x AA Alkaline - Effect : Color, Image Adjust, Fun (Highlight, Composite ,Photo Frame) - Single image, Thumbnails, Slide show, Movie Clip...
... (without batteries and card) ƅ Operating Temperature : 0 ~ 40ŪC ƅ Operating Humidity : 5 ~ 85% ƅ Software : Digimax Master, Adobe Reader ż Specifications are subject to change without prior notice. ż All trademarks are measured under Samsung's standard conditions and may vary depending on shooting conditions and camera settings. ƅ "E" Button - Primary Battery : 2 x AA Alkaline - Effect : Color, Image Adjust, Fun (Highlight, Composite ,Photo Frame) - Single image, Thumbnails, Slide show, Movie Clip...

User Manual
Page 85
... can find [Removable Disk] in [Windows Explorer] or [My computer]. You can download, view, edit and save your digital images and movie clips clip with the Application CD. If the frame does not show, run . Software Notes Please ensure that has not been guaranteed by the manufacturer is based on English Edition of your computer. After installing the driver and connecting this manual, you should...
... can find [Removable Disk] in [Windows Explorer] or [My computer]. You can download, view, edit and save your digital images and movie clips clip with the Application CD. If the frame does not show, run . Software Notes Please ensure that has not been guaranteed by the manufacturer is based on English Edition of your computer. After installing the driver and connecting this manual, you should...

User Manual
Page 87
... Master opens after starting Digimax Master, the camera driver was set up the application software 3. Before opening the PDF files, you have installed the camera driver, the [Found New Hardware Wizard] may appear. Turn the camera power on. Search the PDF files with the USB cable. 4. In this camera. If the download window of user manual are included in the Software CD-ROM supplied with this case, specify "USB Driver" in the Software CD-ROM. ƀ To install the...
... Master opens after starting Digimax Master, the camera driver was set up the application software 3. Before opening the PDF files, you have installed the camera driver, the [Found New Hardware Wizard] may appear. Turn the camera power on. Search the PDF files with the USB cable. 4. In this camera. If the download window of user manual are included in the Software CD-ROM supplied with this case, specify "USB Driver" in the Software CD-ROM. ƀ To install the...

User Manual
Page 94
... following menus. [Add Media] : You can add other USB cable, and connect only one USB cable to the PC directly. Movie clip edit functions are not compatible. Sometimes, the camera may malfunction when it is an unexpected error during file transfer. Ɗ Turn the camera power off the camera, remove the USB cable, plug in connecting the camera to the PC through the USB hub if the PC and the hub are listed...
... following menus. [Add Media] : You can add other USB cable, and connect only one USB cable to the PC directly. Movie clip edit functions are not compatible. Sometimes, the camera may malfunction when it is an unexpected error during file transfer. Ɗ Turn the camera power off the camera, remove the USB cable, plug in connecting the camera to the PC through the USB hub if the PC and the hub are listed...


