User Manual
Page 2
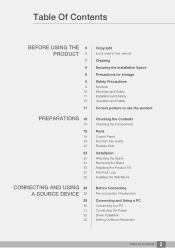
... Icons used in this manual Cleaning Securing the Installation Space Precautions for storage Safety Precautions Symbols Electricity and Safety Installation and Safety Operation and Safety Correct posture to use the product Checking the Contents Checking the Components Parts Control Panel Function Key Guide Reverse Side Installation Attaching the Stand Removing the Stand Adjusting the Product Tilt Anti-theft Lock Installing the Wall Mount Before Connecting Pre-connection Checkpoints Connecting and Using a PC Connecting to a PC Connecting the Power Driver Installation Setting Optimum Resolution...
... Icons used in this manual Cleaning Securing the Installation Space Precautions for storage Safety Precautions Symbols Electricity and Safety Installation and Safety Operation and Safety Correct posture to use the product Checking the Contents Checking the Components Parts Control Panel Function Key Guide Reverse Side Installation Attaching the Stand Removing the Stand Adjusting the Product Tilt Anti-theft Lock Installing the Wall Mount Before Connecting Pre-connection Checkpoints Connecting and Using a PC Connecting to a PC Connecting the Power Driver Installation Setting Optimum Resolution...
User Manual
Page 9
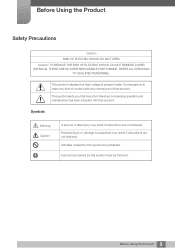
... USER SERVICEABLE PARTS INSIDE. This symbol alerts you that high voltage is dangerous to properties may result if instructions are not followed. Instructions marked by this product. This symbol indicates that important literature concerning operation and maintenance has been included with any kind of this symbol are prohibited. Personal injury or damage to make any internal part...
... USER SERVICEABLE PARTS INSIDE. This symbol alerts you that high voltage is dangerous to properties may result if instructions are not followed. Instructions marked by this product. This symbol indicates that important literature concerning operation and maintenance has been included with any kind of this symbol are prohibited. Personal injury or damage to make any internal part...

User Manual
Page 11
... the plug when disconnecting the power cord from the power socket. An electric shock or fire may result. Do not use . The product may suffocate. 11 Before Using the Product Before Using the Product Caution Do not unplug the power cord when the product is connected unobstructed. If any problem occurs in the product, unplug the power cable to the...
... the plug when disconnecting the power cord from the power socket. An electric shock or fire may result. Do not use . The product may suffocate. 11 Before Using the Product Before Using the Product Caution Do not unplug the power cord when the product is connected unobstructed. If any problem occurs in the product, unplug the power cable to the...
User Manual
Page 21
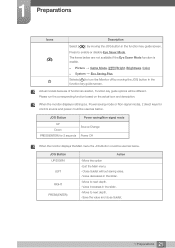
... be used as below . Power saving mode or Non-signal mode), 2 direct keys for 2 seconds Source Change Power Off When the monitor displays the Main menu the JOG Button could be different. Close Sublist without saving value. - Move to turn the Monitor off by moving the JOG button in the function key guide screen. JOG Button Power saving/Non-signal mode UP Down PRESS(ENTER) for control source and power could be used as below . When the monitor displays nothing...
... be used as below . Power saving mode or Non-signal mode), 2 direct keys for 2 seconds Source Change Power Off When the monitor displays the Main menu the JOG Button could be different. Close Sublist without saving value. - Move to turn the Monitor off by moving the JOG button in the function key guide screen. JOG Button Power saving/Non-signal mode UP Down PRESS(ENTER) for control source and power could be used as below . When the monitor displays nothing...
User Manual
Page 29
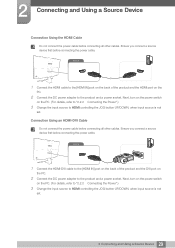
... you connect a source device first before connecting the power cable. Next, turn on the power switch on the PC. (For details, refer to "2.2.2 Connecting the Power".) 3 Change the input source to HDMI controlling the JOG button UP/DOWN, when input source is not set . HDMI IN 1 Connect the HDMI cable to the [HDMI IN] port on the back of the product and the DVI port on the PC. 2 Connect the DC power adapter to the product and a power socket. HDMI IN 1 Connect the HDMI-DVI cable...
... you connect a source device first before connecting the power cable. Next, turn on the power switch on the PC. (For details, refer to "2.2.2 Connecting the Power".) 3 Change the input source to HDMI controlling the JOG button UP/DOWN, when input source is not set . HDMI IN 1 Connect the HDMI cable to the [HDMI IN] port on the back of the product and the DVI port on the PC. 2 Connect the DC power adapter to the product and a power socket. HDMI IN 1 Connect the HDMI-DVI cable...

User Manual
Page 32
... 2.2.3 Driver Installation You can set the optimum resolution and frequency for further details. 32 2 Connecting and Using a Source Device Refer to your Windows OS manual for this product by installing the corresponding drivers. An installation driver is contained on the CD supplied with the product. If the file provided is faulty, visit the Samsung homepage (http://www.samsung.com/) and download the file. 1 Insert the user manual...
... 2.2.3 Driver Installation You can set the optimum resolution and frequency for further details. 32 2 Connecting and Using a Source Device Refer to your Windows OS manual for this product by installing the corresponding drivers. An installation driver is contained on the CD supplied with the product. If the file provided is faulty, visit the Samsung homepage (http://www.samsung.com/) and download the file. 1 Insert the user manual...

User Manual
Page 34
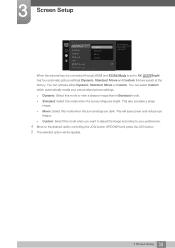
... suit your product for details. 3.1 SAMSUNG MAGIC Bright This menu provides an optimum picture quality suitable for enjoying video and DVD content. Dynamic Contrast: Obtain balanced brightness through automatic contrast adjustment. 34 3 Screen Setup Picture SMAAMSGUINCG Bright Brightness Contrast Sharpness Color SMAAMSGUINCG Upscale HDMI Black Level Custom 100 Standard 75 Cinema 60 Dynamic ContrasCtusto5m0 50 22O00ff 0 Set to the actual product. 3 Screen Setup Configure the screen settings such as required. Standard...
... suit your product for details. 3.1 SAMSUNG MAGIC Bright This menu provides an optimum picture quality suitable for enjoying video and DVD content. Dynamic Contrast: Obtain balanced brightness through automatic contrast adjustment. 34 3 Screen Setup Picture SMAAMSGUINCG Bright Brightness Contrast Sharpness Color SMAAMSGUINCG Upscale HDMI Black Level Custom 100 Standard 75 Cinema 60 Dynamic ContrasCtusto5m0 50 22O00ff 0 Set to the actual product. 3 Screen Setup Configure the screen settings such as required. Standard...
User Manual
Page 35
... Custom. 3 Screen Setup Picture SMAAMSGUINCG Bright Brightness Contrast Sharpness Color SMAAMSGUINCG Upscale HDMI Black Level Dynamic Standard Movie Custom 100 75 60 Custo5m0 50 22O00ff 0 Set to AV, MSAAMSGUINCGBright has four automatic picture settings (Dynamic, Standard, Movie and Custom) that are preset at the factory. When the external input is connected through HDMI and PC/AV Mode is set to an optimum picture quality suitable for the working environment. This...
... Custom. 3 Screen Setup Picture SMAAMSGUINCG Bright Brightness Contrast Sharpness Color SMAAMSGUINCG Upscale HDMI Black Level Dynamic Standard Movie Custom 100 75 60 Custo5m0 50 22O00ff 0 Set to AV, MSAAMSGUINCGBright has four automatic picture settings (Dynamic, Standard, Movie and Custom) that are preset at the factory. When the external input is connected through HDMI and PC/AV Mode is set to an optimum picture quality suitable for the working environment. This...
User Manual
Page 42
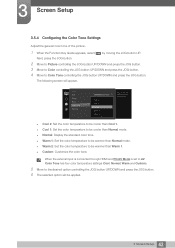
... appear. 3 Screen Setup 3.5.4 Configuring the Color Tone Settings Adjust the general color tone of the picture. 1 When the Function Key Guide appears, select [ ] by moving the JOG button UP. Color Red Green Blue Color Tone Gamma Cool 2 Cool 1 Normal Warm 1 Warm 2 50 50 50 Normal Mode1 Select a color tone that best suits your viewing needs. Cool 2: Set the color temperature to be cooler than Cool 1. Cool 1: Set the color temperature...
... appear. 3 Screen Setup 3.5.4 Configuring the Color Tone Settings Adjust the general color tone of the picture. 1 When the Function Key Guide appears, select [ ] by moving the JOG button UP. Color Red Green Blue Color Tone Gamma Cool 2 Cool 1 Normal Warm 1 Warm 2 50 50 50 Normal Mode1 Select a color tone that best suits your viewing needs. Cool 2: Set the color temperature to be cooler than Cool 1. Cool 1: Set the color temperature...

User Manual
Page 45
... the video signal. Normal: Select this mode when there is no contrast ratio degradation. Low: Select this is the case, correct the degraded picture quality using HDMI Black Level. This function is only available in HDMI mode. The functions available on the monitor may vary depending on the connected source device. Refer to adjust the image quality. Picture SMAAMSGUINCG Bright Brightness Contrast Sharpness Color SMAAMSGUINCG Upscale HDMI Black...
... the video signal. Normal: Select this mode when there is no contrast ratio degradation. Low: Select this is the case, correct the degraded picture quality using HDMI Black Level. This function is only available in HDMI mode. The functions available on the monitor may vary depending on the connected source device. Refer to adjust the image quality. Picture SMAAMSGUINCG Bright Brightness Contrast Sharpness Color SMAAMSGUINCG Upscale HDMI Black...

User Manual
Page 50
... Time Picture Size Screen Adjustment 4:3 16:9 Screen Fit 1O00ff O75ff 60 50 50 2200 0 Choose the size and aspect ratio of the picture displayed on the ports provided with an aspect ratio of these signals.). This can only be set when the external input is connected through HDMI and PC/AV Mode is 480p, 576p, 720p, or 1080p and monitor can display normally (Not every model can support...
... Time Picture Size Screen Adjustment 4:3 16:9 Screen Fit 1O00ff O75ff 60 50 50 2200 0 Choose the size and aspect ratio of the picture displayed on the ports provided with an aspect ratio of these signals.). This can only be set when the external input is connected through HDMI and PC/AV Mode is 480p, 576p, 720p, or 1080p and monitor can display normally (Not every model can support...

User Manual
Page 58
... the default setting. 4 Move to Eco Saving Plus controlling the JOG button UP/DOWN and press the JOG button. The following screen will be applied. 58 5 Setup and Reset System Eco Saving Plus Off Timer PC/AV Mode Source Detection Key Repeat Time Power LED On Reset All Off Auto Low High Adjust the power consumption of each function is enabled. The functions available on the monitor may...
... the default setting. 4 Move to Eco Saving Plus controlling the JOG button UP/DOWN and press the JOG button. The following screen will be applied. 58 5 Setup and Reset System Eco Saving Plus Off Timer PC/AV Mode Source Detection Key Repeat Time Power LED On Reset All Off Auto Low High Adjust the power consumption of each function is enabled. The functions available on the monitor may...

User Manual
Page 68
... the sound or cause choppy audio when applying the headphones. Set the input volume for the input device to a problem with the volume of a connected input device is weak, usually due to at least 20% and control the volume using the volume control (JOG button LEFT/RIGHT) on the product. Mute can also be disabled when the monitor turns on or power-saving mode activates. If the audio quality of an input device...
... the sound or cause choppy audio when applying the headphones. Set the input volume for the input device to a problem with the volume of a connected input device is weak, usually due to at least 20% and control the volume using the volume control (JOG button LEFT/RIGHT) on the product. Mute can also be disabled when the monitor turns on or power-saving mode activates. If the audio quality of an input device...

User Manual
Page 71
... is properly connected to "2.2 Connecting and Using a PC") 71 8 Troubleshooting Guide Solutions Check the cable connection between the product and PC, and ensure the connectors are locked. (Refer to a PC, perform a self-diagnosis test. 1 Power off . If the problem persists, contact Samsung Customer Service Center. If the screen remains blank, check the PC system, video controller and cable. 8.1.2 Checking the Resolution and Frequency For a mode that exceeds the supported resolution (refer to "9.3 Standard Signal Mode Table"), the...
... is properly connected to "2.2 Connecting and Using a PC") 71 8 Troubleshooting Guide Solutions Check the cable connection between the product and PC, and ensure the connectors are locked. (Refer to a PC, perform a self-diagnosis test. 1 Power off . If the problem persists, contact Samsung Customer Service Center. If the screen remains blank, check the PC system, video controller and cable. 8.1.2 Checking the Resolution and Frequency For a mode that exceeds the supported resolution (refer to "9.3 Standard Signal Mode Table"), the...
User Manual
Page 72
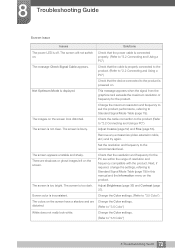
... and are Change the Color settings. The screen is too bright. The screen is blurry. The screen is displayed. Check that the power cable is connected properly. (Refer to "2.2 Connecting and Using a PC") Check that the cable is properly connected to the product. (Refer to the product is inconsistent. Adjust Brightness (page 36) and Contrast (page 37). distorted. (Refer to "3.5 Color") 72 8 Troubleshooting Guide There are within the range of resolution and frequency compatible with the product...
... and are Change the Color settings. The screen is too bright. The screen is blurry. The screen is displayed. Check that the power cable is connected properly. (Refer to "2.2 Connecting and Using a PC") Check that the cable is properly connected to the product. (Refer to the product is inconsistent. Adjust Brightness (page 36) and Contrast (page 37). distorted. (Refer to "3.5 Color") 72 8 Troubleshooting Guide There are within the range of resolution and frequency compatible with the product...
User Manual
Page 75
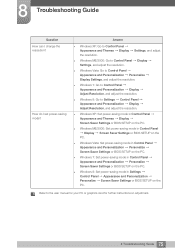
... Appearance and Themes Display Settings, and adjust the resolution. Windows ME/2000: Go to Control Panel Display Settings, and adjust the resolution. Windows Vista: Go to Control Panel Appearance and Personalization Personalize Display Settings, and adjust the resolution. Windows 7: Go to Control Panel Appearance and Personalization Display Adjust Resolution, and adjust the resolution. Windows 8: Go to the user manual for your PC or graphics card for further instructions on the PC. 8 Troubleshooting Guide Question How can I set power-saving mode?
... Appearance and Themes Display Settings, and adjust the resolution. Windows ME/2000: Go to Control Panel Display Settings, and adjust the resolution. Windows Vista: Go to Control Panel Appearance and Personalization Personalize Display Settings, and adjust the resolution. Windows 7: Go to Control Panel Appearance and Personalization Display Adjust Resolution, and adjust the resolution. Windows 8: Go to the user manual for your PC or graphics card for further instructions on the PC. 8 Troubleshooting Guide Question How can I set power-saving mode?
User Manual
Page 76
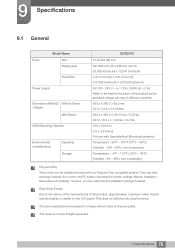
... the installation settings if desired. The above specifications are subject to change without notice to improve quality. This does not affect product performance. This device is a Class B digital apparatus. 76 9 Specifications However, you can be brighter or darker on the LCD panel. 9 Specifications 9.1 General Panel Model Name Size Display area Pixel Pitch Power Supply Dimensions (WxHxD) Without Stand / Weight With Stand VESA Mounting Interface Environmental considerations Operating Storage S27E510C 27 Inches (68...
... the installation settings if desired. The above specifications are subject to change without notice to improve quality. This does not affect product performance. This device is a Class B digital apparatus. 76 9 Specifications However, you can be brighter or darker on the LCD panel. 9 Specifications 9.1 General Panel Model Name Size Display area Pixel Pitch Power Supply Dimensions (WxHxD) Without Stand / Weight With Stand VESA Mounting Interface Environmental considerations Operating Storage S27E510C 27 Inches (68...
User Manual
Page 79
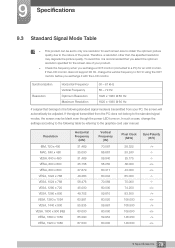
... the power LED turns on. Synchronization Resolution Horizontal Frequency Vertical Frequency Optimum Resolution Maximum Resolution 30 - 81 kHz 56 - 72 Hz 1920 x 1080 @ 60 Hz 1920 x 1080 @ 60 Hz If a signal that you select the optimum resolution specified for the screen size of your product. Check the frequency when you exchange a CDT monitor (connected to a PC) for each screen size to obtain the optimum picture quality due to 60 Hz using...
... the power LED turns on. Synchronization Resolution Horizontal Frequency Vertical Frequency Optimum Resolution Maximum Resolution 30 - 81 kHz 56 - 72 Hz 1920 x 1080 @ 60 Hz 1920 x 1080 @ 60 Hz If a signal that you select the optimum resolution specified for the screen size of your product. Check the frequency when you exchange a CDT monitor (connected to a PC) for each screen size to obtain the optimum picture quality due to 60 Hz using...

User Manual
Page 91
... affects screen flicker. 91 Appendix Horizontal Frequency Characters or images displayed on the monitor screen consist of the graphics cards in Hz. Gamma The Gamma menu adjusts the grey scale that the screen refreshes 60 times per second by those horizontal lines. Changing the grey scale through Gamma adjustment will change the medium brightness on the monitor screen. A horizontal frequency of 85 means that the horizontal lines that show variations of color change the screen brightness, tint, size...
... affects screen flicker. 91 Appendix Horizontal Frequency Characters or images displayed on the monitor screen consist of the graphics cards in Hz. Gamma The Gamma menu adjusts the grey scale that the screen refreshes 60 times per second by those horizontal lines. Changing the grey scale through Gamma adjustment will change the medium brightness on the monitor screen. A horizontal frequency of 85 means that the horizontal lines that show variations of color change the screen brightness, tint, size...

User Manual
Page 93
... Using a PC 28 Contact SAMSUNG WORLD WIDE 81 Contrast 37 Copyright 6 Correct Disposal 90 Correct posture to use the product 17 D Display Time 57 E Easy Setting Box 69 Eco Saving Plus 58 Eye Saver Mode 46 G Game Mode 47 General 76 H HDMI Black Level 45 I Information 66 Installation 23 K Key Repeat Time 63 L Language 56 O Off Timer 59 P Parts 19 PC/AV Mode 61 Picture Size 49 Position 55 Power LED...
... Using a PC 28 Contact SAMSUNG WORLD WIDE 81 Contrast 37 Copyright 6 Correct Disposal 90 Correct posture to use the product 17 D Display Time 57 E Easy Setting Box 69 Eco Saving Plus 58 Eye Saver Mode 46 G Game Mode 47 General 76 H HDMI Black Level 45 I Information 66 Installation 23 K Key Repeat Time 63 L Language 56 O Off Timer 59 P Parts 19 PC/AV Mode 61 Picture Size 49 Position 55 Power LED...


