User Manual
Page 2
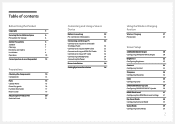
... Guide 17 Reverse Side 19 Adjusting the Product Tilt 20 Anti-theft Lock 21 Connecting and Using a Source Device Before Connecting 22 Pre-connection Checkpoints 22 Connecting and Using a PC 22 Connection Using the D-SUB Cable (Analogue Type) 22 Connection Using the HDMI Cable 23 Connection Using an HDMI-DVI Cable 23 Connection Using an DP Cable 24 Connecting to Headphones 24 Connecting the Power 25 Driver Installation 26 Setting Optimum Resolution 26 Using the Wireless Charging function Wireless Charging 27 Precautions 28 Screen Setup SAMSUNG MAGIC Bright...
... Guide 17 Reverse Side 19 Adjusting the Product Tilt 20 Anti-theft Lock 21 Connecting and Using a Source Device Before Connecting 22 Pre-connection Checkpoints 22 Connecting and Using a PC 22 Connection Using the D-SUB Cable (Analogue Type) 22 Connection Using the HDMI Cable 23 Connection Using an HDMI-DVI Cable 23 Connection Using an DP Cable 24 Connecting to Headphones 24 Connecting the Power 25 Driver Installation 26 Setting Optimum Resolution 26 Using the Wireless Charging function Wireless Charging 27 Precautions 28 Screen Setup SAMSUNG MAGIC Bright...
User Manual
Page 3
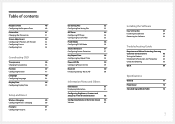
... Others Information 61 Displaying Information 61 Configuring Brightness, Contrast and Sharpness from the Initial Screen 62 Configuring Volume in the Initial Screen 63 Volume 63 Installing the Software Easy Setting Box 64 Installing the Software 64 Removing the Software 64 Troubleshooting Guide Requirements Before Contacting Samsung Customer Service Centre 65 Testing the Product 65 Checking the Resolution and Frequency 65 Check the following. 66 Q & A 69 Specifications General 71 PowerSaver 73 Standard Signal Mode Table 74 3
... Others Information 61 Displaying Information 61 Configuring Brightness, Contrast and Sharpness from the Initial Screen 62 Configuring Volume in the Initial Screen 63 Volume 63 Installing the Software Easy Setting Box 64 Installing the Software 64 Removing the Software 64 Troubleshooting Guide Requirements Before Contacting Samsung Customer Service Centre 65 Testing the Product 65 Checking the Resolution and Frequency 65 Check the following. 66 Q & A 69 Specifications General 71 PowerSaver 73 Standard Signal Mode Table 74 3

User Manual
Page 6
... of space as shown below or greater when installing the product. ――The exterior may result if instructions are prohibited. Instructions marked by this symbol must be charged.) This symbol alerts you want to clean the inside . Symbols Warning A serious or fatal...models can develop white stains on the product. 10 cm (3,93 inches) 10 cm (3,93 inches) 10 cm (3,93 inches) 10 cm (3,93 inches) Safety Precautions Caution RISK OF ELECTRIC SHOCK DO NOT OPEN Caution : TO REDUCE THE RISK OF ELECTRIC SHOCK, DO NOT REMOVE COVER. (OR BACK) THERE ARE NO USER SERVICEABLE PARTS...
... of space as shown below or greater when installing the product. ――The exterior may result if instructions are prohibited. Instructions marked by this symbol must be charged.) This symbol alerts you want to clean the inside . Symbols Warning A serious or fatal...models can develop white stains on the product. 10 cm (3,93 inches) 10 cm (3,93 inches) 10 cm (3,93 inches) 10 cm (3,93 inches) Safety Precautions Caution RISK OF ELECTRIC SHOCK DO NOT OPEN Caution : TO REDUCE THE RISK OF ELECTRIC SHOCK, DO NOT REMOVE COVER. (OR BACK) THERE ARE NO USER SERVICEABLE PARTS...
User Manual
Page 17
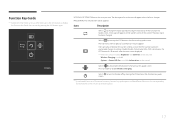
... input signal has been changed. Return UP/DOWN/LEFT/RIGHT: Move to display the Function Key Guide. Wireless Charging is available. Function Key Guide ――To enter the main menu or to use other items, press the JOG button to the item you want. The description for 10 seconds when the main menu displayed. ――If the OSD control is locked, Brightness and Contrast...
... input signal has been changed. Return UP/DOWN/LEFT/RIGHT: Move to display the Function Key Guide. Wireless Charging is available. Function Key Guide ――To enter the main menu or to use other items, press the JOG button to the item you want. The description for 10 seconds when the main menu displayed. ――If the OSD control is locked, Brightness and Contrast...

User Manual
Page 19
Connect to a source device using the D-SUB cable. Connects to a PC using an HDMI cable or HDMI-DVI cable. Specifications are subject to change without notice to a PC using a DP cable. Reverse Side ――The colour and shape of parts may differ from what is shown. Port Description Connects to improve quality. Connect to the DC power adapter. 19 Connects to an audio output device such as headphones.
Connect to a source device using the D-SUB cable. Connects to a PC using an HDMI cable or HDMI-DVI cable. Specifications are subject to change without notice to a PC using a DP cable. Reverse Side ――The colour and shape of parts may differ from what is shown. Port Description Connects to improve quality. Connect to the DC power adapter. 19 Connects to an audio output device such as headphones.

User Manual
Page 23
.... 2 Connect the DC power adapter to the HDMI IN port on the back of the product and the HDMI port on the product. 23 Connection Using an HDMI-DVI Cable ――Do not connect the power cable before connecting the power cable. Next, turn on the power switch on the PC. 3 Change the input source to HDMI controlling the JOG button UP/DOWN, when input source is connected using the HDMI-DVI cable. ――Provided ports may vary depending on the product. 1 Connect the HDMI-DVI cable...
.... 2 Connect the DC power adapter to the HDMI IN port on the back of the product and the HDMI port on the product. 23 Connection Using an HDMI-DVI Cable ――Do not connect the power cable before connecting the power cable. Next, turn on the power switch on the PC. 3 Change the input source to HDMI controlling the JOG button UP/DOWN, when input source is connected using the HDMI-DVI cable. ――Provided ports may vary depending on the product. 1 Connect the HDMI-DVI cable...

User Manual
Page 24
.... ――The sound could only be heard when using the HDMI to DisplayPort controlling the JOG button UP/DOWN, when input source is not set. ――A DP cable shorter under 1.5m in length is recommended. Ensure you connect a source device first before connecting the power cable. Next, turn on the power switch on the PC. 3 Change the input source to HDMI cable or DP cable. ――Provided ports may vary depending...
.... ――The sound could only be heard when using the HDMI to DisplayPort controlling the JOG button UP/DOWN, when input source is not set. ――A DP cable shorter under 1.5m in length is recommended. Ensure you connect a source device first before connecting the power cable. Next, turn on the power switch on the PC. 3 Change the input source to HDMI cable or DP cable. ――Provided ports may vary depending...

User Manual
Page 26
... message about setting optimum resolution will appear up to Display Properties and check that the resolution and refresh rate are appropriate. Refer to your PC. 4 Go to three times for a specified time even when the product is turned off and on again. ――The optimum resolution can set the resolution on your Windows OS manual for further details. Setup Guide Language The optimal resolution for this monitor is...
... message about setting optimum resolution will appear up to Display Properties and check that the resolution and refresh rate are appropriate. Refer to your PC. 4 Go to three times for a specified time even when the product is turned off and on again. ――The optimum resolution can set the resolution on your Windows OS manual for further details. Setup Guide Language The optimal resolution for this monitor is...
User Manual
Page 30
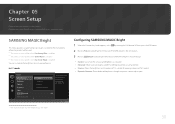
...; Dynamic Contrast: Obtain balanced brightness through automatic contrast adjustment. -- In PC mode Picture SMAAMSGUINCG Bright Brightness Contrast Sharpness Color SMAAMSGUINCG Upscale HDMI Black Level Custom Standard Cinema Dynamic Contrast Set to suit your product for details. Off Return Configuring SAMSUNG MAGIC Bright 1 When the Function Key Guide appears, select by moving the JOG button UP. The displayed image may differ depending on the model. 30 Chapter 05 Screen Setup Configure the screen settings such as...
...; Dynamic Contrast: Obtain balanced brightness through automatic contrast adjustment. -- In PC mode Picture SMAAMSGUINCG Bright Brightness Contrast Sharpness Color SMAAMSGUINCG Upscale HDMI Black Level Custom Standard Cinema Dynamic Contrast Set to suit your product for details. Off Return Configuring SAMSUNG MAGIC Bright 1 When the Function Key Guide appears, select by moving the JOG button UP. The displayed image may differ depending on the model. 30 Chapter 05 Screen Setup Configure the screen settings such as...

User Manual
Page 31
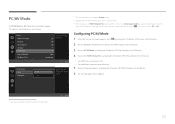
... personalized picture settings. •• Dynamic: Select this mode to the desired option controlling the JOG button UP/DOWN and press the JOG button. 5 The selected option will be applied. -- The displayed image may differ depending on the model. 31 This also provides a sharp image. •• Movie: Select this mode when the surroundings are bright. In AV mode Picture SMAAMSGUINCG Bright Brightness Contrast Sharpness Color SMAAMSGUINCG Upscale HDMI Black...
... personalized picture settings. •• Dynamic: Select this mode to the desired option controlling the JOG button UP/DOWN and press the JOG button. 5 The selected option will be applied. -- The displayed image may differ depending on the model. 31 This also provides a sharp image. •• Movie: Select this mode when the surroundings are bright. In AV mode Picture SMAAMSGUINCG Bright Brightness Contrast Sharpness Color SMAAMSGUINCG Upscale HDMI Black...

User Manual
Page 35
... tone that best suits your viewing needs. -- The displayed image may differ depending on the model. Picture SMAAMSGUINCG Bright Brightness Contrast Sharpness Color SMAAMSGUINCG Upscale HDMI Black Level Custom 100 75 60 Configure color settings. Values closer to 100 mean greater intensity for the colour •• Green: Adjust the green saturation level. Values closer to 100 mean greater intensity for the colour. •• Blue: Adjust the blue saturation level...
... tone that best suits your viewing needs. -- The displayed image may differ depending on the model. Picture SMAAMSGUINCG Bright Brightness Contrast Sharpness Color SMAAMSGUINCG Upscale HDMI Black Level Custom 100 75 60 Configure color settings. Values closer to 100 mean greater intensity for the colour •• Green: Adjust the green saturation level. Values closer to 100 mean greater intensity for the colour. •• Blue: Adjust the blue saturation level...
User Manual
Page 37
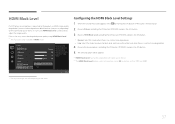
Picture SMAAMSGUINCG Bright Brightness Contrast Sharpness Color SAMSUNG MAGIC Upscale HDMI Black Level Normal Low Custom 100 75 60 Optimize HDMI picture brightness and contrast by adjusting the black level of the video signal. 해제 Return Configuring the HDMI Black Level Settings 1 When the Function Key Guide appears, select by moving the JOG button UP. Next, press the JOG button. 2 Move to Picture controlling the JOG button UP/DOWN and press the JOG button. 3 Move to HDMI Black Level...
Picture SMAAMSGUINCG Bright Brightness Contrast Sharpness Color SAMSUNG MAGIC Upscale HDMI Black Level Normal Low Custom 100 75 60 Optimize HDMI picture brightness and contrast by adjusting the black level of the video signal. 해제 Return Configuring the HDMI Black Level Settings 1 When the Function Key Guide appears, select by moving the JOG button UP. Next, press the JOG button. 2 Move to Picture controlling the JOG button UP/DOWN and press the JOG button. 3 Move to HDMI Black Level...
User Manual
Page 51
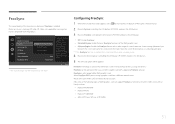
... screen may flicker when you use a Samsung DP cable. Return -- The displayed image may differ depending on the model. Note that screen flickering may occur during game play games. 4 Move to the desired option controlling the JOG button UP/DOWN and press the JOG button. 5 The selected option will be operated when you play . ――If the FreeSync function is only supported by...
... screen may flicker when you use a Samsung DP cable. Return -- The displayed image may differ depending on the model. Note that screen flickering may occur during game play games. 4 Move to the desired option controlling the JOG button UP/DOWN and press the JOG button. 5 The selected option will be operated when you play . ――If the FreeSync function is only supported by...

User Manual
Page 52
... game option settings. A higher resolution generally decreases the response rate. ――If the FreeSync function is enabled, the response rate during the game may also fix this issue. Decreasing the game setting values might help to remove the flicker. Point the right mouse button, select the AMD Catalyst Control Centre. 52 ――For additional AMD graphics card models that support the FreeSync...
... game option settings. A higher resolution generally decreases the response rate. ――If the FreeSync function is enabled, the response rate during the game may also fix this issue. Decreasing the game setting values might help to remove the flicker. Point the right mouse button, select the AMD Catalyst Control Centre. 52 ――For additional AMD graphics card models that support the FreeSync...
User Manual
Page 56
.../AV mode for the HDMI source. ――This function does not support Analog mode. ――Supplied for the wide models only such as 16:9 or 16:10. ――If the monitor is useful when you view a movie. You can select PC or AV. Return 56 This option is in HDMI, DisplayPort mode and the screen says Check Signal Cable or power saving mode activates, press the JOG button to...
.../AV mode for the HDMI source. ――This function does not support Analog mode. ――Supplied for the wide models only such as 16:9 or 16:10. ――If the monitor is useful when you view a movie. You can select PC or AV. Return 56 This option is in HDMI, DisplayPort mode and the screen says Check Signal Cable or power saving mode activates, press the JOG button to...
User Manual
Page 64
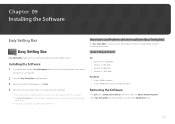
... Setting Box, download it from the Samsung Electronics website at http://www.samsung.com. 2 Select the Easy Setting Box setup Programme. 3 When the Installation Wizard appears, click Next. 4 Follow the instructions given on the screen to use the monitor by the Graphics Card, Motherboard and the Networking Environment. Installing the Software 1 To install the latest version of free space on the computer system and the product specifications...
... Setting Box, download it from the Samsung Electronics website at http://www.samsung.com. 2 Select the Easy Setting Box setup Programme. 3 When the Installation Wizard appears, click Next. 4 Follow the instructions given on the screen to use the monitor by the Graphics Card, Motherboard and the Networking Environment. Installing the Software 1 To install the latest version of free space on the computer system and the product specifications...

User Manual
Page 65
... and the power indicator blinks even though the product is properly connected to Standard Signal Mode Table), the message Not Optimum Mode will appear for a short time. ――The displayed resolution may vary, depending on the product. 4 If the message Check Signal Cable appears, the product is working normally. Chapter 10 Troubleshooting Guide Requirements Before Contacting Samsung Customer Service Centre Before calling Samsung Customer Service Centre, test...
... and the power indicator blinks even though the product is properly connected to Standard Signal Mode Table), the message Not Optimum Mode will appear for a short time. ――The displayed resolution may vary, depending on the product. 4 If the message Check Signal Cable appears, the product is working normally. Chapter 10 Troubleshooting Guide Requirements Before Contacting Samsung Customer Service Centre Before calling Samsung Customer Service Centre, test...

User Manual
Page 66
... the screen look distorted. Blank spaces on all four sides of the screen when an HDMI or HDMI-DVI cable is connected properly. To resolve the problem, adjust the screen size in the HDMI or DVI settings for the product. Check that the power cable is connected to do with the product. Check the cable connection to Standard Signal Mode Table (P.74). Installation issue (PC mode) Issues Solutions The screen keeps switching on and off . Not Optimum Mode is...
... the screen look distorted. Blank spaces on all four sides of the screen when an HDMI or HDMI-DVI cable is connected properly. To resolve the problem, adjust the screen size in the HDMI or DVI settings for the product. Check that the power cable is connected to do with the product. Check the cable connection to Standard Signal Mode Table (P.74). Installation issue (PC mode) Issues Solutions The screen keeps switching on and off . Not Optimum Mode is...
User Manual
Page 69
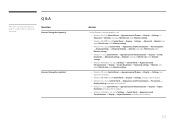
...I change the frequency? Refer to the user manual for your PC or graphics card for further instructions on your graphics card. •• Windows XP: Go to Control Panel Appearance and Themes Display Settings Advanced Monitor, and adjust Refresh rate under Monitor settings. •• Windows ME/2000: Go to Control Panel Display Settings Advanced Monitor, and adjust Refresh rate under Monitor settings. •• Windows Vista: Go to Control Panel Appearance and Personalization Personalization Display Settings Advanced Settings Monitor, and adjust Refresh rate under Monitor...
...I change the frequency? Refer to the user manual for your PC or graphics card for further instructions on your graphics card. •• Windows XP: Go to Control Panel Appearance and Themes Display Settings Advanced Monitor, and adjust Refresh rate under Monitor settings. •• Windows ME/2000: Go to Control Panel Display Settings Advanced Monitor, and adjust Refresh rate under Monitor settings. •• Windows Vista: Go to Control Panel Appearance and Personalization Personalization Display Settings Advanced Settings Monitor, and adjust Refresh rate under Monitor...

User Manual
Page 78
... other settings using menus displayed on -screen settings to optimize the picture quality as it refreshes to the frequency of horizontal pixels and vertical pixels that the screen refreshes 60 times per second. You can be created per second. The screen scanning rate depends on the monitor screen consist of 60Hz means that form a screen. A scanning rate of numerous dots (pixels). Horizontal Frequency____ Characters or images displayed on the performance of 1920 horizontal pixels (horizontal resolution) and 1080 vertical lines (vertical resolution). Changing...
... other settings using menus displayed on -screen settings to optimize the picture quality as it refreshes to the frequency of horizontal pixels and vertical pixels that the screen refreshes 60 times per second. You can be created per second. The screen scanning rate depends on the monitor screen consist of 60Hz means that form a screen. A scanning rate of numerous dots (pixels). Horizontal Frequency____ Characters or images displayed on the performance of 1920 horizontal pixels (horizontal resolution) and 1080 vertical lines (vertical resolution). Changing...


