

User Manual Ver.1.0 (English)
Page 21
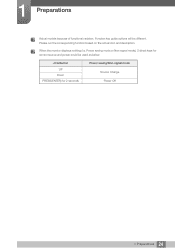
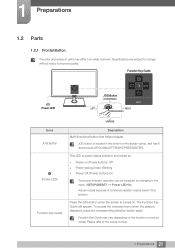
... the corresponding direction button again. 1 Preparations 1.2 Parts 1.2.1 Frontal Button The color and shape of parts may vary depending on the function or product model. Function Key Guide Power LED AUTO AUTO ReRteutrunrn JOG Button DOWN(FRONT) Return LEFT RIGHT PRESS(ENTER) Icons JOG Button (Power LED) Function Key ...Please refer to improve quality. Function Key Guide may differ from what is located in the menu. (SETUP&RESET Power LED On) Actual models because of functional variation maybe haven't this function. To access the onscreen menu when the guide is turned on.
... the corresponding direction button again. 1 Preparations 1.2 Parts 1.2.1 Frontal Button The color and shape of parts may vary depending on the function or product model. Function Key Guide Power LED AUTO AUTO ReRteutrunrn JOG Button DOWN(FRONT) Return LEFT RIGHT PRESS(ENTER) Icons JOG Button (Power LED) Function Key ...Please refer to improve quality. Function Key Guide may differ from what is located in the menu. (SETUP&RESET Power LED On) Actual models because of functional variation maybe haven't this function. To access the onscreen menu when the guide is turned on.

User Manual Ver.1.0 (English)
Page 22
1 Preparations 1.2.2 Direct Key guide For guidance on shortcut keys, the below OSD (On Screen Display) will be displayed if you move the JOG button in any direction. Models with sound option Brightness Volume Features UP/DOWN: Adjust Brightness. LEFT/RIGHT: Adjust Volume. PRESS(ENTER): Display Function Key Guide. Models without sound option Brightness Features UP/DOWN/LEFT/RIGHT: Adjust Brightness. PRESS(ENTER): Display Function Key Guide. 22 1 Preparations
1 Preparations 1.2.2 Direct Key guide For guidance on shortcut keys, the below OSD (On Screen Display) will be displayed if you move the JOG button in any direction. Models with sound option Brightness Volume Features UP/DOWN: Adjust Brightness. LEFT/RIGHT: Adjust Volume. PRESS(ENTER): Display Function Key Guide. Models without sound option Brightness Features UP/DOWN/LEFT/RIGHT: Adjust Brightness. PRESS(ENTER): Display Function Key Guide. 22 1 Preparations
User Manual Ver.1.0 (English)
Page 24
Please run the corresponding function based on the actual icon and description. Power saving mode or Non-signal mode), 2 direct keys for 2 seconds Power saving/Non-signal mode Source Change Power Off 24 1 Preparations When the monitor displays nothing (i.e. JOG Button UP Down PRESS(ENTER) for control source and power could be different. 1 Preparations Actual models because of functional variation, Function key guide options will be used as below.
Please run the corresponding function based on the actual icon and description. Power saving mode or Non-signal mode), 2 direct keys for 2 seconds Power saving/Non-signal mode Source Change Power Off 24 1 Preparations When the monitor displays nothing (i.e. JOG Button UP Down PRESS(ENTER) for control source and power could be different. 1 Preparations Actual models because of functional variation, Function key guide options will be used as below.
User Manual Ver.1.0 (English)
Page 25
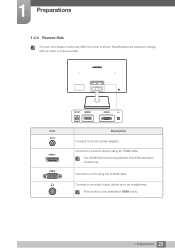
DC14V HDMI IN RGB IN Port DC14V HDMI IN RGB IN DC14V HDMI IN RGB IN Description Connect to an audio output device such as headphones. This function is supplied for the HDMI-dedicated models only. Connect to the DC power adapter. Specifications are subject to change without notice to a source device using the D-SUB cable. Connect to a PC using an HDMI cable. Connect to improve quality. The [HDMI IN] terminal is only available in HDMI mode. 25 1 Preparations 1 Preparations 1.2.4 Reverse Side The color and shape of parts may differ from what is shown.
DC14V HDMI IN RGB IN Port DC14V HDMI IN RGB IN DC14V HDMI IN RGB IN Description Connect to an audio output device such as headphones. This function is supplied for the HDMI-dedicated models only. Connect to the DC power adapter. Specifications are subject to change without notice to a source device using the D-SUB cable. Connect to a PC using an HDMI cable. Connect to improve quality. The [HDMI IN] terminal is only available in HDMI mode. 25 1 Preparations 1 Preparations 1.2.4 Reverse Side The color and shape of parts may differ from what is shown.

User Manual Ver.1.0 (English)
Page 35
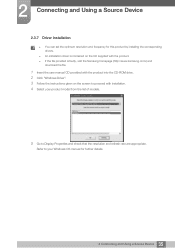
.... An installation driver is contained on the CD supplied with the product. If the file provided is faulty, visit the Samsung homepage (http://www.samsung.com/) and download the file. 1 Insert the user manual CD provided with the product into the CD-ROM drive. 2 Click "Windows Driver...". 3 Follow the instructions given on the screen to proceed with installation. 4 Select your product model from the list of models. 5 Go to Display ...
.... An installation driver is contained on the CD supplied with the product. If the file provided is faulty, visit the Samsung homepage (http://www.samsung.com/) and download the file. 1 Insert the user manual CD provided with the product into the CD-ROM drive. 2 Click "Windows Driver...". 3 Follow the instructions given on the screen to proceed with installation. 4 Select your product model from the list of models. 5 Go to Display ...

User Manual Ver.1.0 (English)
Page 47
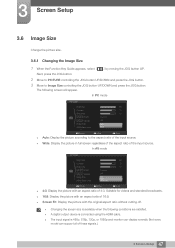
...1 When the Function Key Guide appears, select [ ] by moving the JOG button UP. In AV mode PICTURE Brightness Contrast Sharpness SAMSUNG MAGIC Bright SAMSUNG MAGIC Upscale Image Size HDMI Black Level Custom Off 4A:3uto 16:9 Screen Fit Return Move Enter 4:3: Display the picture..., 576p, 720p, or 1080p and monitor can display normally (Not every model can support all of these signals.). 47 3 Screen Setup In PC mode PICTURE Brightness Contrast Sharpness SAMSUNG MAGIC Bright SAMSUNG MAGIC Upscale Image Size HDMI Black Level Custom Off Auto Wide Return Move ...
...1 When the Function Key Guide appears, select [ ] by moving the JOG button UP. In AV mode PICTURE Brightness Contrast Sharpness SAMSUNG MAGIC Bright SAMSUNG MAGIC Upscale Image Size HDMI Black Level Custom Off 4A:3uto 16:9 Screen Fit Return Move Enter 4:3: Display the picture..., 576p, 720p, or 1080p and monitor can display normally (Not every model can support all of these signals.). 47 3 Screen Setup In PC mode PICTURE Brightness Contrast Sharpness SAMSUNG MAGIC Bright SAMSUNG MAGIC Upscale Image Size HDMI Black Level Custom Off Auto Wide Return Move ...

User Manual Ver.1.0 (English)
Page 50
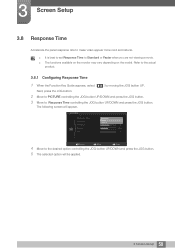
... JOG button. 3 Move to Standard or Faster when you are not viewing a movie. The functions available on the monitor may vary depending on the model. 3 Screen Setup 3.8 Response Time Accelerate the panel response rate to make video appear more vivid and natural. It is best to set Response Time...
... JOG button. 3 Move to Standard or Faster when you are not viewing a movie. The functions available on the monitor may vary depending on the model. 3 Screen Setup 3.8 Response Time Accelerate the panel response rate to make video appear more vivid and natural. It is best to set Response Time...

User Manual Ver.1.0 (English)
Page 67
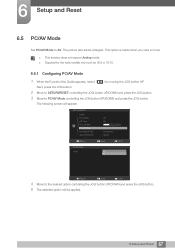
... picture size will appear. This option is useful when you view a movie. This function does not support Analog mode. Supplied for the wide models only such as 16:9 or 16:10. 6.5.1 Configuring PC/AV Mode 1 When the Function Key Guide appears, select [ ] by moving the JOG button UP. Next...
... picture size will appear. This option is useful when you view a movie. This function does not support Analog mode. Supplied for the wide models only such as 16:9 or 16:10. 6.5.1 Configuring PC/AV Mode 1 When the Function Key Guide appears, select [ ] by moving the JOG button UP. Next...
User Manual Ver.1.0 (English)
Page 71
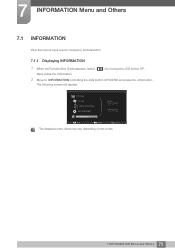
The following screen will appear. Next, press the JOG button. 2 Move to INFORMATION controlling the JOG button UP/DOWN and press the JOG button. PICTURE COLOR MENU SETTINGS SETUP&RESET INFORMATION Analog **kHz **Hz NP **** x **** Optimal Mode **** x **** **Hz Exit Move Enter The displayed menu items may vary depending on the model. 71 7 INFORMATION Menu and Others 7 INFORMATION Menu and Others 7.1 INFORMATION View the current input source, frequency and resolution. 7.1.1 Displaying INFORMATION 1 When the Function Key Guide appears, select [ ] by moving the JOG button UP.
The following screen will appear. Next, press the JOG button. 2 Move to INFORMATION controlling the JOG button UP/DOWN and press the JOG button. PICTURE COLOR MENU SETTINGS SETUP&RESET INFORMATION Analog **kHz **Hz NP **** x **** Optimal Mode **** x **** **Hz Exit Move Enter The displayed menu items may vary depending on the model. 71 7 INFORMATION Menu and Others 7 INFORMATION Menu and Others 7.1 INFORMATION View the current input source, frequency and resolution. 7.1.1 Displaying INFORMATION 1 When the Function Key Guide appears, select [ ] by moving the JOG button UP.

User Manual Ver.1.0 (English)
Page 83
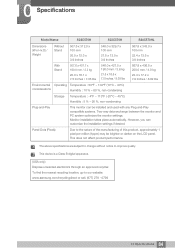
... cable, Detachable HDMI to the label at the back of the product as the standard voltage can vary in different countries. 10 Specifications 10.1 General Model Name S22C570H S23C570H S24C570HL Panel Size 21.5 Inches (54 cm) Display area 476.64 mm (H) x 268.11 mm (V) 18.77 Inches (H) x 10.56 Inches (V) Pixel...
... cable, Detachable HDMI to the label at the back of the product as the standard voltage can vary in different countries. 10 Specifications 10.1 General Model Name S22C570H S23C570H S24C570HL Panel Size 21.5 Inches (54 cm) Display area 476.64 mm (H) x 268.11 mm (V) 18.77 Inches (H) x 10.56 Inches (V) Pixel...
User Manual Ver.1.0 (English)
Page 84
... performance. The above specifications are subject to change without notice to our website: www.samsung.com/recyclingdirect or call, (877) 278 - 0799 84 10 Specifications However, you can be brighter or darker on the LCD panel. 10 Specifications Model Name S22C570H S23C570H S24C570HL Dimensions (W x H x D) / Weight Without Stand 507.6 x 312.0 x 100 mm 20...
... performance. The above specifications are subject to change without notice to our website: www.samsung.com/recyclingdirect or call, (877) 278 - 0799 84 10 Specifications However, you can be brighter or darker on the LCD panel. 10 Specifications Model Name S22C570H S23C570H S24C570HL Dimensions (W x H x D) / Weight Without Stand 507.6 x 312.0 x 100 mm 20...
User Manual Ver.1.0 (English)
Page 85
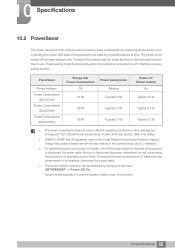
...not available, disconnect the power cable. The power indicator operation can vary in different operating conditions or when settings are changed.(S**C570 Model Power saving mode / Power off the screen and controlling the power LED status if the product is a US registered mark of time.... to 0 watts when the power switch is connected to 0 watts, turn off in the menu. (SETUP&RESET Power LED On) Actual models because of functional variation maybe haven't this product reduces power consumption by changing in power-saving mode. 10 Specifications 10.2 PowerSaver The power-saving...
...not available, disconnect the power cable. The power indicator operation can vary in different operating conditions or when settings are changed.(S**C570 Model Power saving mode / Power off the screen and controlling the power LED status if the product is a US registered mark of time.... to 0 watts when the power switch is connected to 0 watts, turn off in the menu. (SETUP&RESET Power LED On) Actual models because of functional variation maybe haven't this product reduces power consumption by changing in power-saving mode. 10 Specifications 10.2 PowerSaver The power-saving...
User Manual Ver.1.0 (English)
Page 21
...The Function Key Guide will appear. JOG button is shown. To access the onscreen menu when the guide is turned on the function or product model. Function Key Guide may differ from what is located in the bottom of the screen center, and has 5 directions as Power on...61548; Power Off (Power button): On The power Indicator operation can be swapped by changing in the menu. (SETUP&RESET Power LED On) Actual models because of parts may vary depending on . Specifications are subject to change without notice to the actual product. 21 1 Preparations Please refer to improve ...
...The Function Key Guide will appear. JOG button is shown. To access the onscreen menu when the guide is turned on the function or product model. Function Key Guide may differ from what is located in the bottom of the screen center, and has 5 directions as Power on...61548; Power Off (Power button): On The power Indicator operation can be swapped by changing in the menu. (SETUP&RESET Power LED On) Actual models because of parts may vary depending on . Specifications are subject to change without notice to the actual product. 21 1 Preparations Please refer to improve ...

User Manual Ver.1.0 (English)
Page 22
Models without sound option Brightness Features UP/DOWN/LEFT/RIGHT: Adjust Brightness. PRESS(ENTER): Display Function Key Guide. 22 1 Preparations Models with sound option Brightness Volume Features UP/DOWN: Adjust Brightness. LEFT/RIGHT: Adjust Volume. PRESS(ENTER): Display Function Key Guide. 1 Preparations 1.2.2 Direct Key guide For guidance on shortcut keys, the below OSD (On Screen Display) will be displayed if you move the JOG button in any direction.
Models without sound option Brightness Features UP/DOWN/LEFT/RIGHT: Adjust Brightness. PRESS(ENTER): Display Function Key Guide. 22 1 Preparations Models with sound option Brightness Volume Features UP/DOWN: Adjust Brightness. LEFT/RIGHT: Adjust Volume. PRESS(ENTER): Display Function Key Guide. 1 Preparations 1.2.2 Direct Key guide For guidance on shortcut keys, the below OSD (On Screen Display) will be displayed if you move the JOG button in any direction.

User Manual Ver.1.0 (English)
Page 24
JOG Button UP Down PRESS(ENTER) for control source and power could be different. Power saving mode or Non-signal mode), 2 direct keys for 2 seconds Power saving/Non-signal mode Source Change Power Off 24 1 Preparations Please run the corresponding function based on the actual icon and description. 1 Preparations Actual models because of functional variation, Function key guide options will be used as below. When the monitor displays nothing (i.e.
JOG Button UP Down PRESS(ENTER) for control source and power could be different. Power saving mode or Non-signal mode), 2 direct keys for 2 seconds Power saving/Non-signal mode Source Change Power Off 24 1 Preparations Please run the corresponding function based on the actual icon and description. 1 Preparations Actual models because of functional variation, Function key guide options will be used as below. When the monitor displays nothing (i.e.

User Manual Ver.1.0 (English)
Page 25
Connect to a source device using the D-SUB cable. This function is supplied for the HDMI-dedicated models only. Connect to the DC power adapter. The [HDMI IN] terminal is only available in HDMI mode. 25 1 Preparations 1 Preparations 1.2.4 Reverse Side The color and shape of parts may differ from what is shown. DC14V HDMI IN RGB IN Port DC14V HDMI IN RGB IN DC14V HDMI IN RGB IN Description Connect to an audio output device such as headphones. Connect to improve quality. Specifications are subject to change without notice to a PC using an HDMI cable.
Connect to a source device using the D-SUB cable. This function is supplied for the HDMI-dedicated models only. Connect to the DC power adapter. The [HDMI IN] terminal is only available in HDMI mode. 25 1 Preparations 1 Preparations 1.2.4 Reverse Side The color and shape of parts may differ from what is shown. DC14V HDMI IN RGB IN Port DC14V HDMI IN RGB IN DC14V HDMI IN RGB IN Description Connect to an audio output device such as headphones. Connect to improve quality. Specifications are subject to change without notice to a PC using an HDMI cable.
User Manual Ver.1.0 (English)
Page 35
.... An installation driver is contained on the CD supplied with the product. If the file provided is faulty, visit the Samsung homepage (http://www.samsung.com/) and download the file. 1 Insert the user manual CD provided with the product into the CD-ROM drive. 2 Click "Windows Driver...". 3 Follow the instructions given on the screen to proceed with installation. 4 Select your product model from the list of models. 5 Go to your ...
.... An installation driver is contained on the CD supplied with the product. If the file provided is faulty, visit the Samsung homepage (http://www.samsung.com/) and download the file. 1 Insert the user manual CD provided with the product into the CD-ROM drive. 2 Click "Windows Driver...". 3 Follow the instructions given on the screen to proceed with installation. 4 Select your product model from the list of models. 5 Go to your ...
User Manual Ver.1.0 (English)
Page 47
...the HDMI cable. The input signal is available when the following screen will appear. In PC mode PICTURE Brightness Contrast Sharpness SAMSUNG MAGIC Bright SAMSUNG MAGIC Upscale Image Size HDMI Black Level Custom Off Auto Wide Return Move Enter Auto: Display the picture according to Image Size... without cutting off. Changing the screen size is 480p, 576p, 720p, or 1080p and monitor can display normally (Not every model can support all of 16:9. Screen Fit: Display the picture with an aspect ratio of these signals.). 47 3 Screen Setup
...the HDMI cable. The input signal is available when the following screen will appear. In PC mode PICTURE Brightness Contrast Sharpness SAMSUNG MAGIC Bright SAMSUNG MAGIC Upscale Image Size HDMI Black Level Custom Off Auto Wide Return Move Enter Auto: Display the picture according to Image Size... without cutting off. Changing the screen size is 480p, 576p, 720p, or 1080p and monitor can display normally (Not every model can support all of 16:9. Screen Fit: Display the picture with an aspect ratio of these signals.). 47 3 Screen Setup
User Manual Ver.1.0 (English)
Page 50
... Move Enter 4 Move to Standard or Faster when you are not viewing a movie. The functions available on the monitor may vary depending on the model. 3 Screen Setup 3.8 Response Time Accelerate the panel response rate to make video appear more vivid and natural. It is best to set Response Time...
... Move Enter 4 Move to Standard or Faster when you are not viewing a movie. The functions available on the monitor may vary depending on the model. 3 Screen Setup 3.8 Response Time Accelerate the panel response rate to make video appear more vivid and natural. It is best to set Response Time...
User Manual Ver.1.0 (English)
Page 67
.... 67 6 Setup and Reset This option is useful when you view a movie. This function does not support Analog mode. Supplied for the wide models only such as 16:9 or 16:10. 6.5.1 Configuring PC/AV Mode 1 When the Function Key Guide appears, select [ ] by moving the JOG button UP. Next...
.... 67 6 Setup and Reset This option is useful when you view a movie. This function does not support Analog mode. Supplied for the wide models only such as 16:9 or 16:10. 6.5.1 Configuring PC/AV Mode 1 When the Function Key Guide appears, select [ ] by moving the JOG button UP. Next...

