
User Manual Ver.1.0 (English)
Page 2
...Start 1-1 Custody and Maintenance 1-2 Cleaning the Monitor 1-3 Safety Precautions 1-4 INSTALLING THE PRODUCT Package Contents 2-1 Installing the Stand 2-2 Connecting with a PC 2-3 Connecting a HDMI cable 2-4 Kensington Lock 2-5 USING THE PRODUCT Setting the Optimal Resolution 3-1 Standard Signal Mode Table 3-2 Standard Signal Mode Table 3-3 Standard Signal Mode Table 3-4 Standard Signal Mode Table 3-5 Standard Signal Mode Table 3-6 Standard Signal Mode Table 3-7 Standard Signal Mode Table 3-8 Standard Signal Mode Table 3-9 Standard Signal Mode Table 3-10 Standard Signal Mode...
...Start 1-1 Custody and Maintenance 1-2 Cleaning the Monitor 1-3 Safety Precautions 1-4 INSTALLING THE PRODUCT Package Contents 2-1 Installing the Stand 2-2 Connecting with a PC 2-3 Connecting a HDMI cable 2-4 Kensington Lock 2-5 USING THE PRODUCT Setting the Optimal Resolution 3-1 Standard Signal Mode Table 3-2 Standard Signal Mode Table 3-3 Standard Signal Mode Table 3-4 Standard Signal Mode Table 3-5 Standard Signal Mode Table 3-6 Standard Signal Mode Table 3-7 Standard Signal Mode Table 3-8 Standard Signal Mode Table 3-9 Standard Signal Mode Table 3-10 Standard Signal Mode...

User Manual Ver.1.0 (English)
Page 10
... into the product (the vents, ports, etc). • If water or an alien substance enters the product, turn the power off , unplug the power cord and contact a service center. • Otherwise, it may result in a problem with the product, electric shock or fire. When not using the product for a long time, use the power-saving mode or set the screensaver to the moving...
... into the product (the vents, ports, etc). • If water or an alien substance enters the product, turn the power off , unplug the power cord and contact a service center. • Otherwise, it may result in a problem with the product, electric shock or fire. When not using the product for a long time, use the power-saving mode or set the screensaver to the moving...
User Manual Ver.1.0 (English)
Page 18
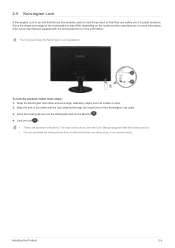
... instructions, see the User Manual supplied with the lock attached through the looped end of the Kensington lock cable. 3. Installing the Product 2-5 2-5 Kensington Lock A Kensington Lock is an anti-theft device that they can purchase the locking device from an electronics store, an online shop, or our service center. You must purchase the Kensington Lock separately. Since the shape and usage of the cable...
... instructions, see the User Manual supplied with the lock attached through the looped end of the Kensington lock cable. 3. Installing the Product 2-5 2-5 Kensington Lock A Kensington Lock is an anti-theft device that they can purchase the locking device from an electronics store, an online shop, or our service center. You must purchase the Kensington Lock separately. Since the shape and usage of the cable...
User Manual Ver.1.0 (English)
Page 36
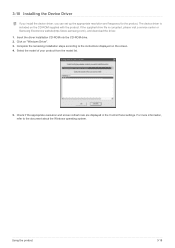
..., please visit a service center or Samsung Electronics website(http://www.samsung.com/), and download the driver. 1. If the supplied drive file is included on "Windows Driver". 3. Click on the CD-ROM supplied with the product. Check if the appropriate resolution and screen refresh rate are displayed in the Control Panel settings. Select the model of your product from the model list. 5. Using the product 3-18 Complete the remaining installation steps according to...
..., please visit a service center or Samsung Electronics website(http://www.samsung.com/), and download the driver. 1. If the supplied drive file is included on "Windows Driver". 3. Click on the CD-ROM supplied with the product. Check if the appropriate resolution and screen refresh rate are displayed in the Control Panel settings. Select the model of your product from the model list. 5. Using the product 3-18 Complete the remaining installation steps according to...
User Manual Ver.1.0 (English)
Page 37
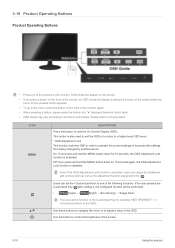
... button label. • OSD Guide may vary according to control the brightness of the screen. 3-19 Using the product You can set the function of the Customized Key by another person On: If you press and hold the MENU button down for 10 seconds, the OSD Adjustment Lock function is activated, users can adjust the brightness and contrast and can set up the adjustment function assigned to view the On Screen Display (OSD...
... button label. • OSD Guide may vary according to control the brightness of the screen. 3-19 Using the product You can set the function of the Customized Key by another person On: If you press and hold the MENU button down for 10 seconds, the OSD Adjustment Lock function is activated, users can adjust the brightness and contrast and can set up the adjustment function assigned to view the On Screen Display (OSD...
User Manual Ver.1.0 (English)
Page 38
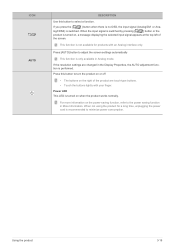
... buttons on the power-saving function, refer to the power saving function in More Information. If the resolution settings are touch-type buttons. • Touch the buttons lightly with an Analog interface only. When the input signal is switched by pressing [ ] button or the product is turned on , a message displaying the selected input signal appears at the top left of the product are changed in Analog mode. Power LED This LED is turned on when the product works normally...
... buttons on the power-saving function, refer to the power saving function in More Information. If the resolution settings are touch-type buttons. • Touch the buttons lightly with an Analog interface only. When the input signal is switched by pressing [ ] button or the product is turned on , a message displaying the selected input signal appears at the top left of the product are changed in Analog mode. Power LED This LED is turned on when the product works normally...
User Manual Ver.1.0 (English)
Page 40
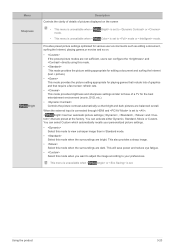
... require a fast screen refresh rate. • This mode provides brightness and sharpness settings similar to those of pictures displayed on the screen • This menu is unavailable when < mode. • This menu is unavailable when < Bright> is set to mode or mode. This also provides a sharp image. • Select this mode when the surroundings are bright. Menu Sharpness Bright Description Controls the clarity of details of a TV for the best entertainment environment (movie...
... require a fast screen refresh rate. • This mode provides brightness and sharpness settings similar to those of pictures displayed on the screen • This menu is unavailable when < mode. • This menu is unavailable when < Bright> is set to mode or mode. This also provides a sharp image. • Select this mode when the surroundings are bright. Menu Sharpness Bright Description Controls the clarity of details of a TV for the best entertainment environment (movie...
User Manual Ver.1.0 (English)
Page 43
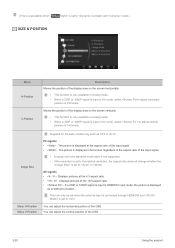
... set when the external input is connected through HDMI/DVI and is without truncation. The picture is displayed at the aspect ratio of the display area on the screen horizontally. • This function is only available in Analog mode. • When a 720P or 1080P signal is input in AV mode ,select to . If a 720P or 1080P signal is input in 0-6 levels. PC signals • - AV signals • - Image Size Menu H-Position Menu V-Position Supplied for the wide models...
... set when the external input is connected through HDMI/DVI and is without truncation. The picture is displayed at the aspect ratio of the display area on the screen horizontally. • This function is only available in Analog mode. • When a 720P or 1080P signal is input in AV mode ,select to . If a 720P or 1080P signal is input in 0-6 levels. PC signals • - AV signals • - Image Size Menu H-Position Menu V-Position Supplied for the wide models...
User Manual Ver.1.0 (English)
Page 47
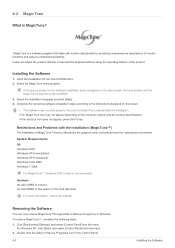
... [Start] select [Settings], and select [Control Panel] from the menu. 2. Select the installation language and click [Next]. 4. Complete the remaining software installation steps according to -understand guidelines. Double-click the [Add or Remove Programs] icon in Windows. MagicTune is a software program that helps with the mouse and the keyboard without using the operating buttons of monitor functions and easy-to the instructions displayed on the screen. • The software may...
... [Start] select [Settings], and select [Control Panel] from the menu. 2. Select the installation language and click [Next]. 4. Complete the remaining software installation steps according to -understand guidelines. Double-click the [Add or Remove Programs] icon in Windows. MagicTune is a software program that helps with the mouse and the keyboard without using the operating buttons of monitor functions and easy-to the instructions displayed on the screen. • The software may...

User Manual Ver.1.0 (English)
Page 51
... resolution or the maximum frequency of the screen when an [HDMI] or [HDMI-DVI] cable is set to , the display brightness can differ according to the mode set for details on how to the input signal. A blank screen appears / I cannot turn the product on screen adjustment menu (OSD) does not appear. The on Is the power cord connected properly? Adjust the and . (Refer to the , ) The display brightness can differ according to adjust the screen settings.) THE IMAGE IS TOO LIGHT...
... resolution or the maximum frequency of the screen when an [HDMI] or [HDMI-DVI] cable is set to , the display brightness can differ according to the mode set for details on how to the input signal. A blank screen appears / I cannot turn the product on screen adjustment menu (OSD) does not appear. The on Is the power cord connected properly? Adjust the and . (Refer to the , ) The display brightness can differ according to adjust the screen settings.) THE IMAGE IS TOO LIGHT...

User Manual Ver.1.0 (English)
Page 52
... card or the driver? Did you change the resolution and the frequency appropriate to the Windows user manual for the product? Is the graphics card configured correctly? Windows 7 : Change the color settings by selecting Control Panel → Appearance and Personalization → Display → Adjust resolution → Advanced settings → Monitor. (For more times when booting up the graphics card referring to the (Standard Signal Mode Table) The color is displayed in black and white Is the entire screen displayed...
... card or the driver? Did you change the resolution and the frequency appropriate to the Windows user manual for the product? Is the graphics card configured correctly? Windows 7 : Change the color settings by selecting Control Panel → Appearance and Personalization → Display → Adjust resolution → Advanced settings → Monitor. (For more times when booting up the graphics card referring to the (Standard Signal Mode Table) The color is displayed in black and white Is the entire screen displayed...
User Manual Ver.1.0 (English)
Page 2
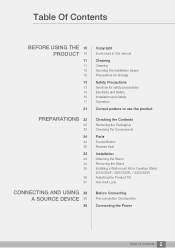
... this manual Cleaning Cleaning Securing the Installation Space Precautions for storage Safety Precautions Symbols for safety precautions Electricity and Safety Installation and Safety Operation Correct posture to use the product Checking the Contents Removing the Packaging Checking the Components Parts Frontal Button Reverse Side Installation Attaching the Stand Removing the Stand Installing a Wall-mount Kit or Desktop Stand (S19C300F / S20C300FL / S22C300F) Adjusting the Product Tilt Anti-theft Lock Before Connecting Pre-connection Checkpoints Connecting the Power...
... this manual Cleaning Cleaning Securing the Installation Space Precautions for storage Safety Precautions Symbols for safety precautions Electricity and Safety Installation and Safety Operation Correct posture to use the product Checking the Contents Removing the Packaging Checking the Components Parts Frontal Button Reverse Side Installation Attaching the Stand Removing the Stand Installing a Wall-mount Kit or Desktop Stand (S19C300F / S20C300FL / S22C300F) Adjusting the Product Tilt Anti-theft Lock Before Connecting Pre-connection Checkpoints Connecting the Power...
User Manual Ver.1.0 (English)
Page 15
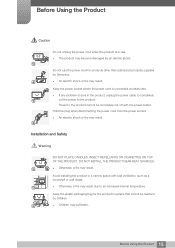
... not unplug the power cord when the product is connected unobstructed. If any problem occurs in use the power cord for the product in a narrow space with the power button. Installation and Safety Warning DO NOT PLACE CANDLES, INSECT REPELLANTS OR CIGARETTES ON TOP OF THE PRODUCT. Keep the power socket where the power cord is in the product, unplug the power cable to completely !
... not unplug the power cord when the product is connected unobstructed. If any problem occurs in use the power cord for the product in a narrow space with the power button. Installation and Safety Warning DO NOT PLACE CANDLES, INSECT REPELLANTS OR CIGARETTES ON TOP OF THE PRODUCT. Keep the power socket where the power cord is in the product, unplug the power cable to completely !

User Manual Ver.1.0 (English)
Page 23
Components Quick setup guide Warranty card (Not available in some locations) User manual Power cable DC power adapter D-SUB cable (optional) DVI cable (optional) HDMI cable (optional) HDMI-DVI cable (optional) Stand base Stand neck (Other areas) Components may differ from the image shown. Stand neck (North America only) 23 1 Preparations 1 Preparations 1.1.2 Checking the Components Contact the dealer from whom you purchased the product if any item is missing. The appearance of the components and items sold separately may vary depending on the country.
Components Quick setup guide Warranty card (Not available in some locations) User manual Power cable DC power adapter D-SUB cable (optional) DVI cable (optional) HDMI cable (optional) HDMI-DVI cable (optional) Stand base Stand neck (Other areas) Components may differ from the image shown. Stand neck (North America only) 23 1 Preparations 1 Preparations 1.1.2 Checking the Components Contact the dealer from whom you purchased the product if any item is missing. The appearance of the components and items sold separately may vary depending on the country.
User Manual Ver.1.0 (English)
Page 25
...; Available only in Display Properties will appear at the top left corner of the screen. Confirm a menu selection. Press the [AUTO] button to control the brightness and contrast of the screen. If you power on the OSD menu. Refer to the upper or lower menu or adjust the value for an option on the product or change the input source (Analog/DVI). Use this button to automatically adjust the screen settings. Changing the resolution in Analog mode.
...; Available only in Display Properties will appear at the top left corner of the screen. Confirm a menu selection. Press the [AUTO] button to control the brightness and contrast of the screen. If you power on the OSD menu. Refer to the upper or lower menu or adjust the value for an option on the product or change the input source (Analog/DVI). Use this button to automatically adjust the screen settings. Changing the resolution in Analog mode.
User Manual Ver.1.0 (English)
Page 43
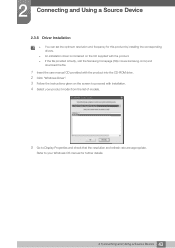
... to Display Properties and check that the resolution and refresh rate are appropriate. 2 Connecting and Using a Source Device 2.3.6 Driver Installation You can set the optimum resolution and frequency for this product by installing the corresponding drivers. An installation driver is contained on the CD supplied with the product. If the file provided is faulty, visit the Samsung homepage (http://www.samsung.com/) and download the file. 1 Insert the user manual...
... to Display Properties and check that the resolution and refresh rate are appropriate. 2 Connecting and Using a Source Device 2.3.6 Driver Installation You can set the optimum resolution and frequency for this product by installing the corresponding drivers. An installation driver is contained on the CD supplied with the product. If the file provided is faulty, visit the Samsung homepage (http://www.samsung.com/) and download the file. 1 Insert the user manual...
User Manual Ver.1.0 (English)
Page 114
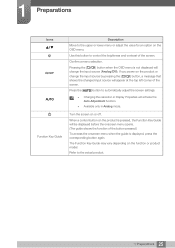
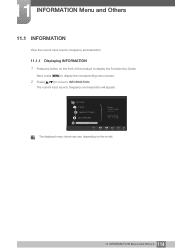
PICTURE COLOR MENU SETTINGS SETUP&RESET INFORMATION EXIT EXIT ࣏ࢽ Analog **kHz **Hz NP **** x **** Optimal Mode **** x **** **Hz AUTO AUTO ۴ The displayed menu items may vary depending on the front of the product to INFORMATION. Next, press [MENU] to display the corresponding menu screen. 2 Press [ ] to move to display the Function Key Guide. The current input source, frequency and resolution will appear. 11 INFORMATION Menu and Others 11.1 INFORMATION View the current input source, frequency and resolution. 11...
PICTURE COLOR MENU SETTINGS SETUP&RESET INFORMATION EXIT EXIT ࣏ࢽ Analog **kHz **Hz NP **** x **** Optimal Mode **** x **** **Hz AUTO AUTO ۴ The displayed menu items may vary depending on the front of the product to INFORMATION. Next, press [MENU] to display the corresponding menu screen. 2 Press [ ] to move to display the Function Key Guide. The current input source, frequency and resolution will appear. 11 INFORMATION Menu and Others 11.1 INFORMATION View the current input source, frequency and resolution. 11...

User Manual Ver.1.0 (English)
Page 120
.... If the problem persists, contact Samsung Customer Service Center. If the screen is turned off and the power indicator blinks even though the product is working normally. The screen will appear for a short time. 13.1.3 Check the following. Check the cable connection between the product and PC, and ensure the connectors are locked. (Refer to "2.3 Connecting and Using a PC") 120 13 Troubleshooting Guide Installation issue (PC mode) The screen keeps switching on . Check if your...
.... If the problem persists, contact Samsung Customer Service Center. If the screen is turned off and the power indicator blinks even though the product is working normally. The screen will appear for a short time. 13.1.3 Check the following. Check the cable connection between the product and PC, and ensure the connectors are locked. (Refer to "2.3 Connecting and Using a PC") 120 13 Troubleshooting Guide Installation issue (PC mode) The screen keeps switching on . Check if your...
User Manual Ver.1.0 (English)
Page 124
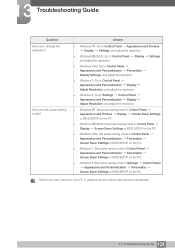
... Settings, and adjust the resolution. Windows ME/2000: Go to Control Panel Display Settings, and adjust the resolution. Windows Vista: Go to Control Panel Appearance and Personalization Personalize Display Settings, and adjust the resolution. Windows 7: Go to Control Panel Appearance and Personalization Display Adjust Resolution, and adjust the resolution. Windows 8: Go to the user manual for your PC or graphics card for further instructions on the PC. How do I change the resolution? 13 Troubleshooting Guide Question How can I set power-saving mode...
... Settings, and adjust the resolution. Windows ME/2000: Go to Control Panel Display Settings, and adjust the resolution. Windows Vista: Go to Control Panel Appearance and Personalization Personalize Display Settings, and adjust the resolution. Windows 7: Go to Control Panel Appearance and Personalization Display Adjust Resolution, and adjust the resolution. Windows 8: Go to the user manual for your PC or graphics card for further instructions on the PC. How do I change the resolution? 13 Troubleshooting Guide Question How can I set power-saving mode...

User Manual Ver.1.0 (English)
Page 153
... screen. Appendix 153 Pixels are expressed with black and white variation, and grey scale refers to the medium area between black and white. Changes to the screen brightness are transmitted in Hz. Screen data is transmitted 60 times per second by those horizontal lines. Horizontal Frequency Characters or images displayed on the screen. Vertical Frequency One image is called "refresh rate" and affects screen flicker. Gamma The Gamma menu adjusts the grey scale that an image...
... screen. Appendix 153 Pixels are expressed with black and white variation, and grey scale refers to the medium area between black and white. Changes to the screen brightness are transmitted in Hz. Screen data is transmitted 60 times per second by those horizontal lines. Horizontal Frequency Characters or images displayed on the screen. Vertical Frequency One image is called "refresh rate" and affects screen flicker. Gamma The Gamma menu adjusts the grey scale that an image...


