User Manual
Page 2
...Removing the Stand (S24F356FH*/S27F358FW*) 22 Connecting and Using a Source Device Pre-connection Checkpoints 23 Connecting and Using a PC 23 Connection Using the D-SUB Cable (Analog Type) 23 Connection Using the HDMI or HDMI-DVI Cable 24 Connection Using an DP Cable 24 Connecting the Power 25 Correct posture to use the product 26 Driver Installation 26 Setting Optimum Resolution 26 Screen Setup SAMSUNG MAGIC Bright 27 Brightness 28 Contrast 28 Sharpness 28 Color 28 SAMSUNG MAGIC Angle (S22F350FH*/ S22F352FH*/S22F354FH*) 29 SAMSUNG MAGIC Upscale 29 HDMI Black...
...Removing the Stand (S24F356FH*/S27F358FW*) 22 Connecting and Using a Source Device Pre-connection Checkpoints 23 Connecting and Using a PC 23 Connection Using the D-SUB Cable (Analog Type) 23 Connection Using the HDMI or HDMI-DVI Cable 24 Connection Using an DP Cable 24 Connecting the Power 25 Correct posture to use the product 26 Driver Installation 26 Setting Optimum Resolution 26 Screen Setup SAMSUNG MAGIC Bright 27 Brightness 28 Contrast 28 Sharpness 28 Color 28 SAMSUNG MAGIC Angle (S22F350FH*/ S22F352FH*/S22F354FH*) 29 SAMSUNG MAGIC Upscale 29 HDMI Black...

User Manual
Page 3
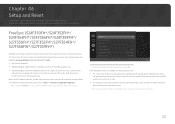
...*/S27F359FH*) 33 Eco Saving Plus 35 Off Timer 35 PC/AV Mode 35 Source Detection 35 Key Repeat Time 35 Power LED On 36 Reset All 36 Information 36 Installing the Software Easy Setting Box 37 Troubleshooting Guide Requirements Before Contacting Samsung Customer Service Center 38 Testing the Product 38 Checking the Resolution and Frequency 38 Check the following. 38 Q & A 40 Specifications General 41 Standard Signal Mode Table 42 Appendix...
...*/S27F359FH*) 33 Eco Saving Plus 35 Off Timer 35 PC/AV Mode 35 Source Detection 35 Key Repeat Time 35 Power LED On 36 Reset All 36 Information 36 Installing the Software Easy Setting Box 37 Troubleshooting Guide Requirements Before Contacting Samsung Customer Service Center 38 Testing the Product 38 Checking the Resolution and Frequency 38 Check the following. 38 Q & A 40 Specifications General 41 Standard Signal Mode Table 42 Appendix...
User Manual
Page 4
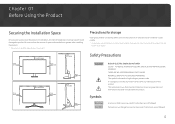
... part of contact with this product. Chapter 01 Before Using the Product Securing the Installation Space Ensure some space around the product for storage High-glossy models can develop white stains on the product. 10 cm (3.93 Inches) 10 cm (3.93 Inches) 10 cm (3.93 Inches) 10 cm (3.93 Inches) 10 cm (3.93 Inches) 10 cm (3.93 Inches) 10 cm (3.93 Inches...
... part of contact with this product. Chapter 01 Before Using the Product Securing the Installation Space Ensure some space around the product for storage High-glossy models can develop white stains on the product. 10 cm (3.93 Inches) 10 cm (3.93 Inches) 10 cm (3.93 Inches) 10 cm (3.93 Inches) 10 cm (3.93 Inches) 10 cm (3.93 Inches) 10 cm (3.93 Inches...
User Manual
Page 5
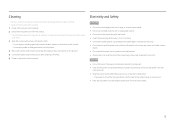
... power cord or plug, or a loose power socket. •• Do not use the power cord with other products. •• Keep the power socket where the power cord is not loose. •• Connect the power plug to the product when an issue occurs. •• Hold the plug when disconnecting the power cord from the product. ――Hold the power cable by the plug and do not touch...
... power cord or plug, or a loose power socket. •• Do not use the power cord with other products. •• Keep the power socket where the power cord is not loose. •• Connect the power plug to the product when an issue occurs. •• Hold the plug when disconnecting the power cord from the product. ――Hold the power cable by the plug and do not touch...
User Manual
Page 6
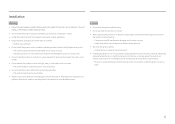
...cause an injury. ‒‒ Install the product only on a cabinet or shelf, make sure that the bottom edge of ...8226;• Do not install the product in the kitchen or near the kitchen stove. And do not install or use the product in a ...SOURCES. •• Do not install the product in poorly ventilated spaces such as a bookcase or closet. •• Install the product at such a place. 6 Caution •• Do not drop the product while moving. •• Do not set down the product on its performance. ‒‒ Be sure to consult Samsung Customer Service...
...cause an injury. ‒‒ Install the product only on a cabinet or shelf, make sure that the bottom edge of ...8226;• Do not install the product in the kitchen or near the kitchen stove. And do not install or use the product in a ...SOURCES. •• Do not install the product in poorly ventilated spaces such as a bookcase or closet. •• Install the product at such a place. 6 Caution •• Do not drop the product while moving. •• Do not set down the product on its performance. ‒‒ Be sure to consult Samsung Customer Service...
User Manual
Page 7
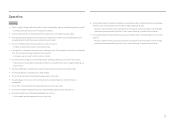
.... 7 Operation Warning •• There is found, do not touch the product or power plug. Then contact Samsung Customer Service Center. ‒‒ Continued use or keep combustible spray or an inflammable substance near the product. •• Ensure the vents are not blocked by pulling the power cord or any cable. •• If a gas leakage is a high voltage...
.... 7 Operation Warning •• There is found, do not touch the product or power plug. Then contact Samsung Customer Service Center. ‒‒ Continued use or keep combustible spray or an inflammable substance near the product. •• Ensure the vents are not blocked by pulling the power cord or any cable. •• If a gas leakage is a high voltage...
User Manual
Page 8
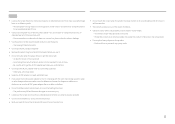
... of product use. •• Do not touch the screen when the product has been turned on using the product for an extended period of children. •• Exercise caution when adjusting the product angle or stand height. ‒‒ Your hand or finger may get stuck and injured. ‒‒ Tilting the product at the recommended resolution and frequency. ‒...
... of product use. •• Do not touch the screen when the product has been turned on using the product for an extended period of children. •• Exercise caution when adjusting the product angle or stand height. ‒‒ Your hand or finger may get stuck and injured. ‒‒ Tilting the product at the recommended resolution and frequency. ‒...

User Manual
Page 11
... will be adjusted. You can be different. 11 The OSD (On Screen Display) of the screen if the input signal has been changed. Selects by pressing the JOG button again. System Power LED On is enable. •• Picture MSAMASGUNICGBright, Brightness, Color, Game Mode •• System Eco Saving Plus Selects to change the input signal by moving the JOG button in the function key guide screen. ――Actual models because of...
... will be adjusted. You can be different. 11 The OSD (On Screen Display) of the screen if the input signal has been changed. Selects by pressing the JOG button again. System Power LED On is enable. •• Picture MSAMASGUNICGBright, Brightness, Color, Game Mode •• System Eco Saving Plus Selects to change the input signal by moving the JOG button in the function key guide screen. ――Actual models because of...
User Manual
Page 12
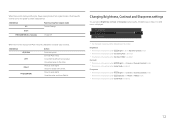
JOG Button UP Power saving/Non-signal mode Source Change Down PRESS(ENTER) for control source and power could be used as below . Move to next depth. Brightness ――This menu is not available when MSAMASGUNICGBright is set to Dynamic Contrast mode. ――This menu is not available when Eco Saving Plus is enabled. ――This menu is not available when Eye Saver Mode is displayed. Sharpness ――...
JOG Button UP Power saving/Non-signal mode Source Change Down PRESS(ENTER) for control source and power could be used as below . Move to next depth. Brightness ――This menu is not available when MSAMASGUNICGBright is set to Dynamic Contrast mode. ――This menu is not available when Eco Saving Plus is enabled. ――This menu is not available when Eye Saver Mode is displayed. Sharpness ――...
User Manual
Page 13
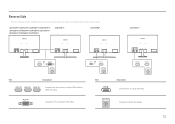
Connects to a PC using the D-SUB cable. Reverse Side ――The color and shape of parts may differ from what is shown. Connect to a PC using an HDMI cable or HDMI-DVI cable. Specifications are subject to change without notice to the AC/DC adapter. 13 Connects to improve quality. S22F350FH*/S22F352FH*/S22F354FH*/S24F350FH*/ S24F352FH*/S24F354FH*/S24F359FH*/S27F350FH*/ S27F352FH*/S27F354FH*/S27F359FH* S24F356FH* S27F358FW* S32F351FU* Port Description Port Description Connects to a source device using a DP cable.
Connects to a PC using the D-SUB cable. Reverse Side ――The color and shape of parts may differ from what is shown. Connect to a PC using an HDMI cable or HDMI-DVI cable. Specifications are subject to change without notice to the AC/DC adapter. 13 Connects to improve quality. S22F350FH*/S22F352FH*/S22F354FH*/S24F350FH*/ S24F352FH*/S24F354FH*/S24F359FH*/S27F350FH*/ S27F352FH*/S27F354FH*/S27F359FH* S24F356FH* S27F358FW* S32F351FU* Port Description Port Description Connects to a source device using a DP cable.
User Manual
Page 26
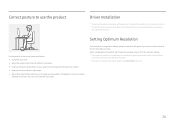
... power on your heart. Use the product in Control Panel on the product for the first time after purchase. Correct posture to use the product Driver Installation ――You can set the optimum resolution and frequency for this product by installing the corresponding drivers. ――To install the latest version of the product driver, download it from the Samsung Electronics website at about setting optimum resolution...
... power on your heart. Use the product in Control Panel on the product for the first time after purchase. Correct posture to use the product Driver Installation ――You can set the optimum resolution and frequency for this product by installing the corresponding drivers. ――To install the latest version of the product driver, download it from the Samsung Electronics website at about setting optimum resolution...
User Manual
Page 27
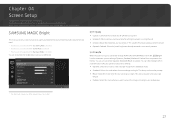
... the environment where the product will save power and reduce eye fatigue. •• Custom: Select this mode when you want to adjust the image according to your personalized picture settings. •• Dynamic: Select this mode to your preferences. Off Off Return ――The displayed image may vary depending on the model. Picture SAMSUNG MAGIC Bright Brightness Contrast Sharpness Color SAMSUNG MAGIC Angle SMAMASGUNI CG Upscale...
... the environment where the product will save power and reduce eye fatigue. •• Custom: Select this mode when you want to adjust the image according to your personalized picture settings. •• Dynamic: Select this mode to your preferences. Off Off Return ――The displayed image may vary depending on the model. Picture SAMSUNG MAGIC Bright Brightness Contrast Sharpness Color SAMSUNG MAGIC Angle SMAMASGUNI CG Upscale...
User Manual
Page 28
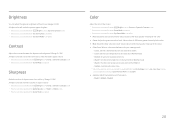
... the contrast to 100 mean greater intensity for the color. •• Green: Adjust the green saturation level. Values closer to make the object appear clearer. ――This option is not available when MSAMASGUNICGBright is in Mode1 or Mode2 mode. ――This menu is not available when Game Mode is enabled. Brightness You can adjust the general brightness of the picture. (Range...
... the contrast to 100 mean greater intensity for the color. •• Green: Adjust the green saturation level. Values closer to make the object appear clearer. ――This option is not available when MSAMASGUNICGBright is in Mode1 or Mode2 mode. ――This menu is not available when Game Mode is enabled. Brightness You can adjust the general brightness of the picture. (Range...
User Manual
Page 30
... the panel response rate to make video appear more vivid and natural. ――It is best to set to On. ――If you want to Standard or Faster when you are satisfied. ――A digital output device is connected using the HDMI/DP cable. ――The input signal is 480p, 576p, 720p, or 1080p and monitor can display normally (Not every model can...
... the panel response rate to make video appear more vivid and natural. ――It is best to set to On. ――If you want to Standard or Faster when you are satisfied. ――A digital output device is connected using the HDMI/DP cable. ――The input signal is 480p, 576p, 720p, or 1080p and monitor can display normally (Not every model can...
User Manual
Page 33
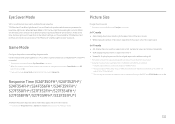
.... FreeSync can I change the frequency? ――When using the function, contact the Samsung Service Center. 33 Installing the latest drivers from the AMD website may also fix this mode. Refer to remove the flicker. This feature will eliminate screen tearing and lag during game play games depending on the resolution. Return ――The displayed image may differ depending on the model. A higher resolution generally decreases...
.... FreeSync can I change the frequency? ――When using the function, contact the Samsung Service Center. 33 Installing the latest drivers from the AMD website may also fix this mode. Refer to remove the flicker. This feature will eliminate screen tearing and lag during game play games depending on the resolution. Return ――The displayed image may differ depending on the model. A higher resolution generally decreases...
User Manual
Page 35
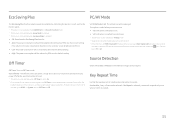
..., go to MENU System and set to On. ――For products for the wide models only such as the method to AV. Source Detection Select either Auto or Manual as 16:9 or 16:10. ――If the monitor is in HDMI/DisplayPort mode and the screen says Check Signal Cable or power saving mode activates, press the JOG button to Off. The picture size will automatically power off timer...
..., go to MENU System and set to On. ――For products for the wide models only such as the method to AV. Source Detection Select either Auto or Manual as 16:9 or 16:10. ――If the monitor is in HDMI/DisplayPort mode and the screen says Check Signal Cable or power saving mode activates, press the JOG button to Off. The picture size will automatically power off timer...
User Manual
Page 36
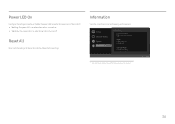
... when the product is on the model. 36 Power LED On Information Configure the settings to the default factory settings. View the current input source, frequency and resolution. Reset All Return all the settings for the product to enable or disable the power LED located at the lower part of the product. •• Working: The power LED is on when the product is turned on. •• Stand-by: The power LED is turned off.
... when the product is on the model. 36 Power LED On Information Configure the settings to the default factory settings. View the current input source, frequency and resolution. Reset All Return all the settings for the product to enable or disable the power LED located at the lower part of the product. •• Working: The power LED is on when the product is turned on. •• Stand-by: The power LED is turned off.
User Manual
Page 38
... connected to adjust the screen settings.) Screen issue The power LED is connected properly. Testing the Product Check if your product as follows. Installation issue (PC mode) The screen keeps switching on and off both the PC and product. 2 Disconnect the cables from the product. 3 Power on . To resolve the problem, adjust the screen size in the HDMI or DVI settings for a short time. ――The displayed resolution may vary, depending on the screen are locked...
... connected to adjust the screen settings.) Screen issue The power LED is connected properly. Testing the Product Check if your product as follows. Installation issue (PC mode) The screen keeps switching on and off both the PC and product. 2 Disconnect the cables from the product. 3 Power on . To resolve the problem, adjust the screen size in the HDMI or DVI settings for a short time. ――The displayed resolution may vary, depending on the screen are locked...
User Manual
Page 39
... menu on the user's viewing angle. Set the resolution and frequency to use. 39 Press any accessories (video extension cable, etc.) and try again. Source device issue A beeping sound is heard when my PC is choppy. This message appears when the signal from the graphics card exceeds the maximum resolution or frequency for the PC are shadows or ghost images left on the screen look white. Change the Color settings. If using a Windows...
... menu on the user's viewing angle. Set the resolution and frequency to use. 39 Press any accessories (video extension cable, etc.) and try again. Source device issue A beeping sound is heard when my PC is choppy. This message appears when the signal from the graphics card exceeds the maximum resolution or frequency for the PC are shadows or ghost images left on the screen look white. Change the Color settings. If using a Windows...
User Manual
Page 40
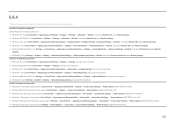
... Screen Resolution Advanced settings Monitor, and adjust Refresh rate under Monitor settings. •• Windows 8(Windows 8.1): Go to Settings Control Panel Appearance and Personalization Display Screen Resolution Advanced settings Monitor, and adjust Refresh rate under Monitor settings. •• Windows 10: Go to Settings System Display Advanced display settings Display adapter properties Monitor, and adjust Screen refresh rate under Monitor settings. How can I change the frequency? Q & A ――Refer to the user manual for further instructions on adjustment...
... Screen Resolution Advanced settings Monitor, and adjust Refresh rate under Monitor settings. •• Windows 8(Windows 8.1): Go to Settings Control Panel Appearance and Personalization Display Screen Resolution Advanced settings Monitor, and adjust Refresh rate under Monitor settings. •• Windows 10: Go to Settings System Display Advanced display settings Display adapter properties Monitor, and adjust Screen refresh rate under Monitor settings. How can I change the frequency? Q & A ――Refer to the user manual for further instructions on adjustment...


