User Manual Ver.1.0 (English)
Page 20
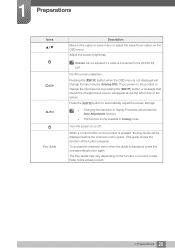
... on the OSD menu. z Changing the resolution in Analog mode. Refer to automatically adjust the screen settings. Turn the screen on the function or product model. Volume can be displayed before the onscreen menu opens. (The guide shows the function of the screen. The Key Guide may vary depending on or...
... on the OSD menu. z Changing the resolution in Analog mode. Refer to automatically adjust the screen settings. Turn the screen on the function or product model. Volume can be displayed before the onscreen menu opens. (The guide shows the function of the screen. The Key Guide may vary depending on or...
User Manual Ver.1.0 (English)
Page 21
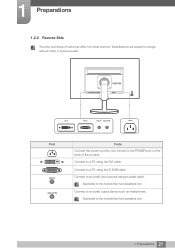
... AUDIO OUT Ports Connect the power cord for your monitor to an audio output device such as headphones. Applicable to the models that have speakers only. 21 1 Preparations Applicable to the models that have speakers only. Connect to improve quality. Specifications are subject to change without notice to a PC using the D-SUB...
... AUDIO OUT Ports Connect the power cord for your monitor to an audio output device such as headphones. Applicable to the models that have speakers only. 21 1 Preparations Applicable to the models that have speakers only. Connect to improve quality. Specifications are subject to change without notice to a PC using the D-SUB...

User Manual Ver.1.0 (English)
Page 28
2 Connecting and Using a Source Device Connecting to Headphones or Speakers Do not connect the power cable before connecting the power cable. AUDIO IN AUDIO OUT 1 Connect an audio output device such as headphones or speakers to the models that have speakers only. 28 2 Connecting and Using a Source Device Applicable to [ AUDIO OUT ] on the product. Ensure you connect a source device first before connecting all other cables.
2 Connecting and Using a Source Device Connecting to Headphones or Speakers Do not connect the power cable before connecting the power cable. AUDIO IN AUDIO OUT 1 Connect an audio output device such as headphones or speakers to the models that have speakers only. 28 2 Connecting and Using a Source Device Applicable to [ AUDIO OUT ] on the product. Ensure you connect a source device first before connecting all other cables.

User Manual Ver.1.0 (English)
Page 30
...appropriate. z If the file provided is contained on the screen to proceed with the product. z An installation driver is faulty, visit the Samsung homepage (http://www.samsung.com) and download the file. 1 Insert the user manual CD provided with the product into the CD-ROM drive. 2 Click "Windows ...Driver". 3 Follow the instructions given on the CD supplied with installation. 4 Select your product model from the list of models. 5 Go to your Windows...
...appropriate. z If the file provided is contained on the screen to proceed with the product. z An installation driver is faulty, visit the Samsung homepage (http://www.samsung.com) and download the file. 1 Insert the user manual CD provided with the product into the CD-ROM drive. 2 Click "Windows ...Driver". 3 Follow the instructions given on the CD supplied with installation. 4 Select your product model from the list of models. 5 Go to your Windows...
User Manual Ver.1.0 (English)
Page 57
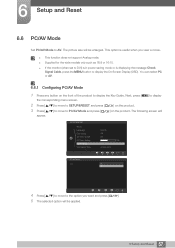
... screen. 2 Press [ ] to move to SETUP&RESET and press [ ] on the product. 3 Press [ ] to move to the option you view a movie. z Supplied for the wide models only such as 16:9 or 16:10. You can select PC or AV. 6.6.1 Configuring PC/AV Mode 1 Press any button on the product. SETUP&RESET...
... screen. 2 Press [ ] to move to SETUP&RESET and press [ ] on the product. 3 Press [ ] to move to the option you view a movie. z Supplied for the wide models only such as 16:9 or 16:10. You can select PC or AV. 6.6.1 Configuring PC/AV Mode 1 Press any button on the product. SETUP&RESET...

User Manual Ver.1.0 (English)
Page 63
..., frequency and resolution will appear. 7 INFORMATION Menu and Others 7.1 INFORMATION View the current input source, frequency and resolution. 7.1.1 Displaying INFORMATION 1 Press any button on the model. 63 7 INFORMATION Menu and Others Next, press [MENU] to display the corresponding menu screen. 2 Press [ ] to move to display the Key Guide. PICTURE COLOR SIZE...
..., frequency and resolution will appear. 7 INFORMATION Menu and Others 7.1 INFORMATION View the current input source, frequency and resolution. 7.1.1 Displaying INFORMATION 1 Press any button on the model. 63 7 INFORMATION Menu and Others Next, press [MENU] to display the corresponding menu screen. 2 Press [ ] to move to display the Key Guide. PICTURE COLOR SIZE...

User Manual Ver.1.0 (English)
Page 76
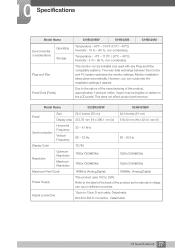
10 Specifications 10.1 General Model Name S19B420BW S19B420B S19B420M Panel Size 19.0 Inches (48 cm) 18.5 Inches (47 cm) 408.24 mm (H) x 255.15 Display area 409.8 mm (H) x 230.4 mm (V) ...
10 Specifications 10.1 General Model Name S19B420BW S19B420B S19B420M Panel Size 19.0 Inches (48 cm) 18.5 Inches (47 cm) 408.24 mm (H) x 255.15 Display area 409.8 mm (H) x 230.4 mm (V) ...
User Manual Ver.1.0 (English)
Page 77
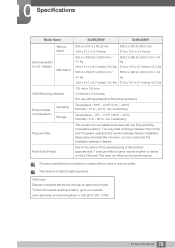
...monitor and PC system optimizes the monitor settings. Signal connectors 15pin-to-15pin D-sub cable, Detachable DVI-D to 240V. 10 Specifications Model Name Environmental considerations Operating Storage Plug-and-Play Panel Dots (Pixels) S19B420BW S19B420B S19B420M Temperature : 50°F - 104°F...on the LCD panel. Monitor installation takes place automatically. However, you can vary in different countries. This does not affect product performance. Model Name S22B420BW S24B420BW Panel Size 22.0 Inches (55 cm) Display area 473.76 mm (H) x 296.1 mm (V) 24.0 Inches (61 cm...
...monitor and PC system optimizes the monitor settings. Signal connectors 15pin-to-15pin D-sub cable, Detachable DVI-D to 240V. 10 Specifications Model Name Environmental considerations Operating Storage Plug-and-Play Panel Dots (Pixels) S19B420BW S19B420B S19B420M Temperature : 50°F - 104°F...on the LCD panel. Monitor installation takes place automatically. However, you can vary in different countries. This does not affect product performance. Model Name S22B420BW S24B420BW Panel Size 22.0 Inches (55 cm) Display area 473.76 mm (H) x 296.1 mm (V) 24.0 Inches (61 cm...
User Manual Ver.1.0 (English)
Page 78
... digital apparatus. (USA only) Dispose unwanted electronics through an approved recycler. 10 Specifications Model Name Without Stand Dimensions (W x H x D) / Weight With Stand VESA Mounting Interface Environmental considerations Operating Storage Plug-and-Play Panel Dots (Pixels) S22B420BW S24B420BW 505.5 x 331.5 x 60.25 mm 19.9 x 13.1 x 2.4 ...This does not affect product performance. The above specifications are subject to change without notice to our website: www.samsung.com/recyclingdirect or call, (877) 278 - 0799 78 10 Specifications To find the nearest recycling location, ...
... digital apparatus. (USA only) Dispose unwanted electronics through an approved recycler. 10 Specifications Model Name Without Stand Dimensions (W x H x D) / Weight With Stand VESA Mounting Interface Environmental considerations Operating Storage Plug-and-Play Panel Dots (Pixels) S22B420BW S24B420BW 505.5 x 331.5 x 60.25 mm 19.9 x 13.1 x 2.4 ...This does not affect product performance. The above specifications are subject to change without notice to our website: www.samsung.com/recyclingdirect or call, (877) 278 - 0799 78 10 Specifications To find the nearest recycling location, ...

