User Manual (ENGLISH)
Page 1
PDP-MONITOR (PLASMA DISPLAY PANEL) PPM42M5S PPM42M5H PPM50M5H PPM63M5H Owner's Instructions Before operating the unit, please read this manual thoroughly, and retain it for Commercial Use and Operation ON-SCREEN MENUS Picture In Picture (PIP) VIDEO WALL MDC (Multiple Display Control) Screen Burn Protection Digital Natural Image engine This device is a Class A digital apparatus. Register your product at www.samsung.com/global/register Intended for future reference.
PDP-MONITOR (PLASMA DISPLAY PANEL) PPM42M5S PPM42M5H PPM50M5H PPM63M5H Owner's Instructions Before operating the unit, please read this manual thoroughly, and retain it for Commercial Use and Operation ON-SCREEN MENUS Picture In Picture (PIP) VIDEO WALL MDC (Multiple Display Control) Screen Burn Protection Digital Natural Image engine This device is a Class A digital apparatus. Register your product at www.samsung.com/global/register Intended for future reference.
User Manual (ENGLISH)
Page 2
... may leave traces of borders displayed on the left, right and center of the screen caused by image retention. - To prevent this PDP Monitor) on the plasma monitor panel for more than a certain period of time may cause similar effect to the screen. This is making a 'cracking' noise. Failure to... do not install and operate there. ◆ Heat on the top of the PDP Monitor The top side of the product may be prevented ...
... may leave traces of borders displayed on the left, right and center of the screen caused by image retention. - To prevent this PDP Monitor) on the plasma monitor panel for more than a certain period of time may cause similar effect to the screen. This is making a 'cracking' noise. Failure to... do not install and operate there. ◆ Heat on the top of the PDP Monitor The top side of the product may be prevented ...
User Manual (ENGLISH)
Page 4
...9632; Inserting the Batteries in the Remote Control 9 ■ Assembling the Stand-Base 9 ■ Installing the Display on the Wall Attachment Panel 10 ■ Installing the Display Vertically 12 ■ Before Using the Video Wall and the Multiple Display Control function ........ 12 ■ ...Connecting Speakers 13 ■ Switching Your PDP Monitor On and Off 15 ■ Choosing Your Language 15 ◆ USING YOUR DISPLAY ■ Changing the Picture Standard 16 ■...
...9632; Inserting the Batteries in the Remote Control 9 ■ Assembling the Stand-Base 9 ■ Installing the Display on the Wall Attachment Panel 10 ■ Installing the Display Vertically 12 ■ Before Using the Video Wall and the Multiple Display Control function ........ 12 ■ ...Connecting Speakers 13 ■ Switching Your PDP Monitor On and Off 15 ■ Choosing Your Language 15 ◆ USING YOUR DISPLAY ■ Changing the Picture Standard 16 ■...

User Manual (ENGLISH)
Page 5
... Setting the Multiple Screen 33 ■ Displaying the Setting Information 34 ■ Setting and Displaying the Current Time 34 ■ Switching the PDP Monitor On and Off Automatically 35 ■ Selecting the Fan 37 ■ Setting the Film Mode 38 ■ Viewing the Picture in Picture (PIP... 39 ■ Listening to the Sound of the Sub Picture 41 ■ Viewing an External Signal Source 42 ◆ ADDITIONAL INFORMATION AND CONNECTIONS ■ Connecting to the Audio/Video Input 43 ■ Connecting to the S-Video Input 44 ■ Connecting...
... Setting the Multiple Screen 33 ■ Displaying the Setting Information 34 ■ Setting and Displaying the Current Time 34 ■ Switching the PDP Monitor On and Off Automatically 35 ■ Selecting the Fan 37 ■ Setting the Film Mode 38 ■ Viewing the Picture in Picture (PIP... 39 ■ Listening to the Sound of the Sub Picture 41 ■ Viewing an External Signal Source 42 ◆ ADDITIONAL INFORMATION AND CONNECTIONS ■ Connecting to the Audio/Video Input 43 ■ Connecting to the S-Video Input 44 ■ Connecting...
User Manual (ENGLISH)
Page 6
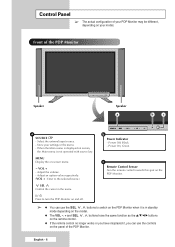
Control Panel ➢ The actual configuration of the PDP Monitor. Adjust an option value respectively. (VOL + : Enter to switch on the PDP Monitor when it is in standby mode depending on the model. ◆ The VOL -, + and SEL , buttons have the same function as the buttons on the ...remote control. ◆ If the remote control no longer works or you have misplaced it, you can use the controls on the panel of your PDP Monitor may be different, depending on screen, the Main menu is displayed on your settings in the menu. English - 6 MENU Display the on and...
Control Panel ➢ The actual configuration of the PDP Monitor. Adjust an option value respectively. (VOL + : Enter to switch on the PDP Monitor when it is in standby mode depending on the model. ◆ The VOL -, + and SEL , buttons have the same function as the buttons on the ...remote control. ◆ If the remote control no longer works or you have misplaced it, you can use the controls on the panel of your PDP Monitor may be different, depending on screen, the Main menu is displayed on your settings in the menu. English - 6 MENU Display the on and...
User Manual (ENGLISH)
Page 7
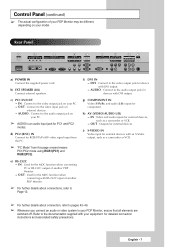
... VCR. - Refer to the video output jack for device with your equipment for detailed connection instructions and associated safety precautions. Control Panel (continued) ➢ The actual configuration of your PDP Monitor may be different, depending on your PC. ➢ AUDIO is an audio input jack for PC1 and PC2 modes. b) EXT SPEAKER...
... VCR. - Refer to the video output jack for device with your equipment for detailed connection instructions and associated safety precautions. Control Panel (continued) ➢ The actual configuration of your PDP Monitor may be different, depending on your PC. ➢ AUDIO is an audio input jack for PC1 and PC2 modes. b) EXT SPEAKER...
User Manual (ENGLISH)
Page 8
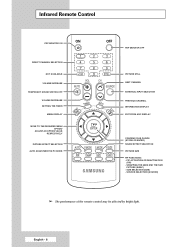
... SETTING THE TIMER MENU DISPLAY MOVE TO THE REQUIRED MENU OPTION/ ADJUST AN OPTION VALUE RESPECTIVELY PICTURE EFFECT SELECTION AUTO ADJUSTMENT IN PC MODE PDP MONITOR OFF PICTURE STILL NEXT CHANNEL EXTERNAL INPUT SELECTION PREVIOUS CHANNEL INFORMATION DISPLAY EXIT FROM ANY DISPLAY CONFIRM YOUR CHOICE (STORE OR ENTER) SOUND EFFECT SELECTION...
... SETTING THE TIMER MENU DISPLAY MOVE TO THE REQUIRED MENU OPTION/ ADJUST AN OPTION VALUE RESPECTIVELY PICTURE EFFECT SELECTION AUTO ADJUSTMENT IN PC MODE PDP MONITOR OFF PICTURE STILL NEXT CHANNEL EXTERNAL INPUT SELECTION PREVIOUS CHANNEL INFORMATION DISPLAY EXIT FROM ANY DISPLAY CONFIRM YOUR CHOICE (STORE OR ENTER) SOUND EFFECT SELECTION...

User Manual (ENGLISH)
Page 9
... Inserting the Batteries in the Remote Control You must insert or replace the batteries in the remote control when you: ◆ Purchase the PDP Monitor ◆ Find that the remote control is no longer operating correctly 1 Remove the cover on the rear of the remote control by aligning it... with the stand and firmly secure the PDP Monitor using 4 screws provided. ➢ Two or more people should carry the PDP Monitor. Never lay the PDP Monitor on the battery against - alkaline and manganese. on the remote control ◆ + on the ...
... Inserting the Batteries in the Remote Control You must insert or replace the batteries in the remote control when you: ◆ Purchase the PDP Monitor ◆ Find that the remote control is no longer operating correctly 1 Remove the cover on the rear of the remote control by aligning it... with the stand and firmly secure the PDP Monitor using 4 screws provided. ➢ Two or more people should carry the PDP Monitor. Never lay the PDP Monitor on the battery against - alkaline and manganese. on the remote control ◆ + on the ...
User Manual (ENGLISH)
Page 11
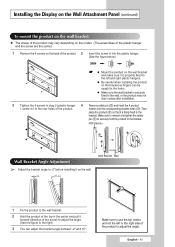
... hanger. (See the figure below) ☛ ◆ Mount the product on the wall bracket and make sure it on the wall. PDP Monitor Wall Bracket Angle Adjustment ➢ Adjust the bracket angle to -2o before installing it is securely fixed to the wall, or the product may ... Remove the 4 screws on the back of the product. 2 Insert the screw into the corresponding bracket holes (!). Installing the Display on the Wall Attachment Panel (continued) To mount the product on the wall bracket ◆ The shape of the product may not stay in place after installation. 3 Tighten the 4...
... hanger. (See the figure below) ☛ ◆ Mount the product on the wall bracket and make sure it on the wall. PDP Monitor Wall Bracket Angle Adjustment ➢ Adjust the bracket angle to -2o before installing it is securely fixed to the wall, or the product may ... Remove the 4 screws on the back of the product. 2 Insert the screw into the corresponding bracket holes (!). Installing the Display on the Wall Attachment Panel (continued) To mount the product on the wall bracket ◆ The shape of the product may not stay in place after installation. 3 Tighten the 4...
User Manual (ENGLISH)
Page 12
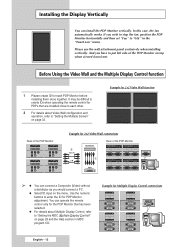
Please use the wall attachment panel exclusively when installing vertically. Use the numeric buttons to "Setting the Multiple Screen" on page 33. Example for PDP Monitor adjustment. It may be difficult to create IDs when operating the remote control for each other. 2 For details about ...29 and the Help section in the "Function" menu. If you have to each PDP Monitor before installing them close to put left side of the PDP Monitor Example for the PDP Monitor that are installed close together. Installing the Display Vertically You can connect a Composite (Video) ...
Please use the wall attachment panel exclusively when installing vertically. Use the numeric buttons to "Setting the Multiple Screen" on page 33. Example for PDP Monitor adjustment. It may be difficult to create IDs when operating the remote control for each other. 2 For details about ...29 and the Help section in the "Function" menu. If you have to each PDP Monitor before installing them close to put left side of the PDP Monitor Example for the PDP Monitor that are installed close together. Installing the Display Vertically You can connect a Composite (Video) ...
User Manual (ENGLISH)
Page 13
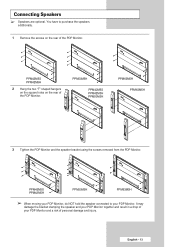
... the speakers additionally. 1 Remove the screws on the rear of the PDP Monitor. You have to your PDP Monitor and a risk of your PDP Monitor. PPM42M5S PPM42M5H 2 Hang the two "T" shaped hangers on the square holes on the rear of the PDP Monitor. English - 13 It may damage the bracket clamping the speaker and your...
... the speakers additionally. 1 Remove the screws on the rear of the PDP Monitor. You have to your PDP Monitor and a risk of your PDP Monitor. PPM42M5S PPM42M5H 2 Hang the two "T" shaped hangers on the square holes on the rear of the PDP Monitor. English - 13 It may damage the bracket clamping the speaker and your...

User Manual (ENGLISH)
Page 14
Connecting Speakers (continued) Connect the speaker audio cable to the external speaker output jack on the rear of the PDP Monitor matching the "+" and "-" ends of the cable with the diagram on the PDP Monitor. ➢ ◆ The speakers MUST have a power handling capability of these ferrite cores to secure it. English - 14...
Connecting Speakers (continued) Connect the speaker audio cable to the external speaker output jack on the rear of the PDP Monitor matching the "+" and "-" ends of the cable with the diagram on the PDP Monitor. ➢ ◆ The speakers MUST have a power handling capability of these ferrite cores to secure it. English - 14...
User Manual (ENGLISH)
Page 15
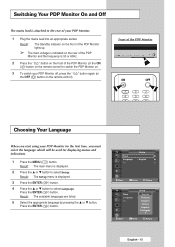
...the frequency is 50 or 60Hz. 2 Press the " " button on the front of the PDP Monitor (or the ON ( ) button on the remote control). or † button to switch the PDP Monitor on. 3 To switch your PDP Monitor off, press the " " button again (or the OFF ( ) button on the remote control... Time Language PC English : EnFgrlaisnhçais Deutsch Italiano Español Português † Move Enter Return English - 15 Front of your PDP Monitor for the first time, you must select the language which will be used for displaying menus and indications. 1 Press the MENU ( ) button. Result:...
...the frequency is 50 or 60Hz. 2 Press the " " button on the front of the PDP Monitor (or the ON ( ) button on the remote control). or † button to switch the PDP Monitor on. 3 To switch your PDP Monitor off, press the " " button again (or the OFF ( ) button on the remote control... Time Language PC English : EnFgrlaisnhçais Deutsch Italiano Español Português † Move Enter Return English - 15 Front of your PDP Monitor for the first time, you must select the language which will be used for displaying menus and indications. 1 Press the MENU ( ) button. Result:...

User Manual (ENGLISH)
Page 17
... MENU ( ) button. Warm2 ◆ Custom - Warm : PC Mode. ◆ Cool - Cool1 - Result: The following options are available. ◆ Cool2 - Customizing the Picture Settings Your PDP Monitor has several setting options that allow you reach the optimal setting. ➢ ◆ Press the ... or † button to select other option(s). ◆ When the...
... MENU ( ) button. Warm2 ◆ Custom - Warm : PC Mode. ◆ Cool - Cool1 - Result: The following options are available. ◆ Cool2 - Customizing the Picture Settings Your PDP Monitor has several setting options that allow you reach the optimal setting. ➢ ◆ Press the ... or † button to select other option(s). ◆ When the...
User Manual (ENGLISH)
Page 19
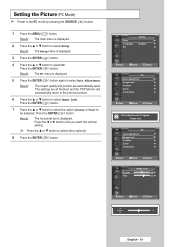
.... 4 Press the ... Press the ENTER ( ) button. 7 Press the ... The settings are automatically reset. Result: The screen quality and position are all finished, and the PDP Monitor will automatically return to select Auto Adjustment. Result: The horizontal bar is displayed. 5 Press the ENTER ( ) button again to the previous picture. 6 Press the ... Please...
.... 4 Press the ... Press the ENTER ( ) button. 7 Press the ... The settings are automatically reset. Result: The screen quality and position are all finished, and the PDP Monitor will automatically return to select Auto Adjustment. Result: The horizontal bar is displayed. 5 Press the ENTER ( ) button again to the previous picture. 6 Press the ... Please...
User Manual (ENGLISH)
Page 26
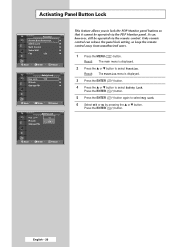
Activating Panel Button Lock TV Function Screen Burn Protection √ Safety Lock √ Multi Control √ Video Wall... Lock Key Lock IR Lock Change PIN : Off Off On This feature allows you to lock the PDP Monitor panel buttons so that it cannot be operated via the PDP Monitor panel. Press the ENTER ( ) button. Move Enter Return English - 26 Press the ENTER ( ) button....Key Lock. 6 Select Off or On by pressing the ▲ or ▼ button. It can release the panel lock setting, so keep the remote control away from unauthorized users. 1 Press the MENU ( ) button.
Activating Panel Button Lock TV Function Screen Burn Protection √ Safety Lock √ Multi Control √ Video Wall... Lock Key Lock IR Lock Change PIN : Off Off On This feature allows you to lock the PDP Monitor panel buttons so that it cannot be operated via the PDP Monitor panel. Press the ENTER ( ) button. Move Enter Return English - 26 Press the ENTER ( ) button....Key Lock. 6 Select Off or On by pressing the ▲ or ▼ button. It can release the panel lock setting, so keep the remote control away from unauthorized users. 1 Press the MENU ( ) button.

User Manual (ENGLISH)
Page 27
...; button to lock the remote control so that it cannot be operated via the remote control. It can, however, still be operated via the PDP Monitor Panel buttons. 1 Press the MENU ( ) button. TV Function Screen Burn Protection √ Safety Lock √ Multi Control √ Video Wall √ Fan : Off √ Move Enter...
...; button to lock the remote control so that it cannot be operated via the remote control. It can, however, still be operated via the PDP Monitor Panel buttons. 1 Press the MENU ( ) button. TV Function Screen Burn Protection √ Safety Lock √ Multi Control √ Video Wall √ Fan : Off √ Move Enter...
User Manual (ENGLISH)
Page 28
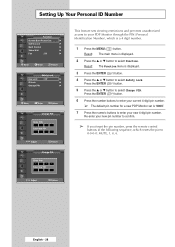
... Adjust Return TV Change PIN Enter PIN ** ** Enter New PIN Adjust Return This feature sets viewing restrictions and prevents unauthorized access to your PDP Monitor through the PIN (Personal Identification Number), which resets the pin to select Change PIN. Result: The Function menu is a 4 digit number. 1... the ENTER ( ) button. 6 Press the number buttons to enter your current 4-digit pin number. ➢ The default pin number for a new PDP Monitor set is displayed. 2 Press the ▲ or ▼ button to enter your new pin number to confirm. ➢ If you forget the pin number...
... Adjust Return TV Change PIN Enter PIN ** ** Enter New PIN Adjust Return This feature sets viewing restrictions and prevents unauthorized access to your PDP Monitor through the PIN (Personal Identification Number), which resets the pin to select Change PIN. Result: The Function menu is a 4 digit number. 1... the ENTER ( ) button. 6 Press the number buttons to enter your current 4-digit pin number. ➢ The default pin number for a new PDP Monitor set is displayed. 2 Press the ▲ or ▼ button to enter your new pin number to confirm. ➢ If you forget the pin number...
User Manual (ENGLISH)
Page 29
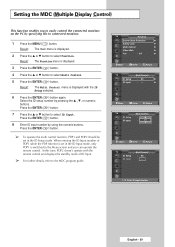
... set in the ID Input mode, only PDP1 is switched to the Menu screen and you to easily control the connected monitors on the PC by specifying IDs to connected monitors. 1 Press the MENU ( ) button. Press the ENTER ( ) button. 7 Press the ▲ or ▼ button to select Multi Control. 5... enables you can operate the remote control. Enter ID Input Number English - 29 When entering the ID Input number of PDP1 while the PDP Monitor is displayed with the remote control and displays the standby mode of ID Input. ➢ For further details, refer to select Function. Result:...
... set in the ID Input mode, only PDP1 is switched to the Menu screen and you to easily control the connected monitors on the PC by specifying IDs to connected monitors. 1 Press the MENU ( ) button. Press the ENTER ( ) button. 7 Press the ▲ or ▼ button to select Multi Control. 5... enables you can operate the remote control. Enter ID Input Number English - 29 When entering the ID Input number of PDP1 while the PDP Monitor is displayed with the remote control and displays the standby mode of ID Input. ➢ For further details, refer to select Function. Result:...
User Manual (ENGLISH)
Page 33
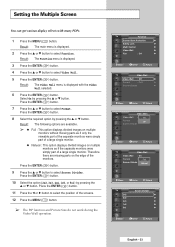
...ENTER ( ) button. Therefore there are available. ➢ ◆ Full : This option displays divided images on multiple monitors without missing parts as if the separate monitors were simply part of a large single monitor. Press the ENTER ( ) button. 8 Select the required option by pressing the ▲ or ▼ button. ...9650; or ▼ button. Press the ENTER ( ) button. 11 Press the œ or √ button to select the position of the monitors. Press the ENTER ( ) button. 9 Press the ▲ or ▼ button to select Function. Setting the Multiple Screen You can get various...
...ENTER ( ) button. Therefore there are available. ➢ ◆ Full : This option displays divided images on multiple monitors without missing parts as if the separate monitors were simply part of a large single monitor. Press the ENTER ( ) button. 8 Select the required option by pressing the ▲ or ▼ button. ...9650; or ▼ button. Press the ENTER ( ) button. 11 Press the œ or √ button to select the position of the monitors. Press the ENTER ( ) button. 9 Press the ▲ or ▼ button to select Function. Setting the Multiple Screen You can get various...


