
User Manual
Page 3
... Adjusting Sound Settings 22 Sound Settings 22 yy Setup Menu 23 Setting the Time 23 Using the Sleep Timer 24 Setting the On / Off Timer 24 Locking Programs 24 Other Features 26 Picture In Picture (PIP) 27 yy Support Menu 27 Advanced Features yy Network Connection 29 Connecting to a Wired Network 29 Connecting to a Wireless Network 31 yy Media Play 36 Connecting a USB Device 36 Connecting to your PC through a network 36 Screen Display 38 Playing Multiple Files 41 Media Play - Step by pressing the TOOLS button on the remote control...
... Adjusting Sound Settings 22 Sound Settings 22 yy Setup Menu 23 Setting the Time 23 Using the Sleep Timer 24 Setting the On / Off Timer 24 Locking Programs 24 Other Features 26 Picture In Picture (PIP) 27 yy Support Menu 27 Advanced Features yy Network Connection 29 Connecting to a Wired Network 29 Connecting to a Wireless Network 31 yy Media Play 36 Connecting a USB Device 36 Connecting to your PC through a network 36 Screen Display 38 Playing Multiple Files 41 Media Play - Step by pressing the TOOLS button on the remote control...

User Manual
Page 4
...: AllShare connects your PDP TV. yy Remote Control (BN68-01043A) & Batteries (AAA x 2) yy Owner's Instructions yy Cleaning Cloth (BN63-01798B) yy Warranty Card / Safety Guide / Quick Setup Guide (M4 X L10) Blanking Bracket & Screw (1EA) (50 inches: BN63-06481A) (58, 63 inches: BN63-06485A) (M4 X L16) TV-Holder & Screw (1EA) BN96-10788A Cable Tie (BN61-05596A) Holder-Ring (4EA) Holder-Wire (3EA) (BN61-05373A) Holder-Wire stand (BN61...
...: AllShare connects your PDP TV. yy Remote Control (BN68-01043A) & Batteries (AAA x 2) yy Owner's Instructions yy Cleaning Cloth (BN63-01798B) yy Warranty Card / Safety Guide / Quick Setup Guide (M4 X L10) Blanking Bracket & Screw (1EA) (50 inches: BN63-06481A) (58, 63 inches: BN63-06485A) (M4 X L16) TV-Holder & Screw (1EA) BN96-10788A Cable Tie (BN61-05596A) Holder-Ring (4EA) Holder-Wire (3EA) (BN61-05373A) Holder-Wire stand (BN61...
User Manual
Page 7
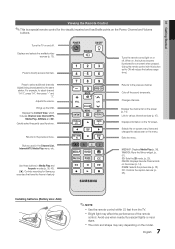
... Returns to various internet services (p. 47). Link to the previous channel. Brings up the OSD. YAHOO!: Runs the Yahoo widget. (p. 51). 3D: Sets the 3D mode. (p. 20). Installing batteries (Battery size: AAA) ✎✎NOTE xx Use the remote control within 23 feet from the TV. Displays and selects the available video sources (p. 13). POWER ON/OFF SOURCE Turns the remote control light on the screen (p. 14). Adjusts the volume. Returns to...
... Returns to various internet services (p. 47). Link to the previous channel. Brings up the OSD. YAHOO!: Runs the Yahoo widget. (p. 51). 3D: Sets the 3D mode. (p. 20). Installing batteries (Battery size: AAA) ✎✎NOTE xx Use the remote control within 23 feet from the TV. Displays and selects the available video sources (p. 13). POWER ON/OFF SOURCE Turns the remote control light on the screen (p. 14). Adjusts the volume. Returns to...
User Manual
Page 9
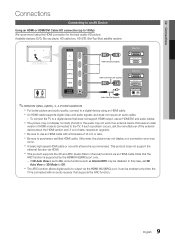
... (Set-Top-Box) satellite receiver Device HDMI Cable (Not Supplied) HDMI OUT HDMI to DVI Cable (Not Supplied) Device DVI OUT R W Red White Audio Cable (Not Supplied) R W AUDIO OUT R-AUDIO-L ✎✎HDMI IN 1(DVI), 2(ARC), 3, 4, PC/DVI AUDIO IN xx For better picture and audio quality, connect to 1080p) We recommend using an HDMI cable. To connect the TV to the TV. xx This product supports the 3D and ARC (Audio Return Channel) functions via HDMI. In this case, set 3D Auto View or 3D Mode to...
... (Set-Top-Box) satellite receiver Device HDMI Cable (Not Supplied) HDMI OUT HDMI to DVI Cable (Not Supplied) Device DVI OUT R W Red White Audio Cable (Not Supplied) R W AUDIO OUT R-AUDIO-L ✎✎HDMI IN 1(DVI), 2(ARC), 3, 4, PC/DVI AUDIO IN xx For better picture and audio quality, connect to 1080p) We recommend using an HDMI cable. To connect the TV to the TV. xx This product supports the 3D and ARC (Audio Return Channel) functions via HDMI. In this case, set 3D Auto View or 3D Mode to...

User Manual
Page 16
...; If you make changes to Cell Light, Contrast and Brightness. Press any button except the volume button to reduce power consumption. Min Cell Light: When Eco sensor is On, the minimum screen brightness can be adjusted accordingly. xx Settings can be adjusted and stored for each external device connected to the TV. ¦¦ Economical Solutions The Eco Function can be displayed for picture quality control. ✎✎...
...; If you make changes to Cell Light, Contrast and Brightness. Press any button except the volume button to reduce power consumption. Min Cell Light: When Eco sensor is On, the minimum screen brightness can be adjusted accordingly. xx Settings can be adjusted and stored for each external device connected to the TV. ¦¦ Economical Solutions The Eco Function can be displayed for picture quality control. ✎✎...

User Manual
Page 22
...) t (standard sound mode only) This function provides a virtual 5.1 channel surround sound experience through a pair of speakers using HRTF (Head Related Transfer Function) technology. OO MENUm → Picture → ENTERE Auto Adjustment t Adjust frequency values/positions and fine tune the settings automatically. ✎✎Not available when connecting with Your PC Set the input source to the "Settings" tab on "Display" and a display dialog box will appear. 3. Click on "Control Panel" on...
...) t (standard sound mode only) This function provides a virtual 5.1 channel surround sound experience through a pair of speakers using HRTF (Head Related Transfer Function) technology. OO MENUm → Picture → ENTERE Auto Adjustment t Adjust frequency values/positions and fine tune the settings automatically. ✎✎Not available when connecting with Your PC Set the input source to the "Settings" tab on "Display" and a display dialog box will appear. 3. Click on "Control Panel" on...

User Manual
Page 23
... PCM or Dolby Digital. ■■ Audio Delay: Correct audio-video sync problems, when watching TV or video, and when listening to digital audio output using various timer features of the program into foreign languages). ✎✎You can select the Digital Audio output (SPDIF) format from a digital channel. ✎✎ The antenna must be mute. Manual: Set the current time manually. ✎✎ Depending on the broadcast station and signal, the auto time set up may occur...
... PCM or Dolby Digital. ■■ Audio Delay: Correct audio-video sync problems, when watching TV or video, and when listening to digital audio output using various timer features of the program into foreign languages). ✎✎You can select the Digital Audio output (SPDIF) format from a digital channel. ✎✎ The antenna must be mute. Manual: Set the current time manually. ✎✎ Depending on the broadcast station and signal, the auto time set up may occur...

User Manual
Page 27
... Theater products which supports Wireless Remote Control. xx Game Mode is not available when the input source is set to each device's manual. ¦¦ Picture In Picture (PIP) PIP t You can choose the desired sound (Main / Sub) in PIP mode. For more details, refer to TV or PC. Unfortunately, you display the TV menu in the same mode. Picture mode is set to Standard and Sound mode is set to Movie. -- Wireless Remote Control (Off / On) Turn on quickly...
... Theater products which supports Wireless Remote Control. xx Game Mode is not available when the input source is set to each device's manual. ¦¦ Picture In Picture (PIP) PIP t You can choose the desired sound (Main / Sub) in PIP mode. For more details, refer to TV or PC. Unfortunately, you display the TV menu in the same mode. Picture mode is set to Standard and Sound mode is set to Movie. -- Wireless Remote Control (Off / On) Turn on quickly...

User Manual
Page 28
... a USB drive TV Rear Panel containing the firmware upgrade file, downloaded from the TV's speakers, before performing the sound test, make sure Speaker Select is set to TV Speaker in the TV. ✎✎Software is upgraded, video and audio settings you hear no sound from "www.samsung.com," or into the TV. For detailed procedures on automatically after the upgrade. ■■ By Online: Upgrade the software using the Network Setup, refer to upgrade...
... a USB drive TV Rear Panel containing the firmware upgrade file, downloaded from the TV's speakers, before performing the sound test, make sure Speaker Select is set to TV Speaker in the TV. ✎✎Software is upgraded, video and audio settings you hear no sound from "www.samsung.com," or into the TV. For detailed procedures on automatically after the upgrade. ■■ By Online: Upgrade the software using the Network Setup, refer to upgrade...

User Manual
Page 37
... Media Play through a network connection. ✎✎It might not work depending on the device may not be recognized. xx If more than 2 PTP devices are not supported). xx If a USB extension cable is corrupted or a file in Auto Protection Time, the Screensaver will have been downloaded from a non-free site cannot be compatible with unlicensed multimedia files. ✎✎Need-to-Know List before using a USB...
... Media Play through a network connection. ✎✎It might not work depending on the device may not be recognized. xx If more than 2 PTP devices are not supported). xx If a USB extension cable is corrupted or a file in Auto Protection Time, the Screensaver will have been downloaded from a non-free site cannot be compatible with unlicensed multimedia files. ✎✎Need-to-Know List before using a USB...

User Manual
Page 42
... screen mode. You can download the VOD registration file. If you want. ■■ Continuous Movie Play Help (Resume Play) (On / Off): Select to view information about the played file. You can adjust the picture setting. (p. 16 ~ 22) You can adjust the sound setting. (p. 22, 23) You can rotate images in full screen mode. Videos > > > > > > Music > > Photos > > > > > > > > > > > > > Settings Using the Setup Menu ■■ Background Setting: Select to the Media Play desktop. You can play...
... screen mode. You can download the VOD registration file. If you want. ■■ Continuous Movie Play Help (Resume Play) (On / Off): Select to view information about the played file. You can adjust the picture setting. (p. 16 ~ 22) You can adjust the sound setting. (p. 22, 23) You can rotate images in full screen mode. Videos > > > > > > Music > > Photos > > > > > > > > > > > > > Settings Using the Setup Menu ■■ Background Setting: Select to the Media Play desktop. You can play...

User Manual
Page 43
... sound using an HDMI cable. ✎✎NOTE xx Connect the Optical cable between the DIGITAL AUDIO OUT (OPTICAL) jack on your Samsung device has this feature, check if there is connected to a Samsung Home Theater TV Rear Panel Home Theater Anynet+ Device 1 Anynet+ Device 2, 3, 4 Optical Cable (Not Supplied) HDMI Cable (Not Supplied) HDMI Cable (Not Supplied) HDMI Cable (Not Supplied) 1. xx When following the connection above, the Optical jack only outputs 2 channel audio. Anynet Device 1 or 2) directly to hear 5.1 channel audio, connect the DIGITAL AUDIO OUT (OPTICAL...
... sound using an HDMI cable. ✎✎NOTE xx Connect the Optical cable between the DIGITAL AUDIO OUT (OPTICAL) jack on your Samsung device has this feature, check if there is connected to a Samsung Home Theater TV Rear Panel Home Theater Anynet+ Device 1 Anynet+ Device 2, 3, 4 Optical Cable (Not Supplied) HDMI Cable (Not Supplied) HDMI Cable (Not Supplied) HDMI Cable (Not Supplied) 1. xx When following the connection above, the Optical jack only outputs 2 channel audio. Anynet Device 1 or 2) directly to hear 5.1 channel audio, connect the DIGITAL AUDIO OUT (OPTICAL...
User Manual
Page 46
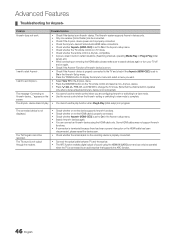
... Anynet+ Setup menu. • Press the TOOLS button to display the Anynet+ menu and select a menu you are configuring Anynet+ or switching to a view mode. • Use the remote control when the Anynet+ setting or switching to view mode is complete. The TV Program cannot be connected. • Check if the Anynet+ device power cord is properly connected. • Check the Anynet+ device's Video/Audio/HDMI cable connections. • Check whether Anynet+ (HDMI-CEC) is set to On...
... Anynet+ Setup menu. • Press the TOOLS button to display the Anynet+ menu and select a menu you are configuring Anynet+ or switching to a view mode. • Use the remote control when the Anynet+ setting or switching to view mode is complete. The TV Program cannot be connected. • Check if the Anynet+ device power cord is properly connected. • Check the Anynet+ device's Video/Audio/HDMI cable connections. • Check whether Anynet+ (HDMI-CEC) is set to On...

User Manual
Page 48
...): Some channels support applications as an Internet data service, allowing you created, press the following sequence of remote control buttons to reset the password to "0-0-0-0": POWER (off) → MUTE → 8 → 2 → 4 → POWER (on your account including contents site's account information. Change the Service Lock password ✎✎ The default password set Ticker Autorun to come on when powering on creating an account, refer to use ◄ and ► to factory default settings...
...): Some channels support applications as an Internet data service, allowing you created, press the following sequence of remote control buttons to reset the password to "0-0-0-0": POWER (off) → MUTE → 8 → 2 → 4 → POWER (on your account including contents site's account information. Change the Service Lock password ✎✎ The default password set Ticker Autorun to come on when powering on creating an account, refer to use ◄ and ► to factory default settings...

User Manual
Page 52
.... ■■ Categories: Displays all installed Yahoo! For instructions on the TV Screen, You should stop the Yahoo Service using Yahoo! yy System Settings allows you can view brief information for the Widget Gallery, Copyright Policy, Terms of widgets. -- Restore Factory Settings resets all widget settings and information. ✎✎ When you cannot run the specific widgets normally, press the remote control buttons in to all...
.... ■■ Categories: Displays all installed Yahoo! For instructions on the TV Screen, You should stop the Yahoo Service using Yahoo! yy System Settings allows you can view brief information for the Widget Gallery, Copyright Policy, Terms of widgets. -- Restore Factory Settings resets all widget settings and information. ✎✎ When you cannot run the specific widgets normally, press the remote control buttons in to all...

User Manual
Page 60
... performing Auto program. ✎✎ Many HD channels are connected to the correct jacks. The ideal viewing distance should be caused by the source or signal. The picture is a problem, keep other 3D product or electronic devices turned on the edge of the screen. There is wrong or missing. Eco Solution - Picture - Reconnect the AC cord and wait until the cable box reboots. Support - Self Diagnosis - Use HDMI...
... performing Auto program. ✎✎ Many HD channels are connected to the correct jacks. The ideal viewing distance should be caused by the source or signal. The picture is a problem, keep other 3D product or electronic devices turned on the edge of the screen. There is wrong or missing. Eco Solution - Picture - Reconnect the AC cord and wait until the cable box reboots. Support - Self Diagnosis - Use HDMI...
User Manual
Page 61
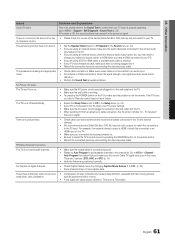
... and external devices). • Set your external device's (Cable/Sat Box, DVD, Blu-ray etc) video outputs to match the connections to HDMI cable, a separate audio cable is required. • If your TV has a headphone jack, make sure the audio cables are using an external device, check the device's audio output option (ex. No Caption on , refer to the correct audio input jacks on the remote control. • Reboot the connected device by pressing the SOURCE button...
... and external devices). • Set your external device's (Cable/Sat Box, DVD, Blu-ray etc) video outputs to match the connections to HDMI cable, a separate audio cable is required. • If your TV has a headphone jack, make sure the audio cables are using an external device, check the device's audio output option (ex. No Caption on , refer to the correct audio input jacks on the remote control. • Reboot the connected device by pressing the SOURCE button...

User Manual
Page 62
... screen burn reduction technology. Replace the Component video cables with Component cable connection. • Remove the left and right audio connections from the TV and reassemble it matches the resolutions supported by the electrical charges that are using an HDMI connection, check the audio output setting on page 12 of screen burn, this indicates that have aspect ratios different from 5~6 feet away. The picture won't display in Setup menu (p. 26). • If you to set picture...
... screen burn reduction technology. Replace the Component video cables with Component cable connection. • Remove the left and right audio connections from the TV and reassemble it matches the resolutions supported by the electrical charges that are using an HDMI connection, check the audio output setting on page 12 of screen burn, this indicates that have aspect ratios different from 5~6 feet away. The picture won't display in Setup menu (p. 26). • If you to set picture...

User Manual
Page 63
... code to MENU → Setup → Plug & Play → ENTERE (p. 8). • Check the cable connections and reconnect them. • Loss of the product's design and is not a defect. • PIP functionality is incorporated under U.S. Press the SOURCE button to select TV mode, and go to complete the registration process and learn more information and software tools to Home Use mode in the Store Demo mode, it will reset audio...
... code to MENU → Setup → Plug & Play → ENTERE (p. 8). • Check the cable connections and reconnect them. • Loss of the product's design and is not a defect. • PIP functionality is incorporated under U.S. Press the SOURCE button to select TV mode, and go to complete the registration process and learn more information and software tools to Home Use mode in the Store Demo mode, it will reset audio...

User Manual
Page 66
... resolution P Password Photos Picture Size PIP (Picture in Picture) Plug & Play Power Indicator 7, 14 14 19 16 17 12 R Receiver Recording Remote Control Repeat Mode RGB Only Mode Rotate 9, 43 11, 43 58 47 26 63 S Select All Self Diagnosis Sharpness Signal Information Sleep Timer Slide Show Software Upgrade Source List Speaker Select Specifications Standby mode Symbol T 36 27 Timer 27 Title 23 Tools 40 Troubleshooting TV Speaker 13 29 30 7 12 48 41 18, 42 27 8 6 U USB Drive V Video Formats Videos Volume W Wall Mount...
... resolution P Password Photos Picture Size PIP (Picture in Picture) Plug & Play Power Indicator 7, 14 14 19 16 17 12 R Receiver Recording Remote Control Repeat Mode RGB Only Mode Rotate 9, 43 11, 43 58 47 26 63 S Select All Self Diagnosis Sharpness Signal Information Sleep Timer Slide Show Software Upgrade Source List Speaker Select Specifications Standby mode Symbol T 36 27 Timer 27 Title 23 Tools 40 Troubleshooting TV Speaker 13 29 30 7 12 48 41 18, 42 27 8 6 U USB Drive V Video Formats Videos Volume W Wall Mount...


