Quick Guide Ver.1.0 (English)
Page 1
... any questions or comments relating to Samsung products, please contact the SAMSUNG customer care center. All rights reserved. [PH4500-5000-ZA]BN68-05661A-00ENG.indb 1 BN68-05661A-00 E-MANUAL Thank you have any questions, please call us Samsung Electronics Canada Inc., Customer Service 55...Court Mississauga, Ontario L5R 4B2 Canada Samsung Electronics America, Inc. 85 Challenger Road Ridgefield Park, NJ 07660 Plasma TV user manual © 2014 Samsung Electronics Co., Ltd. To receive more complete service, please register your product at www.samsung.com/register Model Serial No If ...
... any questions or comments relating to Samsung products, please contact the SAMSUNG customer care center. All rights reserved. [PH4500-5000-ZA]BN68-05661A-00ENG.indb 1 BN68-05661A-00 E-MANUAL Thank you have any questions, please call us Samsung Electronics Canada Inc., Customer Service 55...Court Mississauga, Ontario L5R 4B2 Canada Samsung Electronics America, Inc. 85 Challenger Road Ridgefield Park, NJ 07660 Plasma TV user manual © 2014 Samsung Electronics Co., Ltd. To receive more complete service, please register your product at www.samsung.com/register Model Serial No If ...
Quick Guide Ver.1.0 (English)
Page 4
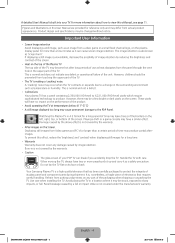
...have no impact on the plasma display panel for more than a certain period of electronics that has been carefully packaged to a change in this e-Manual, see page 11. Damage caused by the above effect is not covered by the warranty. • Caution The glass screen of the packaging when... as heat dissipates from Video games and PC's for reference only and may become hot after long periods of use as temperature or humidity. Your Samsung Plasma TV is making a 'cracking' noise. Use care when installing the TV. Panel breakage caused by reducing the brightness and contrast of the ...
...have no impact on the plasma display panel for more than a certain period of electronics that has been carefully packaged to a change in this e-Manual, see page 11. Damage caused by the above effect is not covered by the warranty. • Caution The glass screen of the packaging when... as heat dissipates from Video games and PC's for reference only and may become hot after long periods of use as temperature or humidity. Your Samsung Plasma TV is making a 'cracking' noise. Use care when installing the TV. Panel breakage caused by reducing the brightness and contrast of the ...

Quick Guide Ver.1.0 (English)
Page 5
...opposite or wrong direction. If any items are missing, contact your dealer. ✎✎ The items' colors and shapes may vary depending on -screen user's manual built into your TV. (page 11) Accessories and Cables ✎✎ Please make sure the following items are included with your TV. Cable Plugs Ports... Features • Media Play: Media Play lets you access, view, or play photos, videos, or music located on USB devices and digital cameras. • e-Manual: Provides a detailed, on the model. ✎✎ Check that there are no thicker than the cable illustrated below .
...opposite or wrong direction. If any items are missing, contact your dealer. ✎✎ The items' colors and shapes may vary depending on -screen user's manual built into your TV. (page 11) Accessories and Cables ✎✎ Please make sure the following items are included with your TV. Cable Plugs Ports... Features • Media Play: Media Play lets you access, view, or play photos, videos, or music located on USB devices and digital cameras. • e-Manual: Provides a detailed, on the model. ✎✎ Check that there are no thicker than the cable illustrated below .
Quick Guide Ver.1.0 (English)
Page 8
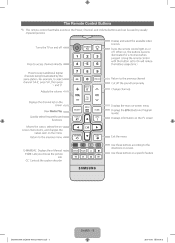
...). Displays information on -screen menu. Press to select channel '54-3', press '54', then press '-' and '3'. For example, to access channels directly. View Media Play. E-MANUAL: Displays the e-Manual. Change channels. P.SIZE: Lets you choose the picture size. Use these buttons according to select additional digital channels being broadcasted by visually impaired persons...
...). Displays information on -screen menu. Press to select channel '54-3', press '54', then press '-' and '3'. For example, to access channels directly. View Media Play. E-MANUAL: Displays the e-Manual. Change channels. P.SIZE: Lets you choose the picture size. Use these buttons according to select additional digital channels being broadcasted by visually impaired persons...
Quick Guide Ver.1.0 (English)
Page 11
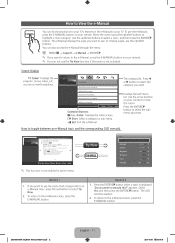
... Picture Mode t O MENUm → Picture → Picture Mode → ENTERE Picture modes apply preset adjustments to toggle between an e-Manual topic and the corresponding OSD menu(s). Press the ENTERE button when a topic is only available when connecting a PC. The OSD window appears....Color • Tint (G/R) Standard 10 95 45 50 50 G50 R50 Method 1 1. Method 2 1. Use the up/down buttons to the e-Manual screen, press the E-MANUAL button. You can only select Entertain and Standard. ● Dynamic: Suitable for a bright room. ● Standard: Suitable for a normal environment...
... Picture Mode t O MENUm → Picture → Picture Mode → ENTERE Picture modes apply preset adjustments to toggle between an e-Manual topic and the corresponding OSD menu(s). Press the ENTERE button when a topic is only available when connecting a PC. The OSD window appears....Color • Tint (G/R) Standard 10 95 45 50 50 G50 R50 Method 1 1. Method 2 1. Use the up/down buttons to the e-Manual screen, press the E-MANUAL button. You can only select Entertain and Standard. ● Dynamic: Suitable for a bright room. ● Standard: Suitable for a normal environment...
Quick Guide Ver.1.0 (English)
Page 12
...the Preset Picture Mode ■ Picture Mode t O MENUm → Picture → Picture Mode → ENTERE Picture modes apply preset adjustments to the e-Manual home screen. { Yellow (Zoom): Magnifies a screen. } Blue (Index): Displays the Index screen. b Green (Home): Moves to the picture. To search...PC. U Move R Return How to the topic. To return to the previous or next page. L (Page): Moves to the e-Manual screen, press the E-MANUAL button. Select a mode using the ▲/▼ buttons, and then press ENTERE. Using the Zoom mode When you selected. 3. Press...
...the Preset Picture Mode ■ Picture Mode t O MENUm → Picture → Picture Mode → ENTERE Picture modes apply preset adjustments to the e-Manual home screen. { Yellow (Zoom): Magnifies a screen. } Blue (Index): Displays the Index screen. b Green (Home): Moves to the picture. To search...PC. U Move R Return How to the topic. To return to the previous or next page. L (Page): Moves to the e-Manual screen, press the E-MANUAL button. Select a mode using the ▲/▼ buttons, and then press ENTERE. Using the Zoom mode When you selected. 3. Press...
Quick Guide Ver.1.0 (English)
Page 13
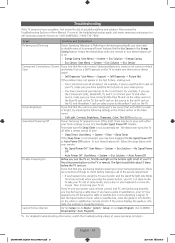
...Contrast, Brightness, Sharpness, Color, Tint (G/R) and so on your Eco friendly No Signal Power Off feature. Unwanted Powering Off If your Samsung TV appears to turn these features off by the box. Then try adjusting the following settings in sleep mode. If none of sleep mode...Support → Self Diagnosis → Picture Test If the problem does not appear in the e-Manual. Auto Program). ✎✎ For detailed troubleshooting information, watch the troubleshooting videos at 1-800-SAMSUNG (1-800-726-7864). If the screen displays the guide or info data, the problem is not...
...Contrast, Brightness, Sharpness, Color, Tint (G/R) and so on your Eco friendly No Signal Power Off feature. Unwanted Powering Off If your Samsung TV appears to turn these features off by the box. Then try adjusting the following settings in sleep mode. If none of sleep mode...Support → Self Diagnosis → Picture Test If the problem does not appear in the e-Manual. Auto Program). ✎✎ For detailed troubleshooting information, watch the troubleshooting videos at 1-800-SAMSUNG (1-800-726-7864). If the screen displays the guide or info data, the problem is not...
Quick Guide Ver.1.0 (English)
Page 16
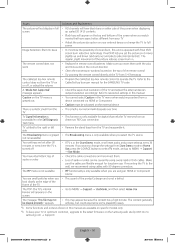
... played properly." The content generally will play, but could experience some playability issues. ✎✎ Some functions and pictures shown in this manual are using cables with 90 degree connectors. Caption on the TV menu is greyed out. • You cannot select Caption in the TV... Broadcasting menu is normal and will dissipate over time. The PIP menu is not available. • PIP functionality is only available for the SAMSUNG TV code. Issues Solutions and Explanations The picture will not display in full screen. • HD channels will have black bars on either ...
... played properly." The content generally will play, but could experience some playability issues. ✎✎ Some functions and pictures shown in this manual are using cables with 90 degree connectors. Caption on the TV menu is greyed out. • You cannot select Caption in the TV... Broadcasting menu is normal and will dissipate over time. The PIP menu is not available. • PIP functionality is only available for the SAMSUNG TV code. Issues Solutions and Explanations The picture will not display in full screen. • HD channels will have black bars on either ...

Quick Guide Ver.1.0 (English)
Page 17
...Specifications (VESA) Install your TV is used or the consumer fails to follow the product installation instructions. • Do not mount the TV at 1-800-SAMSUNG (1-800-726-7864). If you install the wall mount. Product Family TV size in VESA screw hole specs (A inches * B) in millimeters Standard Screw... inside of the TV set. • For wall mounts that are too long may result in the table below. • Samsung wall mount kits contain a detailed installation manual and all parts necessary for wall mount kits are provided. • Do not use screws that do not comply with the VESA...
...Specifications (VESA) Install your TV is used or the consumer fails to follow the product installation instructions. • Do not mount the TV at 1-800-SAMSUNG (1-800-726-7864). If you install the wall mount. Product Family TV size in VESA screw hole specs (A inches * B) in millimeters Standard Screw... inside of the TV set. • For wall mounts that are too long may result in the table below. • Samsung wall mount kits contain a detailed installation manual and all parts necessary for wall mount kits are provided. • Do not use screws that do not comply with the VESA...
Quick Guide Ver.1.0 (English)
Page 19
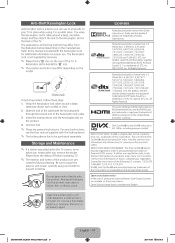
... Lock for additional information on the back of the following U.S. Be sure to wipe the exterior and screen carefully using a soft cloth to the manual provided with the locking device. ✎✎ The locking device has to be registered in a public place. Manufactured under a license from U.S. ... that goes into the Kensington slot on the model. Do not use to vod.divx. The Kensington Lock is a digital video format created by Samsung. ✎✎ Please find a "K" icon on how to convert your device setup menu. Dolby and the double-D symbol are trademarks of the...
... Lock for additional information on the back of the following U.S. Be sure to wipe the exterior and screen carefully using a soft cloth to the manual provided with the locking device. ✎✎ The locking device has to be registered in a public place. Manufactured under a license from U.S. ... that goes into the Kensington slot on the model. Do not use to vod.divx. The Kensington Lock is a digital video format created by Samsung. ✎✎ Please find a "K" icon on how to convert your device setup menu. Dolby and the double-D symbol are trademarks of the...
User Manual Ver.1.0 (English)
Page 9
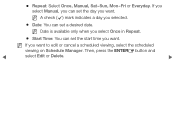
NN Date is available only when you select Once in Repeat. ●● Start Time: You can set the start time you want . ●● Repeat: Select Once, Manual, Sat~Sun, Mon~Fri or Everyday. Then, press the ENTERE button and ◀ select Edit or Delete. ▶ NN If you want to edit or cancel a scheduled viewing, select the scheduled viewing on Schedule Manager. If you select Manual, you can set the day you selected. ●● Date: You can set a desired date. NN A check (c) mark indicates a day you want.
NN Date is available only when you select Once in Repeat. ●● Start Time: You can set the start time you want . ●● Repeat: Select Once, Manual, Sat~Sun, Mon~Fri or Everyday. Then, press the ENTERE button and ◀ select Edit or Delete. ▶ NN If you want to edit or cancel a scheduled viewing, select the scheduled viewing on Schedule Manager. If you select Manual, you can set the day you selected. ●● Date: You can set a desired date. NN A check (c) mark indicates a day you want.
User Manual Ver.1.0 (English)
Page 29
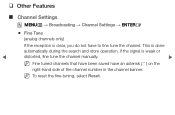
❑❑ Other Features ■■ Channel Settings OO MENUm → Broadcasting → Channel Settings → ENTERE ●● Fine Tune (analog channels only) If the reception is done automatically during the search and store operation. This is clear, you do not have an asterisk ( * ) on the right-hand side of the channel number in the channel banner. If the signal is weak or ◀ distorted, fine tune the channel manually. ▶ NN Fine tuned channels that have been saved have to fine tune the channel. NN To reset the fine-tuning, select Reset.
❑❑ Other Features ■■ Channel Settings OO MENUm → Broadcasting → Channel Settings → ENTERE ●● Fine Tune (analog channels only) If the reception is done automatically during the search and store operation. This is clear, you do not have an asterisk ( * ) on the right-hand side of the channel number in the channel banner. If the signal is weak or ◀ distorted, fine tune the channel manually. ▶ NN Fine tuned channels that have been saved have to fine tune the channel. NN To reset the fine-tuning, select Reset.

User Manual Ver.1.0 (English)
Page 69
If this occurs, set the time correctly. Clock Mode: Set the current time manually or automatically. ●● Auto: The TV sets the current time automatically using the time from a digital channel. NN Depending on the broadcast station and signal, Auto may not set the time manually. ◀ ▶ NN You must have cable or an antenna connected to the TV to have the TV set the time automatically. ●● Manual: Set the current time manually.
If this occurs, set the time correctly. Clock Mode: Set the current time manually or automatically. ●● Auto: The TV sets the current time automatically using the time from a digital channel. NN Depending on the broadcast station and signal, Auto may not set the time manually. ◀ ▶ NN You must have cable or an antenna connected to the TV to have the TV set the time automatically. ●● Manual: Set the current time manually.

User Manual Ver.1.0 (English)
Page 70
Clock Set: Set the Date and Time. Press ENTERE when done. Use the l/r buttons to move from one entry field to enter numbers. Use the number buttons or the u/d buttons to the next. DST: Switches the DST (Daylight Saving Time) function on or off. NN Available only when Clock Mode is set to Auto. ◀ ▶ Select Date or Time, and then press ENTERE. NN This function is only available when the Clock Mode is set to Manual. Select Clock Set.
Clock Set: Set the Date and Time. Press ENTERE when done. Use the l/r buttons to move from one entry field to enter numbers. Use the number buttons or the u/d buttons to the next. DST: Switches the DST (Daylight Saving Time) function on or off. NN Available only when Clock Mode is set to Auto. ◀ ▶ Select Date or Time, and then press ENTERE. NN This function is only available when the Clock Mode is set to Manual. Select Clock Set.

User Manual Ver.1.0 (English)
Page 73
If you select Manual, you can use On Timer. NN The c mark indicates days you want On Timer ▶ to turn on a day of your TV. Setup: Select Off, Once, Everyday, Mon~Fri, Mon~Sat, Sat~Sun, or ◀ Manual. NN You must set up three separate On Timer configurations. ❑❑ Setting the On/Off Timer OO MENUm → System → Time → On Timer Off Timer → ENTERE Set On Timer so that your TV turns on automatically at a time and on your choosing. ●● On Timer: You can set the clock before you can choose the days you 've selected.
If you select Manual, you can use On Timer. NN The c mark indicates days you want On Timer ▶ to turn on a day of your TV. Setup: Select Off, Once, Everyday, Mon~Fri, Mon~Sat, Sat~Sun, or ◀ Manual. NN You must set up three separate On Timer configurations. ❑❑ Setting the On/Off Timer OO MENUm → System → Time → On Timer Off Timer → ENTERE Set On Timer so that your TV turns on automatically at a time and on your choosing. ●● On Timer: You can set the clock before you can choose the days you 've selected.
User Manual Ver.1.0 (English)
Page 77
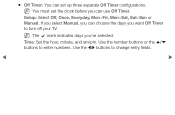
Setup: Select Off, Once, Everyday, Mon~Fri, Mon~Sat, Sat~Sun or Manual. Time: Set the hour, minute, and am/pm. ●● Off Timer: You can use Off Timer. NN You must set the clock before you can set up three separate Off Timer configurations. Use the number buttons or the u/d buttons to change entry fields. ◀ ▶ NN The c mark indicates days you want Off Timer to turn off your TV. Use the l/r buttons to enter numbers. If you select Manual, you can choose the days you 've selected.
Setup: Select Off, Once, Everyday, Mon~Fri, Mon~Sat, Sat~Sun or Manual. Time: Set the hour, minute, and am/pm. ●● Off Timer: You can use Off Timer. NN You must set the clock before you can set up three separate Off Timer configurations. Use the number buttons or the u/d buttons to change entry fields. ◀ ▶ NN The c mark indicates days you want Off Timer to turn off your TV. Use the l/r buttons to enter numbers. If you select Manual, you can choose the days you 've selected.

User Manual Ver.1.0 (English)
Page 79
... display brightness may change (become slightly darker in power saving mode. ◀ ●● Auto Power Off: The TV will automatically turn off if you manually adjust the minimum screen brightness. You can control the screen's minimum brightness with the Min Cell Light function. ●● No Signal Power Off : Sets...
... display brightness may change (become slightly darker in power saving mode. ◀ ●● Auto Power Off: The TV will automatically turn off if you manually adjust the minimum screen brightness. You can control the screen's minimum brightness with the Min Cell Light function. ●● No Signal Power Off : Sets...

User Manual Ver.1.0 (English)
Page 88
NN You can only choose external devices that are highlighted. ◀ NN For detailed information, refer to the TV. ❑❑ Using the Source List ■■ Source List OO MENUm → Applications → Source List→ ENTERE NN When you press the SOURCE button, the Source screen is displayed immediately. In the Source list, connected inputs are connected to "Changing the Input Source" in the paper ▶ User Manual.
NN You can only choose external devices that are highlighted. ◀ NN For detailed information, refer to the TV. ❑❑ Using the Source List ■■ Source List OO MENUm → Applications → Source List→ ENTERE NN When you press the SOURCE button, the Source screen is displayed immediately. In the Source list, connected inputs are connected to "Changing the Input Source" in the paper ▶ User Manual.
User Manual Ver.1.0 (English)
Page 90
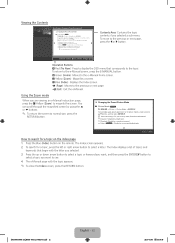
... button to exit to view or play, and then press the ENTERE button. 7. To disconnect the USB device, go to "Disconnecting a USB Device" in the e-Manual. 8. Select a file to the TV screen. 9. Press the RETURN button to exit a current screen and go to the previous screen. 6. NN Even though the player...
... button to exit to view or play, and then press the ENTERE button. 7. To disconnect the USB device, go to "Disconnecting a USB Device" in the e-Manual. 8. Select a file to the TV screen. 9. Press the RETURN button to exit a current screen and go to the previous screen. 6. NN Even though the player...

User Manual Ver.1.0 (English)
Page 97
For information about controlling playback, go to "Disconnecting a USB Device" in the e-Manual. 8. To disconnect the USB device, go to select a folder, and then press the ENTERE button. 6. Press the EXIT button to exit to view or play, and then press the ENTERE or ∂ button on your remote. 7. 5. Select a file to the TV screen. ◀ 9. Press the RETURN button to exit a current screen and go to "Playing selected files" and "Controlling Photo / Video / Music Playback" in the ▶ e-Manual. If necessary, use the u/d/l/r buttons to the previous screen.
For information about controlling playback, go to "Disconnecting a USB Device" in the e-Manual. 8. To disconnect the USB device, go to select a folder, and then press the ENTERE button. 6. Press the EXIT button to exit to view or play, and then press the ENTERE or ∂ button on your remote. 7. 5. Select a file to the TV screen. ◀ 9. Press the RETURN button to exit a current screen and go to "Playing selected files" and "Controlling Photo / Video / Music Playback" in the ▶ e-Manual. If necessary, use the u/d/l/r buttons to the previous screen.


