
Quick Guide Easy Manual Ver.1.0 (English)
Page 13
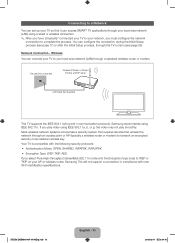
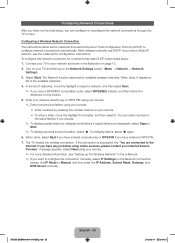
... through a standard wireless router or modem. Network Connection - If you play smoothly. Samsung recommends using IEEE 802.11a, b, or g, the video may not play video using IEEE 802.11n. Connecting to a Network You can set to WEP or TKIP on the Wall Wireless IP Router or Modem that it can... configure the connection during the Initial Setup process (see page 17) or after the Initial Setup process, through the TV's menu (see page 25). Wireless You can connect...
... through a standard wireless router or modem. Network Connection - If you play smoothly. Samsung recommends using IEEE 802.11a, b, or g, the video may not play video using IEEE 802.11n. Connecting to a Network You can set to WEP or TKIP on the Wall Wireless IP Router or Modem that it can... configure the connection during the Initial Setup process (see page 17) or after the Initial Setup process, through the TV's menu (see page 25). Wireless You can connect...
Quick Guide Easy Manual Ver.1.0 (English)
Page 16
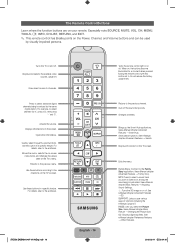
...Power, Channel, and Volume buttons and can be used functions. Press to the previous channel. Opens the OSD (Menu). Use this button set to On will reduce the battery usage time.) Returns to select additional digital channels being broadcasted. For details, refer...specific feature. For details, refer to the previous menu. Changes channels. See e-Manual chapter Advanced Features → Search. Exits the menu. See e-Manual chapter Advanced Features → Family Story. See e-Manual chapter Basic Features → Adjusting Sound Settings. X: Turns the 3D image on or off...
...Power, Channel, and Volume buttons and can be used functions. Press to the previous channel. Opens the OSD (Menu). Use this button set to On will reduce the battery usage time.) Returns to select additional digital channels being broadcasted. For details, refer...specific feature. For details, refer to the previous menu. Changes channels. See e-Manual chapter Advanced Features → Search. Exits the menu. See e-Manual chapter Advanced Features → Family Story. See e-Manual chapter Basic Features → Adjusting Sound Settings. X: Turns the 3D image on or off...

Quick Guide Easy Manual Ver.1.0 (English)
Page 17
...Demo, some functions will not work, and the TV will display on-screen menus using the onscreen Network menu. Wired Network on page 19. To configure network settings later, refer to "Setting up the network connection later using the language you select beginning with the next step in the Setup process.... For more information about Store Demo, go to 3A - Select Next Select a Language. Select the menu language you want to configure the settings later, or do not know your TV. You can set to TV. See "Changing the Input Source" (page 21). ✎✎ To return to the ...
...Demo, some functions will not work, and the TV will display on-screen menus using the onscreen Network menu. Wired Network on page 19. To configure network settings later, refer to "Setting up the network connection later using the language you select beginning with the next step in the Setup process.... For more information about Store Demo, go to 3A - Select Next Select a Language. Select the menu language you want to configure the settings later, or do not know your TV. You can set to TV. See "Changing the Input Source" (page 21). ✎✎ To return to the ...

Quick Guide Easy Manual Ver.1.0 (English)
Page 18
... of networks, move the Highlight to the Internet. message appears. When done, go to "Setting up the Wired or Wireless Network" in the e-Manual or see the Network Connection sections in the TV's Menu. Auto Program (1) on the screen. For more information, refer to 6 - If you choose... Upgrade Step. ✎✎ If the connection fails, select Previous, repeat Step 1 and 2, carefully re-enter your network later through Network Settings in this manual (pages 13 and 25). 3b Wired Network The TV checks the network connection, then displays the You are connected to Step ...
... of networks, move the Highlight to the Internet. message appears. When done, go to "Setting up the Wired or Wireless Network" in the e-Manual or see the Network Connection sections in the TV's Menu. Auto Program (1) on the screen. For more information, refer to 6 - If you choose... Upgrade Step. ✎✎ If the connection fails, select Previous, repeat Step 1 and 2, carefully re-enter your network later through Network Settings in this manual (pages 13 and 25). 3b Wired Network The TV checks the network connection, then displays the You are connected to Step ...
Quick Guide Easy Manual Ver.1.0 (English)
Page 19
For more information, refer to Software Update (Preference Features → Support Menu) in the e-Manual. ✎✎ This may take a few seconds to display. Select Agree. ✎✎ To use an aerial cable to connect to 9 - ... HRC, or IRC. The General Disclaimer screen appears. You do not need to 7 - Repeat the same process with Analog Cable System. 4. 4 Software Upgrade: When Network Settings is complete, your remote. When done, select Next. If you select this option, go to 8 - If new software is ✎✎ To update later, complete...
For more information, refer to Software Update (Preference Features → Support Menu) in the e-Manual. ✎✎ This may take a few seconds to display. Select Agree. ✎✎ To use an aerial cable to connect to 9 - ... HRC, or IRC. The General Disclaimer screen appears. You do not need to 7 - Repeat the same process with Analog Cable System. 4. 4 Software Upgrade: When Network Settings is complete, your remote. When done, select Next. If you select this option, go to 8 - If new software is ✎✎ To update later, complete...

Quick Guide Easy Manual Ver.1.0 (English)
Page 20
...will appear. Push the Controller to the left (to 45 minutes, depending on screen menu (Menu → System → Time → Clock → DST). Channel memorization can only set -top box. Select On if you selected I have a set the current time and date manually, using your Time Zone, and then select Next.... Auto If you can take up the Function menu using your cable system. The DST function sets the time ahead one hour to turn the DST function on through the TV's on your remote. Manual If you selected...
...will appear. Push the Controller to the left (to 45 minutes, depending on screen menu (Menu → System → Time → Clock → DST). Channel memorization can only set -top box. Select On if you selected I have a set the current time and date manually, using your Time Zone, and then select Next.... Auto If you can take up the Function menu using your cable system. The DST function sets the time ahead one hour to turn the DST function on through the TV's on your remote. Manual If you selected...
Quick Guide Easy Manual Ver.1.0 (English)
Page 22
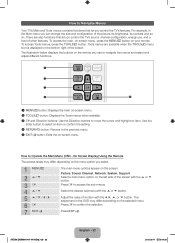
To access the main, on-screen menu, press the MENUm button on -screen menu. Use the Enter button to select an item or confirm the setting. 4 RETURNR button: Returns to the previous menu. 5 EXITe button: Exits the on your remote. On Screen Display) Using the Remote The access steps may ...differ depending on the selected menu. Adjust the value of other features. Press E to Operate the Main Menu (OSD - To ...
To access the main, on-screen menu, press the MENUm button on -screen menu. Use the Enter button to select an item or confirm the setting. 4 RETURNR button: Returns to the previous menu. 5 EXITe button: Exits the on your remote. On Screen Display) Using the Remote The access steps may ...differ depending on the selected menu. Adjust the value of other features. Press E to Operate the Main Menu (OSD - To ...
Quick Guide Easy Manual Ver.1.0 (English)
Page 25
.... ✎✎ To display capital letters (or redisplay small letters if capital letters are connected to the Network Settings screen. (Menu → Network → Network Settings) 3. Enter your network security key or WPS PIN using your remote. ✎✎ Enter numbers and letters using... the screen. 5. You can configure or reconfigure the network connections through the TV's menu. The TV checks the wireless connection. Set IP Mode to configure the connection manually, select IP Settings on your remote. ✎✎ For more detailed information, see the e-Manual for...
.... ✎✎ To display capital letters (or redisplay small letters if capital letters are connected to the Network Settings screen. (Menu → Network → Network Settings) 3. Enter your network security key or WPS PIN using your remote. ✎✎ Enter numbers and letters using... the screen. 5. You can configure or reconfigure the network connections through the TV's menu. The TV checks the wireless connection. Set IP Mode to configure the connection manually, select IP Settings on your remote. ✎✎ For more detailed information, see the e-Manual for...
Quick Guide Easy Manual Ver.1.0 (English)
Page 26
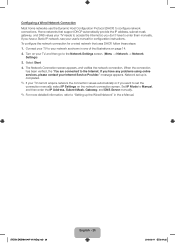
... automatically or if you have any problems using online services, please contact your TV needs to the Network Settings screen. (Menu → Network → Network Settings) 3. To configure the network connection for configuration instructions. Network set up the Wired Network" in one of the illustrations on the network connection screen. Configuring a Wired Network Connection...
... automatically or if you have any problems using online services, please contact your TV needs to the Network Settings screen. (Menu → Network → Network Settings) 3. To configure the network connection for configuration instructions. Network set up the Wired Network" in one of the illustrations on the network connection screen. Configuring a Wired Network Connection...
Quick Guide Easy Manual Ver.1.0 (English)
Page 29
...Samsung Customer Service at 1-800-SAMSUNG (1-800-726-7864). Issues Flickering and Dimming Component Connections / Screen Color Screen Brightness Solutions and Explanations If your TV and video source, make sure: •• Your connections are correct but just a little too dark or bright, try adjusting the following settings in the Picture menu... to the correct jacks. If you have connected your Samsung TV are all consistent. Troubleshooting If the TV seems to have a problem, first review this list of the Main menu: •• Cell Light, Contrast, Brightness, Sharpness...
...Samsung Customer Service at 1-800-SAMSUNG (1-800-726-7864). Issues Flickering and Dimming Component Connections / Screen Color Screen Brightness Solutions and Explanations If your TV and video source, make sure: •• Your connections are correct but just a little too dark or bright, try adjusting the following settings in the Picture menu... to the correct jacks. If you have connected your Samsung TV are all consistent. Troubleshooting If the TV seems to have a problem, first review this list of the Main menu: •• Cell Light, Contrast, Brightness, Sharpness...
Quick Guide Easy Manual Ver.1.0 (English)
Page 30
...on your Eco friendly No Signal Power Off feature. To test the signal output of things to be an issue with either your Timer settings or your keyboard or move the mouse. If you're sure your power cord, remote control, and PC are functioning properly, you ...Solution → Auto Power Off Before you have a cable or satellite box, your Samsung television, there are having a cable issue. Re-run Setup (Go to User Menu → System → Setup) or run Auto Program. (Go to User Menu → Channel → Auto Program). ✎✎ For detailed troubleshooting information, ...
...on your Eco friendly No Signal Power Off feature. To test the signal output of things to be an issue with either your Timer settings or your keyboard or move the mouse. If you're sure your power cord, remote control, and PC are functioning properly, you ...Solution → Auto Power Off Before you have a cable or satellite box, your Samsung television, there are having a cable issue. Re-run Setup (Go to User Menu → System → Setup) or run Auto Program. (Go to User Menu → Channel → Auto Program). ✎✎ For detailed troubleshooting information, ...
User Manual Ver.1.0 (English)
Page 2
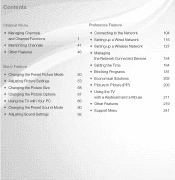
Contents Channel Menu Preference Feature • Managing Channels and Channel Functions • Memorizing Channels • Other Features • Connecting to the Network 104 1 • Setting up a Wired Network 115 41 • Setting up a Wireless Network 127 46 • Managing the Network Connected Devices 154 Basic Feature • Setting the Time 164 • Blocking ...Keyboard and a Mouse 211 • Using the TV with Your PC 86 • Other Features 219 • Changing the Preset Sound Mode 90 • Support Menu 241 • Adjusting Sound Settings 92
Contents Channel Menu Preference Feature • Managing Channels and Channel Functions • Memorizing Channels • Other Features • Connecting to the Network 104 1 • Setting up a Wired Network 115 41 • Setting up a Wireless Network 127 46 • Managing the Network Connected Devices 154 Basic Feature • Setting the Time 164 • Blocking ...Keyboard and a Mouse 211 • Using the TV with Your PC 86 • Other Features 219 • Changing the Preset Sound Mode 90 • Support Menu 241 • Adjusting Sound Settings 92
User Manual Ver.1.0 (English)
Page 20
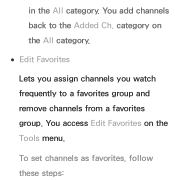
category on the Tools menu. You add channels back to a favorites group and remove channels from a favorites group. To set channels as favorites, follow these steps: You access Edit Favorites on the All category. ●● Edit Favorites Lets you assign channels you watch frequently to the Added Ch. in the All category.
category on the Tools menu. You add channels back to a favorites group and remove channels from a favorites group. To set channels as favorites, follow these steps: You access Edit Favorites on the All category. ●● Edit Favorites Lets you assign channels you watch frequently to the Added Ch. in the All category.
User Manual Ver.1.0 (English)
Page 31
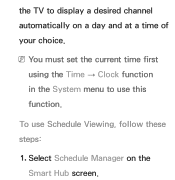
To use this function. NNYou must set the current time first using the Time → Clock function in the System menu to display a desired channel automatically on the Smart Hub screen. Select Schedule Manager on a day and at a time of your choice. the TV to use Schedule Viewing, follow these steps: 1.
To use this function. NNYou must set the current time first using the Time → Clock function in the System menu to display a desired channel automatically on the Smart Hub screen. Select Schedule Manager on a day and at a time of your choice. the TV to use Schedule Viewing, follow these steps: 1.
User Manual Ver.1.0 (English)
Page 57
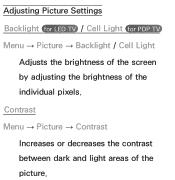
Adjusting Picture Settings Backlight for LED TV / Cell Light for PDP TV Menu → Picture → Backlight / Cell Light Adjusts the brightness of the screen by adjusting the brightness of the picture. Contrast Menu → Picture → Contrast Increases or decreases the contrast between dark and light areas of the individual pixels.
Adjusting Picture Settings Backlight for LED TV / Cell Light for PDP TV Menu → Picture → Backlight / Cell Light Adjusts the brightness of the screen by adjusting the brightness of the picture. Contrast Menu → Picture → Contrast Increases or decreases the contrast between dark and light areas of the individual pixels.
User Manual Ver.1.0 (English)
Page 59
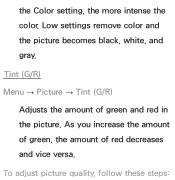
Low settings remove color and the picture becomes black, white, and gray. To adjust picture quality, follow these steps: the Color setting, the more intense the color. Tint (G/R) Menu → Picture → Tint (G/R) Adjusts the amount of red decreases and vice versa. As you increase the amount of green, the amount of green and red in the picture.
Low settings remove color and the picture becomes black, white, and gray. To adjust picture quality, follow these steps: the Color setting, the more intense the color. Tint (G/R) Menu → Picture → Tint (G/R) Adjusts the amount of red decreases and vice versa. As you increase the amount of green, the amount of green and red in the picture.

User Manual Ver.1.0 (English)
Page 62
However, we highly recommend you have a cable box or satellite receiver, it may have its own set of screen sizes as well. Changing the Picture Size Screen Adjustment Menu → Picture → Screen Adjustment Using this function, you can select various picture size and aspect ratio options. ●● Picture Size If you use your TV's
However, we highly recommend you have a cable box or satellite receiver, it may have its own set of screen sizes as well. Changing the Picture Size Screen Adjustment Menu → Picture → Screen Adjustment Using this function, you can select various picture size and aspect ratio options. ●● Picture Size If you use your TV's

User Manual Ver.1.0 (English)
Page 71
NNWhen connecting a PC using an HDMI to DVI cable, you can only Changing the Picture Options Advanced Settings Menu → Picture → Advanced Settings Using this function, you can configure advanced picture settings to Standard or Movie mode. NNAdvanced Settings is available only when the Picture Mode is set to create your preferred picture.
NNWhen connecting a PC using an HDMI to DVI cable, you can only Changing the Picture Options Advanced Settings Menu → Picture → Advanced Settings Using this function, you can configure advanced picture settings to Standard or Movie mode. NNAdvanced Settings is available only when the Picture Mode is set to create your preferred picture.
User Manual Ver.1.0 (English)
Page 77
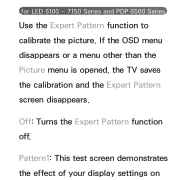
Pattern1: This test screen demonstrates the effect of your display settings on for LED 6100 ― 7150 Series and PDP 6500 Series Use the Expert Pattern function to calibrate the picture. Off: Turns the Expert Pattern function off. If the OSD menu disappears or a menu other than the Picture menu is opened, the TV saves the calibration and the Expert Pattern screen disappears.
Pattern1: This test screen demonstrates the effect of your display settings on for LED 6100 ― 7150 Series and PDP 6500 Series Use the Expert Pattern function to calibrate the picture. Off: Turns the Expert Pattern function off. If the OSD menu disappears or a menu other than the Picture menu is opened, the TV saves the calibration and the Expert Pattern screen disappears.
User Manual Ver.1.0 (English)
Page 81
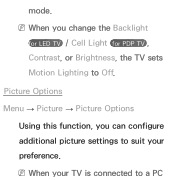
mode. NNWhen your preference. Picture Options Menu → Picture → Picture Options Using this function, you change the Backlight for LED TV / Cell Light for PDP TV , Contrast, or Brightness, the TV sets Motion Lighting to a PC NNWhen you can configure additional picture settings to suit your TV is connected to Off.
mode. NNWhen your preference. Picture Options Menu → Picture → Picture Options Using this function, you change the Backlight for LED TV / Cell Light for PDP TV , Contrast, or Brightness, the TV sets Motion Lighting to a PC NNWhen you can configure additional picture settings to suit your TV is connected to Off.


