Quick Guide (easy Manual) (ver.1.0) (English)
Page 1
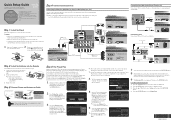
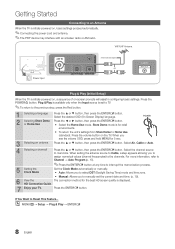
... time, it automatically launches the Plug & Play function. Step 3: Connect Power and Antenna or Cable VHF/UHF Antenna Antenna Cable (Not Supplied) or Use a 75 ohm (round) cable. Plug & Play Auto Program in the battery compartment. 3. Cable : 35 48% Stop E Enter m Skip Plug.... Press Right arrow button on your TV, call: 1-800-SAMSUNG (1-800-726-7864) For web support please visit: www.samsung.com/support 1-800-SAMSUNG (1-800-726-7864) Samsung Electronics America, Inc. 85 Challenger Road Ridgefield Park, NJ 07660-2112 Samsung Electronics Canada Inc. 55 Standish Court Mississauga...
... time, it automatically launches the Plug & Play function. Step 3: Connect Power and Antenna or Cable VHF/UHF Antenna Antenna Cable (Not Supplied) or Use a 75 ohm (round) cable. Plug & Play Auto Program in the battery compartment. 3. Cable : 35 48% Stop E Enter m Skip Plug.... Press Right arrow button on your TV, call: 1-800-SAMSUNG (1-800-726-7864) For web support please visit: www.samsung.com/support 1-800-SAMSUNG (1-800-726-7864) Samsung Electronics America, Inc. 85 Challenger Road Ridgefield Park, NJ 07660-2112 Samsung Electronics Canada Inc. 55 Standish Court Mississauga...
Quick Guide (easy Manual) (ver.1.0) (English)
Page 2
..., press the button to the HDMI, DVI, Component, Composite, or D-sub jack, press the SOURCE button on your favorite TV show, you can use the ▼ or ▲ on your remote. 4. Displays and selects the available video sources. Changing Channels and Adjusting the Volume Adjust... Press the RETURN button on your remote when done. Connecting a USB Device for Samsung recorders that have the Anynet+ feature). To connect a USB device for the visually impaired and has Braille points on your TV's On/Off Timer, you want. 4. Turn on the Power, Channel and Volume...
..., press the button to the HDMI, DVI, Component, Composite, or D-sub jack, press the SOURCE button on your favorite TV show, you can use the ▼ or ▲ on your remote. 4. Displays and selects the available video sources. Changing Channels and Adjusting the Volume Adjust... Press the RETURN button on your remote when done. Connecting a USB Device for Samsung recorders that have the Anynet+ feature). To connect a USB device for the visually impaired and has Braille points on your TV's On/Off Timer, you want. 4. Turn on the Power, Channel and Volume...
User Manual (user Manual) (ver.1.0) (English)
Page 2
...the surrounding environment such as a full screen picture. Conditions covered are limited only to fill the screen if your Samsung limited warranty. • SAMSUNG ELECTRONICS NORTH AMERICAN LIMITED WARRANTY STATEMENT Subject to produce. Displaying stationary graphics and images on screen, such as heat ..., refer to page 15 of the purchaser. A 'cracking' noise may produce partial after long periods of use these controls to the Original Purchaser only. Watching the Plasma TV in 4:3 format for longer than several minutes as on a video game) on the performance of the product...
...the surrounding environment such as a full screen picture. Conditions covered are limited only to fill the screen if your Samsung limited warranty. • SAMSUNG ELECTRONICS NORTH AMERICAN LIMITED WARRANTY STATEMENT Subject to produce. Displaying stationary graphics and images on screen, such as heat ..., refer to page 15 of the purchaser. A 'cracking' noise may produce partial after long periods of use these controls to the Original Purchaser only. Watching the Plasma TV in 4:3 format for longer than several minutes as on a video game) on the performance of the product...
User Manual (user Manual) (ver.1.0) (English)
Page 3
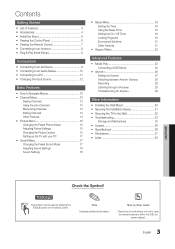
...to a PC 11 yy Changing the Input Source 12 Basic Features yy How to Navigate Menus 12 yy Channel Menu 13 Seeing Channels 13 Using Favorite Channels 13 Memorizing Channels 13 Editing Channels 14 Other Features 14 yy Picture Menu 15 Changing the Preset Picture Mode 15 Adjusting Picture ...Settings 15 Changing the Picture Options 15 Setting up the TV with your PC 17 yy Sound Menu 17 Changing the Preset Sound Mode 17 Adjusting Sound Settings 18 Sound Settings 18 yy Setup Menu...
...to a PC 11 yy Changing the Input Source 12 Basic Features yy How to Navigate Menus 12 yy Channel Menu 13 Seeing Channels 13 Using Favorite Channels 13 Memorizing Channels 13 Editing Channels 14 Other Features 14 yy Picture Menu 15 Changing the Preset Picture Mode 15 Adjusting Picture ...Settings 15 Changing the Picture Options 15 Setting up the TV with your PC 17 yy Sound Menu 17 Changing the Preset Sound Mode 17 Adjusting Sound Settings 18 Sound Settings 18 yy Setup Menu...
User Manual (user Manual) (ver.1.0) (English)
Page 4
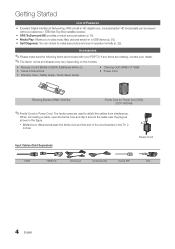
...a built-in HD digital tuner, nonsubscription HD broadcasts can check to shield the cables from interference. Getting Started List of the cord inserted in the TV: 2 A inches Input Cables (Sold Separately) Power Cord HDMI HDMI-DVI Component Composite (AV) Coaxial (RF) VGA 4 English yy SRS TruSurround HD...for Power Cord (1EA) (3301-002049) ✎✎Ferrite Core for Power Cord: The ferrite cores are used to make sure the following items are missing, contact your PDP TV. When connecting a cable, open the ferrite core and clip it around the cable near the plug as shown...
...a built-in HD digital tuner, nonsubscription HD broadcasts can check to shield the cables from interference. Getting Started List of the cord inserted in the TV: 2 A inches Input Cables (Sold Separately) Power Cord HDMI HDMI-DVI Component Composite (AV) Coaxial (RF) VGA 4 English yy SRS TruSurround HD...for Power Cord (1EA) (3301-002049) ✎✎Ferrite Core for Power Cord: The ferrite cores are used to make sure the following items are missing, contact your PDP TV. When connecting a cable, open the ferrite core and clip it around the cable near the plug as shown...
User Manual (user Manual) (ver.1.0) (English)
Page 6
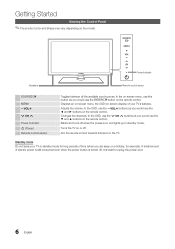
... P (Power) Remote control sensor Toggles between all the available input sources. In the OSD, use the z buttons as you would use the ◄ and ► buttons on or off . Standby mode Do not leave your TV's features. A small amount of electric power is still consumed even when the power button is ...turned off . It is on a holiday, for long periods of your TV in standby mode. In the on-screen menu, use the ▼ and ▲ buttons on the remote control. Displays an on-screen menu, the OSD (on screen display) of...
... P (Power) Remote control sensor Toggles between all the available input sources. In the OSD, use the z buttons as you would use the ◄ and ► buttons on or off . Standby mode Do not leave your TV's features. A small amount of electric power is still consumed even when the power button is ...turned off . It is on a holiday, for long periods of your TV in standby mode. In the on-screen menu, use the ▼ and ▲ buttons on the remote control. Displays an on-screen menu, the OSD (on screen display) of...
User Manual (user Manual) (ver.1.0) (English)
Page 7
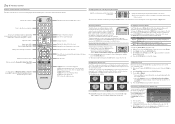
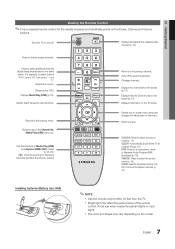
... S.MODE: Press to the previous menu. Installing batteries (Battery size: AAA) ✎✎NOTE xx Use the remote control within 23 feet from the TV. Adjusts the volume. Displays the channel list on the screen (p. 13). 01 Getting Started Viewing the Remote... Control ✎✎This is a special remote control for Samsung recorders that have the Anynet+ feature) A BC D S.MODE SLEEP P.MODE P.SIZE Returns to the previous channel. Quickly select frequently used...
... S.MODE: Press to the previous menu. Installing batteries (Battery size: AAA) ✎✎NOTE xx Use the remote control within 23 feet from the TV. Adjusts the volume. Displays the channel list on the screen (p. 13). 01 Getting Started Viewing the Remote... Control ✎✎This is a special remote control for Samsung recorders that have the Anynet+ feature) A BC D S.MODE SLEEP P.MODE P.SIZE Returns to the previous channel. Quickly select frequently used...
User Manual (user Manual) (ver.1.0) (English)
Page 8
...; or ▼ button, then press the ENTERE button. Select the channel source to interrupt the memorization process. HD Connection Guide. 7 Enjoy your TV. yy To return the unit's settings from Store Demo to select DST (Daylight Saving Time) mode and time zone. For more information, refer to... ▲ or ▼ button, then press the ENTERE button. When setting the antenna source to Cable, a step appears allowing you to Home Use (standard): Press the volume button on -screen prompts will assist in configuring basic settings. yy Manual: Allows you see the volume OSD, press and...
...; or ▼ button, then press the ENTERE button. Select the channel source to interrupt the memorization process. HD Connection Guide. 7 Enjoy your TV. yy To return the unit's settings from Store Demo to select DST (Daylight Saving Time) mode and time zone. For more information, refer to... ▲ or ▼ button, then press the ENTERE button. When setting the antenna source to Cable, a step appears allowing you to Home Use (standard): Press the volume button on -screen prompts will assist in configuring basic settings. yy Manual: Allows you see the volume OSD, press and...
User Manual (user Manual) (ver.1.0) (English)
Page 9
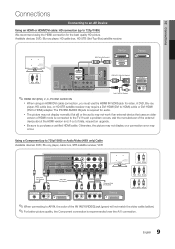
... error may require a DVI-HDMI (DVI to HDMI) cable or DVI-HDMI (DVI to HDMI) adapter. 02 Connections Connections Connecting to an AV Device Using an HDMI or HDMI/DVI cable: HD connection (up to 720p/1080i) or Audio/Video (480i only) Cable Available devices: DVD, Blu-ray player,...1(DVI), 2, 3, PC/DVI AUDIO IN xx When using the HDMI connection for video. HDMI Cable (Not Supplied) Device HDMI OUT Device HDMI IN 3 R W HDMI to the TV. Using a Component (up to 720p/1080i) We recommend using an HDMI/DVI cable connection, you must use the HDMI IN 1(DVI) jack for the best quality...
... error may require a DVI-HDMI (DVI to HDMI) cable or DVI-HDMI (DVI to HDMI) adapter. 02 Connections Connections Connecting to an AV Device Using an HDMI or HDMI/DVI cable: HD connection (up to 720p/1080i) or Audio/Video (480i only) Cable Available devices: DVD, Blu-ray player,...1(DVI), 2, 3, PC/DVI AUDIO IN xx When using the HDMI connection for video. HDMI Cable (Not Supplied) Device HDMI OUT Device HDMI IN 3 R W HDMI to the TV. Using a Component (up to 720p/1080i) We recommend using an HDMI/DVI cable connection, you must use the HDMI IN 1(DVI) jack for the best quality...
User Manual (user Manual) (ver.1.0) (English)
Page 10
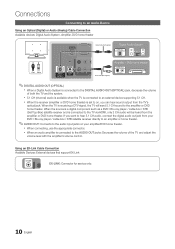
... on , you want to hear 5.1 CH audio, connect the digital audio out jack from the TV's optical jack. If you can hear sound output from your amplifier/DVD home theater. xx When connecting, use the appropriate connector. Using an EX-Link Cable Connection Available Devices: External devices that support EX-Link EX-LINK...
... on , you want to hear 5.1 CH audio, connect the digital audio out jack from the TV's optical jack. If you can hear sound output from your amplifier/DVD home theater. xx When connecting, use the appropriate connector. Using an EX-Link Cable Connection Available Devices: External devices that support EX-Link EX-LINK...
User Manual (user Manual) (ver.1.0) (English)
Page 12
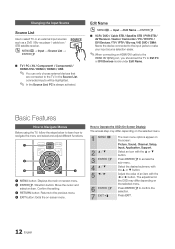
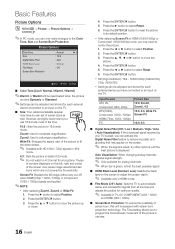
... Move the cursor and select an item. Select the desired submenu with the ◄ or ► button. Basic Features How to Navigate Menus Before using the TV, follow the steps below to learn how to DVI PC or DVI Devices mode under Edit Name. P.MODE P.SIZE 3 RETURN button: Returns to confirm...the ▲ or ▼ button. Press ENTERE to the previous menu. 4 EXIT button: Exits the on-screen menu. Changing the Input Source Source List Use to Operate the OSD (On Screen Display) The access step may differ depending on the selected menu. The adjustment in the OSD may differ depending...
... Move the cursor and select an item. Select the desired submenu with the ◄ or ► button. Basic Features How to Navigate Menus Before using the TV, follow the steps below to learn how to DVI PC or DVI Devices mode under Edit Name. P.MODE P.SIZE 3 RETURN button: Returns to confirm...the ▲ or ▼ button. Press ENTERE to the previous menu. 4 EXIT button: Exits the on-screen menu. Changing the Input Source Source List Use to Operate the OSD (On Screen Display) The access step may differ depending on the selected menu. The adjustment in the OSD may differ depending...
User Manual (user Manual) (ver.1.0) (English)
Page 13
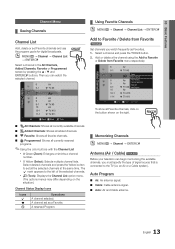
.... Select a channel and press the TOOLS button. 2. Add or delete a the channel using the Add to the TV (i.e. an Air or a Cable system). CHLIST 6 Air 6-1 * TV #6 7 Air 8 Air 9 Air 9-1 * TV #9 10 Air 10-1 * TV #10 11-1 * TV #11 Air Zoom Select T Tools Add to Favorite / Delete from Favorite menu respectively. ... button to Favorite Timer Viewing Channel Name Edit Select All Auto Program * TV #10 * TV #11 Air Zoom Select T Tools To show all currently reserved programs. ✎✎Using the color buttons with the Channel List xx Green (Zoom): Enlarges or shrinks...
.... Select a channel and press the TOOLS button. 2. Add or delete a the channel using the Add to the TV (i.e. an Air or a Cable system). CHLIST 6 Air 6-1 * TV #6 7 Air 8 Air 9 Air 9-1 * TV #9 10 Air 10-1 * TV #10 11-1 * TV #11 Air Zoom Select T Tools Add to Favorite / Delete from Favorite menu respectively. ... button to Favorite Timer Viewing Channel Name Edit Select All Auto Program * TV #10 * TV #11 Air Zoom Select T Tools To show all currently reserved programs. ✎✎Using the color buttons with the Channel List xx Green (Zoom): Enlarges or shrinks...
User Manual (user Manual) (ver.1.0) (English)
Page 14
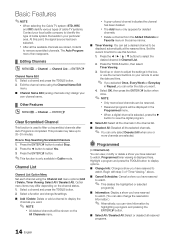
... at the reserved time. Programmed timer viewing is only available in Cable mode. Select a channel and press the TOOLS button. 2. Edit the channel name using the Channel List menu options (Add / Delete, Timer Viewing, Select All / Deselect All). Press the ENTERE button to Stop Searching Scrambled Channels 1. xx...and IRC identify various types of cable TV systems. Contact your local cable company to select the desired channel in Channel List. 2. At this function. 1. Option menu items may take up or down to adjust the settings in the box, or use the numeric buttons on your remote to ...
... at the reserved time. Programmed timer viewing is only available in Cable mode. Select a channel and press the TOOLS button. 2. Edit the channel name using the Channel List menu options (Add / Delete, Timer Viewing, Select All / Deselect All). Press the ENTERE button to Stop Searching Scrambled Channels 1. xx...and IRC identify various types of cable TV systems. Contact your local cable company to select the desired channel in Channel List. 2. At this function. 1. Option menu items may take up or down to adjust the settings in the box, or use the numeric buttons on your remote to ...
User Manual (user Manual) (ver.1.0) (English)
Page 16
...be adjusted and stored for optimum quality. ✎✎ Available in HDMI (1080i/1080p) or Component (1080i/1080p) mode, you use 16:9 mode most of the picture to select Position. 2. P.SIZE 16:9 : Sets the picture to select Position. 2. xx After selecting ... (720p / 1080i / 1080p) or Component (1080i / 1080p) signals are not covered by your TV is displayed. Wide Fit: Enlarges the aspect ratio of the time. Zoom1: Use for a stronger magnification. Zoom2: Use for moderate magnification. Input Source ATV, AV, Component (480i, 480p) DTV(1080i), Component (1080i,...
...be adjusted and stored for optimum quality. ✎✎ Available in HDMI (1080i/1080p) or Component (1080i/1080p) mode, you use 16:9 mode most of the picture to select Position. 2. P.SIZE 16:9 : Sets the picture to select Position. 2. xx After selecting ... (720p / 1080i / 1080p) or Component (1080i / 1080p) signals are not covered by your TV is displayed. Wide Fit: Enlarges the aspect ratio of the time. Zoom1: Use for a stronger magnification. Zoom2: Use for moderate magnification. Input Source ATV, AV, Component (480i, 480p) DTV(1080i), Component (1080i,...
User Manual (user Manual) (ver.1.0) (English)
Page 17
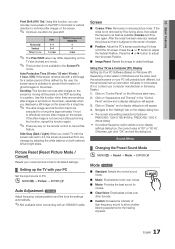
Press the ▲ or ▼ button to default settings. Click on "Control Panel" on your computer manufacturer or Samsung Dealer.) 1. yy The correct size setting (resolution) [Optimum: PN42C450: 1024 X 768 @ 60Hz, PN50C450: 1360 X 768 @ 60Hz] yy If a vertical-frequency option exists ...mode. Otherwise, just click "OK" and exit the dialog box. Using Your TV as possible (Coarse) and Finetune again. Side Gray (Dark / Light): When you watch TV with an HDMI/DVI cable. 03 Basic Features Pixel Shift (Off / On): Using this function, you can minutely move pixels on the PDP in ...
Press the ▲ or ▼ button to default settings. Click on "Control Panel" on your computer manufacturer or Samsung Dealer.) 1. yy The correct size setting (resolution) [Optimum: PN42C450: 1024 X 768 @ 60Hz, PN50C450: 1360 X 768 @ 60Hz] yy If a vertical-frequency option exists ...mode. Otherwise, just click "OK" and exit the dialog box. Using Your TV as possible (Coarse) and Finetune again. Side Gray (Dark / Light): When you watch TV with an HDMI/DVI cable. 03 Basic Features Pixel Shift (Off / On): Using this function, you can minutely move pixels on the PDP in ...
User Manual (user Manual) (ver.1.0) (English)
Page 18
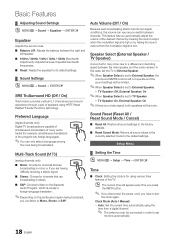
... of many audio tracks (for channels that are MTS broadcasting in order to the default settings. Auto: Set the current time automatically using HRTF (Head Related Transfer Function) technology. xx TV Speaker: On, External Speaker: On ✎✎If there is usually a foreign-language translation. ✎✎Depending on the particular program...
... of many audio tracks (for channels that are MTS broadcasting in order to the default settings. Auto: Set the current time automatically using HRTF (Head Related Transfer Function) technology. xx TV Speaker: On, External Speaker: On ✎✎If there is usually a foreign-language translation. ✎✎Depending on the particular program...
User Manual (user Manual) (ver.1.0) (English)
Page 19
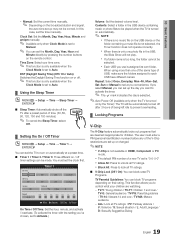
... is only one of the same type of being left idle to turn on automatically at you use is not selected, the Timer function does not operate correctly. xx Block All: Press to lock all TV ratings. / FV: Fantasy violence / V: Violence / S: Sexual situation / L: Adult Language / D: Sexually Suggestive Dialog 19 English xx If...
... is only one of the same type of being left idle to turn on automatically at you use is not selected, the Timer function does not operate correctly. xx Block All: Press to lock all TV ratings. / FV: Fantasy violence / V: Violence / S: Sexual situation / L: Adult Language / D: Sexually Suggestive Dialog 19 English xx If...
User Manual (user Manual) (ver.1.0) (English)
Page 20
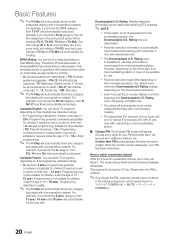
.... xx The rating will automatically be blocked. For example, if you block the L sub-rating in TV-PG, then the L subratings in English only. So, if you block the TV-Y category, then TV-Y7 will automatically be used while watching DTV channels. ✎✎ NOTE xx If information is downloaded from the broadcasting station...
.... xx The rating will automatically be blocked. For example, if you block the L sub-rating in TV-PG, then the L subratings in English only. So, if you block the TV-Y category, then TV-Y7 will automatically be used while watching DTV channels. ✎✎ NOTE xx If information is downloaded from the broadcasting station...
User Manual (user Manual) (ver.1.0) (English)
Page 21
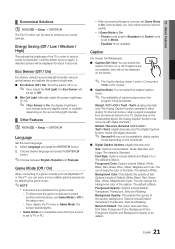
...; Economical Solutions OO MENUm → Setup → ENTERE The Eco Function can be used to reduce power consumption. Energy Saving (Off / Low / Medium / High) This adjusts the brightness of the TV in the setup menu. -- The default is Black. Background Opacity: This adjusts the ...your power savings. Return to Default: This option sets each Size, Font Style, Foreground Color, Background Color, Foreground Opacity and Background Opacity to the TV. (Depending on the screen. ✎✎ The Caption feature doesn't work with digital channels.) Default / Service1~Service6 / CC1~CC4 / Text1...
...; Economical Solutions OO MENUm → Setup → ENTERE The Eco Function can be used to reduce power consumption. Energy Saving (Off / Low / Medium / High) This adjusts the brightness of the TV in the setup menu. -- The default is Black. Background Opacity: This adjusts the ...your power savings. Return to Default: This option sets each Size, Font Style, Foreground Color, Background Color, Foreground Opacity and Background Opacity to the TV. (Depending on the screen. ✎✎ The Caption feature doesn't work with digital channels.) Default / Service1~Service6 / CC1~CC4 / Text1...
User Manual (user Manual) (ver.1.0) (English)
Page 22
... upgrade. Please visit HDMI IN 3 Samsung.com or contact the Samsung call centers and how to TV Speaker in Caption Mode. Upgrades USB Drive will return to minimum with the VOL - xx The availability of the TV. ■■ Picture Test (Yes / No): Use to Transparent. xx When no sound ...is output from the TV's speakers, before ...
... upgrade. Please visit HDMI IN 3 Samsung.com or contact the Samsung call centers and how to TV Speaker in Caption Mode. Upgrades USB Drive will return to minimum with the VOL - xx The availability of the TV. ■■ Picture Test (Yes / No): Use to Transparent. xx When no sound ...is output from the TV's speakers, before ...


