
Service Manual
Page 4
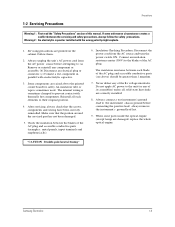
... conductive parts (see above the printed circuit board for safety. Do not apply AC power to prevent contact with thermally hot components. Samsung Electronics 1-3 1-2 Servicing Precautions Precautions Warning 1 : First read the "Safety Precautions" section of the AC plug. Always unplug the unit... ground before attempting to: (a) Remove or reinstall any of its assemblies) unless all such elements to the blades of this manual. When some unforeseen circumstance creates a conflict between the servicing and safety precautions, always follow the safety precautions. Reinstall all solid...
... conductive parts (see above the printed circuit board for safety. Do not apply AC power to prevent contact with thermally hot components. Samsung Electronics 1-3 1-2 Servicing Precautions Precautions Warning 1 : First read the "Safety Precautions" section of the AC plug. Always unplug the unit... ground before attempting to: (a) Remove or reinstall any of its assemblies) unless all such elements to the blades of this manual. When some unforeseen circumstance creates a conflict between the servicing and safety precautions, always follow the safety precautions. Reinstall all solid...
Service Manual
Page 38
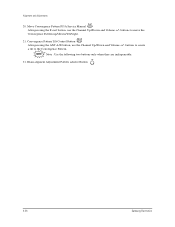
Alignment and Adjustments 20. Move Convergence Pattern P55A Service Manual After pressing the R.surf button, use the Channel Up/Down and Volume +/- buttons to create a tilt to move the Convergence Pattern up/down/left/right. 21. Note : Use the following two buttons only when they are indispensable. 21. Convergence Pattern Tilt Control Button After pressing the ANT A/B button, use the Channel Up/Down and Volume +/- Beam aligment Adjustment Pattern achieve Button 4-26 Samsung Electronics buttons to the Convergence Pattern.
Alignment and Adjustments 20. Move Convergence Pattern P55A Service Manual After pressing the R.surf button, use the Channel Up/Down and Volume +/- buttons to create a tilt to move the Convergence Pattern up/down/left/right. 21. Note : Use the following two buttons only when they are indispensable. 21. Convergence Pattern Tilt Control Button After pressing the ANT A/B button, use the Channel Up/Down and Volume +/- Beam aligment Adjustment Pattern achieve Button 4-26 Samsung Electronics buttons to the Convergence Pattern.
Service Manual
Page 74
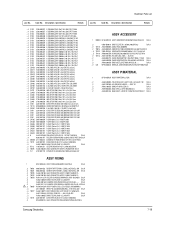
Electrical Parts List Loc. Code No. S.N.A ..2 CIS BP68-00054A MANUAL USERS;HCM473WJX,ENG,W/P100G,P55A, ASSY P/MATERIAL 1 BP92-00542A ASSY P/MATERIAL;,P55A S.N.A ..2 AA60-40006A PIN-STAPLE;AUTO,33X17.8X2.4,H18,33X17.8X S.N.A ..2... AA63-10002B BAND-TIE;NYLON66 V2,L140,NTR S.N.A ...3 T0121 3301-001201 CORE-FERRITE;AE,21x11x32mm,1500,280G ..2 BP39-00047A LEAD CONNECTOR;P55A/HCM4215W,UL2547#26,U Samsung Electronics 7-19 No. S.N.A ..2 T0116 AA39-00006A CABLE RCA;,3000MM ..2 T0074 AA59-00262A REMOCON;,TM63,COMMONDO,48,G6671B,EX,S/S ...3 T0122 2802-000194 RESONATOR-CERAMIC;8MHz...
Electrical Parts List Loc. Code No. S.N.A ..2 CIS BP68-00054A MANUAL USERS;HCM473WJX,ENG,W/P100G,P55A, ASSY P/MATERIAL 1 BP92-00542A ASSY P/MATERIAL;,P55A S.N.A ..2 AA60-40006A PIN-STAPLE;AUTO,33X17.8X2.4,H18,33X17.8X S.N.A ..2... AA63-10002B BAND-TIE;NYLON66 V2,L140,NTR S.N.A ...3 T0121 3301-001201 CORE-FERRITE;AE,21x11x32mm,1500,280G ..2 BP39-00047A LEAD CONNECTOR;P55A/HCM4215W,UL2547#26,U Samsung Electronics 7-19 No. S.N.A ..2 T0116 AA39-00006A CABLE RCA;,3000MM ..2 T0074 AA59-00262A REMOCON;,TM63,COMMONDO,48,G6671B,EX,S/S ...3 T0122 2802-000194 RESONATOR-CERAMIC;8MHz...
Service Manual
Page 93
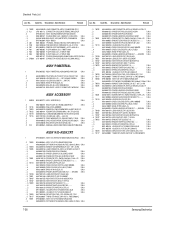
Code No. S.N.A AA61-00615B BRACKET-EARTH;54J8,PBS,T0.5,-,-,-,- Description ; S.N.A BP68-00054A MANUAL USERS;HCM473WJX,ENG,W/P100G,P55A, ASSY K/D-ASSY,CRT 1 BP98-00091A ASSY K/D-ASSY,CRT;HCM4215W3S/XAA,P55A S.N.A ..2 T0262 ...3 ...3 T0079 ...3 T0076 ...3 ...3 ...3 ...3 T0081 ...3 ...3 ....5,NYLON66 V2 S.N.A AA27-00249A DEFLECTION YOKE;-,DPD-5292AA,S/S,7,29.1 AA26-30006F TRANS FBT-ANODE CAP ASS'Y;-,FWZ-50A001C, 7-38 Samsung Electronics Description ; Specification Remark Loc. No. AA41-00853A PCB-SERSOR;SVP-42W5HRC,FR-4,2L,A,1.6T,24 S.N.A BP32-00001A SENSOR...
Code No. S.N.A AA61-00615B BRACKET-EARTH;54J8,PBS,T0.5,-,-,-,- Description ; S.N.A BP68-00054A MANUAL USERS;HCM473WJX,ENG,W/P100G,P55A, ASSY K/D-ASSY,CRT 1 BP98-00091A ASSY K/D-ASSY,CRT;HCM4215W3S/XAA,P55A S.N.A ..2 T0262 ...3 ...3 T0079 ...3 T0076 ...3 ...3 ...3 ...3 T0081 ...3 ...3 ....5,NYLON66 V2 S.N.A AA27-00249A DEFLECTION YOKE;-,DPD-5292AA,S/S,7,29.1 AA26-30006F TRANS FBT-ANODE CAP ASS'Y;-,FWZ-50A001C, 7-38 Samsung Electronics Description ; Specification Remark Loc. No. AA41-00853A PCB-SERSOR;SVP-42W5HRC,FR-4,2L,A,1.6T,24 S.N.A BP32-00001A SENSOR...
Service Manual
Page 111
...WARRANTY;-,-,W/P150(G),-,138X212,-, S.N.A AA68-00560A CARD-SVC NETWORK;-,W/P100(G),-,-,SEM,1', S.N.A AA69-30009C BAG-SHEET;LDPE,T0.08,W150,L120,-,-,- S.N.A BP68-00056B MANUAL USERS;ST47W3PC,ENG,W/P 100g,P55A,S.N.A BP68-00057B MANUAL USERS;ST47W3PC,SPA,W/P 100g,P55A,S.N.A ASSY K/D-CPT 1 BP98-00180A ASSY K/D-CPT;ST54T8PCS/XAX,P55A S.N.A ..2 T0026 ...3 ...3 T0117 ...3 T0078...-COUPLER,B;PROJ,ALDC,T8,BLK S.N.A AA63-10007C BAND-PP;W18,CLEA,1G S.N.A 7-56 Samsung Electronics Description ; Electrical Parts List Loc. No. S.N.A AA61-00615B BRACKET-EARTH;54J8,PBS,T0.5,-,-,-,-
...WARRANTY;-,-,W/P150(G),-,138X212,-, S.N.A AA68-00560A CARD-SVC NETWORK;-,W/P100(G),-,-,SEM,1', S.N.A AA69-30009C BAG-SHEET;LDPE,T0.08,W150,L120,-,-,- S.N.A BP68-00056B MANUAL USERS;ST47W3PC,ENG,W/P 100g,P55A,S.N.A BP68-00057B MANUAL USERS;ST47W3PC,SPA,W/P 100g,P55A,S.N.A ASSY K/D-CPT 1 BP98-00180A ASSY K/D-CPT;ST54T8PCS/XAX,P55A S.N.A ..2 T0026 ...3 ...3 T0117 ...3 T0078...-COUPLER,B;PROJ,ALDC,T8,BLK S.N.A AA63-10007C BAND-PP;W18,CLEA,1G S.N.A 7-56 Samsung Electronics Description ; Electrical Parts List Loc. No. S.N.A AA61-00615B BRACKET-EARTH;54J8,PBS,T0.5,-,-,-,-
Service Manual
Page 130
Code No. Description ; Specification Remark Loc. S.N.A BP68-00054A MANUAL USERS;HCM473WJX,ENG,W/P100G,P55A, ASSY K/D-CRT 1 BP98-00173A ASSY K/D-CRT ASSY;HCN4727WSC/XAA,P55A S.N.A ..2 T0026 ...3 ...3 T0117 ...3 T0078 ...3 T0079 ...3 T0076 ...3 ...3 ...3 ...3 T0081 ...3 ...3 ...3 T0114 ...3 ...3...,-,- ..2 AA60-40006A PIN-STAPLE;AUTO,33X17.8X2.4,H18,33X17.8X ..2 WOODEN AA63-10007C BAND-PP;W18,CLEA,1G S.N.A S.N.A S.N.A S.N.A S.N.A S.N.A Samsung Electronics 7-75 No. No. AA41-00853A PCB-SERSOR;SVP-42W5HRC,FR-4,2L,A,1.6T,24 S.N.A BP32-00001A SENSOR PHOTO;BCS5030G1,-40 TO +85,0.42 U...
Code No. Description ; Specification Remark Loc. S.N.A BP68-00054A MANUAL USERS;HCM473WJX,ENG,W/P100G,P55A, ASSY K/D-CRT 1 BP98-00173A ASSY K/D-CRT ASSY;HCN4727WSC/XAA,P55A S.N.A ..2 T0026 ...3 ...3 T0117 ...3 T0078 ...3 T0079 ...3 T0076 ...3 ...3 ...3 ...3 T0081 ...3 ...3 ...3 T0114 ...3 ...3...,-,- ..2 AA60-40006A PIN-STAPLE;AUTO,33X17.8X2.4,H18,33X17.8X ..2 WOODEN AA63-10007C BAND-PP;W18,CLEA,1G S.N.A S.N.A S.N.A S.N.A S.N.A S.N.A Samsung Electronics 7-75 No. No. AA41-00853A PCB-SERSOR;SVP-42W5HRC,FR-4,2L,A,1.6T,24 S.N.A BP32-00001A SENSOR PHOTO;BCS5030G1,-40 TO +85,0.42 U...
Owners Instructions
Page 6
...2.3 2.,5 2.6 2.6 2.7 2.8 2.8 2.9 3.1 3.1 3.1 3.3 3.4 3.5 3.6 3.6 3.6 3.7 3.7 3.8 3.8 3.9 3.9 3.10 3.10 3.10 3.10 3.11 3.11 3.11 3.12 3.13 3.14 3.14 3.1,5 3.1B Adding and Ezasing Channels (Manual Method) ........ Connecting a Camcorder Connecting a DVD (480i, 480p) Playez Connecting a DTV Set Top Box (480p, 10800 Connecting Surzound Speakers Installing Battezies in the Remote Control 3: Operation...TV On and Off Plug & Play Featuze Using the PezfVct Focus Feature Adjusting Manual convergence Adjust Red Convergence Viewing the Menus and On Sczeen Displays Viewing the ...
...2.3 2.,5 2.6 2.6 2.7 2.8 2.8 2.9 3.1 3.1 3.1 3.3 3.4 3.5 3.6 3.6 3.6 3.7 3.7 3.8 3.8 3.9 3.9 3.10 3.10 3.10 3.10 3.11 3.11 3.11 3.12 3.13 3.14 3.14 3.1,5 3.1B Adding and Ezasing Channels (Manual Method) ........ Connecting a Camcorder Connecting a DVD (480i, 480p) Playez Connecting a DTV Set Top Box (480p, 10800 Connecting Surzound Speakers Installing Battezies in the Remote Control 3: Operation...TV On and Off Plug & Play Featuze Using the PezfVct Focus Feature Adjusting Manual convergence Adjust Red Convergence Viewing the Menus and On Sczeen Displays Viewing the ...

Owners Instructions
Page 7
... 3.16 Adjusting the Vulume 3.16 Using Mute 3.16 Customizing the Sound 3.17 Using Automatic Sound Settings 3.18 Setting the Clock 3.19 Option 1: Setting the Clock Manually 3.19 Option 2: Using the Local PBS Channel to Operate Yuur Cable Box 4.21 5: Troubleshooting ............ Cable) fur PiP ..... 4.12 Selecting a Signal Source (External A/V) for PIP ......... 4.12...
... 3.16 Adjusting the Vulume 3.16 Using Mute 3.16 Customizing the Sound 3.17 Using Automatic Sound Settings 3.18 Setting the Clock 3.19 Option 1: Setting the Clock Manually 3.19 Option 2: Using the Local PBS Channel to Operate Yuur Cable Box 4.21 5: Troubleshooting ............ Cable) fur PiP ..... 4.12 Selecting a Signal Source (External A/V) for PIP ......... 4.12...
Owners Instructions
Page 25
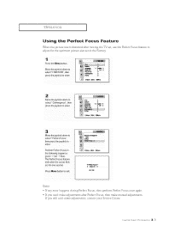
..., The Perfect Focus feature ends after Perfbct Focus, then make adjustments, contact your Service Center. (2HAI']}}¢ IH}¢i 3.3 IV ()P} AII()N If'you can 't make manual adjustments. Move thejoystick down to select '!Convergence", then press thejoystick to enter. OPERATION ] Using the Perfect Focus Feature When the picture size is distorted after...
..., The Perfect Focus feature ends after Perfbct Focus, then make adjustments, contact your Service Center. (2HAI']}}¢ IH}¢i 3.3 IV ()P} AII()N If'you can 't make manual adjustments. Move thejoystick down to select '!Convergence", then press thejoystick to enter. OPERATION ] Using the Perfect Focus Feature When the picture size is distorted after...

Owners Instructions
Page 26
..." Witt be high, Iighted. @_. :: : j._ _J/ _'_F_m , continued... 34 c.,,],], l,]i_.: rv o,,}},,',i,,N le4m_J 2 Move thejoystick down to use the remote control for tile convergence adjustments. OPERATION ] Adjusting Manual Convergence If' the color appears spread out or "smeared" on the screen, the convergence probably alignment. Be sure to select ?FUNCTION",then press t_ejoYstick tOenter...
..." Witt be high, Iighted. @_. :: : j._ _J/ _'_F_m , continued... 34 c.,,],], l,]i_.: rv o,,}},,',i,,N le4m_J 2 Move thejoystick down to use the remote control for tile convergence adjustments. OPERATION ] Adjusting Manual Convergence If' the color appears spread out or "smeared" on the screen, the convergence probably alignment. Be sure to select ?FUNCTION",then press t_ejoYstick tOenter...

Owners Instructions
Page 30
... Dress [hejoystick to identify the type of the available channels for memorizing channels: selecting a broadcast source, memorizing the channels (automatic) and adding and deleting channels (manual). Note: STD, HRC and IRC identif'y various types of'cable TV systems. Contact your local cable company to Z e_l[eK TV)- There are memorized, use...
... Dress [hejoystick to identify the type of the available channels for memorizing channels: selecting a broadcast source, memorizing the channels (automatic) and adding and deleting channels (manual). Note: STD, HRC and IRC identif'y various types of'cable TV systems. Contact your local cable company to Z e_l[eK TV)- There are memorized, use...

Owners Instructions
Page 31
This takes about one to the Setup menu. Adding and Erasing Channels (Manual Method) Use the number buttons to select !Auto Program", then press thejOyStiCk GO enter. Move the joystick down to directly select the channel that wilI ...
This takes about one to the Setup menu. Adding and Erasing Channels (Manual Method) Use the number buttons to select !Auto Program", then press thejOyStiCk GO enter. Move the joystick down to directly select the channel that wilI ...

Owners Instructions
Page 41
...;Adj. 4_Movu OOMe_u The time will appear every time you can check the time while watching the TV[ (Just press Display) Option 1: Setting the Clock Manually Press the Menu button Movethejoystickdownto select ° JUNCTION", then pressjoyst Ck tO enter. _i _g_'_NR _ 4"0_ _ _ _lp : l< :- 2 Move thejoystick down to setec[ Time" tnen...
...;Adj. 4_Movu OOMe_u The time will appear every time you can check the time while watching the TV[ (Just press Display) Option 1: Setting the Clock Manually Press the Menu button Movethejoystickdownto select ° JUNCTION", then pressjoyst Ck tO enter. _i _g_'_NR _ 4"0_ _ _ _lp : l< :- 2 Move thejoystick down to setec[ Time" tnen...

Owners Instructions
Page 44
... tuning, the letters "MFT" will appear when you press the Display button while watching this channel. SPECIAL FEATURES Fine Tuning Channels Use fine tuning to manually adjust a particular channel for optimal reception. 1 Select the aooroDrla[e channo Press the Menu button Move the joystick down [o select" Fine Tune, Antares ANT_.AW AutoPm_em...
... tuning, the letters "MFT" will appear when you press the Display button while watching this channel. SPECIAL FEATURES Fine Tuning Channels Use fine tuning to manually adjust a particular channel for optimal reception. 1 Select the aooroDrla[e channo Press the Menu button Move the joystick down [o select" Fine Tune, Antares ANT_.AW AutoPm_em...


