P2350 Stand Removal - Samsung
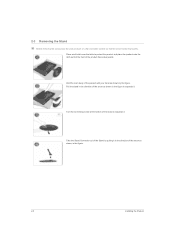
P2350 Stand Removal
Related Manual Pages

Similar Questions

Removing The Stand From My T24a350 24inch Tv
how to remove the stand from my Samsung T24A350 24inch t
how to remove the stand from my Samsung T24A350 24inch t
(Posted by bushhouse43 4 years ago)

Stand Removable Install Wall Mount
how do you remove the stand from unit
how do you remove the stand from unit
(Posted by devineassociates 12 years ago)

Stand Removal
How do i remove the stand off of my monitor without breaking it ?
How do i remove the stand off of my monitor without breaking it ?
(Posted by BlayneVayne 12 years ago)