
User Manual Ver.1.0 (English)
Page 5
...must plug the small end of the camera. This is not responsible for any loss of the camera may result in your camera to malfunction. Exercise caution when you charge batteries. Protect your camera's overall performance. 4 Do not expose the lens to direct sunlight, as this may cause.... Check that may result in noise in electric shock or camera malfunction or cause a fire. Never use . If the camera stops operating, remove the battery and allow it fires. This may damage your camera. The manufacturer is normal and does not affect your camera's lens.
...must plug the small end of the camera. This is not responsible for any loss of the camera may result in your camera to malfunction. Exercise caution when you charge batteries. Protect your camera's overall performance. 4 Do not expose the lens to direct sunlight, as this may cause.... Check that may result in noise in electric shock or camera malfunction or cause a fire. Never use . If the camera stops operating, remove the battery and allow it fires. This may damage your camera. The manufacturer is normal and does not affect your camera's lens.
User Manual Ver.1.0 (English)
Page 7
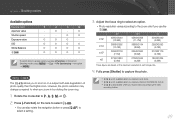
...on Program mode. That is based on the shooting mode. Annotation Shooting mode indications Shooting mode Smart Auto Program Aperture Priority Shutter Priority Manual Lens Priority Magic Scene Movie Wi-Fi Indication t P A S M i g s v B 6 The number next to perform a ...step; Indications used in this manual Icons used in this manual Icon [ ] ( ) → * Function Additional information Safety warnings and precautions Camera buttons. for example: Select J → Quality (represents select J, and then Quality). Page number of related information The order of options or menus you...
...on Program mode. That is based on the shooting mode. Annotation Shooting mode indications Shooting mode Smart Auto Program Aperture Priority Shutter Priority Manual Lens Priority Magic Scene Movie Wi-Fi Indication t P A S M i g s v B 6 The number next to perform a ...step; Indications used in this manual Icons used in this manual Icon [ ] ( ) → * Function Additional information Safety warnings and precautions Camera buttons. for example: Select J → Quality (represents select J, and then Quality). Page number of related information The order of options or menus you...

User Manual Ver.1.0 (English)
Page 8
...22 Rule of Thirds 22 Photos with two subjects 23 Flash 24 Flash guide number 24 Bounce Photography 25 Chapter 1 My Camera Getting started 27 Unpacking 27 Camera layout 28 Using the SMART LINK button 30 Display icons 31 In Shooting mode 31 Capturing photos 31 Recording videos 32 About... the level gauge 32 In Playback mode 33 Viewing photos 33 Playing videos 33 Lenses 34 Lens layout 34 Locking or unlocking the lens 35 Lens markings ...
...22 Rule of Thirds 22 Photos with two subjects 23 Flash 24 Flash guide number 24 Bounce Photography 25 Chapter 1 My Camera Getting started 27 Unpacking 27 Camera layout 28 Using the SMART LINK button 30 Display icons 31 In Shooting mode 31 Capturing photos 31 Recording videos 32 About... the level gauge 32 In Playback mode 33 Viewing photos 33 Playing videos 33 Lenses 34 Lens layout 34 Locking or unlocking the lens 35 Lens markings ...

User Manual Ver.1.0 (English)
Page 13
... Maintaining the camera 149 Cleaning the camera 149 Camera lens and display 149 Image sensor 149 Camera body 149 Using or storing the camera 150 Inappropriate places to use or store the camera 150 Using on beaches or shores 150 Storing for extended period of time 150 Using the camera with caution ...battery message 156 Notes about using the battery 156 Notes about charging the battery 156 Before contacting a service center 157 Camera specifications 160 Glossary 165 Optional accessories 171 Index 173 FCC notice 176 Declaration sentence in official languages 179 12
... Maintaining the camera 149 Cleaning the camera 149 Camera lens and display 149 Image sensor 149 Camera body 149 Using or storing the camera 150 Inappropriate places to use or store the camera 150 Using on beaches or shores 150 Storing for extended period of time 150 Using the camera with caution ...battery message 156 Notes about using the battery 156 Notes about charging the battery 156 Before contacting a service center 157 Camera specifications 160 Glossary 165 Optional accessories 171 Index 173 FCC notice 176 Declaration sentence in official languages 179 12
User Manual Ver.1.0 (English)
Page 14
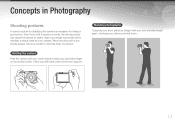
... still to maintain a steady base for your camera. Concepts in Photography Shooting postures A correct posture for stabilizing the camera is necessary for support. When shooting with your feet shoulder-length apart, and keep your left hand under the lens for taking a good photo. Place your elbows... pointed down. 13 Holding the camera Hold the camera with your right hand and place you hold your shot; Standing photography Compose your ...
... still to maintain a steady base for your camera. Concepts in Photography Shooting postures A correct posture for stabilizing the camera is necessary for support. When shooting with your feet shoulder-length apart, and keep your left hand under the lens for taking a good photo. Place your elbows... pointed down. 13 Holding the camera Hold the camera with your right hand and place you hold your shot; Standing photography Compose your ...
User Manual Ver.1.0 (English)
Page 22
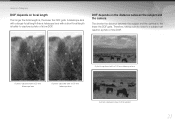
... , the lower the DOF gets. A telescope lens with a longer focal length than a telescope lens with a 100 mm telescope lens A photo captured close to the subject 21 Therefore, taking a photo close to a subject can result in Photography DOF depends on the distance between the subject and the camera The shorter the distance between the subject...
... , the lower the DOF gets. A telescope lens with a longer focal length than a telescope lens with a 100 mm telescope lens A photo captured close to the subject 21 Therefore, taking a photo close to a subject can result in Photography DOF depends on the distance between the subject and the camera The shorter the distance between the subject...

User Manual Ver.1.0 (English)
Page 27
Chapter 1 My Camera Learn about your camera's layout, display icons, basic functions, supplied lens, and optional accessories.
Chapter 1 My Camera Learn about your camera's layout, display icons, basic functions, supplied lens, and optional accessories.

User Manual Ver.1.0 (English)
Page 29
... P: Program mode (p. 44) • A: Aperture Priority mode (p. 45) 4 • S: Shutter Priority mode (p. 45) 1 • M: Manual mode (p. 46) 5 • i: Lens Priority Mode (p. 47) 6 • g: Magic Mode (p. 50) 7 8 • s: Scene mode (p. 51) • v: Movie mode (p. 54) • B: Wi-Fi (p. ...100) 2 SMART LINK button Start a desired Wi-Fi function. (p. 30) 3 Microphone 4 Eyelet for camera strap 5 Speaker 6 Image sensor No. Name 7 Lens release button 8 Lens mount 9 Lens mount index 10 AF-assist light/Timer lamp 11 Power switch 12 Shutter button 28 My...
... P: Program mode (p. 44) • A: Aperture Priority mode (p. 45) 4 • S: Shutter Priority mode (p. 45) 1 • M: Manual mode (p. 46) 5 • i: Lens Priority Mode (p. 47) 6 • g: Magic Mode (p. 50) 7 8 • s: Scene mode (p. 51) • v: Movie mode (p. 54) • B: Wi-Fi (p. ...100) 2 SMART LINK button Start a desired Wi-Fi function. (p. 30) 3 Microphone 4 Eyelet for camera strap 5 Speaker 6 Image sensor No. Name 7 Lens release button 8 Lens mount 9 Lens mount index 10 AF-assist light/Timer lamp 11 Power switch 12 Shutter button 28 My...

User Manual Ver.1.0 (English)
Page 35
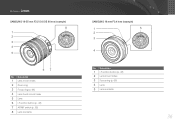
Description 1 Lens mount index 2 Zoom lock switch 3 Lens 4 Focus ring (p. 66) 5 i-Function button (p. 48) 6 Zoom ring 7 Lens contacts When not using the lens, attach the lens cap and lens mount cover to protect the lens from dust and scratches. 6 3 5 4 34 Learn about the functions of each lens and select one that suits your NX series camera. My Camera Lenses You can purchase optional lenses made exclusively for your needs and preferences. Lens layout SAMSUNG 20-50 mm F3.5-5.6 ED II lens (example) 7 1 2 No.
Description 1 Lens mount index 2 Zoom lock switch 3 Lens 4 Focus ring (p. 66) 5 i-Function button (p. 48) 6 Zoom ring 7 Lens contacts When not using the lens, attach the lens cap and lens mount cover to protect the lens from dust and scratches. 6 3 5 4 34 Learn about the functions of each lens and select one that suits your NX series camera. My Camera Lenses You can purchase optional lenses made exclusively for your needs and preferences. Lens layout SAMSUNG 20-50 mm F3.5-5.6 ED II lens (example) 7 1 2 No.
User Manual Ver.1.0 (English)
Page 36
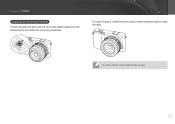
My Camera > Lenses Locking or unlocking the lens To lock the lens, pull and hold the zoom lock switch away from the camera body and rotate the zoom ring clockwise. To unlock the lens, rotate the zoom ring counter-clockwise until you hear the click. You cannot capture a photo when the lens is locked. 35
My Camera > Lenses Locking or unlocking the lens To lock the lens, pull and hold the zoom lock switch away from the camera body and rotate the zoom ring clockwise. To unlock the lens, rotate the zoom ring counter-clockwise until you hear the click. You cannot capture a photo when the lens is locked. 35
User Manual Ver.1.0 (English)
Page 37
My Camera > Lenses SAMSUNG 18-55 mm F3.5-5.6 OIS III lens (example) 8 1 2 3 4 5 67 No. Description 1 i-Function button (p. 48) 2 Lens mount index 3 Focus ring (p. 66) 4 Lens 5 Lens contacts 36 Description 1 Lens mount index 2 Zoom ring 3 Focus ring (p. 66) 4 Lens hood mount index 5 Lens 6 i-Function button (p. 48) 7 AF/MF switch (p. 65) 8 Lens contacts SAMSUNG 16 mm F2.4 lens (example) 1 5 2 3 4 No.
My Camera > Lenses SAMSUNG 18-55 mm F3.5-5.6 OIS III lens (example) 8 1 2 3 4 5 67 No. Description 1 i-Function button (p. 48) 2 Lens mount index 3 Focus ring (p. 66) 4 Lens 5 Lens contacts 36 Description 1 Lens mount index 2 Zoom ring 3 Focus ring (p. 66) 4 Lens hood mount index 5 Lens 6 i-Function button (p. 48) 7 AF/MF switch (p. 65) 8 Lens contacts SAMSUNG 16 mm F2.4 lens (example) 1 5 2 3 4 No.
User Manual Ver.1.0 (English)
Page 38
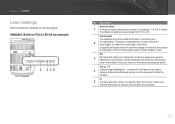
...means the maximum aperture value range from the middle of the lens to 6.3. Lenses with this feature can detect camera shake and effectively cancel out the movement inside the camera. Ø 5 The lens diameter. My Camera > Lenses Lens markings Find out what the numbers on the lens signify. ED 3 ED stands for Extra-low Dispersion. OIS...). Longer focal lengths result in narrower angles of view and the subject is expressed in wider angles of supported aperture values. SAMSUNG 18-200 mm F3.5-6.3 ED OIS lens (example) 1 2 345 No. Description Aperture value 1 A range of view.
...means the maximum aperture value range from the middle of the lens to 6.3. Lenses with this feature can detect camera shake and effectively cancel out the movement inside the camera. Ø 5 The lens diameter. My Camera > Lenses Lens markings Find out what the numbers on the lens signify. ED 3 ED stands for Extra-low Dispersion. OIS...). Longer focal lengths result in narrower angles of view and the subject is expressed in wider angles of supported aperture values. SAMSUNG 18-200 mm F3.5-6.3 ED OIS lens (example) 1 2 345 No. Description Aperture value 1 A range of view.
User Manual Ver.1.0 (English)
Page 44
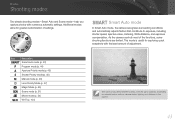
...modes allow for capturing quick snapshots with numerous automatic settings. t Smart Auto mode In Smart Auto mode, the camera recognizes surrounding conditions and automatically adjusts factors that contribute to the subject. 43 This mode is useful for greater... 43) P Program mode (p. 44) A Aperture Priority mode (p. 45) S Shutter Priority mode (p. 45) M Manual mode (p. 46) i Lens Priority Mode (p. 47) g Magic Mode (p. 50) s Scene mode (p. 51) v Movie mode (p. 54) B Wi-Fi (p. 100) The camera may detect different scenes, even the same subjects, depending on external factors such as...
...modes allow for capturing quick snapshots with numerous automatic settings. t Smart Auto mode In Smart Auto mode, the camera recognizes surrounding conditions and automatically adjusts factors that contribute to the subject. 43 This mode is useful for greater... 43) P Program mode (p. 44) A Aperture Priority mode (p. 45) S Shutter Priority mode (p. 45) M Manual mode (p. 46) i Lens Priority Mode (p. 47) g Magic Mode (p. 50) s Scene mode (p. 51) v Movie mode (p. 54) B Wi-Fi (p. 100) The camera may detect different scenes, even the same subjects, depending on external factors such as...

User Manual Ver.1.0 (English)
Page 48
...;lter effect. • If you attached. My Camera > Shooting modes i Lens Priority mode Using the E mode You can also use this function by pressing [f]. 3 Adjust the focus ring to capture the photo. Available scene modes and filter effects (for SAMSUNG 20-50 mm F3.5-5.6 ED II lens): Beauty Shot, Portrait, Children, Backlight, Landscape...
...;lter effect. • If you attached. My Camera > Shooting modes i Lens Priority mode Using the E mode You can also use this function by pressing [f]. 3 Adjust the focus ring to capture the photo. Available scene modes and filter effects (for SAMSUNG 20-50 mm F3.5-5.6 ED II lens): Beauty Shot, Portrait, Children, Backlight, Landscape...

User Manual Ver.1.0 (English)
Page 49
AUTO 4 Fully press [Shutter] to select an option. AUTO 48 My Camera > Shooting modes Using i-Function in PASM modes When you use the i-Function button on an i-Function lens, you can manually select and adjust shutter speed, aperture value, exposure value, ISO sensitivity, and White Balance on the lens. 1 Rotate the mode dial to P, A, S, or M. 2 Press [i-Function] on the lens to select a setting. • You can also rotate the navigation button or press [C/F] to select a setting. 3 Adjust the focus ring to capture the photo.
AUTO 4 Fully press [Shutter] to select an option. AUTO 48 My Camera > Shooting modes Using i-Function in PASM modes When you use the i-Function button on an i-Function lens, you can manually select and adjust shutter speed, aperture value, exposure value, ISO sensitivity, and White Balance on the lens. 1 Rotate the mode dial to P, A, S, or M. 2 Press [i-Function] on the lens to select a setting. • You can also rotate the navigation button or press [C/F] to select a setting. 3 Adjust the focus ring to capture the photo.
User Manual Ver.1.0 (English)
Page 50
... when you record videos by rotating the zoom ring. 1 Rotate the mode dial to P, A, S, M, or i. 2 Press [i-Function] on the lens to select Z. • You can also rotate the navigation button or press [C/F] to select a setting. 3 Adjust the focus ring to select an ... the Digital zoom. However, the photo resolution may change compared to when you to zoom in on the lens in by pressing the video recording button. 49 O O O O O - O - - O - My Camera > Shooting modes Available options Shooting mode Aperture value Shutter speed Exposure value ISO White Balance Z P A ...
... when you record videos by rotating the zoom ring. 1 Rotate the mode dial to P, A, S, M, or i. 2 Press [i-Function] on the lens to select Z. • You can also rotate the navigation button or press [C/F] to select a setting. 3 Adjust the focus ring to select an ... the Digital zoom. However, the photo resolution may change compared to when you to zoom in on the lens in by pressing the video recording button. 49 O O O O O - O - - O - My Camera > Shooting modes Available options Shooting mode Aperture value Shutter speed Exposure value ISO White Balance Z P A ...

User Manual Ver.1.0 (English)
Page 55
... at 30 or 24 fps, and saves the files in MP4 (H.264) format. 24 fps is not recorded. • If you remove the camera lens while recording a movie, the recording will be able to record images accurately. While shooting a video, press [F] to 640X480). • When formatting a memory..., continue shooting by ISO-IEC and ITU-T. The camera lets you can select Program in the capacity of the camera suddenly while shooting a movie, the camera may be recorded if you adjust the lens while recording a video. • When using the camera. Use a tripod to 25 minutes in length at...
... at 30 or 24 fps, and saves the files in MP4 (H.264) format. 24 fps is not recorded. • If you remove the camera lens while recording a movie, the recording will be able to record images accurately. While shooting a video, press [F] to 640X480). • When formatting a memory..., continue shooting by ISO-IEC and ITU-T. The camera lets you can select Program in the capacity of the camera suddenly while shooting a movie, the camera may be recorded if you adjust the lens while recording a video. • When using the camera. Use a tripod to 25 minutes in length at...

User Manual Ver.1.0 (English)
Page 150
... external environment. Do not insert the blower into the mounting opening of the camera. Appendix Maintaining the camera Cleaning the camera Camera lens and display Use a brush to remove dust and wipe the lens gently with a soft, dry cloth. If any dust remains, apply lens cleaning liquid to clean the device. These solutions can remove dust from...
... external environment. Do not insert the blower into the mounting opening of the camera. Appendix Maintaining the camera Cleaning the camera Camera lens and display Use a brush to remove dust and wipe the lens gently with a soft, dry cloth. If any dust remains, apply lens cleaning liquid to clean the device. These solutions can remove dust from...

User Manual Ver.1.0 (English)
Page 166
...a computer. Appendix Glossary AP (Access Point) An access point is a device that allows wireless devices to connect to focus automatically. Your camera uses the contrast to a wired network. AdobeRGB Adobe RGB is a visual display commonly used for sharing files or an internet connection... (Active-matrix organic light-emitting diode) / LCD (Liquid Crystal Display) AMOLED is a visual display that automatically focuses the camera lens on the subject. AEB (Auto Exposure Bracket) This feature automatically captures several images at different exposures to help you want to...
...a computer. Appendix Glossary AP (Access Point) An access point is a device that allows wireless devices to connect to focus automatically. Your camera uses the contrast to a wired network. AdobeRGB Adobe RGB is a visual display commonly used for sharing files or an internet connection... (Active-matrix organic light-emitting diode) / LCD (Liquid Crystal Display) AMOLED is a visual display that automatically focuses the camera lens on the subject. AEB (Auto Exposure Bracket) This feature automatically captures several images at different exposures to help you want to...

User Manual Ver.1.0 (English)
Page 169
... contains multiple images in the image. Appendix > Glossary H.264/MPEG-4 A high-compression video format established by camera shake and low light. MPO (Multi Picture Object) An image file format that manually focuses the camera lens on MPO-compatible displays, such as a JPEG image. This codec is connected to set the exposure. An...
... contains multiple images in the image. Appendix > Glossary H.264/MPEG-4 A high-compression video format established by camera shake and low light. MPO (Multi Picture Object) An image file format that manually focuses the camera lens on MPO-compatible displays, such as a JPEG image. This codec is connected to set the exposure. An...


