Quick Guide (easy Manual) (ver.1.2) (English)
Page 5
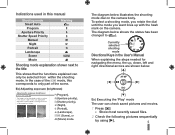
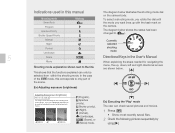
... the 'Play' mode The user can only be taken bright or dark according to the amount of light. The diagram below illustrates the shooting mode dial on the camera. In the case of the mode, this manual Shooting mode Smart Auto Program Aperture Priority Shutter Speed Priority...movies. 1 Press [ ] • Show most recently saved files. 2 Check the following pictures sequentially by controlling the amount of light entered into the lens. Currently selected shooting mode Directional Keys in this corresponds to only part of the scene. Indications used in the User's...
... the 'Play' mode The user can only be taken bright or dark according to the amount of light. The diagram below illustrates the shooting mode dial on the camera. In the case of the mode, this manual Shooting mode Smart Auto Program Aperture Priority Shutter Speed Priority...movies. 1 Press [ ] • Show most recently saved files. 2 Check the following pictures sequentially by controlling the amount of light entered into the lens. Currently selected shooting mode Directional Keys in this corresponds to only part of the scene. Indications used in the User's...
Quick Guide (easy Manual) (ver.1.2) (English)
Page 7
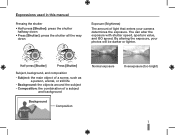
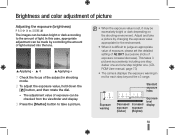
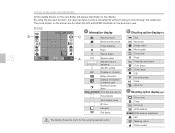
You can alter the exposure with shutter speed, aperture value, and ISO speed. By altering the exposure, your camera determines the exposure. Expressions used in this manual Pressing the shutter • Half-press [Shutter]: press the shutter halfway down • Press [Shutter]: press the ...; Subject: the main object of a scene, such as a person, animal, or still life • Background: the objects around the subject • Composition: the combination of light that enters your photos will be darker or lighter.
You can alter the exposure with shutter speed, aperture value, and ISO speed. By altering the exposure, your camera determines the exposure. Expressions used in this manual Pressing the shutter • Half-press [Shutter]: press the shutter halfway down • Press [Shutter]: press the ...; Subject: the main object of a scene, such as a person, animal, or still life • Background: the objects around the subject • Composition: the combination of light that enters your photos will be darker or lighter.
Quick Guide (easy Manual) (ver.1.2) (English)
Page 9
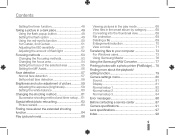
...the red-eye fix function 50 1st Curtain, 2nd Curtain 51 Adjusting the ISO sensitivity 51 Adjusting the amount of flash light 52 Focusing methods 53 Changing the Focusing methods 53 Changing the focus area 54 Setting the focus of the selected area 55 Setting ...71 Transferring files to your computer 73 For Windows users 73 Using Samsung Master 76 Using the Samsung RAW Converter 77 Printing photos with a photo printer (PictBridge) ... 78 Finding more about the playback/ editing function 79 Camera settings menu 80 Sound 81 Display 81 Normal setup 1 82 Normal setup ...
...the red-eye fix function 50 1st Curtain, 2nd Curtain 51 Adjusting the ISO sensitivity 51 Adjusting the amount of flash light 52 Focusing methods 53 Changing the Focusing methods 53 Changing the focus area 54 Setting the focus of the selected area 55 Setting ...71 Transferring files to your computer 73 For Windows users 73 Using Samsung Master 76 Using the Samsung RAW Converter 77 Printing photos with a photo printer (PictBridge) ... 78 Finding more about the playback/ editing function 79 Camera settings menu 80 Sound 81 Display 81 Normal setup 1 82 Normal setup ...
Quick Guide (easy Manual) (ver.1.2) (English)
Page 30
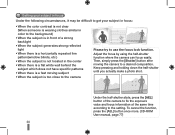
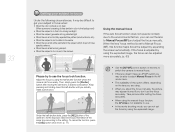
...8226; When the subject is too close to the camera Please try to use the focus lock function. Under the half-shutter state, press the [AEL] button of a strong backlight • When the subject generates strong reflected light • When there is a horizontally repeated line ...pattern(window blinds, etc.) • When the subject is not located in front of the camera to fix the exposure value and focus information at white wall behind ...
...8226; When the subject is too close to the camera Please try to use the focus lock function. Under the half-shutter state, press the [AEL] button of a strong backlight • When the subject generates strong reflected light • When there is a horizontally repeated line ...pattern(window blinds, etc.) • When the subject is not located in front of the camera to fix the exposure value and focus information at white wall behind ...
Quick Guide (easy Manual) (ver.1.2) (English)
Page 35
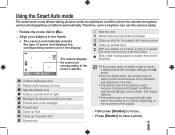
...detcts a face, the camera may not select portrait mode because of the orientation and brightness of the face. • The camera may not recognize a scene because of adverse photograph conditions such as bad lighting, camera shake, and subject distance. • The camera may not recognize the mode..., even if the camera is on a tripod, depending on a tripod, a shot...
...detcts a face, the camera may not select portrait mode because of the orientation and brightness of the face. • The camera may not recognize a scene because of adverse photograph conditions such as bad lighting, camera shake, and subject distance. • The camera may not recognize the mode..., even if the camera is on a tripod, depending on a tripod, a shot...
Quick Guide (easy Manual) (ver.1.2) (English)
Page 37
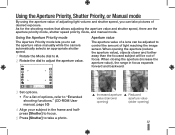
...) 37 Using the Aperture Priority, Shutter Priority, or Manual mode By using the aperture value of adjusting light volume and shutter speed, you to set the aperture value manually while the camera automatically selects an appropriate shutter speed. 1 Rotate the Mode dial to A. 2 Rotate the dial to ...the aperture (reduce the aperture value), objects closer and further away than the focused subject will be adjusted to control the amount of light reaching the image sensor. As for the shooting modes that allows adjusting the aperture value and shutter speed, there are the aperture priority ...
...) 37 Using the Aperture Priority, Shutter Priority, or Manual mode By using the aperture value of adjusting light volume and shutter speed, you to set the aperture value manually while the camera automatically selects an appropriate shutter speed. 1 Rotate the Mode dial to A. 2 Rotate the dial to ...the aperture (reduce the aperture value), objects closer and further away than the focused subject will be adjusted to control the amount of light reaching the image sensor. As for the shooting modes that allows adjusting the aperture value and shutter speed, there are the aperture priority ...
Quick Guide (easy Manual) (ver.1.2) (English)
Page 49
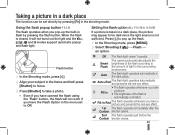
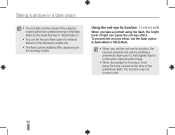
...;ash is closed, it will not work if you take Fill in a picture. • The brightness of light in the dark place. Off The flash light doesn't operate. The camera automatically adjusts the Smart brightness of the flash according to take a photo. • Even if you pop...half-press [Shutter] to focus. 3 Press [Shutter] to SMART Flash the amount of the flash is automatically controlled. Auto The flash light operates automatically in the surrounding environment. Press [ ] to Off. Setting the flash option If a picture is taken in a dark place, the picture ...
...;ash is closed, it will not work if you take Fill in a picture. • The brightness of light in the dark place. Off The flash light doesn't operate. The camera automatically adjusts the Smart brightness of the flash according to take a photo. • Even if you pop...half-press [Shutter] to focus. 3 Press [Shutter] to SMART Flash the amount of the flash is automatically controlled. Auto The flash light operates automatically in the surrounding environment. Press [ ] to Off. Setting the flash option If a picture is taken in a dark place, the picture ...
Quick Guide (easy Manual) (ver.1.2) (English)
Page 50
... to the brighter flash it emits when capturing the image. • When the subject is moving or is far away from the camera at the time of light can set the auto flash option for external flashes on the NX-series models only. • The flash options available... differ, depending on the shooting modes. Using the red-eye fix function When you set the red-eye fix function, the camera prevents red-eye...
... to the brighter flash it emits when capturing the image. • When the subject is moving or is far away from the camera at the time of light can set the auto flash option for external flashes on the NX-series models only. • The flash options available... differ, depending on the shooting modes. Using the red-eye fix function When you set the red-eye fix function, the camera prevents red-eye...
Quick Guide (easy Manual) (ver.1.2) (English)
Page 51
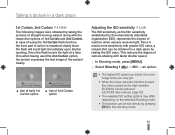
... The function can be set directly by pressing [ISO] in the shooting mode. 51 Since the flash bursts the light at a later time when having used , the noise caused by the high-sensitive ISO(3200) can be reduced. (CD...setting options may get. • When the noise reduction function is remained clearly since the flash will burst light immediately upon shutter opening. In case of using the 1st Curtain flash function, the front part of action is...established by the international standards organization (ISO), represents the degree of reaction when camera receives light.
... The function can be set directly by pressing [ISO] in the shooting mode. 51 Since the flash bursts the light at a later time when having used , the noise caused by the high-sensitive ISO(3200) can be reduced. (CD...setting options may get. • When the noise reduction function is remained clearly since the flash will burst light immediately upon shutter opening. In case of using the 1st Curtain flash function, the front part of action is...established by the international standards organization (ISO), represents the degree of reaction when camera receives light.
Quick Guide (easy Manual) (ver.1.2) (English)
Page 52
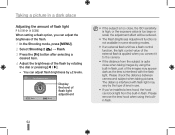
...part of lens in use. • If you connect it to the camera. • If the distance from the built-in some shooting modes. • If an external flash unit has a flash control function, the light control value of the external flash is applied when you 've ... be reduced. • The Flash Brightness Adjustment function is not available in flash. The distance interfered with the flash light. Please check the distance between camera and subject when taking images by the type of the images may appear dark as the lens is interfered with flash...
...part of lens in use. • If you connect it to the camera. • If the distance from the built-in some shooting modes. • If an external flash unit has a flash control function, the light control value of the external flash is applied when you 've ... be reduced. • The Flash Brightness Adjustment function is not available in flash. The distance interfered with the flash light. Please check the distance between camera and subject when taking images by the type of the images may appear dark as the lens is interfered with flash...
Quick Guide (easy Manual) (ver.1.2) (English)
Page 57
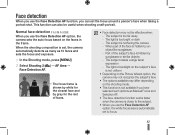
... of the face is hidden by an object like sunglasses - Normal face detection When you use the Face Detection AF option, the camera sets the auto focus based on the shooting mode. • This function is not available if you use the Face Detection AF function, you...automatically set the focus around a person's face when taking a portrait shot. The light or backlight on the subject's face is too bright or dark - The light is not uniform • Depending on the Picture Wizard option, the camera may not recognize the subject's face • The options available may not be useful...
... of the face is hidden by an object like sunglasses - Normal face detection When you use the Face Detection AF option, the camera sets the auto focus based on the shooting mode. • This function is not available if you use the Face Detection AF function, you...automatically set the focus around a person's face when taking a portrait shot. The light or backlight on the subject's face is too bright or dark - The light is not uniform • Depending on the Picture Wizard option, the camera may not recognize the subject's face • The options available may not be useful...
Quick Guide (easy Manual) (ver.1.2) (English)
Page 59
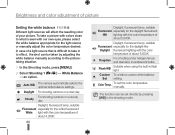
...decrease). This takes 3 pictures successively, including one step darker one and one step brighter one. (CDROM User manual, page 73) • The camera displays the exposure warning in shooting mode. 2 To adjust the exposure value, hold down the [ ] button, and then rotate the dial. •... the shooting environment. S Applying - Adjust and take a picture. • When the exposure value is difficult to the amount of light. In this case, appropriate adjustment can be made by changing the exposure value appropriate for each step beyond the ±3 range. 32 Exposure warning...
...decrease). This takes 3 pictures successively, including one step darker one and one step brighter one. (CDROM User manual, page 73) • The camera displays the exposure warning in shooting mode. 2 To adjust the exposure value, hold down the [ ] button, and then rotate the dial. •... the shooting environment. S Applying - Adjust and take a picture. • When the exposure value is difficult to the amount of light. In this case, appropriate adjustment can be made by changing the exposure value appropriate for each step beyond the ±3 range. 32 Exposure warning...
Quick Guide (easy Manual) (ver.1.2) (English)
Page 60
To take in the shooting mode. Auto WB The camera automatically selects the optimal white balance settings. Daylight, fluorescent lamp, suitable Fluorescent especially for the white fluorescent White light with colors close to the picturetaking situation. 1 In the Shooting mode, press [MENU]. 2 Select Shooting...incandescent bulbs. Brightness and color adjustment of picture Setting the white balance Different light sources will affect the resulting color of about 6,500K. In case of a light source that is seen with our own eyes, please select the white ...
To take in the shooting mode. Auto WB The camera automatically selects the optimal white balance settings. Daylight, fluorescent lamp, suitable Fluorescent especially for the white fluorescent White light with colors close to the picturetaking situation. 1 In the Shooting mode, press [MENU]. 2 Select Shooting...incandescent bulbs. Brightness and color adjustment of picture Setting the white balance Different light sources will affect the resulting color of about 6,500K. In case of a light source that is seen with our own eyes, please select the white ...

Quick Guide (easy Manual) (ver.1.2) (English)
Page 88
... An incorrect white balance can create unrealistic color. Format the card. (p. 82) If you encounter this situation, play back files on your camera may not be set to play the file (the name of focus, the photo may be blurry. Select the proper white balance option to...; Make sure that the lens is not a malfunction of a file, your computer. Use a tripod to static electricity. If you change to suit the light source. (p. 60) 88 The photo is blurry • If the subject is shaken while shooting, the photo may be blurry. If not, clean the lens...
... An incorrect white balance can create unrealistic color. Format the card. (p. 82) If you encounter this situation, play back files on your camera may not be set to play the file (the name of focus, the photo may be blurry. Select the proper white balance option to...; Make sure that the lens is not a malfunction of a file, your computer. Use a tripod to static electricity. If you change to suit the light source. (p. 60) 88 The photo is blurry • If the subject is shaken while shooting, the photo may be blurry. If not, clean the lens...
Quick Guide (easy Manual) (ver.1.2) (English)
Page 94
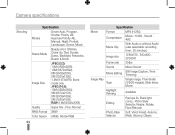
Camera specifications Shooting Specification Modes Smart Auto, Program, Shutter Priority AE, Aperture Priority AE, Manual, Night, Portrait, Landscape, Scene, Movie Scene Mode Beauty shot, ... Editing Still Image Capture, Time Trimming Image Play Type Single image, Thumbnails (3/9/20 images), Slide show, Movie Highlight Warning Available Editing Red eye fix, Back light comp., Photo Style Selector, Resize, Rotate, Face Retouch Photo Style Soft, Vivid, Forest, Autumn, Selector Misty, Gloomy, Classic
Camera specifications Shooting Specification Modes Smart Auto, Program, Shutter Priority AE, Aperture Priority AE, Manual, Night, Portrait, Landscape, Scene, Movie Scene Mode Beauty shot, ... Editing Still Image Capture, Time Trimming Image Play Type Single image, Thumbnails (3/9/20 images), Slide show, Movie Highlight Warning Available Editing Red eye fix, Back light comp., Photo Style Selector, Resize, Rotate, Face Retouch Photo Style Soft, Vivid, Forest, Autumn, Selector Misty, Gloomy, Classic
Quick Guide (easy Manual) (ver.1.2) (English)
Page 98
Index A Adjusting exposure 5 AEL function 30 Automatic focus 32 Aperture priority mode 37 Aperture value 37 AF Priority 64 AF assist light 64 AE BKT 65 AF Sound 81 Anynet+ 84 B Background 7 Battery 15 Bracket setup 65 Backlight adjustment 79 Button sound 81 C Composition 7 Close-up 35 ...Continuous AF 53 98 Changing the shooting method 61 Continuous shooting 61 Color temperature 65 Color space 65 Center-weighted metering 65 Camera specifications 91 D Direction keys 5 Diopter adjustment dial 13 Display type 26 Depth Preview 34 Depth of field 34 Deleting a file 69...
Index A Adjusting exposure 5 AEL function 30 Automatic focus 32 Aperture priority mode 37 Aperture value 37 AF Priority 64 AF assist light 64 AE BKT 65 AF Sound 81 Anynet+ 84 B Background 7 Battery 15 Bracket setup 65 Backlight adjustment 79 Button sound 81 C Composition 7 Close-up 35 ...Continuous AF 53 98 Changing the shooting method 61 Continuous shooting 61 Color temperature 65 Color space 65 Center-weighted metering 65 Camera specifications 91 D Direction keys 5 Diopter adjustment dial 13 Display type 26 Depth Preview 34 Depth of field 34 Deleting a file 69...
User Manual (user Manual) (ver.1.3) (English)
Page 5
...pictures and movies. 1 Press [ ] • Show most recently saved files. 2 Check the following pictures sequentially by controlling the amount of light entered into the lens. S Applying - To select a shooting mode, you rotate the dial until the mode you want lines up , down, ...When explaining the steps needed for navigating the Shooting mode explanation shown next to the amount of light. The diagram below illustrates the shooting mode dial on the camera. Manual Currently Night selected Portrait Landscape shooting mode 5 Scene Movie Directional Keys in this corresponds to...
...pictures and movies. 1 Press [ ] • Show most recently saved files. 2 Check the following pictures sequentially by controlling the amount of light entered into the lens. S Applying - To select a shooting mode, you rotate the dial until the mode you want lines up , down, ...When explaining the steps needed for navigating the Shooting mode explanation shown next to the amount of light. The diagram below illustrates the shooting mode dial on the camera. Manual Currently Night selected Portrait Landscape shooting mode 5 Scene Movie Directional Keys in this corresponds to...

User Manual (user Manual) (ver.1.3) (English)
Page 7
..., your camera determines the exposure. You can alter the exposure with shutter speed, aperture value, and ISO speed. Expressions used in this manual Pressing the shutter • Half-press [Shutter]: press the shutter halfway down • Press [Shutter]: press the shutter all the way down Exposure (Brightness) The amount of light that...
..., your camera determines the exposure. You can alter the exposure with shutter speed, aperture value, and ISO speed. Expressions used in this manual Pressing the shutter • Half-press [Shutter]: press the shutter halfway down • Press [Shutter]: press the shutter all the way down Exposure (Brightness) The amount of light that...
User Manual (user Manual) (ver.1.3) (English)
Page 25
The icons shown on the screen are in use. of camera shake 12:00AM 2010.01.01 Time, date and year info Focus indicator ମGGଯ Spot metering area AF zone Histogram Grid display The ... OIS and AF/MF switches on the display. B Shooting option display(left) 14M Size Movie size SF Image quality Movie quality Focus area Flash Flash light adjustment RGB Color space Smart range OIS OIS Voice recording Fader Wind Cut C Shooting option display(right) Drive mode Timer AF mode White balance White...
The icons shown on the screen are in use. of camera shake 12:00AM 2010.01.01 Time, date and year info Focus indicator ମGGଯ Spot metering area AF zone Histogram Grid display The ... OIS and AF/MF switches on the display. B Shooting option display(left) 14M Size Movie size SF Image quality Movie quality Focus area Flash Flash light adjustment RGB Color space Smart range OIS OIS Voice recording Fader Wind Cut C Shooting option display(right) Drive mode Timer AF mode White balance White...
User Manual (user Manual) (ver.1.3) (English)
Page 33
... in color to the background) • When the subject is in front of a strong backlight • When the subject generates strong reflected light • When there is a horizontally repeated line pattern (window blinds, etc.) • When the subject is not located in the AF mode menu..... Under the half-shutter state, press the [AEL] button of this function helps focus the subject by using the half-shutter function where the camera can focus easily. Then, simply press the [Shutter] button after setting the focus accurately. • When using the manual focus function, the...
... in color to the background) • When the subject is in front of a strong backlight • When the subject generates strong reflected light • When there is a horizontally repeated line pattern (window blinds, etc.) • When the subject is not located in the AF mode menu..... Under the half-shutter state, press the [AEL] button of this function helps focus the subject by using the half-shutter function where the camera can focus easily. Then, simply press the [Shutter] button after setting the focus accurately. • When using the manual focus function, the...


