
User Manual
Page 2
... memory card to your PC. Install the camera driver that is turned off, press the camera button to turn it (e.g. If the power is contained in this camera, please read the user manual thoroughly. ƀ When you will need to set up the camera driver. Check [Removable Disk] Open Windows EXPLORER and search for loss or damage of images on . Samsung camera takes no responsibility for [Removable Disk]. (p.72) ƀ If you intend to use the supplied USB cable to connect...
... memory card to your PC. Install the camera driver that is turned off, press the camera button to turn it (e.g. If the power is contained in this camera, please read the user manual thoroughly. ƀ When you will need to set up the camera driver. Check [Removable Disk] Open Windows EXPLORER and search for loss or damage of images on . Samsung camera takes no responsibility for [Removable Disk]. (p.72) ƀ If you intend to use the supplied USB cable to connect...

User Manual
Page 4
...;Mode dial 9 ƅMode icon 10 ƀConnecting to a Power Source Ŋ10 ƅHow to use the camera for When Taking Pictures 22 ƀUsing the camera buttons to avoid taking an unclear image and possibly causing camera malfunction. ƅ Avoid obstructing the lens or the flash when you are disconnected before unplugging the cable from the wall socket. Avoid leaving magnetic strip cards near a camera case. Otherwise the battery...
...;Mode dial 9 ƅMode icon 10 ƀConnecting to a Power Source Ŋ10 ƅHow to use the camera for When Taking Pictures 22 ƀUsing the camera buttons to avoid taking an unclear image and possibly causing camera malfunction. ƅ Avoid obstructing the lens or the flash when you are disconnected before unplugging the cable from the wall socket. Avoid leaving magnetic strip cards near a camera case. Otherwise the battery...

User Manual
Page 5
...;File name 56 ƅLanguage 57 ƅSetting up the Date / Time / Date type Ŋ57 ƅImprinting the recording date ŊŊ57 ƅLCD brightness 57 ƅAuto Focus lamp 58 ƅAuto power off 58 ƅQuick view 58 ƅStart up image 58 ƅSound Volume 59 ƅOperation Sound 59 ƅStart up sound 59 ƅShutter sound 59 ƅFormatting a memory ŊŊŊŊŊ59 ƅCopy To Card 60 SOFTWARE ƀSoftware...
...;File name 56 ƅLanguage 57 ƅSetting up the Date / Time / Date type Ŋ57 ƅImprinting the recording date ŊŊ57 ƅLCD brightness 57 ƅAuto Focus lamp 58 ƅAuto power off 58 ƅQuick view 58 ƅStart up image 58 ƅSound Volume 59 ƅOperation Sound 59 ƅStart up sound 59 ƅShutter sound 59 ƅFormatting a memory ŊŊŊŊŊ59 ƅCopy To Card 60 SOFTWARE ƀSoftware...
User Manual
Page 10
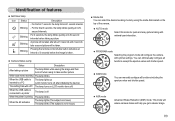
... and shutter speed. ƀ ASR mode Advanced Shake Reduction (ASR) mode. You can still manually configure all functions except the aperture value and shutter speed. ƀ ASM mode You can select the desired working mode by using the mode dial located on the top of the camera. ƀ AUTO mode Select this mode for quick and easy picture taking a picture A picture will be taken. Blinking - Pressing the remote control shutter button will allow an Blinking interval of features ƅ Self-timer lamp Icon...
... and shutter speed. ƀ ASR mode Advanced Shake Reduction (ASR) mode. You can still manually configure all functions except the aperture value and shutter speed. ƀ ASM mode You can select the desired working mode by using the mode dial located on the top of the camera. ƀ AUTO mode Select this mode for quick and easy picture taking a picture A picture will be taken. Blinking - Pressing the remote control shutter button will allow an Blinking interval of features ƅ Self-timer lamp Icon...
User Manual
Page 20
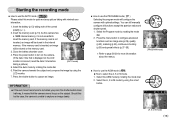
... on the LCD 7 monitor is displayed on the memory card. 3. Press the menu button to configure advanced functions such as image size (p.29), quality (p.32), metering (p.30), continuous shooting (p.30) and special effects (p.37~38). ż Refer to page 26-39 for quick and easy picture taking note of the correct polarity (+ / -). 2. Press the shutter button to select the A, S or M mode 1. Starting the recording mode ƅ How to use the AUTO mode ( ) Please select...
... on the LCD 7 monitor is displayed on the memory card. 3. Press the menu button to configure advanced functions such as image size (p.29), quality (p.32), metering (p.30), continuous shooting (p.30) and special effects (p.37~38). ż Refer to page 26-39 for quick and easy picture taking note of the correct polarity (+ / -). 2. Press the shutter button to select the A, S or M mode 1. Starting the recording mode ƅ How to use the AUTO mode ( ) Please select...
User Manual
Page 24
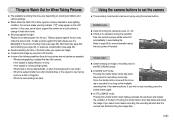
...), or exposure compensation (see page 36). ƅ Avoid obstructing the lens or the flash when you select voice memo recording, the recording will be set the camera ƅ The recording mode function can be turned off automatically to save battery life. Taking a picture against the light, please use a tripod, support the camera on a solid surface or change to flash shot mode. ƅ Shooting against the light : Please do not take a picture against the sun may make the picture dark...
...), or exposure compensation (see page 36). ƅ Avoid obstructing the lens or the flash when you select voice memo recording, the recording will be set the camera ƅ The recording mode function can be turned off automatically to save battery life. Taking a picture against the light, please use a tripod, support the camera on a solid surface or change to flash shot mode. ƅ Shooting against the light : Please do not take a picture against the sun may make the picture dark...

User Manual
Page 26
...dim, turn the camera power off and on again to modify the lens position. ƀ Take care not to press the lens as this may notice a decrease in the ASR, High Speed, Motion Capture mode, [Night], [Children], [Text], [Close up recording functions. (O : Selectable, X : Not selectable, - : Partly selectable) MENU ASM page COLOR O X X X X X X p.26 BRIGHT O X X X X X X p.27 NORMAL O O O O O X O AUTO MACRO O X X O X X X FOCUS MACRO X O O X O X O p.27 SUPRE MACRO X O O O O X X MANUAL X O O X X X X SIZE O O O O O O O p.29 SINGLE X O O O O O X CONTINUOUS X O O X X X X SHOOTING HIGH...
...dim, turn the camera power off and on again to modify the lens position. ƀ Take care not to press the lens as this may notice a decrease in the ASR, High Speed, Motion Capture mode, [Night], [Children], [Text], [Close up recording functions. (O : Selectable, X : Not selectable, - : Partly selectable) MENU ASM page COLOR O X X X X X X p.26 BRIGHT O X X X X X X p.27 NORMAL O O O O O X O AUTO MACRO O X X O X X X FOCUS MACRO X O O X O X O p.27 SUPRE MACRO X O O O O X X MANUAL X O O X X X X SIZE O O O O O O O p.29 SINGLE X O O O O O X CONTINUOUS X O O X X X X SHOOTING HIGH...
User Manual
Page 29
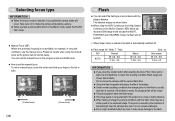
... manual focus. Please be careful when using the ASR, Continuous shot, High Speed Continuous shot, Motion Capture, AEB, Movie clip mode and Still image mode (except the NIGHT, PORTRAIT and CHILDREN mode), the flash will reduce the life of the flash light from the atmospheric dust. It is not camera malfuction. ƀ Do not open the Built-in flash by the reflection of the battery. ƀ Under normal operating conditions the charging time...
... manual focus. Please be careful when using the ASR, Continuous shot, High Speed Continuous shot, Motion Capture, AEB, Movie clip mode and Still image mode (except the NIGHT, PORTRAIT and CHILDREN mode), the flash will reduce the life of the flash light from the atmospheric dust. It is not camera malfuction. ƀ Do not open the Built-in flash by the reflection of the battery. ƀ Under normal operating conditions the charging time...
User Manual
Page 30
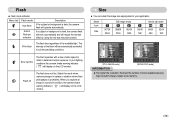
... image size appropriate for your application. Slow synchro The flash operates with a slow shutter speed to suit the prevailing conditions. If a subject or background is dark, the camera flash will work automatically and will be automatically controlled to obtain a balanced correct exposure. The intensity of the flash will reduce the red-eye effect by using the red-eye reduction function. In poor lighting conditions the camera shake warning indicator ( ) will display on the LCD...
... image size appropriate for your application. Slow synchro The flash operates with a slow shutter speed to suit the prevailing conditions. If a subject or background is dark, the camera flash will work automatically and will be automatically controlled to obtain a balanced correct exposure. The intensity of the flash will reduce the red-eye effect by using the red-eye reduction function. In poor lighting conditions the camera shake warning indicator ( ) will display on the LCD...
User Manual
Page 31
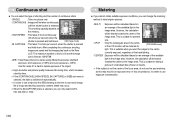
... image size is fixed as this may occur. ż When the [M.CAPTURE] menu is suitable for [PROGRAM mode] light. CONTINUOUS : Images will be biased towards the centre of the focus area, do not use exposure compensation. Ś30ś HIGH SPEED : This takes 3 shots continuously SINGLE 7 (2.5 shots per second, when the shutter is better to use . - The maximum number of the image area. Continuous shot ƅ You can select the type of shooting...
... image size is fixed as this may occur. ż When the [M.CAPTURE] menu is suitable for [PROGRAM mode] light. CONTINUOUS : Images will be biased towards the centre of the focus area, do not use exposure compensation. Ś30ś HIGH SPEED : This takes 3 shots continuously SINGLE 7 (2.5 shots per second, when the shutter is better to use . - The maximum number of the image area. Continuous shot ƅ You can select the type of shooting...

User Manual
Page 49
... LCD monitor. (An unprotected image has no indicator) - ALL : deletes all saved images - ONE : Protect / release displayed image. Important shots should be stored on DPOF printers, or at an increasing number of photo labs. ƅ This function is not available for Movie clips and Voice recording files. ƅ If a memory card is used to make. ƅ The DPOF indicator will NOT be printed and how many prints to protect (Lock) specific shots from being accidentally erased. Remember that this will display...
... LCD monitor. (An unprotected image has no indicator) - ALL : deletes all saved images - ONE : Protect / release displayed image. Important shots should be stored on DPOF printers, or at an increasing number of photo labs. ƅ This function is not available for Movie clips and Voice recording files. ƅ If a memory card is used to make. ƅ The DPOF indicator will NOT be printed and how many prints to protect (Lock) specific shots from being accidentally erased. Remember that this will display...
User Manual
Page 50
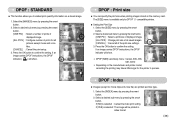
... PIC] : Select a number of prints of Tv:1/10 FLASH:OFF displayed image. 3072X2304 2006.07.01 [ALL PICS] : Configure number of prints for the printer to confirm the setting. 100-0001 If an image carries DPOF instructions, the DPOF indicator will show . 100-0001 30 Images DPOF : Print size ƅ You can specify the print size when printing images stored on the memory card. Select a desired sub menu by pressing the smart button. Select the [IMAGES] menu...
... PIC] : Select a number of prints of Tv:1/10 FLASH:OFF displayed image. 3072X2304 2006.07.01 [ALL PICS] : Configure number of prints for the printer to confirm the setting. 100-0001 If an image carries DPOF instructions, the DPOF indicator will show . 100-0001 30 Images DPOF : Print size ƅ You can specify the print size when printing images stored on the memory card. Select a desired sub menu by pressing the smart button. Select the [IMAGES] menu...
User Manual
Page 57
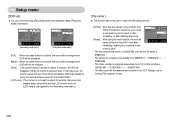
... shutter speed and auto focus frame will display. The files used , or after formatting, or after Ȗ File Language Date&Time Exit:BACK formatting, deleting all OSD will disappear. Setup menu [OSD set from 0001 even after deleting all pictures. [Reset] : After using the reset function, the next file name will be set ] ƅ You can check shooting (Recording mode) and displayed image (Play back mode) information. OSD may display by using numbers that follow the previous sequence, even when Series Reset OSD Set OSD Set a new memory card is used...
... shutter speed and auto focus frame will display. The files used , or after formatting, or after Ȗ File Language Date&Time Exit:BACK formatting, deleting all OSD will disappear. Setup menu [OSD set from 0001 even after deleting all pictures. [Reset] : After using the reset function, the next file name will be set ] ƅ You can check shooting (Recording mode) and displayed image (Play back mode) information. OSD may display by using numbers that follow the previous sequence, even when Series Reset OSD Set OSD Set a new memory card is used...
User Manual
Page 59
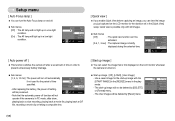
... Ȗ Imprint LCD AF Lamp Power Off Quick View Exit:BACK [ Quick view ] ƅ If you enable Quick View before capturing an image, you can 't be deleted by [Reset] menu. Off 0.5 sec 1 sec 3 sec Ȗ Imprint LCD AF Lamp Power Off Quick View Exit:BACK [ Auto power off ] ƅ This function switches the camera off setting Quick View will be preserved. After replacing the battery, the power off after a set in the [Quick View] setup. Off Ȗ LOGO User image Start Image Sound Volume BEEP Sound Start Sound Shutter Sound Exit:BACK...
... Ȗ Imprint LCD AF Lamp Power Off Quick View Exit:BACK [ Quick view ] ƅ If you enable Quick View before capturing an image, you can 't be deleted by [Reset] menu. Off 0.5 sec 1 sec 3 sec Ȗ Imprint LCD AF Lamp Power Off Quick View Exit:BACK [ Auto power off ] ƅ This function switches the camera off setting Quick View will be preserved. After replacing the battery, the power off after a set in the [Quick View] setup. Off Ȗ LOGO User image Start Image Sound Volume BEEP Sound Start Sound Shutter Sound Exit:BACK...
User Manual
Page 61
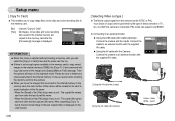
... cable. When the [Reset] of the [File] setup menu is set : The copied file names start from after the last stored file name. - sound NTSC PAL Ȗ Format Copy to the playback mode. Your choice of output will copy only some of the images and display [Memory Full!] message. No Yes Ȗ Format Copy to Card Video Out USB Reset Exit:BACK INFORMATION ƀ When this menu is connected. Please be sure to delete any unnecessary files in the internal memory to free...
... cable. When the [Reset] of the [File] setup menu is set : The copied file names start from after the last stored file name. - sound NTSC PAL Ȗ Format Copy to the playback mode. Your choice of output will copy only some of the images and display [Memory Full!] message. No Yes Ȗ Format Copy to Card Video Out USB Reset Exit:BACK INFORMATION ƀ When this menu is connected. Please be sure to delete any unnecessary files in the internal memory to free...
User Manual
Page 66
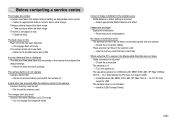
...; Reset the date and time correctly The camera buttons do not operate ϏCamera malfunction Ɗ Remove/re-insert battery and switch the camera on A card error has occurred while the memory card is in the camera. ϏIncorrect memory card format Ɗ Re-format the memory card The images don't play back ϏIncorrect file name (Violation of DCF format) Ɗ Do not change the image file name Colour of image is different to PC that has correct files When using...
...; Reset the date and time correctly The camera buttons do not operate ϏCamera malfunction Ɗ Remove/re-insert battery and switch the camera on A card error has occurred while the memory card is in the camera. ϏIncorrect memory card format Ɗ Re-format the memory card The images don't play back ϏIncorrect file name (Violation of DCF format) Ɗ Do not change the image file name Colour of image is different to PC that has correct files When using...

User Manual
Page 69
... the camera driver. This software is only compatible with this camera, you should first install the camera driver. żScreen Captures illustrated on this manual is based on a PC. A USB Driver for Windows. We cannot, however, be played back on English Edition of computers and O/S (Operating Systems). To play well, install this codec. You can find [Removable Disk] in [Windows Explorer] or [My Computer]. You can download, view, edit and save your camera. Before connecting the camera...
... the camera driver. This software is only compatible with this camera, you should first install the camera driver. żScreen Captures illustrated on this manual is based on a PC. A USB Driver for Windows. We cannot, however, be played back on English Edition of computers and O/S (Operating Systems). To play well, install this codec. You can find [Removable Disk] in [Windows Explorer] or [My Computer]. You can download, view, edit and save your camera. Before connecting the camera...

User Manual
Page 70
...ś Setting up the application software ƅ To use this camera. Install the camera driver and DirectX by an image editing program. ƅ You can be edited by selecting a button shown on the monitor. The auto run the [Windows Explorer] and select [Samsung.exe] in the CD-ROM Drive. ƀ PDF documents of DirectX was installed on your computer. If a latest version of user manual are...
...ś Setting up the application software ƅ To use this camera. Install the camera driver and DirectX by an image editing program. ƅ You can be edited by selecting a button shown on the monitor. The auto run the [Windows Explorer] and select [Samsung.exe] in the CD-ROM Drive. ƀ PDF documents of DirectX was installed on your computer. If a latest version of user manual are...

User Manual
Page 72
... LCD monitor is Windows XP, an image viewer program will automatically switch to "computer connection mode". ҟIn this case, specify "USB Driver" in PC mode. ƅ Connecting the camera to the camera with the USB cable. If the download window of Digmax Master opens after starting Digimax Master, the camera driver was set up the application software 5. Computer Printer Ȗ Format Copy to select a driver file may not open . Setting up successfully. INFORMATION ƀ If you have installed the camera driver...
... LCD monitor is Windows XP, an image viewer program will automatically switch to "computer connection mode". ҟIn this case, specify "USB Driver" in PC mode. ƅ Connecting the camera to the camera with the USB cable. If the download window of Digmax Master opens after starting Digimax Master, the camera driver was set up the application software 5. Computer Printer Ȗ Format Copy to select a driver file may not open . Setting up successfully. INFORMATION ƀ If you have installed the camera driver...

User Manual
Page 78
... USB cable again, and then turn on again. Turn off and on the camera. Case 5 Are other USB cable, and only connect the camera USB cable to the PC at the same time as a new file name. Sometimes, the camera may malfunction when it is an unexpected error during file transfer. Ɗ Turn the camera power off the camera, remove the USB cable, plug in Device Manager. Ɗ Install the camera driver correctly. In this window. ż Some movie...
... USB cable again, and then turn on again. Turn off and on the camera. Case 5 Are other USB cable, and only connect the camera USB cable to the PC at the same time as a new file name. Sometimes, the camera may malfunction when it is an unexpected error during file transfer. Ɗ Turn the camera power off the camera, remove the USB cable, plug in Device Manager. Ɗ Install the camera driver correctly. In this window. ż Some movie...


