

User Manual
Page 1
Please read this manual carefully before using the application software. This manual will guide you for buying a Samsung camera. User Manual Thank you through using the camera, including capturing images, downloading images and using your new camera. ENGLISH
Please read this manual carefully before using the application software. This manual will guide you for buying a Samsung camera. User Manual Thank you through using the camera, including capturing images, downloading images and using your new camera. ENGLISH

User Manual
Page 2
...; Check [Removable Disk] Open Windows EXPLORER and search for buying a Samsung Digital Camera. ● Prior to using this manual are registered trademarks of their respective companies. When transferring the images taken with the camera to your PC, be damaged. Please note that the camera is operating properly before you intend to use it on...
...; Check [Removable Disk] Open Windows EXPLORER and search for buying a Samsung Digital Camera. ● Prior to using this manual are registered trademarks of their respective companies. When transferring the images taken with the camera to your PC, be damaged. Please note that the camera is operating properly before you intend to use it on...
User Manual
Page 3
... the flash too close proximity to build up and distort the camera body or cause a fire. Should this product in close to your dealer or Samsung Camera Service centre. ● Please do not cover the camera or Charger. This may adversely affect the camera's internal components and could pose a risk of extreme variances in fire...
... the flash too close proximity to build up and distort the camera body or cause a fire. Should this product in close to your dealer or Samsung Camera Service centre. ● Please do not cover the camera or Charger. This may adversely affect the camera's internal components and could pose a risk of extreme variances in fire...

User Manual
Page 4
.... Use battery with the polarities reversed. ● Remove the battery when not planning to avoid taking an unclear image and possibly causing camera malfunction. ● Avoid obstructing the lens or the flash when you are disconnected before unplugging the cable from the wall socket. Otherwise... on when you capture an image. ● Before inserting any connector cords or cables to use , always switch off the camera before moving the camera. It may cause breakage of time. Contents READY 007 System chart 008 Identification of battery in fire. - Then make sure ...
.... Use battery with the polarities reversed. ● Remove the battery when not planning to avoid taking an unclear image and possibly causing camera malfunction. ● Avoid obstructing the lens or the flash when you are disconnected before unplugging the cable from the wall socket. Otherwise... on when you capture an image. ● Before inserting any connector cords or cables to use , always switch off the camera before moving the camera. It may cause breakage of time. Contents READY 007 System chart 008 Identification of battery in fire. - Then make sure ...

User Manual
Page 5
... movie clip without sound 025 Pausing while recording a movie clip (Successive Recording) 026 Things to Watch Out for When Taking Pictures 027 Using the camera buttons to set the camera 027 POWER button 027 SHUTTER button 028 ZOOM W / T button 029 Face recognition(FR) button 030 Using the LCD monitor to set the... camera 032 Colour tone 033 Brightness 033 Selecting focus type 034 Flash 036 Size 036 Continuous shot 037 Metering 037 Sharpness 038 Effect 038 Focus Area ...
... movie clip without sound 025 Pausing while recording a movie clip (Successive Recording) 026 Things to Watch Out for When Taking Pictures 027 Using the camera buttons to set the camera 027 POWER button 027 SHUTTER button 028 ZOOM W / T button 029 Face recognition(FR) button 030 Using the LCD monitor to set the... camera 032 Colour tone 033 Brightness 033 Selecting focus type 034 Flash 036 Size 036 Continuous shot 037 Metering 037 Sharpness 038 Effect 038 Focus Area ...

User Manual
Page 6
... trimming 053 Playing back a recorded voice 054 Playing back a recorded voice memo 054 LCD monitor indicator 055 Using the camera buttons to adjust the camera 055 Play mode button 055 BACK button 055 Using the remote control in play mode 056 Thumbnail / Enlargement button 057 Starting the slide show 058 ...
... trimming 053 Playing back a recorded voice 054 Playing back a recorded voice memo 054 LCD monitor indicator 055 Using the camera buttons to adjust the camera 055 Play mode button 055 BACK button 055 Using the remote control in play mode 056 Thumbnail / Enlargement button 057 Starting the slide show 058 ...
User Manual
Page 8
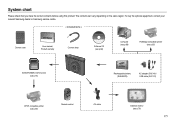
... Please check that you have the correct contents before using this product. To buy the optional equipment, contact your nearest Samsung dealer or Samsung service centre. < Included items > Camera case User manual, Product warranty Camera strap Software CD (see p.86) Computer (see p.88) PictBridge compatible printer (see p.65) SD/SDHC/MMC memory card (see...
... Please check that you have the correct contents before using this product. To buy the optional equipment, contact your nearest Samsung dealer or Samsung service centre. < Included items > Camera case User manual, Product warranty Camera strap Software CD (see p.86) Computer (see p.88) PictBridge compatible printer (see p.65) SD/SDHC/MMC memory card (see...

User Manual
Page 9
It may break the camera. - Do not open the flash by force. Close the flash when you press the shutter button down half way. - Identification of features Front & Top Mode dial Self-timer lamp Remote control sensor ※ Instructions for the Built-in flash Auto focus lamp Lens/ Lens cover Microphone The flash opens automatically when you are not using it to prevent breakage. 《8》 Shutter button Speaker Power button Built-in flash -
It may break the camera. - Do not open the flash by force. Close the flash when you press the shutter button down half way. - Identification of features Front & Top Mode dial Self-timer lamp Remote control sensor ※ Instructions for the Built-in flash Auto focus lamp Lens/ Lens cover Microphone The flash opens automatically when you are not using it to prevent breakage. 《8》 Shutter button Speaker Power button Built-in flash -

User Manual
Page 11
... at 1 second intervals. For the first 7 seconds, the lamp blinks at 0.25- When the printer is ready to a PC (LCD monitor turns off when the camera is printing The lamp blinks. Blinking For 2 seconds, the lamp blinks quickly at 0.25-second intervals before the image is taken. ■...; Camera Status Lamp Status Description Power on The lamp turns on (LCD monitor turns off) When the USB cable is connected to a printer The lamp is ...
... at 1 second intervals. For the first 7 seconds, the lamp blinks at 0.25- When the printer is ready to a PC (LCD monitor turns off when the camera is printing The lamp blinks. Blinking For 2 seconds, the lamp blinks quickly at 0.25-second intervals before the image is taken. ■...; Camera Status Lamp Status Description Power on The lamp turns on (LCD monitor turns off) When the USB cable is connected to a printer The lamp is ...

User Manual
Page 12
...to add special effects to easily configure optimal settings for quick and easy picture taking with optimal settings. This mode will configure the camera with minimal user interaction. You can still manually configure all functions including the aperture value and shutter speed. ■ SCENE mode ..., you get a clearer image. ■ PROGRAM mode Selecting the program mode will reduce camera shake and help you can select the basic menus. To select an advanced menu, select the other camera mode. ■ ASR mode Advanced Shake Reduction (ASR) mode. Identification of features Mode ...
...to add special effects to easily configure optimal settings for quick and easy picture taking with optimal settings. This mode will configure the camera with minimal user interaction. You can still manually configure all functions including the aperture value and shutter speed. ■ SCENE mode ..., you get a clearer image. ■ PROGRAM mode Selecting the program mode will reduce camera shake and help you can select the basic menus. To select an advanced menu, select the other camera mode. ■ ASR mode Advanced Shake Reduction (ASR) mode. Identification of features Mode ...
User Manual
Page 14
..., Auto mode, 10M image size, Fine image quality, Shot to leaking if kept inside the camera. ● Low temperatures (below 0°C) can lose power over time and are measured under Samsung's standard conditions and shooting conditions and may become warm. Be sure to a Power Source You... should use of the camera, the camera body may vary depending on the user's methods. ■ Number of images ...
..., Auto mode, 10M image size, Fine image quality, Shot to leaking if kept inside the camera. ● Low temperatures (below 0°C) can lose power over time and are measured under Samsung's standard conditions and shooting conditions and may become warm. Be sure to a Power Source You... should use of the camera, the camera body may vary depending on the user's methods. ■ Number of images ...
User Manual
Page 15
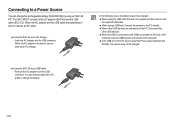
Use the supplied USB cable. ● When using an SAC-46 KIT. Connect the camera to the PC directly. ● When other USB devices. ● When the USB is inserted, it can be used as an AC ...SLB-0837(B)) by using a USB hub. The SAC-46 KIT consists of the PC doesn't meet the Power output standard (5V, 500mA), the camera may not be charged. ● Using the SAC-46 as an AC charger : Insert the AC adapter into the USB connector. When the AC ... the AC adapter and the USB cable are connected to the PC. Connecting to a Power Source You can transmit data with this camera.
Use the supplied USB cable. ● When using an SAC-46 KIT. Connect the camera to the PC directly. ● When other USB devices. ● When the USB is inserted, it can be used as an AC ...SLB-0837(B)) by using a USB hub. The SAC-46 KIT consists of the PC doesn't meet the Power output standard (5V, 500mA), the camera may not be charged. ● Using the SAC-46 as an AC charger : Insert the AC adapter into the USB connector. When the AC ... the AC adapter and the USB cable are connected to the PC. Connecting to a Power Source You can transmit data with this camera.

User Manual
Page 16
... error Being discharged (Using the AC adapter) Charging LED Red LED is on Green LED is on Red LED is on the camera at the same time. Turn the camera off or blinking Orange coloured LED is off while charging the battery. ● If you charge the battery with a fully discharged ... after inserting the rechargeable battery, please check whether the battery is inserted correctly. ● If you insert the fully discharged battery to the cable or camera. ● If the charging LED of the AC Charger does not turn on ● Before inserting any cables or AC adapter, check the directions ...
... error Being discharged (Using the AC adapter) Charging LED Red LED is on Green LED is on Red LED is on the camera at the same time. Turn the camera off or blinking Orange coloured LED is off while charging the battery. ● If you charge the battery with a fully discharged ... after inserting the rechargeable battery, please check whether the battery is inserted correctly. ● If you insert the fully discharged battery to the cable or camera. ● If the charging LED of the AC Charger does not turn on ● Before inserting any cables or AC adapter, check the directions ...

User Manual
Page 17
...The battery is inserted with the correct polarity (+ / -). - Inserting the Battery Insert the battery as shown. - Inserting the memory card Turn off the camera's power before inserting the memory card. - Do not use force to recharge or use recharge or use spare battery) spare battery) Battery empty. ( ... Have the front of the memory card facing toward the back of the camera (LCD monitor) and the card pins toward the front of the camera (Lens). - Doing so may damage the battery chamber cover. If the camera does not turn on the LCD monitor. Insert the memory card as shown...
...The battery is inserted with the correct polarity (+ / -). - Inserting the Battery Insert the battery as shown. - Inserting the memory card Turn off the camera's power before inserting the memory card. - Do not use force to recharge or use recharge or use spare battery) spare battery) Battery empty. ( ... Have the front of the memory card facing toward the back of the camera (LCD monitor) and the card pins toward the front of the camera (Lens). - Doing so may damage the battery chamber cover. If the camera does not turn on the LCD monitor. Insert the memory card as shown...
User Manual
Page 18
...electronic precision device. Should this may become dirty or to come into contact with a different camera. ● Turn off or the memory card is removed while recording, deleting (formatting) or reading. ● Samsung cannot be the case, you may notice that the memory card is warm. If the...; Please keep the memory card in an environment where there are using this camera. ● Do not use a memory card formatted by the Samsung warranty. ● The memory card is not covered by another digital camera. Should this be held responsible for the first time, if it contains data...
...electronic precision device. Should this may become dirty or to come into contact with a different camera. ● Turn off or the memory card is removed while recording, deleting (formatting) or reading. ● Samsung cannot be the case, you may notice that the memory card is warm. If the...; Please keep the memory card in an environment where there are using this camera. ● Do not use a memory card formatted by the Samsung warranty. ● The memory card is not covered by another digital camera. Should this be held responsible for the first time, if it contains data...

User Manual
Page 19
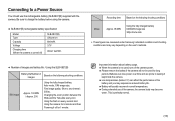
... will be affected by variables such as subject matter and memory card type. These figures are approximate as follows. When using the memory card The camera can be as image capacities can use SD/SDHC Memory Cards and MMC (Multi Media Cards). Slide the switch to the top of the SD...
... will be affected by variables such as subject matter and memory card type. These figures are approximate as follows. When using the memory card The camera can be as image capacities can use SD/SDHC Memory Cards and MMC (Multi Media Cards). Slide the switch to the top of the SD...

User Manual
Page 20
... will be dark when some menus, touch the button and slide your finger to the brightness set as before. 《19》 When Using the Camera for the First Time : Smart button This button is used for shifting the menu cursor to select or for confirming the selected menu.
... will be dark when some menus, touch the button and slide your finger to the brightness set as before. 《19》 When Using the Camera for the First Time : Smart button This button is used for shifting the menu cursor to select or for confirming the selected menu.

User Manual
Page 21
.../ Day and Hour : Minute, ▲ ⇧ press the horizontal smart button. When Using the Camera for the First Time : Setting up the Date / Time and Language When the camera is restarted, the language setting will be maintained. ※ For more information about the World Time, ...Japanese, Russian, Portuguese, Dutch, Danish, Swedish, Finnish, Thai, Bahasa (Malay / Indonesian), Arabic, Polish, Hungarian, Czech and Turkish. ● Even if the camera is turned on for the first time, a menu will not be displayed again after setting up the date, time and language. Press the [Language] menu...
.../ Day and Hour : Minute, ▲ ⇧ press the horizontal smart button. When Using the Camera for the First Time : Setting up the Date / Time and Language When the camera is restarted, the language setting will be maintained. ※ For more information about the World Time, ...Japanese, Russian, Portuguese, Dutch, Danish, Swedish, Finnish, Thai, Bahasa (Malay / Indonesian), Arabic, Polish, Hungarian, Czech and Turkish. ● Even if the camera is turned on for the first time, a menu will not be displayed again after setting up the date, time and language. Press the [Language] menu...
User Manual
Page 23
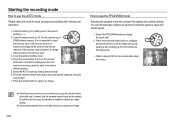
... shutter button down half way, it is not essential to insert the memory card. Press the power button to turn on the camera. (If the date / time that the camera cannot focus on the subject. Close the battery chamber cover. 4. Press the shutter button to capture an image. Press the horizontal ...the AUTO mode by rotating the mode dial. 2. Starting the recording mode How to use the PROGRAM mode Selecting the program mode will configure the camera with minimal user interaction. 1. If the memory card is displayed on the memory card. 3. Insert the memory card (p.16). Point the...
... shutter button down half way, it is not essential to insert the memory card. Press the power button to turn on the camera. (If the date / time that the camera cannot focus on the subject. Close the battery chamber cover. 4. Press the shutter button to capture an image. Press the horizontal ...the AUTO mode by rotating the mode dial. 2. Starting the recording mode How to use the PROGRAM mode Selecting the program mode will configure the camera with minimal user interaction. 1. If the memory card is displayed on the memory card. 3. Insert the memory card (p.16). Point the...
User Manual
Page 24
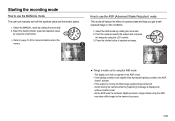
... Starting the recording mode How to use the ASR (Advanced Shake Reduction) mode This mode will not operate in dim conditions. 1. Point the camera towards the subject and compose the image by rotating the mode dial. 2. How to use the MANUAL mode The user can manually set both ... the shutter speed. 1. If the lighting conditions are brighter than fluorescent lighting condition, the ASR doesn't activate. - If the subject is moving the camera while the [Capturing!] message is displayed to process. 《23》 Select the MANUAL mode by using the LCD monitor. 3. As the ASR ...
... Starting the recording mode How to use the ASR (Advanced Shake Reduction) mode This mode will not operate in dim conditions. 1. Point the camera towards the subject and compose the image by rotating the mode dial. 2. How to use the MANUAL mode The user can manually set both ... the shutter speed. 1. If the lighting conditions are brighter than fluorescent lighting condition, the ASR doesn't activate. - If the subject is moving the camera while the [Capturing!] message is displayed to process. 《23》 Select the MANUAL mode by using the LCD monitor. 3. As the ASR ...


