User Guide
Page 2
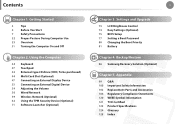
Settings and Upgrade 73 LCD Brightness Control 74 Easy Settings (Optional) 75 BIOS Setup 77 Setting a Boot Password 80 Changing the Boot Priority 81 Battery Chapter 4. Contents Chapter 1. Backup/Restore 86 Samsung Recovery Solution (Optional) Chapter 5. Using the Computer 34 Keyboard 37 Touchpad 42 External-type CD drive (ODD, To be purchased) 44...
Settings and Upgrade 73 LCD Brightness Control 74 Easy Settings (Optional) 75 BIOS Setup 77 Setting a Boot Password 80 Changing the Boot Priority 81 Battery Chapter 4. Contents Chapter 1. Backup/Restore 86 Samsung Recovery Solution (Optional) Chapter 5. Using the Computer 34 Keyboard 37 Touchpad 42 External-type CD drive (ODD, To be purchased) 44...
User Guide
Page 4
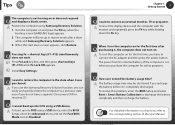
... press the power button. A To turn on for the first time, you purchase the computer for the first time after a short while and Samsung Recovery Solution appears. 3. A The battery usage time may be shortened if you recharge the battery before it is cut when you have a separate..., select the Advanced menu and set the Fast BIOS Mode item to Disabled. Turn the computer on or does not respond Q and displays a blank screen. A To boot up into DOS using Samsung Recovery Solution. 1. Q I extend the battery usage time? When I want to the corresponding section of the computer is...
... press the power button. A To turn on for the first time, you purchase the computer for the first time after a short while and Samsung Recovery Solution appears. 3. A The battery usage time may be shortened if you recharge the battery before it is cut when you have a separate..., select the Advanced menu and set the Fast BIOS Mode item to Disabled. Turn the computer on or does not respond Q and displays a blank screen. A To boot up into DOS using Samsung Recovery Solution. 1. Q I extend the battery usage time? When I want to the corresponding section of the computer is...

User Guide
Page 7
... Memory Capacity Representation The memory capacity reported in capacity calculation. (E.g. This is less than the actual capacity due to the difference in Windows is because BIOS or a video adapter uses a portion of memory or claims it for further use. (E.g. However, the operating system (Windows) calculates the storage device capacity assuming that...
... Memory Capacity Representation The memory capacity reported in capacity calculation. (E.g. This is less than the actual capacity due to the difference in Windows is because BIOS or a video adapter uses a portion of memory or claims it for further use. (E.g. However, the operating system (Windows) calculates the storage device capacity assuming that...
User Guide
Page 63
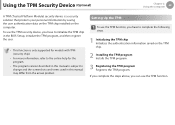
... the actual product. Using the TPM Security Device (Optional) Chapter 2. To use the TPM security device, you have to initialize the TPM chip in the BIOS Setup, initialize the TPM program, and then register the user. • This function is only supported for models with TPM (security chip). • For more...
... the actual product. Using the TPM Security Device (Optional) Chapter 2. To use the TPM security device, you have to initialize the TPM chip in the BIOS Setup, initialize the TPM program, and then register the user. • This function is only supported for models with TPM (security chip). • For more...
User Guide
Page 64
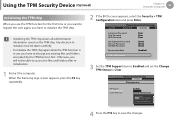
... first. Using the computer 63 Initializing the TPM chip When you use , you have to save the changes. When the Samsung logo screen appears, press the F2 key repeatedly. 2 If the BIOS screen appears, select the Security > TPM Configuration item and press Enter. Otherwise, you will not be taken carefully. • To...
... first. Using the computer 63 Initializing the TPM chip When you use , you have to save the changes. When the Samsung logo screen appears, press the F2 key repeatedly. 2 If the BIOS screen appears, select the Security > TPM Configuration item and press Enter. Otherwise, you will not be taken carefully. • To...
User Guide
Page 73
Chapter 3. Settings and Upgrade LCD Brightness Control 73 Easy Settings (Optional) 74 BIOS Setup 75 Setting a Boot Password 77 Changing the Boot Priority 80 Battery 81
Chapter 3. Settings and Upgrade LCD Brightness Control 73 Easy Settings (Optional) 74 BIOS Setup 75 Setting a Boot Password 77 Changing the Boot Priority 80 Battery 81
User Guide
Page 76
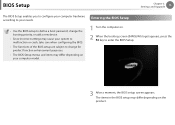
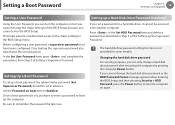
...malfunction or crash, take care when configuring the BIOS. • The functions of the BIOS setup are subject to change for product function enhancement purposes. • The BIOS Setup menus and items may differ depending on . 2 When the booting screen (SAMSUNG logo) appears, press the F2 key to... define a boot password, change the booting priority, or add a new device. • Since incorrect settings may cause your computer model. 1 Turn the computer on the product. Settings and Upgrade 75 The BIOS Setup enables you to...
...malfunction or crash, take care when configuring the BIOS. • The functions of the BIOS setup are subject to change for product function enhancement purposes. • The BIOS Setup menus and items may differ depending on . 2 When the booting screen (SAMSUNG logo) appears, press the F2 key to... define a boot password, change the booting priority, or add a new device. • Since incorrect settings may cause your computer model. 1 Turn the computer on the product. Settings and Upgrade 75 The BIOS Setup enables you to...

User Guide
Page 77
Settings and Upgrade 76 The BIOS Setup Screen The BIOS Setup menus and items may differ from the actual keyboard. Press to configure security functions, including passwords. Security Used to load the default Setup settings. ... is a description about the basic specifications of the computer. The keyboard image may differ depending on your computer model. Exit Used to the Exit menu. BIOS Setup Chapter 3. F1 Up & Down Keys F5/F6 F9 ESC Press to save the changes and exit Setup. Advanced Using this menu, you to enter...
Settings and Upgrade 76 The BIOS Setup Screen The BIOS Setup menus and items may differ from the actual keyboard. Press to configure security functions, including passwords. Security Used to load the default Setup settings. ... is a description about the basic specifications of the computer. The keyboard image may differ depending on your computer model. Exit Used to the Exit menu. BIOS Setup Chapter 3. F1 Up & Down Keys F5/F6 F9 ESC Press to save the changes and exit Setup. Advanced Using this menu, you to enter...

User Guide
Page 78
... to enter the password when you need to enter the BIOS Setup. For some models, if the password entered message appears in the BIOS Setup. By configuring a password, you turn the computer on or enter the BIOS Setup. Setting a Supervisor Password If you set a Supervisor... Password, you turn the computer on or to request assistance from actual product depending on or enter the BIOS Setup. Setting a Boot Password Chapter 3. XXXXXXXX 2 In the Set Supervisor Password item, press . • The password setting provides the following 3...
... to enter the password when you need to enter the BIOS Setup. For some models, if the password entered message appears in the BIOS Setup. By configuring a password, you turn the computer on or enter the BIOS Setup. Setting a Supervisor Password If you set a Supervisor... Password, you turn the computer on or to request assistance from actual product depending on or enter the BIOS Setup. Setting a Boot Password Chapter 3. XXXXXXXX 2 In the Set Supervisor Password item, press . • The password setting provides the following 3...
User Guide
Page 79
...;• Changing the hard disk drive password For security purposes, you set in advance. Be sure to Enabled. If you cannot enter the BIOS Setup. Before configuring a user password, a supervisor password must have to enter a password to boot up a Hard Disk Drive Password (Optional... the computer by pressing the computer Power button. Press in the Set HDD Password item and define a password as described in the BIOS Setup menu. Deactivating the supervisor password also deactivates the user password. Setting up the computer. Setting a Boot Password Chapter 3. Setting ...
...;• Changing the hard disk drive password For security purposes, you set in advance. Be sure to Enabled. If you cannot enter the BIOS Setup. Before configuring a user password, a supervisor password must have to enter a password to boot up a Hard Disk Drive Password (Optional... the computer by pressing the computer Power button. Press in the Set HDD Password item and define a password as described in the BIOS Setup menu. Deactivating the supervisor password also deactivates the user password. Setting up the computer. Setting a Boot Password Chapter 3. Setting ...

User Guide
Page 81
... Boot Priority Chapter 3. The highest boot priority device is now set the Fast BIOS Mode item to Disabled. Settings and Upgrade 80 3 As an example, the procedures...Hard Drive. XXXXXXXX 2 Press on the computer model and driver version. 1 Select the Boot menu in the BIOS Setup. Press the down key (↓) to move to the SATA HDD item and press the F6 key ...to the top item. USB FDD : N/A 4. If you need to boot to DOS using a USB device, enter the BIOS Setup, select the Advanced menu and set to the hard disk drive are described below. The screen images and terms may ...
... Boot Priority Chapter 3. The highest boot priority device is now set the Fast BIOS Mode item to Disabled. Settings and Upgrade 80 3 As an example, the procedures...Hard Drive. XXXXXXXX 2 Press on the computer model and driver version. 1 Select the Boot menu in the BIOS Setup. Press the down key (↓) to move to the SATA HDD item and press the F6 key ...to the top item. USB FDD : N/A 4. If you need to boot to DOS using a USB device, enter the BIOS Setup, select the Advanced menu and set to the hard disk drive are described below. The screen images and terms may ...
User Guide
Page 85
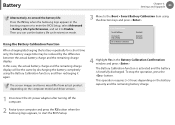
...Battery Calibration item using the Battery Calibration function, and then recharging it to start the BIOS Setup. Settings and Upgrade 84 Alternatively, to extend the battery life Press the F2 key when the Samsung logo appears in the Battery Calibration Confirmation window and press . In this case, ... charge. 1 Disconnect the AC power adapter after turning off the computer. 2 Restart your computer and press the F2 button when the Samsung logo appears, to Enable. The Battery Calibration function is activated and the battery is forcefully discharged. To stop the operation, press the button...
...Battery Calibration item using the Battery Calibration function, and then recharging it to start the BIOS Setup. Settings and Upgrade 84 Alternatively, to extend the battery life Press the F2 key when the Samsung logo appears in the Battery Calibration Confirmation window and press . In this case, ... charge. 1 Disconnect the AC power adapter after turning off the computer. 2 Restart your computer and press the F2 button when the Samsung logo appears, to Enable. The Battery Calibration function is activated and the battery is forcefully discharged. To stop the operation, press the button...

User Guide
Page 129
Index A AP B Battery BIOS Setup Booting Priority C CD Drive Charge Click D Double-Click Drag Dual View L LCD Brightness M 59 Monitor Connection / Output Multi Card Slot 81 O 75 Overview 80 P Password 42 Product Specifications 81 38 R Recorder 38 S 38 Safety Precautions 48 Samsung Recovery Solution Scroll Shortcut Key 73 Status Indicators Supervisor Password T 47 Touchpad 44 U User Password 25 V Volume Control 77 122 W Wired Network Wireless Network 54 7 86 40 34 26 77 Chapter 5 Appendix 128 37 78 54 56 59
Index A AP B Battery BIOS Setup Booting Priority C CD Drive Charge Click D Double-Click Drag Dual View L LCD Brightness M 59 Monitor Connection / Output Multi Card Slot 81 O 75 Overview 80 P Password 42 Product Specifications 81 38 R Recorder 38 S 38 Safety Precautions 48 Samsung Recovery Solution Scroll Shortcut Key 73 Status Indicators Supervisor Password T 47 Touchpad 44 U User Password 25 V Volume Control 77 122 W Wired Network Wireless Network 54 7 86 40 34 26 77 Chapter 5 Appendix 128 37 78 54 56 59


