User Guide
Page 2
...Card Slot (Optional) 47 Connecting an External Display Device 53 Connecting an External Digital Device 54 Adjusting the Volume 56 Wired Network 59 Wireless Network (Optional) 62 Using the TPM Security Device (Optional) 71 Software Launcher (Optional) Chapter 1 Getting Started 1 Chapter 3. Backup/Restore 86 Samsung Recovery Solution (Optional) Chapter 5. Getting Started 3 Tips 4 Before You Start 7 Safety Precautions 22 Proper Posture During Computer Use 25 Overview 31 Turning the Computer On and Off Chapter 2. Settings and Upgrade 73 LCD Brightness Control 74 Easy Settings (Optional) 75 BIOS...
...Card Slot (Optional) 47 Connecting an External Display Device 53 Connecting an External Digital Device 54 Adjusting the Volume 56 Wired Network 59 Wireless Network (Optional) 62 Using the TPM Security Device (Optional) 71 Software Launcher (Optional) Chapter 1 Getting Started 1 Chapter 3. Backup/Restore 86 Samsung Recovery Solution (Optional) Chapter 5. Getting Started 3 Tips 4 Before You Start 7 Safety Precautions 22 Proper Posture During Computer Use 25 Overview 31 Turning the Computer On and Off Chapter 2. Settings and Upgrade 73 LCD Brightness Control 74 Easy Settings (Optional) 75 BIOS...
User Guide
Page 4
... problem, enter the BIOS Setup and select Boot > Smart Battery Calibration to Disabled. The computer will boot up into DOS using a USB device. A2 Install Easy Settings. Q I want to restore the computer to a previous state even if you have a separate OS recovery DVD or recovery CD. Q I cannot boot up into DOS using Samsung Recovery Solution. 1. A To boot up in restore mode after Q purchasing it is not turning on a function, refer to connect an external monitor, TV or projector. A The battery...
... problem, enter the BIOS Setup and select Boot > Smart Battery Calibration to Disabled. The computer will boot up into DOS using a USB device. A2 Install Easy Settings. Q I want to restore the computer to a previous state even if you have a separate OS recovery DVD or recovery CD. Q I cannot boot up into DOS using Samsung Recovery Solution. 1. A To boot up in restore mode after Q purchasing it is not turning on a function, refer to connect an external monitor, TV or projector. A The battery...
User Guide
Page 17
... Samsung Repair Centers will carry out safety checks after repairing the product. In case of electric shock. Close the LCD panel only after checking if the notebook computer is a danger of fire. Safety Precautions Chapter 1 Getting Started 16 Caution Failure to follow the instructions on the manual supplied with a grounding part. Use a wall outlet or multi-plug with the parts. Connect only permitted devices...
... Samsung Repair Centers will carry out safety checks after repairing the product. In case of electric shock. Close the LCD panel only after checking if the notebook computer is a danger of fire. Safety Precautions Chapter 1 Getting Started 16 Caution Failure to follow the instructions on the manual supplied with a grounding part. Use a wall outlet or multi-plug with the parts. Connect only permitted devices...
User Guide
Page 24
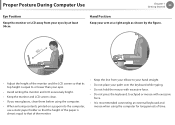
... During Computer Use Chapter 1 Getting Started 23 Eye Position Keep the monitor or LCD away from your palm over the keyboard while typing. • Do not hold the mouse with excessive force. • Do not press the keyboard, touchpad or mouse with excessive force. • It is recommended connecting an external keyboard and mouse when using the computer for long periods of the monitor. • Keep...
... During Computer Use Chapter 1 Getting Started 23 Eye Position Keep the monitor or LCD away from your palm over the keyboard while typing. • Do not hold the mouse with excessive force. • Do not press the keyboard, touchpad or mouse with excessive force. • It is recommended connecting an external keyboard and mouse when using the computer for long periods of the monitor. • Keep...

User Guide
Page 29
... charge a USB device. 2 Chargeable USB 3.0 Port When the AC adapter is optimized for Windows 7. The USB 3.0 feature is connected, it may be used to the computer. Micro Digital 3 Video / Audio Port (Micro HDMI) (Optional) This is running on battery power reduces the battery usage time. • The user cannot evaluate the charging status of whether the power is turned on or o . • Charging a device through a chargeable USB port may take longer than general charging. • Using the Chargeable USB function...
... charge a USB device. 2 Chargeable USB 3.0 Port When the AC adapter is optimized for Windows 7. The USB 3.0 feature is connected, it may be used to the computer. Micro Digital 3 Video / Audio Port (Micro HDMI) (Optional) This is running on battery power reduces the battery usage time. • The user cannot evaluate the charging status of whether the power is turned on or o . • Charging a device through a chargeable USB port may take longer than general charging. • Using the Chargeable USB function...

User Guide
Page 30
... using the LAN adapter (Optional). 6 Microphone You can enjoy digital video and audio by selecting the Easy Settings > General > USB Charging option. (Optional) 1 DC Jack A jack to connect the AC adapter that can be inconvenient to this case, purchase and use a USB extension cable or use the USB ports on or o . • Charging a device through a chargeable USB port may be used to the computer. Micro Digital 4 Video / Audio Port (Micro HDMI) (Optional) This is running on battery power reduces the battery usage time. • The user...
... using the LAN adapter (Optional). 6 Microphone You can enjoy digital video and audio by selecting the Easy Settings > General > USB Charging option. (Optional) 1 DC Jack A jack to connect the AC adapter that can be inconvenient to this case, purchase and use a USB extension cable or use the USB ports on or o . • Charging a device through a chargeable USB port may be used to the computer. Micro Digital 4 Video / Audio Port (Micro HDMI) (Optional) This is running on battery power reduces the battery usage time. • The user...

User Guide
Page 36
... off . Silent Mode Reduces the Fan noise so that users can use the buttons in a bright location, the "The keyboard backlight brightness cannot be changed due to turn the Touchpad off , you use the computer without hearing noise. Keyboard Backlight Brightness Control • If you can turn the audio on , select Easy Settings > General > Keyboard Backlight and adjust the backlight brightness. When using an external mouse only, you can manually control the brightness of the keyboard backlight. When it...
... off . Silent Mode Reduces the Fan noise so that users can use the buttons in a bright location, the "The keyboard backlight brightness cannot be changed due to turn the Touchpad off , you use the computer without hearing noise. Keyboard Backlight Brightness Control • If you can turn the audio on , select Easy Settings > General > Keyboard Backlight and adjust the backlight brightness. When using an external mouse only, you can manually control the brightness of the keyboard backlight. When it...
User Guide
Page 37
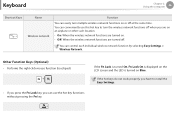
... Easy Settings. If the Fn Lock is turned On, Fn Lock On is displayed on the LCD screen and the LED is turned on or off . You can control each individual wireless network function by selecting Easy Settings > Wireless Network. You can conveniently use the hot key functions without pressing the Fn key. Other Function Keys (Optional) • Performs the right-click mouse function (touchpad). + • If you press the Fn Lock key, you have to turn multiple wireless network functions on Blue. Keyboard...
... Easy Settings. If the Fn Lock is turned On, Fn Lock On is displayed on the LCD screen and the LED is turned on or off . You can control each individual wireless network function by selecting Easy Settings > Wireless Network. You can conveniently use the hot key functions without pressing the Fn key. Other Function Keys (Optional) • Performs the right-click mouse function (touchpad). + • If you press the Fn Lock key, you have to turn multiple wireless network functions on Blue. Keyboard...

User Guide
Page 49
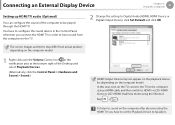
..., to set up dual view: Open the Display Settings window in the Control Panel, select Monitor 2 and select the Expand to fit to this monitor checkbox to set dual view. Connecting an External Display Device 2 Connect the VGA cable (15-pin) to the connected VGA adapter and then connect the other end of the VGA cable to the VGA port of the connected monitor, TV or projector and turn the power on. 4 Press the + key combination...
..., to set up dual view: Open the Display Settings window in the Control Panel, select Monitor 2 and select the Expand to fit to this monitor checkbox to set dual view. Connecting an External Display Device 2 Connect the VGA cable (15-pin) to the connected VGA adapter and then connect the other end of the VGA cable to the VGA port of the connected monitor, TV or projector and turn the power on. 4 Press the + key combination...
User Guide
Page 50
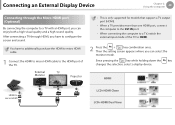
... the key changes the selection, select a display device. You have to a TV, switch the external input mode of the TV. Connecting an External Display Device Chapter 2. Then the setting screen appears where you have to additionally purchase the HDMI to micro HDMI cable. 1 Connect the HDMI to micro HDMI cable to the HDMI port of the TV to HDMI. 2 Press the + key combination once. External Monitor TV Projector • This is only supported for models that support a TV output port (HDMI...
... the key changes the selection, select a display device. You have to a TV, switch the external input mode of the TV. Connecting an External Display Device Chapter 2. Then the setting screen appears where you have to additionally purchase the HDMI to micro HDMI cable. 1 Connect the HDMI to micro HDMI cable to the HDMI port of the TV to HDMI. 2 Press the + key combination once. External Monitor TV Projector • This is only supported for models that support a TV output port (HDMI...
User Guide
Page 52
... configure the sound device in the Control Panel whenever you connect the HDMI TV in order to hear sound from actual product depending on the computer model. 2 Change the setting to Digital Audio (HDMI), HDMI Device or Digital Output Device, click Set Default and click OK. 1 Right-click over the Volume Control icon in the notification area at the bottom right of the computer to HDMI or LCD+HDMI Clone or LCD+HDMI DualView mode using a HDMI cable and then switch...
... configure the sound device in the Control Panel whenever you connect the HDMI TV in order to hear sound from actual product depending on the computer model. 2 Change the setting to Digital Audio (HDMI), HDMI Device or Digital Output Device, click Set Default and click OK. 1 Right-click over the Volume Control icon in the notification area at the bottom right of the computer to HDMI or LCD+HDMI Clone or LCD+HDMI DualView mode using a HDMI cable and then switch...
User Guide
Page 54
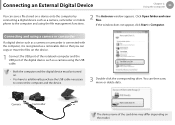
... If a digital device such as a camera or camcorder is connected with the computer, it is recognized as a removable disk so that you can then save, move the files on the device. 1 Connect the USB port of the notebook computer and the USB port of the card drive may differ depending on the model. Click Open folder and view files. If the window does not appear, click Start > Computer...
... If a digital device such as a camera or camcorder is connected with the computer, it is recognized as a removable disk so that you can then save, move the files on the device. 1 Connect the USB port of the notebook computer and the USB port of the card drive may differ depending on the model. Click Open folder and view files. If the window does not appear, click Start > Computer...
User Guide
Page 61
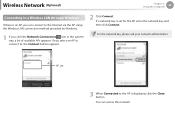
... can access the network. If a network key is displayed, click the Close button. AP List 3 When Connected to the AP is set for the AP, enter the network key and then click Connect. For the network key, please ask your network administrator. You can connect to , the Connect button appears. 2 Click Connect. Wireless Network (Optional) Chapter 2. Using the computer 60 Connecting to a Wireless LAN through Windows If there is an AP, you select an AP to connect to the Internet...
... can access the network. If a network key is displayed, click the Close button. AP List 3 When Connected to the AP is set for the AP, enter the network key and then click Connect. For the network key, please ask your network administrator. You can connect to , the Connect button appears. 2 Click Connect. Wireless Network (Optional) Chapter 2. Using the computer 60 Connecting to a Wireless LAN through Windows If there is an AP, you select an AP to connect to the Internet...
User Guide
Page 74
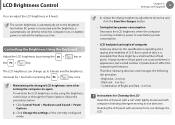
... cloth lightly moistened with excessive force can change up to save battery power consumption. • LCD bad pixels principle of computer Samsung observes the specifications regarding strict quality and reliability of LCD. The screen brightness is automatically set by pressing the + the + key. Controlling the Brightness Using the Keyboard Adjust the LCD brightness by using the brightness control keys or through the Power Options, follow the procedures below. 1. Adjust the display brightness adjustment menu bar and click the Save the changes button...
... cloth lightly moistened with excessive force can change up to save battery power consumption. • LCD bad pixels principle of computer Samsung observes the specifications regarding strict quality and reliability of LCD. The screen brightness is automatically set by pressing the + the + key. Controlling the Brightness Using the Keyboard Adjust the LCD brightness by using the brightness control keys or through the Power Options, follow the procedures below. 1. Adjust the display brightness adjustment menu bar and click the Save the changes button...
User Guide
Page 75
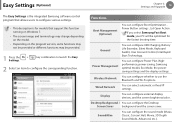
Wireless Network You can configure external display devices, and the screen brightness/color. Display You can configure whether to use the Bluetooth and Wi-Fi options. General You can select automatic or fixed IP settings. Wired Network You can configure USB Charging, Battery Life Extender, Silent Mode, Keyboard backlit, User Account Control, Intel Rapid Start Technology. SoundAlive You can configure the Desktop Screen Saver background and the screen saver. Desktop Background / You can configure the sound mode (Music, Classic, Concert Hall, Movie...
Wireless Network You can configure external display devices, and the screen brightness/color. Display You can configure whether to use the Bluetooth and Wi-Fi options. General You can select automatic or fixed IP settings. Wired Network You can configure USB Charging, Battery Life Extender, Silent Mode, Keyboard backlit, User Account Control, Intel Rapid Start Technology. SoundAlive You can configure the Desktop Screen Saver background and the screen saver. Desktop Background / You can configure the sound mode (Music, Classic, Concert Hall, Movie...

User Guide
Page 78
... password has been set a password, you turn the computer on or enter the BIOS Setup. You can be charged. • When you forget the User Password, you can disable the Supervisor Password, and the User Password is pressed. The supervisor password is not very secure. The password can use an HDD Password as well to authorized users only and protect data and files saved on the computer model and driver version. By configuring a password...
... password has been set a password, you turn the computer on or enter the BIOS Setup. You can be charged. • When you forget the User Password, you can disable the Supervisor Password, and the User Password is pressed. The supervisor password is not very secure. The password can use an HDD Password as well to authorized users only and protect data and files saved on the computer model and driver version. By configuring a password...
User Guide
Page 79
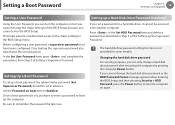
... Security > HDD Password, press the Power button to the major settings in the BIOS Setup menu. Setting a Boot Password Chapter 3. Before configuring a user password, a supervisor password must have to enter a password to boot up the Supervisor Password. •• The hard disk drive password setting function is set a password for later use. Once a boot password is not provided for some models. •• Changing the hard disk drive password For security purposes, you can turn the computer on boot item to remember the password for a hard disk drive, it cannot be set in...
... Security > HDD Password, press the Power button to the major settings in the BIOS Setup menu. Setting a Boot Password Chapter 3. Before configuring a user password, a supervisor password must have to enter a password to boot up the Supervisor Password. •• The hard disk drive password setting function is set a password for later use. Once a boot password is not provided for some models. •• Changing the hard disk drive password For security purposes, you can turn the computer on boot item to remember the password for a hard disk drive, it cannot be set in...
User Guide
Page 85
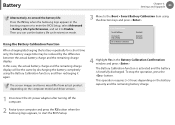
... charge display. This operation requires 3~5 hours depending on the computer model and driver version. 3 Move to the Boot > Smart Battery Calibration item using the Battery Calibration function, and then recharging it to start the BIOS Setup. Settings and Upgrade 84 Alternatively, to extend the battery life Press the F2 key when the Samsung logo appears in the Battery Calibration Confirmation window and press . Then you can use the battery life cycle extension mode...
... charge display. This operation requires 3~5 hours depending on the computer model and driver version. 3 Move to the Boot > Smart Battery Calibration item using the Battery Calibration function, and then recharging it to start the BIOS Setup. Settings and Upgrade 84 Alternatively, to extend the battery life Press the F2 key when the Samsung logo appears in the Battery Calibration Confirmation window and press . Then you can use the battery life cycle extension mode...

User Guide
Page 126
To play a DVD, a DVD drive is required. When canceling Hibernation Mode, all application programs that users can be slim. A LAN enables all data in the early 1980s. Windows Vista uses TCP/IP as within a local area such as the default protocol. LCD (Liquid Crystal Display) There are the same as that saves all connected devices to protect an internal network or intranet from external networks through an authentication procedure. Firewall...
To play a DVD, a DVD drive is required. When canceling Hibernation Mode, all application programs that users can be slim. A LAN enables all data in the early 1980s. Windows Vista uses TCP/IP as within a local area such as the default protocol. LCD (Liquid Crystal Display) There are the same as that saves all connected devices to protect an internal network or intranet from external networks through an authentication procedure. Firewall...
User Guide
Page 128
... a serial interface standard developed to setting a resource of the interface standards used . Windows Media Player A multimedia program included with Windows. The data transmission specifications are not being used to connect a computer to the hard disk. Server In general, a server refers to a computer that other users on the computer memory is not saved to peripheral devices. When a computer is in memory will be lost. Sleep Mode A power mode that supports over...
... a serial interface standard developed to setting a resource of the interface standards used . Windows Media Player A multimedia program included with Windows. The data transmission specifications are not being used to connect a computer to the hard disk. Server In general, a server refers to a computer that other users on the computer memory is not saved to peripheral devices. When a computer is in memory will be lost. Sleep Mode A power mode that supports over...


