
User Manual Windows 8 Ver.1.2 (English)
Page 2
... Boot Password 96 Changing the Boot Priority 97 Upgrading Memory (Optional) 100 Battery Chapter 5. Appendix 120 Important Safety Information 122 Replacement Parts and Accessories 124 Regulatory Compliance Statements 140 WEEE Symbol Information 141 Samsung Packaging Take-Back Program 142 TCO Certified 143... (Optional) 74 Using the TPM Security Device (Optional) Chapter 1 Getting Started 1 83 Using the Multimedia App (Optional) 87 Samsung Software Update 88 Diagnosing the Computer Status and Troubleshooting 89 Using the Slim Security Slot Chapter 4. Contents Chapter 1. Getting Started 3 ...
... Boot Password 96 Changing the Boot Priority 97 Upgrading Memory (Optional) 100 Battery Chapter 5. Appendix 120 Important Safety Information 122 Replacement Parts and Accessories 124 Regulatory Compliance Statements 140 WEEE Symbol Information 141 Samsung Packaging Take-Back Program 142 TCO Certified 143... (Optional) 74 Using the TPM Security Device (Optional) Chapter 1 Getting Started 1 83 Using the Multimedia App (Optional) 87 Samsung Software Update 88 Diagnosing the Computer Status and Troubleshooting 89 Using the Slim Security Slot Chapter 4. Contents Chapter 1. Getting Started 3 ...
User Manual Windows 8 Ver.1.2 (English)
Page 91
Settings and Upgrade BIOS Setup 91 Setting a Boot Password 93 Changing the Boot Priority 96 Upgrading Memory (Optional) 97 Battery 100 Chapter 4.
Settings and Upgrade BIOS Setup 91 Setting a Boot Password 93 Changing the Boot Priority 96 Upgrading Memory (Optional) 97 Battery 100 Chapter 4.

User Manual Windows 8 Ver.1.2 (English)
Page 93
... the major chipsets and additional functions. Setup Menu System Time > System Date > SATA Port 1 CPU Vender CPU Type Core CPU Speed CPU VT (VT-x) Total Memory BIOS Version MICOM Version SanDisk SSD U100 126GB Intel(R) Core(TM) i5-3317U CPU 1.70 GHz Supported 4096 MB E00AAT.017.120804.dg E00AAT.017... Aptio Setup Utility - Copy (C) 2012 American Megatrends, Inc. Settings and Upgrade 92 Setup Menu SysInfo Description This is a description about the basic specifications of the computer. Setup Items Chapter 4.
... the major chipsets and additional functions. Setup Menu System Time > System Date > SATA Port 1 CPU Vender CPU Type Core CPU Speed CPU VT (VT-x) Total Memory BIOS Version MICOM Version SanDisk SSD U100 126GB Intel(R) Core(TM) i5-3317U CPU 1.70 GHz Supported 4096 MB E00AAT.017.120804.dg E00AAT.017... Aptio Setup Utility - Copy (C) 2012 American Megatrends, Inc. Settings and Upgrade 92 Setup Menu SysInfo Description This is a description about the basic specifications of the computer. Setup Items Chapter 4.
User Manual Windows 8 Ver.1.2 (English)
Page 98
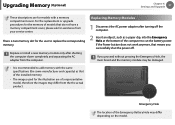
... the images may differ from the the actual product. For the replacement or upgrade procedures for assistance from the computer. Settings and Upgrade 97 These descriptions are of the Emergency Battery Hole may be damaged. •• It is two memory slot for models with the same specifications (the same manufacturer and capacity...
... the images may differ from the the actual product. For the replacement or upgrade procedures for assistance from the computer. Settings and Upgrade 97 These descriptions are of the Emergency Battery Hole may be damaged. •• It is two memory slot for models with the same specifications (the same manufacturer and capacity...

User Manual Windows 8 Ver.1.2 (English)
Page 99
... and Upgrade 98 3 Remove the screw on . Fixing Screw Memory Compartment Cover 4 Insert a new memory module into the memory slot at the bottom of the computer using a screw driver. 5 Push the memory module down while pulling the memory module latches outward. Memory Slot Memory Module Latches 6 Close the memory compartment cover...not be turned on even if you press the power button. If the memory does not fit easily, push the memory module down so that it to turn the computer on the memory compartment cover at an angle of the memory slot. Upgrading Memory (Optional) Chapter 4.
... and Upgrade 98 3 Remove the screw on . Fixing Screw Memory Compartment Cover 4 Insert a new memory module into the memory slot at the bottom of the computer using a screw driver. 5 Push the memory module down while pulling the memory module latches outward. Memory Slot Memory Module Latches 6 Close the memory compartment cover...not be turned on even if you press the power button. If the memory does not fit easily, push the memory module down so that it to turn the computer on the memory compartment cover at an angle of the memory slot. Upgrading Memory (Optional) Chapter 4.

User Manual Windows 8 Ver.1.2 (English)
Page 100
When you replace the memory module, make sure that you do not remove the film. Special film Chapter 4. Settings and Upgrade 99 Upgrading Memory (Optional) Removing a memory module Pull the memory module latches outward. For some models, a special film is attached onto the memory module to enhance the wireless LAN performance. Remove the memory module out at an angle of 30 degrees. The memory module will pop up.
When you replace the memory module, make sure that you do not remove the film. Special film Chapter 4. Settings and Upgrade 99 Upgrading Memory (Optional) Removing a memory module Pull the memory module latches outward. For some models, a special film is attached onto the memory module to enhance the wireless LAN performance. Remove the memory module out at an angle of 30 degrees. The memory module will pop up.


