
User Manual
Page 11
2 Installing the Product 2-1 Package Contents • Unpack the product and check if all of the following contents have been included. • Store the packaging box in case you need to move the Product at a later stage. Monitor CONTENTS Installation Manual Product Warranty User Manual OPTIONAL PARTS Power Cord Keyboard (USB) Mouse (USB) D-Sub Cable 2-2 Installing the Stand Before assembling the product, place the product down on a flat and stable surface so that the screen is facing downwards. 2-1 Installing the Product
2 Installing the Product 2-1 Package Contents • Unpack the product and check if all of the following contents have been included. • Store the packaging box in case you need to move the Product at a later stage. Monitor CONTENTS Installation Manual Product Warranty User Manual OPTIONAL PARTS Power Cord Keyboard (USB) Mouse (USB) D-Sub Cable 2-2 Installing the Stand Before assembling the product, place the product down on a flat and stable surface so that the screen is facing downwards. 2-1 Installing the Product
User Manual
Page 14
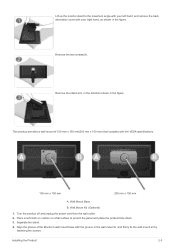
... stand arm in the direction shown in the wall mount ki and firmly fix the wall mount kit by fastening the screws. Wall Mount Kit (Optional) 1. Lift up the monitor stand to protect the panel and place the product face down. 3. Wall Mount Base B.
... stand arm in the direction shown in the wall mount ki and firmly fix the wall mount kit by fastening the screws. Wall Mount Kit (Optional) 1. Lift up the monitor stand to protect the panel and place the product face down. 3. Wall Mount Base B.
User Manual
Page 35
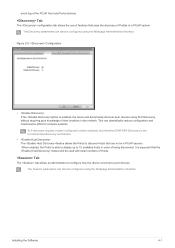
... The On Screen Display (OSD) local GUI (Portal only) is displayed to the user when the device is powered on startup. The Options Window provides a subset of the functionality provided by the Administrative Web Interface described in progress. The Connect Screen also allows access to a ...host device via the Connect Screen. The OSD provides a mechanism to connect to the Options Window. An administrative password is accessible through the button on the Connect Screen. Installing the Software 4-1 The Connect Screen is presented to...
... The On Screen Display (OSD) local GUI (Portal only) is displayed to the user when the device is powered on startup. The Options Window provides a subset of the functionality provided by the Administrative Web Interface described in progress. The Connect Screen also allows access to a ...host device via the Connect Screen. The OSD provides a mechanism to connect to the Options Window. An administrative password is accessible through the button on the Connect Screen. Installing the Software 4-1 The Connect Screen is presented to...

User Manual
Page 37
Figure 2-5: OSD Menu Installing the Software 4-1 The OSD menu contains: • • • • • Selecting one of the selections will produce a list of selections. Figure 2-4: OSD Connect Screen (Connecting) OSD Menu Selecting the menu will produce a settings window.
Figure 2-5: OSD Menu Installing the Software 4-1 The OSD menu contains: • • • • • Selecting one of the selections will produce a list of selections. Figure 2-4: OSD Connect Screen (Connecting) OSD Menu Selecting the menu will produce a settings window.

User Manual
Page 39
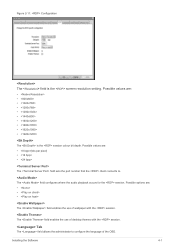
...Host or Portal. The Portal Label parameters can also be appended, e.g. Tab The tab allows an administrator to operate at or . switch, is optional. If DHCP is enabled, this field is the device's gateway IP address. If used , e.g. 'domain.local'. Installing the Software 4-1 Figure 2-7:... This field is the device's primary DNS IP address. If DHCP is disabled, this field is not editable. • The field is optional. The options are: • • • Administrators should always set the to give the Host or Portal a logical name. • The field...
...Host or Portal. The Portal Label parameters can also be appended, e.g. Tab The tab allows an administrator to operate at or . switch, is optional. If DHCP is enabled, this field is the device's gateway IP address. If used , e.g. 'domain.local'. Installing the Software 4-1 Figure 2-7:... This field is the device's primary DNS IP address. If DHCP is disabled, this field is not editable. • The field is optional. The options are: • • • Administrators should always set the to give the Host or Portal a logical name. • The field...
User Manual
Page 40
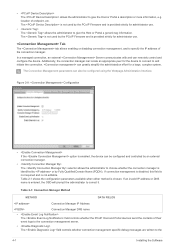
... to specify the IP address of endpoint, etc. Additionally, the connection manager can locate an appropriate peer for administrator use . Figure 2-8: Configuration • If the option is provided strictly for a large, complex system. • The allows the administrator to give the Host or Portal a generic tag information. The is not used...
... to specify the IP address of endpoint, etc. Additionally, the connection manager can locate an appropriate peer for administrator use . Figure 2-8: Configuration • If the option is provided strictly for a large, complex system. • The allows the administrator to give the Host or Portal a generic tag information. The is not used...
User Manual
Page 41
Figure 2-9: Configuration • If the option is expected that are not in a PCoIP session. Tab The tab allows an administrator to configure how the device connects to 10 available hosts in ...
Figure 2-9: Configuration • If the option is expected that are not in a PCoIP session. Tab The tab allows an administrator to configure how the device connects to 10 available hosts in ...
User Manual
Page 43
...; The is the screen resolution setting. The field configures where the audio playback occurs for the session. Tab The field allows the administrator to . Possible options are : • (bits per pixel) • • The field sets the port number that the client connects to configure the language of wallpaper with the...
...; The is the screen resolution setting. The field configures where the audio playback occurs for the session. Tab The field allows the administrator to . Possible options are : • (bits per pixel) • • The field sets the port number that the client connects to configure the language of wallpaper with the...
User Manual
Page 46
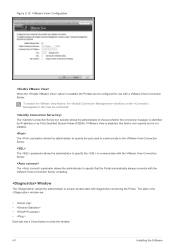
... Name (FQDN). The selector allows the administrator to specify that the Portal automatically always connects with diagnostics concerning the Portal. Figure 2-15: Configuration When the option is enabled, the Portals can be unchecked. The parameter allows the administrator to choose whether the connection manager is not editable. Window The allows the...
... Name (FQDN). The selector allows the administrator to specify that the Portal automatically always connects with diagnostics concerning the Portal. Figure 2-15: Configuration When the option is enabled, the Portals can be unchecked. The parameter allows the administrator to choose whether the connection manager is not editable. Window The allows the...

