User Manual
Page 2
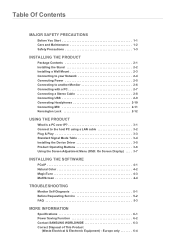
... 2-9 Connecting Headphones 2-10 Connecting MIC 2-11 Kensington Lock 2-12 USING THE PRODUCT What is a PC over IP 3-1 Connect to the host PC using a LAN cable 3-2 Plug & Play 3-3 Standard Signal Mode Table 3-4 Installing the Device Driver 3-5 Product Operating Buttons 3-6 Using the Screen Adjustment Menu (OSD: On Screen Display) . . . . 3-7 INSTALLING THE SOFTWARE PCoIP 4-1 Natural Color 4-2 MagicTune 4-3 MultiScreen 4-4 TROUBLESHOOTING Monitor Self-Diagnosis 5-1 Before Requesting Service 5-2 FAQ 5-3 MORE INFORMATION Specifications 6-1 Power Saving Function 6-2 Contact SAMSUNG...
... 2-9 Connecting Headphones 2-10 Connecting MIC 2-11 Kensington Lock 2-12 USING THE PRODUCT What is a PC over IP 3-1 Connect to the host PC using a LAN cable 3-2 Plug & Play 3-3 Standard Signal Mode Table 3-4 Installing the Device Driver 3-5 Product Operating Buttons 3-6 Using the Screen Adjustment Menu (OSD: On Screen Display) . . . . 3-7 INSTALLING THE SOFTWARE PCoIP 4-1 Natural Color 4-2 MagicTune 4-3 MultiScreen 4-4 TROUBLESHOOTING Monitor Self-Diagnosis 5-1 Before Requesting Service 5-2 FAQ 5-3 MORE INFORMATION Specifications 6-1 Power Saving Function 6-2 Contact SAMSUNG...

User Manual
Page 4
... a wet cloth. About persistent images • Displaying a still image for a long time, set the power-saving mode or screen saver. • Due to technological constraints of the LCD Panel manufacturer, the images generated by this product may appear either brighter or darker than normal by size: The number of Sub-Pixels = Max. 1-2 Care and Maintenance External Surface and Screen Maintenance Clean the product with a soft, damp...
... a wet cloth. About persistent images • Displaying a still image for a long time, set the power-saving mode or screen saver. • Due to technological constraints of the LCD Panel manufacturer, the images generated by this product may appear either brighter or darker than normal by size: The number of Sub-Pixels = Max. 1-2 Care and Maintenance External Surface and Screen Maintenance Clean the product with a soft, damp...
User Manual
Page 6
.... 1-3 Connect the power plug to a wall outlet that is heavier, install the product on the product. Ask an installation engineer or relevant company to install the product onto a wall. •...power off completely. Keep the plastic bags used to use the power cord of at a height where children may reach it may result in a problem with the product, you use the specified wall mount. You cannot cut the power off completely using only the power button on a flat and stable surface. Major Safety Precautions Make sure to pack the product away from the wall when installing...
.... 1-3 Connect the power plug to a wall outlet that is heavier, install the product on the product. Ask an installation engineer or relevant company to install the product onto a wall. •...power off completely. Keep the plastic bags used to use the power cord of at a height where children may reach it may result in a problem with the product, you use the specified wall mount. You cannot cut the power off completely using only the power button on a flat and stable surface. Major Safety Precautions Make sure to pack the product away from the wall when installing...

User Manual
Page 8
... damaged, turn the power off and unplug the power cord. Avoid placing objects such as wax, benzene, alcohol, thinner, mosquitorepellent, fragrance or lubricants when cleaning the product. If you drop the product or the case is easily scratched, be fixed, contact a service center. When thunder or lighting occurs, unplug the power cord and under no circumstance touch the antenna cable as this...
... damaged, turn the power off and unplug the power cord. Avoid placing objects such as wax, benzene, alcohol, thinner, mosquitorepellent, fragrance or lubricants when cleaning the product. If you drop the product or the case is easily scratched, be fixed, contact a service center. When thunder or lighting occurs, unplug the power cord and under no circumstance touch the antenna cable as this...

User Manual
Page 9
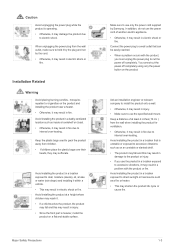
... turning the product upside down or move the product by holding only the stand. • This may cause the product to fall resulting in electric shock, fire or a problem with the product, electric shock or fire. Caution Displaying a still image for a long time, use the power-saving mode or set the screensaver to the moving the product by pulling the power cord...
... turning the product upside down or move the product by holding only the stand. • This may cause the product to fall resulting in electric shock, fire or a problem with the product, electric shock or fire. Caution Displaying a still image for a long time, use the power-saving mode or set the screensaver to the moving the product by pulling the power cord...
User Manual
Page 13
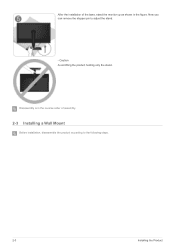
Now you can remove the stopper pin to the following steps. 2-3 Installing the Product Disassembly is in the figure. After the installation of the base, stand the monitor up as shown in the reverse order of assembly. 2-3 Installing a Wall Mount Before installation, disassemble the product according to adjust the stand. - Caution Avoid lifting the product holding only the stand.
Now you can remove the stopper pin to the following steps. 2-3 Installing the Product Disassembly is in the figure. After the installation of the base, stand the monitor up as shown in the reverse order of assembly. 2-3 Installing a Wall Mount Before installation, disassemble the product according to adjust the stand. - Caution Avoid lifting the product holding only the stand.
User Manual
Page 15
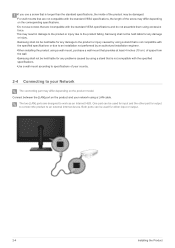
... to the product or injury caused by using a stand that is not compatible with the specified specifications or due to an installation not performed by an authorized installation engineer. •When installing the product using a wall mount, purchase a wall mount that provides at least 4 inches (10 cm) of space from the wall. •Samsung shall not be held liable for either input or output. 2-4 Installing the Product
... to the product or injury caused by using a stand that is not compatible with the specified specifications or due to an installation not performed by an authorized installation engineer. •When installing the product using a wall mount, purchase a wall mount that provides at least 4 inches (10 cm) of space from the wall. •Samsung shall not be held liable for either input or output. 2-4 Installing the Product

User Manual
Page 23
... the model and the manufacturer, for more information, refer to purchase an additional locking device. You can safely use it in public locations. Since the shape and usage of the product ( direction ( ). 2. Locking the product 1. You have to the User Manual supplied with the locking device. Connect the Kensington lock cable. 3. Tie the Kensington lock cable to lock the product so that enables users to...
... the model and the manufacturer, for more information, refer to purchase an additional locking device. You can safely use it in public locations. Since the shape and usage of the product ( direction ( ). 2. Locking the product 1. You have to the User Manual supplied with the locking device. Connect the Kensington lock cable. 3. Tie the Kensington lock cable to lock the product so that enables users to...
User Manual
Page 24
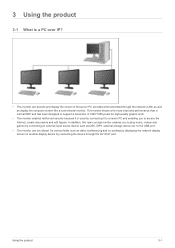
... has been designed to support a resolution of the server PC encoded and transmitted through the DVI OUT port. In addition, this new-concept monitor enables you to the USB port. • This monitor can decode and display the screen of 1920*1080 pixels for various fields such as video conferencing and co-working by displaying the network display screen on another display device by connecting the device through...
... has been designed to support a resolution of the server PC encoded and transmitted through the DVI OUT port. In addition, this new-concept monitor enables you to the USB port. • This monitor can decode and display the screen of 1920*1080 pixels for various fields such as video conferencing and co-working by displaying the network display screen on another display device by connecting the device through...
User Manual
Page 27
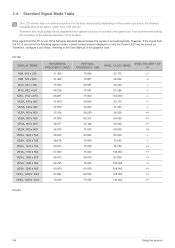
... Signal Mode Table The LCD monitor has one of the following signal modes, a blank screen may be displayed or only the Power LED may be degraded if the optimal resolution is one optimal resolution for the best visual quality depending on . If the signal from the PC is not one of the following standard signal modes, the screen is recommended setting the resolution to the User Manual of the panel, unlike for the panel size. Therefore...
... Signal Mode Table The LCD monitor has one of the following signal modes, a blank screen may be displayed or only the Power LED may be degraded if the optimal resolution is one optimal resolution for the best visual quality depending on . If the signal from the PC is not one of the following standard signal modes, the screen is recommended setting the resolution to the User Manual of the panel, unlike for the panel size. Therefore...
User Manual
Page 29
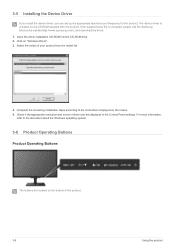
... driver is corrupted, please visit the Samsung Electronics website(http://www.samsung.com/), and download the driver. 1. Select the model of the product. 3-5 Using the product If the supplied drive file is included on "Windows Driver". 3. Complete the remaining installation steps according to the document about the Windows operating system. 3-6 Product Operating Buttons Product Operating Buttons The buttons are displayed in the Control Panel settings. Check if the appropriate resolution and screen refresh rate...
... driver is corrupted, please visit the Samsung Electronics website(http://www.samsung.com/), and download the driver. 1. Select the model of the product. 3-5 Using the product If the supplied drive file is included on "Windows Driver". 3. Complete the remaining installation steps according to the document about the Windows operating system. 3-6 Product Operating Buttons Product Operating Buttons The buttons are displayed in the Control Panel settings. Check if the appropriate resolution and screen refresh rate...

User Manual
Page 30
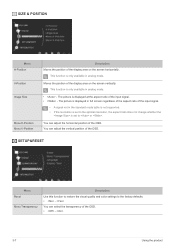
...Menu (OSD: On Screen Display) The Screen Adjustment Menu (OSD: On Screen Display) Structure Top Menus PICTURE Brightness Fine COLOR MagicColor Color Effect SIZE & POSI- Press this button to change the input mode, a message appears in order to maintain the current settings or to adjust volume. TION Contrast Sub Menus Sharpness Red Gamma V-Position Green Image Size Menu Transparency Language MagicBright Coarse Blue Color Tone Menu H-Position Menu V-Position Display Time Using the product 3-7 Use this button to select a function Press [ /SOURCE] to select the video signal...
...Menu (OSD: On Screen Display) The Screen Adjustment Menu (OSD: On Screen Display) Structure Top Menus PICTURE Brightness Fine COLOR MagicColor Color Effect SIZE & POSI- Press this button to change the input mode, a message appears in order to maintain the current settings or to adjust volume. TION Contrast Sub Menus Sharpness Red Gamma V-Position Green Image Size Menu Transparency Language MagicBright Coarse Blue Color Tone Menu H-Position Menu V-Position Display Time Using the product 3-7 Use this button to select a function Press [ /SOURCE] to select the video signal...
User Manual
Page 33
... factory defaults. • - SETUP&RESET Menu Reset Menu Transparency Description Use this function to restore the visual quality and color settings to or . Moves the position of the input signal. • A signal not in full screen regardless of the aspect ratio of the display area on the screen horizontally. The picture is displayed in the standard mode table is not supported. • If the resolution is set to the optimal resolution, the aspect ratio does not change...
... factory defaults. • - SETUP&RESET Menu Reset Menu Transparency Description Use this function to restore the visual quality and color settings to or . Moves the position of the input signal. • A signal not in full screen regardless of the aspect ratio of the display area on the screen horizontally. The picture is displayed in the standard mode table is not supported. • If the resolution is set to the optimal resolution, the aspect ratio does not change...
User Manual
Page 38
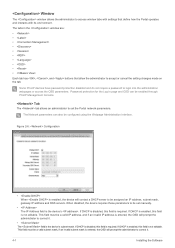
... , and buttons that define how the Portal operates and interacts with its environment. The Network parameters can be configured using the Webpage Administration Interface. This field must be a valid subnet mask, if an invalid subnet mask is entered, the OSD will prompt ...Some PCoIP devices have password protection disabled and do not require a password to set manually. • The IP Address field is enabled, the device will prompt the administrator to correct it . 4-1 Installing the Software When disabled, the device requires these parameters to be set the Portal network ...
... , and buttons that define how the Portal operates and interacts with its environment. The Network parameters can be configured using the Webpage Administration Interface. This field must be a valid subnet mask, if an invalid subnet mask is entered, the OSD will prompt ...Some PCoIP devices have password protection disabled and do not require a password to set manually. • The IP Address field is enabled, the device will prompt the administrator to correct it . 4-1 Installing the Software When disabled, the device requires these parameters to be set the Portal network ...
User Manual
Page 53
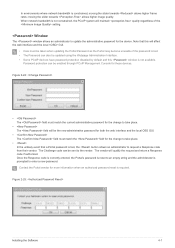
... will maintain quality regardless of the setting. When network bandwidth is not constrained, the PCoIP system will be updated using the Webpage Administration Interface. • Some PCoIP devices have password protection disabled by default and this window is not available. Figure 2-25: Installing the Software 4-1 Contact the Portal vendor for these devices. Window The window allows an administrator to enter a new...
... will maintain quality regardless of the setting. When network bandwidth is not constrained, the PCoIP system will be updated using the Webpage Administration Interface. • Some PCoIP devices have password protection disabled by default and this window is not available. Figure 2-25: Installing the Software 4-1 Contact the Portal vendor for these devices. Window The window allows an administrator to enter a new...
User Manual
Page 54
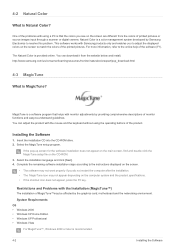
... easy-to the online help of printed pictures or source images input through a scanner or digital camera. MagicTune is a color management system developed by the graphics card, motherboard and the networking environment. You can adjust the product with monitor adjustments by providing comprehensive descriptions of the product. You can download it from the colors of the software (F1). Insert the installation CD into the CD...
... easy-to the online help of printed pictures or source images input through a scanner or digital camera. MagicTune is a color management system developed by the graphics card, motherboard and the networking environment. You can adjust the product with monitor adjustments by providing comprehensive descriptions of the product. You can download it from the colors of the software (F1). Insert the installation CD into the CD...
User Manual
Page 55
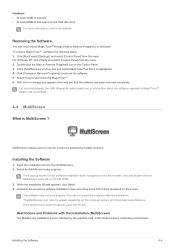
... use the monitor by the graphics card, motherboard and the networking environment. MultiScreen enables users to start removing MagicTune™. 6. For Windows XP, click [Start], and select [Control Panel] from the menu. Double-click the [Add or Remove Programs] icon in Windows. Click [Change or Remove Programs] to the instructions displayed on the screen. For technical support, the FAQ (frequently asked questions) or information about the software upgrade for the software installation does...
... use the monitor by the graphics card, motherboard and the networking environment. MultiScreen enables users to start removing MagicTune™. 6. For Windows XP, click [Start], and select [Control Panel] from the menu. Double-click the [Add or Remove Programs] icon in Windows. Click [Change or Remove Programs] to the instructions displayed on the screen. For technical support, the FAQ (frequently asked questions) or information about the software upgrade for the software installation does...

User Manual
Page 57
... the connection. Troubleshooting 5-1 5 Troubleshooting 5-1 Monitor Self-Diagnosis • You can check if the product is working properly using the Self-Diagnosis function. • If a blank screen is displayed and the Power LED blinks even if the product and the PC are properly connected, perform the self-diagnosis function according to the user manual. Separate the signal cable from the graphics card exceeds the maximum resolution or the maximum frequency of...
... the connection. Troubleshooting 5-1 5 Troubleshooting 5-1 Monitor Self-Diagnosis • You can check if the product is working properly using the Self-Diagnosis function. • If a blank screen is displayed and the Power LED blinks even if the product and the PC are properly connected, perform the self-diagnosis function according to the user manual. Separate the signal cable from the graphics card exceeds the maximum resolution or the maximum frequency of...
User Manual
Page 58
... driver installation. Did you install the device driver for the computer. Set the resolution and the frequency to the appropriate values in the graphics card Refer to the (Standard Signal Mode Table) The color is firmly connected to both the audio-in the graphics card Refer to its maximum, check the volume control on your monitor and the audio-out port on the computer sound card or software program. 5-2 Troubleshooting The color has been changed after turning...
... driver installation. Did you install the device driver for the computer. Set the resolution and the frequency to the appropriate values in the graphics card Refer to the (Standard Signal Mode Table) The color is firmly connected to both the audio-in the graphics card Refer to its maximum, check the volume control on your monitor and the audio-out port on the computer sound card or software program. 5-2 Troubleshooting The color has been changed after turning...
User Manual
Page 60
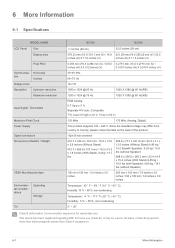
Horizontal tion Vertical Display Color Resolution Optimum resolution Maximum resolution Input Signal, Terminated Maximum Pixel Clock Power Supply Signal connectors Dimensions (WxHxD) / Weight VESA Mounting Interface Environmental considerations Operating Storage Tilt NC190 NC240 19 inches (48 cm) 23.5 inches (59 cm) 376.32 mm (H) X 301.1 mm (V) / 14.8 521.28 mm (H) X 293.22 mm (V) / 20.5 inches (H) X 11.9 inches (V) inches (H) X 11.5 inches (V) 0.294 mm (H) X 0.294 mm (V) / 0.012 0.2715 mm (H) X 0.2715 mm (V) / inches (H) X 0.012 inches (V) 0.0107 inches (H) X 0.0107 inches...
Horizontal tion Vertical Display Color Resolution Optimum resolution Maximum resolution Input Signal, Terminated Maximum Pixel Clock Power Supply Signal connectors Dimensions (WxHxD) / Weight VESA Mounting Interface Environmental considerations Operating Storage Tilt NC190 NC240 19 inches (48 cm) 23.5 inches (59 cm) 376.32 mm (H) X 301.1 mm (V) / 14.8 521.28 mm (H) X 293.22 mm (V) / 20.5 inches (H) X 11.9 inches (V) inches (H) X 11.5 inches (V) 0.294 mm (H) X 0.294 mm (V) / 0.012 0.2715 mm (H) X 0.2715 mm (V) / inches (H) X 0.012 inches (V) 0.0107 inches (H) X 0.0107 inches...


