
User Manual
Page 3
... paper or tape on a disc, clean it for industrial use only. • Condensation may reduce sound and picture quality or cause skipping. -- Disconnect the AC plug from the wall outlet. speakers.). • Disconnect the power cable from the AC supply if the product malfunctions. • Your product is empty. • To turn this apparatus off the product completely, disconnect the AC plug from the...
... paper or tape on a disc, clean it for industrial use only. • Condensation may reduce sound and picture quality or cause skipping. -- Disconnect the AC plug from the wall outlet. speakers.). • Disconnect the power cable from the AC supply if the product malfunctions. • Your product is empty. • To turn this apparatus off the product completely, disconnect the AC plug from the...

User Manual
Page 4
... 3 Disc Storage & Management Getting Started 6 Front Panel 7 Rear Panel 8 Remote Control 9 Accessories 9 Connecting the Speakers 9 Cautions on Moving the Speakers Functions 10 Using Samsung Audio Remote App 10 Install Samsung Audio Remote App 10 Accessing the Samsung Audio Remote App 10 The Display function 10 Changing Display mode 10 The DEMO function 11 Playing a CD 11 Loading a Compact Disc 11 CD/MP3/CD-R Playback 11 Selecting a Track 12 Searching for a Specific Music Passage on a CD 12 Repeat One or All Tracks on a CD 12 Playing USB Devices 12 USB Device Playback...
... 3 Disc Storage & Management Getting Started 6 Front Panel 7 Rear Panel 8 Remote Control 9 Accessories 9 Connecting the Speakers 9 Cautions on Moving the Speakers Functions 10 Using Samsung Audio Remote App 10 Install Samsung Audio Remote App 10 Accessing the Samsung Audio Remote App 10 The Display function 10 Changing Display mode 10 The DEMO function 11 Playing a CD 11 Loading a Compact Disc 11 CD/MP3/CD-R Playback 11 Selecting a Track 12 Searching for a Specific Music Passage on a CD 12 Repeat One or All Tracks on a CD 12 Playing USB Devices 12 USB Device Playback...
User Manual
Page 5
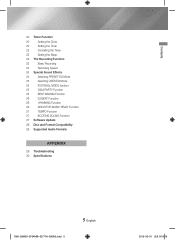
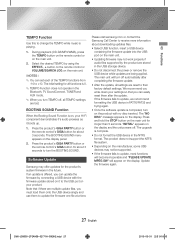
... 24 Special Sound Effects 24 Selecting PRESET EQ Mode 25 Selecting USER EQ Mode 25 FOOTBALL MODE function 25 GIGA PARTY Function 25 BEAT WAVING Function 26 DJ BEAT Function 26 +PANNING Function 26 NON-STOP MUSIC RELAY Function 27 TEMPO Function 27 BOOTING SOUND Function 27 Software Update 28 Disc and Format Compatibility 28 Supported Audio Formats Appendix 29 Troubleshooting 30 Specifications [MX-JS8000-ZP]AH68...
... 24 Special Sound Effects 24 Selecting PRESET EQ Mode 25 Selecting USER EQ Mode 25 FOOTBALL MODE function 25 GIGA PARTY Function 25 BEAT WAVING Function 26 DJ BEAT Function 26 +PANNING Function 26 NON-STOP MUSIC RELAY Function 27 TEMPO Function 27 BOOTING SOUND Function 27 Software Update 28 Disc and Format Compatibility 28 Supported Audio Formats Appendix 29 Troubleshooting 30 Specifications [MX-JS8000-ZP]AH68...

User Manual
Page 6
... Started Front Panel 1 2 8 3 7 4 56 Display Panel 1 Remote control sensor GIGA PARTY button 2 PRESET EQ button USER EQ button FOOTBALL MODE button AUTO CHANGE button 3 DISPLAY/DEMO button MIC 1/2 jacks MIC VOL JOG DJ BEAT button for DJ sound effect +PANNING button for DJ sound effect MEMORY button 4 ENTER button SEARCH button TEMPO button AUX 1/2 Source buttons 5 TUNER Source button CD Source button OPEN/CLOSE button for Disc DISC tray 5 STOP button BACKWARD SEARCH/SKIP button PLAY/PAUSE button FORWARD SEARCH/SKIP button 6 VOLUME/SEARCH JOG MY LIST button USB 1/2 Source buttons 7 USB...
... Started Front Panel 1 2 8 3 7 4 56 Display Panel 1 Remote control sensor GIGA PARTY button 2 PRESET EQ button USER EQ button FOOTBALL MODE button AUTO CHANGE button 3 DISPLAY/DEMO button MIC 1/2 jacks MIC VOL JOG DJ BEAT button for DJ sound effect +PANNING button for DJ sound effect MEMORY button 4 ENTER button SEARCH button TEMPO button AUX 1/2 Source buttons 5 TUNER Source button CD Source button OPEN/CLOSE button for Disc DISC tray 5 STOP button BACKWARD SEARCH/SKIP button PLAY/PAUSE button FORWARD SEARCH/SKIP button 6 VOLUME/SEARCH JOG MY LIST button USB 1/2 Source buttons 7 USB...

User Manual
Page 7
... front panel or remote are pushed, the system will turn off. Use to the Audio Out of the speaker jacks. Secure a minimum 6 inches (15 cm) of clear space on the rear panel of the main unit to connect an external device such as an MP3 player. 3 • Connect AUX IN 1 on all sides of the fan when installing the main unit. POWER 8 • Insert only the provided power cable. [MX-JS8000...
... front panel or remote are pushed, the system will turn off. Use to the Audio Out of the speaker jacks. Secure a minimum 6 inches (15 cm) of clear space on the rear panel of the main unit to connect an external device such as an MP3 player. 3 • Connect AUX IN 1 on all sides of the fan when installing the main unit. POWER 8 • Insert only the provided power cable. [MX-JS8000...

User Manual
Page 8
Getting Started Remote Control Power Bluetooth CD USB TUNING MODE TUNER/AUX NON-STOP MUSIC RELAY PRESET EQ SKIP/TUNING PLAY/PAUSE STOP FOOTBALL VOLUME - Press again to shut off the sound temporarily. FOLDER (-, +), EFFECT (-, +) MY LIST TIMER SET TIMER ON/OFF DISPLAY MY KARAOKE MUTE (Turn off the product.) DELETE MIC VOLUME (-, +) Installing Batteries In The Remote Control • Place batteries in the remote control so they match the polarity of the illustrations in the battery compartment. : (+) to (+) and (-) to (-). • Do...
Getting Started Remote Control Power Bluetooth CD USB TUNING MODE TUNER/AUX NON-STOP MUSIC RELAY PRESET EQ SKIP/TUNING PLAY/PAUSE STOP FOOTBALL VOLUME - Press again to shut off the sound temporarily. FOLDER (-, +), EFFECT (-, +) MY LIST TIMER SET TIMER ON/OFF DISPLAY MY KARAOKE MUTE (Turn off the product.) DELETE MIC VOLUME (-, +) Installing Batteries In The Remote Control • Place batteries in the remote control so they match the polarity of the illustrations in the battery compartment. : (+) to (+) and (-) to (-). • Do...

User Manual
Page 9
... Speakers Recommended speaker setup. ||IMPORTANT | ✎✎ The product may differ from actual product appearance. Cautions on them. User Manual Remote Control / Batteries Power Cable FM/AM Antenna • Figures and illustrations in this user's manual are not installed as recommended. ✎✎ Do not stretch the speaker wires or place a heavy object on Moving the Speakers • When moving the main unit and speakers, make sure to separate all connected speaker cables before. [MX-JS8000...
... Speakers Recommended speaker setup. ||IMPORTANT | ✎✎ The product may differ from actual product appearance. Cautions on them. User Manual Remote Control / Batteries Power Cable FM/AM Antenna • Figures and illustrations in this user's manual are not installed as recommended. ✎✎ Do not stretch the speaker wires or place a heavy object on Moving the Speakers • When moving the main unit and speakers, make sure to separate all connected speaker cables before. [MX-JS8000...

User Manual
Page 10
... the remote control for 5 minutes, and turns on the front panel after 3 minutes. The Display function You can switch between them using 1 and 2 buttons while playing. 10 English [MX-JS8000-ZP]AH68-02771H-00ENG.indd 10 2015-03-31 오전 9:18:13 Changing Display mode Press the DISPLAY/DEMO button on or off. LED Off (unit/speaker) ; --:-- [time display] ; The message remains displayed on again upon key/ remote operation. Market search : Samsung Audio Remote ANDROID...
... the remote control for 5 minutes, and turns on the front panel after 3 minutes. The Display function You can switch between them using 1 and 2 buttons while playing. 10 English [MX-JS8000-ZP]AH68-02771H-00ENG.indd 10 2015-03-31 오전 9:18:13 Changing Display mode Press the DISPLAY/DEMO button on or off. LED Off (unit/speaker) ; --:-- [time display] ; The message remains displayed on again upon key/ remote operation. Market search : Samsung Audio Remote ANDROID...

User Manual
Page 11
... button, Place a disc gently into the disc tray with the disc's label facing up. Press the OPEN/CLOSE button and put a disc into the tray with its label face upwards. 2. The volume level can be adjusted in other functions will change to Stop mode. • If no CD inserted in Stop mode, the product will be displayed. Do not apply force to start playing the disc. • You can play standard compact discs...
... button, Place a disc gently into the disc tray with the disc's label facing up. Press the OPEN/CLOSE button and put a disc into the tray with its label face upwards. 2. The volume level can be adjusted in other functions will change to Stop mode. • If no CD inserted in Stop mode, the product will be displayed. Do not apply force to start playing the disc. • You can play standard compact discs...

User Manual
Page 14
... VOLUME/SEARCH JOG control on the display, remove the USB device. CD-DA/MP3-CD/USB 1. Press the 5 button twice while the USB is 0.5A (based on the product's display. • Only removable HDDs with less than 25 minutes, the product will automatically start playing. When the "REMOVE" message appears on the main unit to the left or right to display the message below: LIST 01--- (01= LIST number, ---= track number) 14 English [MX-JS8000...
... VOLUME/SEARCH JOG control on the display, remove the USB device. CD-DA/MP3-CD/USB 1. Press the 5 button twice while the USB is 0.5A (based on the product's display. • Only removable HDDs with less than 25 minutes, the product will automatically start playing. When the "REMOVE" message appears on the main unit to the left or right to display the message below: LIST 01--- (01= LIST number, ---= track number) 14 English [MX-JS8000...

User Manual
Page 15
... being used, the USB list will not work in a supported format, playback skips to set. • Selection will be cancelled automatically if there is set to display "MY LIST ON/OFF". Even when the MY LIST is no input for 5 seconds. If you eject the disc, CD list is deleted. Viewing or Editing MY LIST Tracks You can use a Bluetooth device to enjoy music with each other using a short, wireless connection. [MX-JS8000...
... being used, the USB list will not work in a supported format, playback skips to set. • Selection will be cancelled automatically if there is set to display "MY LIST ON/OFF". Even when the MY LIST is no input for 5 seconds. If you eject the disc, CD list is deleted. Viewing or Editing MY LIST Tracks You can use a Bluetooth device to enjoy music with each other using a short, wireless connection. [MX-JS8000...

User Manual
Page 16
Press the Bluetooth button of the Hi-Fi Component to a Bluetooth device that supports only the HF (Hands Free) function. ✎✎ Only one Bluetooth device can listen to the music playing on the connected Bluetooth device over the Hi-Fi Component system. • In Bluetooth mode, some model's Play/ Stop/Next/Back functions are not available. ||NOTEs | ✎✎ The product only supports Middle Quality SBC data...
Press the Bluetooth button of the Hi-Fi Component to a Bluetooth device that supports only the HF (Hands Free) function. ✎✎ Only one Bluetooth device can listen to the music playing on the connected Bluetooth device over the Hi-Fi Component system. • In Bluetooth mode, some model's Play/ Stop/Next/Back functions are not available. ||NOTEs | ✎✎ The product only supports Middle Quality SBC data...
User Manual
Page 17
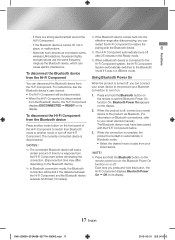
... music to play from Bluetooth mode to the Bluetooth mode if it on its display. [MX-JS8000-ZP]AH68-02771H-00ENG.indd 17 17 English 2015-03-31 오전 9:18:15 When the connection is connected to the Hi-Fi Component system, the Hi-Fi Component System automatically switches to another mode button on the front panel of time for a response from the Hi-Fi Component before . 3. Using Bluetooth Power...
... music to play from Bluetooth mode to the Bluetooth mode if it on its display. [MX-JS8000-ZP]AH68-02771H-00ENG.indd 17 17 English 2015-03-31 오전 9:18:15 When the connection is connected to the Hi-Fi Component system, the Hi-Fi Component System automatically switches to another mode button on the front panel of time for a response from the Hi-Fi Component before . 3. Using Bluetooth Power...

User Manual
Page 18
... Settings menu. (Refer to the TV's user manual for a response from the Hi-Fi Component before terminating the connection. (Disconnection time may differ, depending on the front panel of the Hi-Fi Component to switch from TV SoundConnect mode to the TV, it is available on the front of time for details.) 3. Check whether your favorite CDs and USB tracks. 1. For instructions, see the TV's user manual...
... Settings menu. (Refer to the TV's user manual for a response from the Hi-Fi Component before terminating the connection. (Disconnection time may differ, depending on the front panel of the Hi-Fi Component to switch from TV SoundConnect mode to the TV, it is available on the front of time for details.) 3. Check whether your favorite CDs and USB tracks. 1. For instructions, see the TV's user manual...
User Manual
Page 19
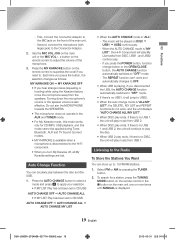
... the OPEN/CLOSE button, the AUTO CHANGE function automatically switches to the Connector-Adaptor. 2. 03 Functions -- and this mode works only for a station, press the TUNING MODE button on the remote control or the @ button on DISC ; USB2 continuously. -- Each time you press the POWER button, function change mode is displayed. 19 English [MX-JS8000-ZP]AH68-02771H-00ENG.indd 19 2015-03-31 오전 9:18:15 The music will play between the disc and the USB...
... the OPEN/CLOSE button, the AUTO CHANGE function automatically switches to the Connector-Adaptor. 2. 03 Functions -- and this mode works only for a station, press the TUNING MODE button on the remote control or the @ button on DISC ; USB2 continuously. -- Each time you press the POWER button, function change mode is displayed. 19 English [MX-JS8000-ZP]AH68-02771H-00ENG.indd 19 2015-03-31 오전 9:18:15 The music will play between the disc and the USB...

User Manual
Page 21
... set tuner timer recording. Select a preset station by pressing the ,/. Result: ON TIME is displayed for a few seconds. Press the ¬ button. button to on the remote control set the timer switch-on the remote control to set the minutes. Result: OFF TIME is displayed for a few seconds. Press the ¬ button. Note that selecting REC NO does not cancel the Timer setting. 2) If you select REC YES, you select FM/AM (radio) CD (compact disc...
... set tuner timer recording. Select a preset station by pressing the ,/. Result: ON TIME is displayed for a few seconds. Press the ¬ button. button to on the remote control set the timer switch-on the remote control to set the minutes. Result: OFF TIME is displayed for a few seconds. Press the ¬ button. Note that selecting REC NO does not cancel the Timer setting. 2) If you select REC YES, you select FM/AM (radio) CD (compact disc...

User Manual
Page 22
... the remote control to start automatically. If you no USB in the main unit, it will start recording. Number is no disc or no longer want to use USB 2. 2. CD • Press the CD button on the screen. 3. OFF 2. USB 1 (Recording device is displayed. 22 English [MX-JS8000-ZP]AH68-02771H-00ENG.indd 22 2015-03-31 오전 9:18:15 Functions ✎✎ When you use the auto timer, you...
... the remote control to start automatically. If you no USB in the main unit, it will start recording. Number is no disc or no longer want to use USB 2. 2. CD • Press the CD button on the screen. 3. OFF 2. USB 1 (Recording device is displayed. 22 English [MX-JS8000-ZP]AH68-02771H-00ENG.indd 22 2015-03-31 오전 9:18:15 Functions ✎✎ When you use the auto timer, you...

User Manual
Page 24
..., press the MEMORY button to the desired level by using the VOLUME/SEARCH JOG on the used USB storage device. Each time you press the REC SPEED button on the remote control, the recording speed will change as USER EQ. ||NOTE | ✎✎ Preset EQ Default value is displayed. FOLKLORE ; Press the PRESET EQ button. ROCK ; REGGAE ; MERENGUE ; JAZZ ; button on the remote control. 2) To adjust the next band, press...
..., press the MEMORY button to the desired level by using the VOLUME/SEARCH JOG on the used USB storage device. Each time you press the REC SPEED button on the remote control, the recording speed will change as USER EQ. ||NOTE | ✎✎ Preset EQ Default value is displayed. FOLKLORE ; Press the PRESET EQ button. ROCK ; REGGAE ; MERENGUE ; JAZZ ; button on the remote control. 2) To adjust the next band, press...
User Manual
Page 27
... or contact the Samsung Call Center to receive more information about downloading updates files. • Select USB function, insert a USB device containing the firmware update into the USB port on the main unit. • Updating firmware may not work properly if audio files supported by using the EFFECT-, + button on the remote control or VOLUME/SEARCH JOG on the main unit. ||NOTEs | ✎✎ You can easily reset them to update, most functions will...
... or contact the Samsung Call Center to receive more information about downloading updates files. • Select USB function, insert a USB device containing the firmware update into the USB port on the main unit. • Updating firmware may not work properly if audio files supported by using the EFFECT-, + button on the remote control or VOLUME/SEARCH JOG on the main unit. ||NOTEs | ✎✎ You can easily reset them to update, most functions will...
User Manual
Page 29
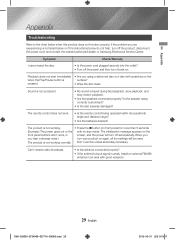
..., all the settings will turn off automatically. The remote control does not work , or screen, and the power will be reset. 04 Appendix Appendix Troubleshooting Refer to the chart below do not help, turn off the product, disconnect the power cord, and contact the nearest authorized dealer or Samsung Electronics Service Center. Symptom I cannot eject the disc. When you you hear a strange noise.) turn your product on front panel) for more...
..., all the settings will turn off automatically. The remote control does not work , or screen, and the power will be reset. 04 Appendix Appendix Troubleshooting Refer to the chart below do not help, turn off the product, disconnect the power cord, and contact the nearest authorized dealer or Samsung Electronics Service Center. Symptom I cannot eject the disc. When you you hear a strange noise.) turn your product on front panel) for more...


