User Manual Ver.1.0 (English)
Page 5
... may interfere with other electronic devices in homes or vehicles. If the glass or acrylic parts are broken, visit a Samsung Electronics Service Center to malfunction. Check that may result from the camera case. Avoid interference with unshielded or improperly shielded electronic...connectors, and accessories. If you force the connectors, improperly connect cables, or improperly install batteries and memory cards, you connect cables or adapters and install batteries and memory cards. This may be leaked, so avoid transferring sensitive data in or near magnetic fields. Do...
... may interfere with other electronic devices in homes or vehicles. If the glass or acrylic parts are broken, visit a Samsung Electronics Service Center to malfunction. Check that may result from the camera case. Avoid interference with unshielded or improperly shielded electronic...connectors, and accessories. If you force the connectors, improperly connect cables, or improperly install batteries and memory cards, you connect cables or adapters and install batteries and memory cards. This may be leaked, so avoid transferring sensitive data in or near magnetic fields. Do...
User Manual Ver.1.0 (English)
Page 10
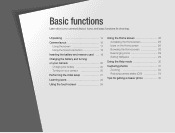
Contents Basic functions 13 Unpacking 14 Camera layout 15 Using the screen 17 Using the Smart Link button 18 Inserting the battery and memory card 19 Charging the battery and turning on your camera ...... 20 Charging the battery 20 Turning on your camera 20 Performing the initial setup 21 Learning ...
Contents Basic functions 13 Unpacking 14 Camera layout 15 Using the screen 17 Using the Smart Link button 18 Inserting the battery and memory card 19 Charging the battery and turning on your camera ...... 20 Charging the battery 20 Turning on your camera 20 Performing the initial setup 21 Learning ...
User Manual Ver.1.0 (English)
Page 13
Contents Settings 137 Settings menu 138 Accessing the settings menu 138 Sound 139 Display 139 Connectivity 140 General 141 Appendixes 144 Error messages 145 Camera maintenance 147 Cleaning your camera 147 Using or storing the camera 148 About memory cards 149 About the battery 152 Before contacting a service center 156 Camera specifications 159 Glossary 163 Index 168 12
Contents Settings 137 Settings menu 138 Accessing the settings menu 138 Sound 139 Display 139 Connectivity 140 General 141 Appendixes 144 Error messages 145 Camera maintenance 147 Cleaning your camera 147 Using or storing the camera 148 About memory cards 149 About the battery 152 Before contacting a service center 156 Camera specifications 159 Glossary 163 Index 168 12
User Manual Ver.1.0 (English)
Page 14
... functions for getting a clearer photo 35 Unpacking 14 Camera layout 15 Using the screen 17 Using the Smart Link button 18 Inserting the battery and memory card ... 19 Charging the battery and turning on your camera 20 Charging the battery 20 Turning on the Home screen 26 Browsing the Home screen 28...
... functions for getting a clearer photo 35 Unpacking 14 Camera layout 15 Using the screen 17 Using the Smart Link button 18 Inserting the battery and memory card ... 19 Charging the battery and turning on your camera 20 Charging the battery 20 Turning on the Home screen 26 Browsing the Home screen 28...
User Manual Ver.1.0 (English)
Page 15
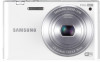
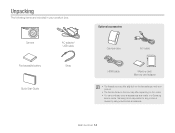
Basic functions 14 Camera Rechargeable battery AC adapter/ USB cable Strap Quick Start Guide Optional accessories Camera case A/V cable HDMI cable Memory card/ Memory card adapter • The illustrations may differ depending on the model. • You can purchase optional accessories at a retailer or a Samsung service center. Samsung is not responsible for any problems caused by using unauthorized accessories. Unpacking The following items are included in your product. • The items included in the box may differ slightly from the items shipped with your product box.
Basic functions 14 Camera Rechargeable battery AC adapter/ USB cable Strap Quick Start Guide Optional accessories Camera case A/V cable HDMI cable Memory card/ Memory card adapter • The illustrations may differ depending on the model. • You can purchase optional accessories at a retailer or a Samsung service center. Samsung is not responsible for any problems caused by using unauthorized accessories. Unpacking The following items are included in your product. • The items included in the box may differ slightly from the items shipped with your product box.
User Manual Ver.1.0 (English)
Page 16
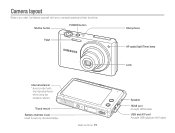
Camera layout Before you start, familiarize yourself with the internal antenna while using the wireless network. Shutter button POWER button Flash Internal antenna* * Avoid contact with your camera's parts and their functions. Tripod mount Battery chamber cover Insert a memory card and battery Basic functions 15 Microphone AF-assist light/Timer lamp Lens Speaker HDMI port Accepts HDMI cable USB and A/V port Accepts USB cable and A/V cable
Camera layout Before you start, familiarize yourself with the internal antenna while using the wireless network. Shutter button POWER button Flash Internal antenna* * Avoid contact with your camera's parts and their functions. Tripod mount Battery chamber cover Insert a memory card and battery Basic functions 15 Microphone AF-assist light/Timer lamp Lens Speaker HDMI port Accepts HDMI cable USB and A/V port Accepts USB cable and A/V cable

User Manual Ver.1.0 (English)
Page 20
Rechargeable battery Rechargeable battery Basic functions 19 Memory card Memory card Insert the battery with the gold-colored contacts facing up. Battery lock Slide the lock up . Insert a memory card with the Samsung logo facing up to insert the battery and an optional memory card into the camera. Removing the battery and memory card Push the card gently until it disengages from the camera, and then pull it out of the slot. Inserting the battery and memory card Learn how to release the battery.
Rechargeable battery Rechargeable battery Basic functions 19 Memory card Memory card Insert the battery with the gold-colored contacts facing up. Battery lock Slide the lock up . Insert a memory card with the Samsung logo facing up to insert the battery and an optional memory card into the camera. Removing the battery and memory card Push the card gently until it disengages from the camera, and then pull it out of the slot. Inserting the battery and memory card Learn how to release the battery.
User Manual Ver.1.0 (English)
Page 24
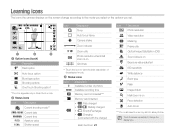
... lines ** Touch the icon to view the brief description of the selected mode. 3 Status icons Icon Description Available number of photos Available recording time Memory card not inserted*** Memory card inserted • : Fully charged • : Partially charged • : Empty (Recharge) • : Charging (Connected with the charger) Basic functions 23 Icon Description Photo resolution ... on Exposure value adjusted ISO sensitivity White balance Burst type Flash Image Adjust Intelli zoom is on Face detection Auto focus *** You must insert a memory card to save photos.
... lines ** Touch the icon to view the brief description of the selected mode. 3 Status icons Icon Description Available number of photos Available recording time Memory card not inserted*** Memory card inserted • : Fully charged • : Partially charged • : Empty (Recharge) • : Charging (Connected with the charger) Basic functions 23 Icon Description Photo resolution ... on Exposure value adjusted ISO sensitivity White balance Burst type Flash Image Adjust Intelli zoom is on Face detection Auto focus *** You must insert a memory card to save photos.

User Manual Ver.1.0 (English)
Page 42
...minutes in slow motion at (10 seconds maximum). Video recordings may be played in length. To record high-resolution or high-speed videos, use memory cards with faster write speeds. • If you activate the OIS function while recording a video, the camera may record the operating sound of ...shooting modes Using the Movie mode In Movie mode, you can record high-speed videos by touching m “ Movie Size “ . • Memory cards with slow write speeds do not support high-speed videos. • The camera does not record audio when recording high-speed videos. • The ...
...minutes in slow motion at (10 seconds maximum). Video recordings may be played in length. To record high-resolution or high-speed videos, use memory cards with faster write speeds. • If you activate the OIS function while recording a video, the camera may record the operating sound of ...shooting modes Using the Movie mode In Movie mode, you can record high-speed videos by touching m “ Movie Size “ . • Memory cards with slow write speeds do not support high-speed videos. • The camera does not record audio when recording high-speed videos. • The ...

User Manual Ver.1.0 (English)
Page 81
...-press [Shutter] to focus. 4 Press and hold [Shutter]. • While you select Single. • It may take longer to save the photos depending on the memory card capacity and performance. • The camera always displays captured photos before returning to adjust the exposure correctly and select a proper light source. Use a tripod for...
...-press [Shutter] to focus. 4 Press and hold [Shutter]. • While you select Single. • It may take longer to save the photos depending on the memory card capacity and performance. • The camera always displays captured photos before returning to adjust the exposure correctly and select a proper light source. Use a tripod for...

User Manual Ver.1.0 (English)
Page 104
Ensure that are compatible with dimensions that your memory card for convenient printing on DPOFcompatible printers. 1 In Playback mode, locate a photo, and then touch m. 2 Touch DPOF. 3 Touch the +/- This information is saved in the Digital ... copies, and then touch o. • You can print photos directly through a DPOF-compatible printer at home. • Photos with the paper you can take the memory card to print and save print options in the MISC folder on your photo dimensions are wider than the paper may be cut off on the...
Ensure that are compatible with dimensions that your memory card for convenient printing on DPOFcompatible printers. 1 In Playback mode, locate a photo, and then touch m. 2 Touch DPOF. 3 Touch the +/- This information is saved in the Digital ... copies, and then touch o. • You can print photos directly through a DPOF-compatible printer at home. • Photos with the paper you can take the memory card to print and save print options in the MISC folder on your photo dimensions are wider than the paper may be cut off on the...

User Manual Ver.1.0 (English)
Page 106
... not necessarily result in a faster HDMI transfer, because the main function of a memory card you control all connected Samsung A/V devices with the type of the card is supported by most HDTVs. 1 On the Home screen, touch . 2 Touch Connectivity “ HDMI Size. 3 Select an HDMI resolution. (p. 141) 4 Turn off your camera and ... sure that the HDTV and camera are turned on, and then select the HDMI mode on the HDTV. • If you have an Anynet+ compatible Samsung HDTV and you have turned on your HDTV may vary with the TV remote control. • The time it takes for the camera to connect...
... not necessarily result in a faster HDMI transfer, because the main function of a memory card you control all connected Samsung A/V devices with the type of the card is supported by most HDTVs. 1 On the Home screen, touch . 2 Touch Connectivity “ HDMI Size. 3 Select an HDMI resolution. (p. 141) 4 Turn off your camera and ... sure that the HDTV and camera are turned on, and then select the HDMI mode on the HDTV. • If you have an Anynet+ compatible Samsung HDTV and you have turned on your HDTV may vary with the TV remote control. • The time it takes for the camera to connect...

User Manual Ver.1.0 (English)
Page 108
... the USB cable. Playback/Editing 107 Transferring files to the computer Connect the camera to the computer, to transfer files from the camera's memory card to your computer with the USB cable. Transferring files to your Windows OS computer Connect the camera to the computer. The manufacturer is blinking...
... the USB cable. Playback/Editing 107 Transferring files to the computer Connect the camera to the computer, to transfer files from the camera's memory card to your computer with the USB cable. Transferring files to your Windows OS computer Connect the camera to the computer. The manufacturer is blinking...
User Manual Ver.1.0 (English)
Page 119
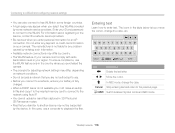
... is not available you connect to a network, ensure your battery is fully charged. • When a DHCP server is not liable for any payment or credit card information on your ID and password to connect to use the WLAN feature only in the country where you purchased the camera. • The process... send files captured in your region. Cancel Done Icon Cancel Description Delete the last letter. txt file and copy it to the inserted memory card to connect to enter text.
... is not available you connect to a network, ensure your battery is fully charged. • When a DHCP server is not liable for any payment or credit card information on your ID and password to connect to use the WLAN feature only in the country where you purchased the camera. • The process... send files captured in your region. Cancel Done Icon Cancel Description Delete the last letter. txt file and copy it to the inserted memory card to connect to enter text.

User Manual Ver.1.0 (English)
Page 143
... Description * Default Specify how to name files. • Reset: Set the file number to start from 0001 when you insert a new memory card, format a memory card, or delete all files. • Series*: Set the file number to resume from the previous file number when you insert a ...new memory card, format a memory card, or delete all files. • The default name of the first folder is 100PHOTO and the default name of the fi...
... Description * Default Specify how to name files. • Reset: Set the file number to start from 0001 when you insert a new memory card, format a memory card, or delete all files. • Series*: Set the file number to resume from the previous file number when you insert a ...new memory card, format a memory card, or delete all files. • The default name of the first folder is 100PHOTO and the default name of the fi...

User Manual Ver.1.0 (English)
Page 144
...output settings will delete all files, including protected files. (Yes, No) Errors can occur if you focus. (Off, On*) Format the memory card. Formatting will not be reset. (Yes, No) Open source licenses Show the Open source licenses information. Settings 143 Settings menu Item AF Lamp Format *... Default Description Set a light to automatically turn on in the camera before using them to help you use a memory card formatted by another brand of camera, a memory card reader, or a computer. Please format memory cards in dark places to capture photos.
...output settings will delete all files, including protected files. (Yes, No) Errors can occur if you focus. (Off, On*) Format the memory card. Formatting will not be reset. (Yes, No) Open source licenses Show the Open source licenses information. Settings 143 Settings menu Item AF Lamp Format *... Default Description Set a light to automatically turn on in the camera before using them to help you use a memory card formatted by another brand of camera, a memory card reader, or a computer. Please format memory cards in dark places to capture photos.

User Manual Ver.1.0 (English)
Page 145
Appendixes Get information about error messages, specifications, and maintenance. Error messages 145 Camera maintenance 147 Cleaning your camera 147 Using or storing the camera 148 About memory cards 149 About the battery 152 Before contacting a service center 156 Camera specifications 159 Glossary 163 Index 168
Appendixes Get information about error messages, specifications, and maintenance. Error messages 145 Camera maintenance 147 Cleaning your camera 147 Using or storing the camera 148 About memory cards 149 About the battery 152 Before contacting a service center 156 Camera specifications 159 Glossary 163 Index 168

User Manual Ver.1.0 (English)
Page 146
... by your camera. File Error Delete the damaged file or contact a service center. Turn on devices on the camera. Insert a microSD, microSDHC, or microSDXC memory card. • The camera cannot connect to locate a device that Initialization failed. The camera has failed to the network using the selected access point. Enter the...
... by your camera. File Error Delete the damaged file or contact a service center. Turn on devices on the camera. Insert a microSD, microSDHC, or microSDXC memory card. • The camera cannot connect to locate a device that Initialization failed. The camera has failed to the network using the selected access point. Enter the...

User Manual Ver.1.0 (English)
Page 147
Network connection disconnected while transferring photos. Try restarting the AllShare Play feature. • The camera has failed to send a photo to a device that contains some photos. Suggested remedies Capture photos or insert a memory card that supports AllShare Play. Appendixes 146 Error messages Error message No Image File Photo transfer failed. Check the network connection and try again. Transfer failed. Try sending again. • The camera has failed to send an email or transfer a photo to the other devices.
Network connection disconnected while transferring photos. Try restarting the AllShare Play feature. • The camera has failed to send a photo to a device that contains some photos. Suggested remedies Capture photos or insert a memory card that supports AllShare Play. Appendixes 146 Error messages Error message No Image File Photo transfer failed. Check the network connection and try again. Transfer failed. Try sending again. • The camera has failed to send an email or transfer a photo to the other devices.

User Manual Ver.1.0 (English)
Page 149
... to your camera by the strap. Using the camera with caution in similar areas. • Your camera is turned on the memory card, remove the memory card from the camera and wait until all moisture has evaporated before reinserting it on beaches or in humid environments When you use it .... Do not handle the battery, adapter, or memory card with wet hands. Using on beaches or shores • Protect your camera from impact, rough handling, and excessive vibration to avoid serious damage....
... to your camera by the strap. Using the camera with caution in similar areas. • Your camera is turned on the memory card, remove the memory card from the camera and wait until all moisture has evaporated before reinserting it on beaches or in humid environments When you use it .... Do not handle the battery, adapter, or memory card with wet hands. Using on beaches or shores • Protect your camera from impact, rough handling, and excessive vibration to avoid serious damage....


