Open Source Guide (ENGLISH)
Page 1
... OpenSSL Toolkit. (http://www.openssl.org/)" * * 4. The names "OpenSSL Toolkit" and "OpenSSL Project" must retain the following conditions * are met: * * 1. Redistributions of source code must display the following disclaimer. * * 2. All advertising materials mentioning features or use of this list of conditions and the following acknowledgment: * "This product includes software developed by...
... OpenSSL Toolkit. (http://www.openssl.org/)" * * 4. The names "OpenSSL Toolkit" and "OpenSSL Project" must retain the following conditions * are met: * * 1. Redistributions of source code must display the following disclaimer. * * 2. All advertising materials mentioning features or use of this list of conditions and the following acknowledgment: * "This product includes software developed by...
Open Source Guide (ENGLISH)
Page 10
... disclaimer of a keep intact all the notices that work written entirely by running for such interactive use in the most ordinary way, to print or display an announcement including an appropriate copyright notice and a notice that there is no charge to all of these conditions, and telling the user how to...
... disclaimer of a keep intact all the notices that work written entirely by running for such interactive use in the most ordinary way, to print or display an announcement including an appropriate copyright notice and a notice that there is no charge to all of these conditions, and telling the user how to...

Open Source Guide (ENGLISH)
Page 20
... need not include anything that is interface-compatible with the version that the work was made by this user a copy. If the work during execution displays copyright notices, you must include the copyright notice for linking with the Library. and, if the work is an executable linked with the Library, with...
... need not include anything that is interface-compatible with the version that the work was made by this user a copy. If the work during execution displays copyright notices, you must include the copyright notice for linking with the Library. and, if the work is an executable linked with the Library, with...
Open Source Guide (ENGLISH)
Page 26
... based on the Program is to exercise the right to be reasonably considered independent and separate works in the most ordinary way, to print or display an announcement including an appropriate copyright notice and a notice that there is no charge to all of these conditions, and telling the user how to...
... based on the Program is to exercise the right to be reasonably considered independent and separate works in the most ordinary way, to print or display an announcement including an appropriate copyright notice and a notice that there is no charge to all of these conditions, and telling the user how to...
User Manual (ENGLISH)
Page 5
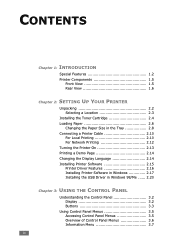
...a Printer Cable 2.10 For Local Printing 2.10 For Network Printing 2.12 Turning the Printer On 2.13 Printing a Demo Page 2.14 Changing the Display Language 2.14 Installing Printer Software 2.15 Printer Driver Features 2.16 Installing Printer Software in Windows 2.17 Installing the USB Driver in Windows 98/Me... ...... 2.20 Chapter 3: USING THE CONTROL PANEL Understanding the Control Panel 3.2 Display 3.2 Buttons 3.3 Using Control Panel Menus 3.5 Accessing Control Panel Menus 3.5 Overview of Control Panel Menus 3.6 Information Menu 3.7 iv
...a Printer Cable 2.10 For Local Printing 2.10 For Network Printing 2.12 Turning the Printer On 2.13 Printing a Demo Page 2.14 Changing the Display Language 2.14 Installing Printer Software 2.15 Printer Driver Features 2.16 Installing Printer Software in Windows 2.17 Installing the USB Driver in Windows 98/Me... ...... 2.20 Chapter 3: USING THE CONTROL PANEL Understanding the Control Panel 3.2 Display 3.2 Buttons 3.3 Using Control Panel Menus 3.5 Accessing Control Panel Menus 3.5 Overview of Control Panel Menus 3.6 Information Menu 3.7 iv
User Manual (ENGLISH)
Page 7
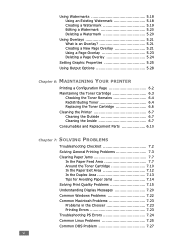
... Cartridge 7.10 In the Paper Exit Area 7.12 In the Duplex Area 7.13 Tips for Avoiding Paper Jams 7.14 Solving Print Quality Problems 7.15 Understanding Display Messages 7.20 Common Windows Problems 7.22 Common Macintosh Problems 7.23 Problems in the Chooser 7.23 Printing Errors 7.23 Troubleshooting PS Errors 7.24 Common Linux Problems...
... Cartridge 7.10 In the Paper Exit Area 7.12 In the Duplex Area 7.13 Tips for Avoiding Paper Jams 7.14 Solving Print Quality Problems 7.15 Understanding Display Messages 7.20 Common Windows Problems 7.22 Common Macintosh Problems 7.23 Problems in the Chooser 7.23 Printing Errors 7.23 Troubleshooting PS Errors 7.24 Common Linux Problems...

User Manual (ENGLISH)
Page 24
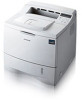
2 SETTING UP YOUR PRINTER This chapter provides step by step information on setting up your printer. This chapter includes: • Unpacking • Installing the Toner Cartridge • Loading Paper • Connecting a Printer Cable • Turning the Printer On • Printing a Demo Page • Changing the Display Language • Installing Printer Software
2 SETTING UP YOUR PRINTER This chapter provides step by step information on setting up your printer. This chapter includes: • Unpacking • Installing the Toner Cartridge • Loading Paper • Connecting a Printer Cable • Turning the Printer On • Printing a Demo Page • Changing the Display Language • Installing Printer Software

User Manual (ENGLISH)
Page 37
... that is operating correctly. 1 In ready mode press the Menu button ( ) on the control panel until you see "Information" on the bottom line of the display. 2 Press the Enter button ( ) to access the menu. 3 Press the scroll button ( or ) until you see "LCD Language" on the bottom line. 4 Press the Enter... the following steps: 1 In ready mode press the Menu button ( ) on the control panel until you see "Demo Page" on the bottom line of the display. 2 Press the Enter button ( ) to access the menu. 3 Press the scroll button ( or ) until you want to use. 6 Press the Enter button ( ) to save ...
... that is operating correctly. 1 In ready mode press the Menu button ( ) on the control panel until you see "Information" on the bottom line of the display. 2 Press the Enter button ( ) to access the menu. 3 Press the scroll button ( or ) until you see "LCD Language" on the bottom line. 4 Press the Enter... the following steps: 1 In ready mode press the Menu button ( ) on the control panel until you see "Demo Page" on the bottom line of the display. 2 Press the Enter button ( ) to access the menu. 3 Press the scroll button ( or ) until you want to use. 6 Press the Enter button ( ) to save ...

User Manual (ENGLISH)
Page 40
... the CD-ROM drive does not automatically run: Select Run from the window, use the scroll button on your PC before beginning installation. Installation will Samsung start automatically. If you can't find the desired language from the Start menu, type x:\cdsetup.exe in Windows System Requirements Verify the following: Item 2 Requirements... procedure, click the icon in the CD-ROM drive. Installing printer software 1 Place the CD-ROM in the upper right corner of the screen to display more languages.
... the CD-ROM drive does not automatically run: Select Run from the window, use the scroll button on your PC before beginning installation. Installation will Samsung start automatically. If you can't find the desired language from the Start menu, type x:\cdsetup.exe in Windows System Requirements Verify the following: Item 2 Requirements... procedure, click the icon in the CD-ROM drive. Installing printer software 1 Place the CD-ROM in the upper right corner of the screen to display more languages.
User Manual (ENGLISH)
Page 45
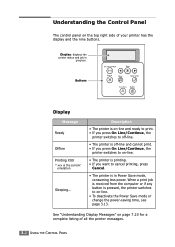
... messages. 3.2 USING THE CONTROL PANEL Understanding the Control Panel The control panel on page 7.20 for a complete listing of your printer has the display and the nine buttons. When a print job is received from the computer or if any button is the current emulation. Sleeping... Buttons... Display Message Ready Offline Printing XXX * xxx is pressed, the printer switches to on -line. • The printer is printing. • If you want to...
... messages. 3.2 USING THE CONTROL PANEL Understanding the Control Panel The control panel on page 7.20 for a complete listing of your printer has the display and the nine buttons. When a print job is received from the computer or if any button is the current emulation. Sleeping... Buttons... Display Message Ready Offline Printing XXX * xxx is pressed, the printer switches to on -line. • The printer is printing. • If you want to...
User Manual (ENGLISH)
Page 46
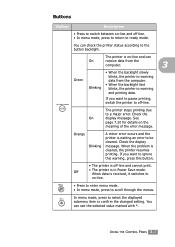
... button. • The printer is received, it switches to on the meaning of the error message. The printer stops printing due to select the displayed submenu item or confirm the changed setting. See page 7.20 for details on -line. • Press to enter menu mode. • In menu...off-line and cannot print. When the problem is waiting an error to be cleared. In menu mode, press to a major error. Check the display message. Orange Blinking A minor error occurs and the printer is cleared, the printer resumes printing. Off • The printer is receiving and printing ...
... button. • The printer is received, it switches to on the meaning of the error message. The printer stops printing due to select the displayed submenu item or confirm the changed setting. See page 7.20 for details on -line. • Press to enter menu mode. • In menu...off-line and cannot print. When the problem is waiting an error to be cleared. In menu mode, press to a major error. Check the display message. Orange Blinking A minor error occurs and the printer is cleared, the printer resumes printing. Off • The printer is receiving and printing ...
User Manual (ENGLISH)
Page 48
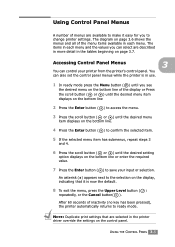
.... 1 In ready mode press the Menu button ( ) until you see the desired menu on the bottom line of the display or Press the scroll button ( or ) until the desired menu item displays on the bottom line 2 Press the Enter button ( ) to access the menu. 3 Press the scroll button ( or... the selected item. 5 If the selected menu item has submenus, repeat steps 3 and 4. 6 Press the scroll button ( or ) until the desired setting option displays on the bottom line or enter the required value. 7 Press the Enter button ( ) to change printer settings. The items in each menu. An asterisk (*) appears...
.... 1 In ready mode press the Menu button ( ) until you see the desired menu on the bottom line of the display or Press the scroll button ( or ) until the desired menu item displays on the bottom line 2 Press the Enter button ( ) to access the menu. 3 Press the scroll button ( or... the selected item. 5 If the selected menu item has submenus, repeat steps 3 and 4. 6 Press the scroll button ( or ) until the desired setting option displays on the bottom line or enter the required value. 7 Press the Enter button ( ) to change printer settings. The items in each menu. An asterisk (*) appears...

User Manual (ENGLISH)
Page 56
... Minutes, 45 Minutes, 60 Minutes When the printer does not receive data for an extended period of the text that appears on the control panel display and information printing. Emulation Values: Auto*, PCL, HEXDUMP, EPSON, PS3, IBM ProPrint The printer language defines how the computer communicates with the printer. Set how...
... Minutes, 45 Minutes, 60 Minutes When the printer does not receive data for an extended period of the text that appears on the control panel display and information printing. Emulation Values: Auto*, PCL, HEXDUMP, EPSON, PS3, IBM ProPrint The printer language defines how the computer communicates with the printer. Set how...

User Manual (ENGLISH)
Page 57
...the required carriage return to the following samples: AA AA BB BB CC CC LF LF+CR 3.14 USING THE CONTROL PANEL The printer will display. Item Explanation Auto Continue Values: Off, On* This item determines whether or not the printer continues printing when it detects the paper mismatching ...message will remain on the air pressure, such as in a high ground. Values: Low*, High You can optimise the print quality depending on the display and the printer will remain off-line until you insert the correct paper. • On: If the paper mismatches, an error message will go ...
...the required carriage return to the following samples: AA AA BB BB CC CC LF LF+CR 3.14 USING THE CONTROL PANEL The printer will display. Item Explanation Auto Continue Values: Off, On* This item determines whether or not the printer continues printing when it detects the paper mismatching ...message will remain on the air pressure, such as in a high ground. Values: Low*, High You can optimise the print quality depending on the display and the printer will remain off-line until you insert the correct paper. • On: If the paper mismatches, an error message will go ...

User Manual (ENGLISH)
Page 64
.... This item reboots the network interface card. This setting will only take effect after you select Yes, the IPX Frame Type option appears on the display. 3 Item Explanation Config Netware Values: Yes, No* You can set this item only when you set the frame type automatically. • EN_8022: Select this value...
.... This item reboots the network interface card. This setting will only take effect after you select Yes, the IPX Frame Type option appears on the display. 3 Item Explanation Config Netware Values: Yes, No* You can set this item only when you set the frame type automatically. • EN_8022: Select this value...

User Manual (ENGLISH)
Page 76
5 Slide the paper width guide and adjust it against the stack of paper loaded in the Multi-Purpose Tray. Now, the display on the front panel prompts you to check which paper is loaded in the software application. You do not have to confirm the paper size ... ) until the size of paper you print from your software application. USING PRINT MATERIALS 4.11 For information about setting on the bottom line of the display. 7 Press the Enter button ( ).
5 Slide the paper width guide and adjust it against the stack of paper loaded in the Multi-Purpose Tray. Now, the display on the front panel prompts you to check which paper is loaded in the software application. You do not have to confirm the paper size ... ) until the size of paper you print from your software application. USING PRINT MATERIALS 4.11 For information about setting on the bottom line of the display. 7 Press the Enter button ( ).

User Manual (ENGLISH)
Page 78
3 When you print a document, you to be printed. The printer picks up the paper and prints. USING PRINT MATERIALS 4.13 Repeat this step for Source from the software application, and then select the correct paper size and type. 4 4 Print a document. After one page is printed, the message appears again. 6 Insert the next sheet into the Multi-Purpose Tray and press the On Line/Continue button ( ). The display shows a message prompting you must select Manual Feed for every page to load paper and press the On Line/Continue button ( ). 5 Press the On Line/Continue button ( ).
3 When you print a document, you to be printed. The printer picks up the paper and prints. USING PRINT MATERIALS 4.13 Repeat this step for Source from the software application, and then select the correct paper size and type. 4 4 Print a document. After one page is printed, the message appears again. 6 Insert the next sheet into the Multi-Purpose Tray and press the On Line/Continue button ( ). The display shows a message prompting you must select Manual Feed for every page to load paper and press the On Line/Continue button ( ). 5 Press the On Line/Continue button ( ).

User Manual (ENGLISH)
Page 91
... copies and print range. The exact steps for printing from the File menu. The basic print settings are using. Make sure that your printer is displayed (It may vary depending on your application).
... copies and print range. The exact steps for printing from the File menu. The basic print settings are using. Make sure that your printer is displayed (It may vary depending on your application).
User Manual (ENGLISH)
Page 92
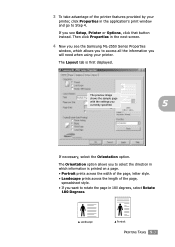
... of the printer features provided by your printer. The preview image shows the sample page with the settings you see the Samsung ML-2550 Series Properties window, which information is first displayed. The Orientation option allows you will need when using your printer, click Properties in the next screen. 4 Now you see Setup...
... of the printer features provided by your printer. The preview image shows the sample page with the settings you see the Samsung ML-2550 Series Properties window, which information is first displayed. The Orientation option allows you will need when using your printer, click Properties in the next screen. 4 Now you see Setup...
User Manual (ENGLISH)
Page 93
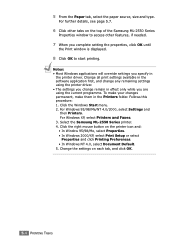
... For further details, see page 5.7. 6 Click other tabs on the top of the Samsung ML-2550 Series Properties window to start printing. Follows this procedure: 1. Click the Windows Start menu. 2. Select the Samsung ML-2550 Series printer. 4. To make your changes permanent, make them in the printer driver....printer driver. • The settings you change remain in effect only while you complete setting the properties, click OK until the Print window is displayed. 8 Click OK to access other features, if needed. 7 When you are using the current programme. 5 From the Paper tab, select ...
... For further details, see page 5.7. 6 Click other tabs on the top of the Samsung ML-2550 Series Properties window to start printing. Follows this procedure: 1. Click the Windows Start menu. 2. Select the Samsung ML-2550 Series printer. 4. To make your changes permanent, make them in the printer driver....printer driver. • The settings you change remain in effect only while you complete setting the properties, click OK until the Print window is displayed. 8 Click OK to access other features, if needed. 7 When you are using the current programme. 5 From the Paper tab, select ...

