Quick Guide (ENGLISH)
Page 1
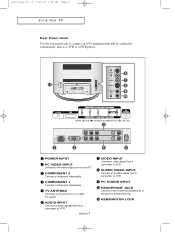
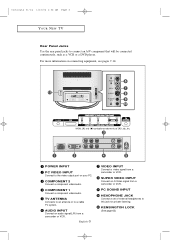
...Connect an S-Video signal from a camcorder or VCR. COMPONENT 1 Connect a component video/audio. POWER INPUT PC VIDEO INPUT Connect to a cable TV system. KENSINGTON LOCK PC SOUND INPUT HEADPHONE JACK Connect a set of external headphones to connect an A/V component that will be connected continuously, such .... AUDIO INPUT Connect an audio signal(L/R) from a camcorder or VCR. victoryia 01-14 1/10/04 1:02 AM Page 3 YOUR NEW TV Rear Panel Jacks Use the rear panel jacks to this jack for private listening. English-1 VIDEO INPUT Connect a video signal from a camcorder or VCR.
...Connect an S-Video signal from a camcorder or VCR. COMPONENT 1 Connect a component video/audio. POWER INPUT PC VIDEO INPUT Connect to a cable TV system. KENSINGTON LOCK PC SOUND INPUT HEADPHONE JACK Connect a set of external headphones to connect an A/V component that will be connected continuously, such .... AUDIO INPUT Connect an audio signal(L/R) from a camcorder or VCR. victoryia 01-14 1/10/04 1:02 AM Page 3 YOUR NEW TV Rear Panel Jacks Use the rear panel jacks to this jack for private listening. English-1 VIDEO INPUT Connect a video signal from a camcorder or VCR.
Quick Guide (ENGLISH)
Page 2
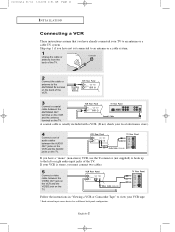
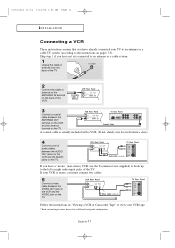
...between the ANTENNA OUT terminal on the VCR and the antenna terminal on the TV. If your VCR is usually included with a VCR. (If not, check your VCR tape. * Each external input source device has a different back panel configuration. A coaxial cable is stereo, you must connect two cables. 5 ...Connect a video cable between the AUDIO OUT jacks on the VCR and the AUDIO jacks on the TV. English-2 Skip step 1 if you have not yet connected ...
...between the ANTENNA OUT terminal on the VCR and the antenna terminal on the TV. If your VCR is usually included with a VCR. (If not, check your VCR tape. * Each external input source device has a different back panel configuration. A coaxial cable is stereo, you must connect two cables. 5 ...Connect a video cable between the AUDIO OUT jacks on the VCR and the AUDIO jacks on the TV. English-2 Skip step 1 if you have not yet connected ...
Quick Guide (ENGLISH)
Page 3
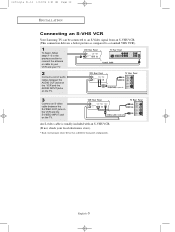
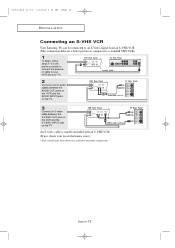
... is usually included with an S-VHS VCR. (If not, check your TV. 2 Connect a set of audio cables between the AUDIO OUT jacks on the VCR and the AUDIO INPUT jacks on the TV. 3 Connect an S-video cable between the S-VIDEO OUT jack on the... VCR and the S-VIDEO INPUT jack on the TV. victoryia 01-14 1/12/04 1:51 AM Page 12 I N S TA L L AT I O N Connecting an S-VHS VCR Your Samsung TV can be connected to an S-Video signal from an S-VHS VCR. (This ... your VCR and your local electronics store). * Each external input source device has a different back panel configuration.
... is usually included with an S-VHS VCR. (If not, check your TV. 2 Connect a set of audio cables between the AUDIO OUT jacks on the VCR and the AUDIO INPUT jacks on the TV. 3 Connect an S-video cable between the S-VIDEO OUT jack on the... VCR and the S-VIDEO INPUT jack on the TV. victoryia 01-14 1/12/04 1:51 AM Page 12 I N S TA L L AT I O N Connecting an S-VHS VCR Your Samsung TV can be connected to an S-Video signal from an S-VHS VCR. (This ... your VCR and your local electronics store). * Each external input source device has a different back panel configuration.
Quick Guide (ENGLISH)
Page 4
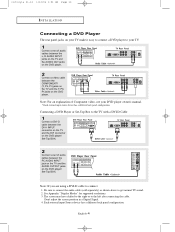
... in a Digital Signal. 4. The screen may have shifted to the right or to the TV with a DVI-D Cable 1 Connect a DVI-D cable between the DVI-I O N Connecting a DVD Player The rear panel jacks on your TV make it easy to connect a DVD player to your DVD player owner's manual. * Each... external input source device has a different back panel configuration. Connecting a DVD Player or Set-Top Box to the left after connecting...
... in a Digital Signal. 4. The screen may have shifted to the right or to the TV with a DVI-D Cable 1 Connect a DVI-D cable between the DVI-I O N Connecting a DVD Player The rear panel jacks on your TV make it easy to connect a DVD player to your DVD player owner's manual. * Each... external input source device has a different back panel configuration. Connecting a DVD Player or Set-Top Box to the left after connecting...
Quick Guide (ENGLISH)
Page 5
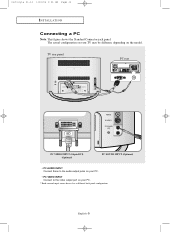
English-5 victoryia 01-14 1/10/04 1:03 AM Page 14 I N S TA L L AT I O N Connecting a PC Note: This figure shows the Standard Connector-jack panel. TV rear panel PC rear PC VIDEO INPUT (24-pin DVI) (Optional) PC SOUND INPUT (Optional) • PC AUDIO INPUT Connect these to the audio-output jacks on your PC. • PC VIDEO INPUT Connect to the video output port on your TV may be different, depending on your PC. * Each external input source device has a different back panel configuration. The actual configuration on the model.
English-5 victoryia 01-14 1/10/04 1:03 AM Page 14 I N S TA L L AT I O N Connecting a PC Note: This figure shows the Standard Connector-jack panel. TV rear panel PC rear PC VIDEO INPUT (24-pin DVI) (Optional) PC SOUND INPUT (Optional) • PC AUDIO INPUT Connect these to the audio-output jacks on your PC. • PC VIDEO INPUT Connect to the video output port on your TV may be different, depending on your PC. * Each external input source device has a different back panel configuration. The actual configuration on the model.
Quick Guide (ENGLISH)
Page 6
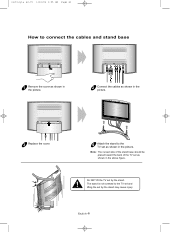
English-6 The stand is not screwed to the TV set as shown in the above figure. Do NOT lift the TV set as shown in the picture. victoryia 62-70 1/10/04 1:05 AM Page 61 How to connect the cables and stand base 1 Remove the cover as shown in the picture. 2 Connect the cables as shown in the picture. 3 Replace the cover. 4 Attach the stand to the TV set and lifting the set by the stand. Note : The curved side of the stand base should be placed toward the back of the TV set by the stand may cause injury.
English-6 The stand is not screwed to the TV set as shown in the above figure. Do NOT lift the TV set as shown in the picture. victoryia 62-70 1/10/04 1:05 AM Page 61 How to connect the cables and stand base 1 Remove the cover as shown in the picture. 2 Connect the cables as shown in the picture. 3 Replace the cover. 4 Attach the stand to the TV set and lifting the set by the stand. Note : The curved side of the stand base should be placed toward the back of the TV set by the stand may cause injury.
User Manual (ENGLISH)
Page 2
... of Features 1 List of Parts 1 Familiarizing Yourself with Your New TV 2 Top Panel Buttons 2 Rear Panel Jacks 3 Remote Control 4 Installing Batteries in the Remote Control 6 The remote control doesn't work 6 Chapter 2: Installation Connecting VHF and UHF Antennas 7 Antennas with 300-ohm Flat Twin Leads 7 Antennas with 75-ohm Round Leads 8 Separate VHF and UHF...
... of Features 1 List of Parts 1 Familiarizing Yourself with Your New TV 2 Top Panel Buttons 2 Rear Panel Jacks 3 Remote Control 4 Installing Batteries in the Remote Control 6 The remote control doesn't work 6 Chapter 2: Installation Connecting VHF and UHF Antennas 7 Antennas with 300-ohm Flat Twin Leads 7 Antennas with 75-ohm Round Leads 8 Separate VHF and UHF...
User Manual (ENGLISH)
Page 3
... the V-Chip 45 Setting Up Your Personal ID Number (PIN 45 How to Enable/Disable the V-Chip 46 How to Set up Restrictions Using the 'TV guidelines' . . . . .46 How to Set up Restrictions using the MPAA Ratings: G, PG, PG-13, R, NC-17, X 48 How to Reset the... 59 Appendix How to connect the cables and stand base 61 Using the Anti-Theft Kensington Lock 62 Retractable Stand 63 Cleaning and Maintaining Your TV 64 Using Your TV in Another Country 64 Specifications 65 Display Modes 66 Setting Up Your Remote Control 67 Remote Control Codes 70 Contents 2
... the V-Chip 45 Setting Up Your Personal ID Number (PIN 45 How to Enable/Disable the V-Chip 46 How to Set up Restrictions Using the 'TV guidelines' . . . . .46 How to Set up Restrictions using the MPAA Ratings: G, PG, PG-13, R, NC-17, X 48 How to Reset the... 59 Appendix How to connect the cables and stand base 61 Using the Anti-Theft Kensington Lock 62 Retractable Stand 63 Cleaning and Maintaining Your TV 64 Using Your TV in Another Country 64 Specifications 65 Display Modes 66 Setting Up Your Remote Control 67 Remote Control Codes 70 Contents 2
User Manual (ENGLISH)
Page 4
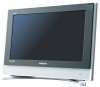
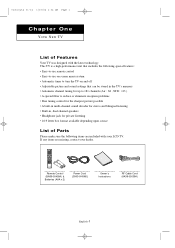
... with the latest technology. victoryia 01-14 1/10/04 1:02 AM Page 1 Chapter One YOUR NEW TV List of Parts Please make sure the following items are missing, contact your LCD TV. This TV is a high-performance unit that includes the following special features: • Easy-to-use remote control ...• Easy-to-use on-screen menu system • Automatic timer to turn the TV on and off • Adjustable picture and...
... with the latest technology. victoryia 01-14 1/10/04 1:02 AM Page 1 Chapter One YOUR NEW TV List of Parts Please make sure the following items are missing, contact your LCD TV. This TV is a high-performance unit that includes the following special features: • Easy-to-use remote control ...• Easy-to-use on-screen menu system • Automatic timer to turn the TV on and off • Adjustable picture and...
User Manual (ENGLISH)
Page 5
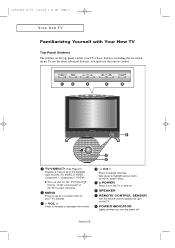
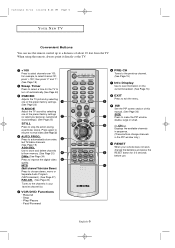
... menu. SPEAKER REMOTE CONTROL SENSOR Aim the remote control towards this spot on the TV. POWER INDICATOR Lights up when you must use the TV/Video( ) buttons on the control panel of the available input sources (TV, VIDEO, S-VIDEO, Component 1, Component 2, PC/DVI). MENU Press to highlight ... or decrease the volume. English-2 victoryia 01-14 1/10/04 1:02 AM Page 2 YOUR NEW TV Familiarizing Yourself with Your New TV Top Panel Buttons The buttons on the top panel control your TV's features. - VOL + Press to change channels. POWER Press to make selections. You can also ...
... menu. SPEAKER REMOTE CONTROL SENSOR Aim the remote control towards this spot on the TV. POWER INDICATOR Lights up when you must use the TV/Video( ) buttons on the control panel of the available input sources (TV, VIDEO, S-VIDEO, Component 1, Component 2, PC/DVI). MENU Press to highlight ... or decrease the volume. English-2 victoryia 01-14 1/10/04 1:02 AM Page 2 YOUR NEW TV Familiarizing Yourself with Your New TV Top Panel Buttons The buttons on the top panel control your TV's features. - VOL + Press to change channels. POWER Press to make selections. You can also ...
User Manual (ENGLISH)
Page 6
... Connects to an antenna or to this jack for private listening. PC SOUND INPUT HEADPHONE JACK Connect a set of external headphones to a cable TV system. AUDIO INPUT Connect an audio signal(L/R) from a camcorder or VCR. For more information on your PC. COMPONENT 1 Connect a component video/audio. ...that will be connected continuously, such as a VCR or a DVD player. victoryia 01-14 1/10/04 1:02 AM Page 3 YOUR NEW TV Rear Panel Jacks Use the rear panel jacks to the video output port on connecting equipment, see pages 7-14. SUPER VIDEO INPUT Connect an S-Video signal from a camcorder or ...
... Connects to an antenna or to this jack for private listening. PC SOUND INPUT HEADPHONE JACK Connect a set of external headphones to a cable TV system. AUDIO INPUT Connect an audio signal(L/R) from a camcorder or VCR. For more information on your PC. COMPONENT 1 Connect a component video/audio. ...that will be connected continuously, such as a VCR or a DVD player. victoryia 01-14 1/10/04 1:02 AM Page 3 YOUR NEW TV Rear Panel Jacks Use the rear panel jacks to the video output port on connecting equipment, see pages 7-14. SUPER VIDEO INPUT Connect an S-Video signal from a camcorder or ...

User Manual (ENGLISH)
Page 7
.... (The remote control will only function with VCR or DVD units that are compatible with the LCD TV.) English-4 P.SIZE 3 Press to change channels. victoryia 01-14 1/10/04 1:03 AM Page 4 YOUR NEW TV Remote Control Frequently Used Buttons You can use the remote control up to a distance of the ...available video sources. JOYSTICK 9 Use to select on -screen menu. 5 MODE Selects a target device to controlled by the samsung remote control (TV, STB, VCR, CABLE, DVD) 6 CH and CH (Channel UP/Down) Press CH or CH to change the screen size.
.... (The remote control will only function with VCR or DVD units that are compatible with the LCD TV.) English-4 P.SIZE 3 Press to change channels. victoryia 01-14 1/10/04 1:03 AM Page 4 YOUR NEW TV Remote Control Frequently Used Buttons You can use the remote control up to a distance of the ...available video sources. JOYSTICK 9 Use to select on -screen menu. 5 MODE Selects a target device to controlled by the samsung remote control (TV, STB, VCR, CABLE, DVD) 6 CH and CH (Channel UP/Down) Press CH or CH to change the screen size.
User Manual (ENGLISH)
Page 8
... to the channels in the PIP window only.) RESET When your remote does not work, change the batteries and press the 9 RESET button for the TV to improve the digital video 5 quality. Stop - Fast/Forward PRE-CH Tunes to the previous channel. (See Page 15) Info Display Use to ... settings (or select your favorite channel list. Press again to select channels over 100. Rewind - When using the remote, always point it directly at the TV. +100 Press to resume normal video.(See Page 32) AUTO PROG. VCR/DVD Functions - For example, to select channel 121, press "+100", then press "2"...
... to the channels in the PIP window only.) RESET When your remote does not work, change the batteries and press the 9 RESET button for the TV to improve the digital video 5 quality. Stop - Fast/Forward PRE-CH Tunes to the previous channel. (See Page 15) Info Display Use to ... settings (or select your favorite channel list. Press again to select channels over 100. Rewind - When using the remote, always point it directly at the TV. +100 Press to resume normal video.(See Page 32) AUTO PROG. VCR/DVD Functions - For example, to select channel 121, press "+100", then press "2"...
User Manual (ENGLISH)
Page 9
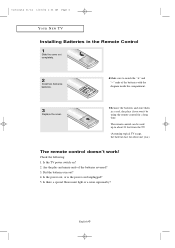
..., the batteries last for a long time. Did the batteries run out? 4. Is the TV power switch on? 2. Is the power out, or is the power cord unplugged? 5. English-6 The remote control can be using the remote control for about ... of the batteries with the diagram inside the compartment. 3 Replace the cover. Check the following: 1. victoryia 01-14 1/10/04 1:03 AM Page 6 YOUR NEW TV Installing Batteries in a cool, dry place if you won't be used up to match the "+" and "-" ends of the batteries reversed? 3. Remove the batteries and...
..., the batteries last for a long time. Did the batteries run out? 4. Is the TV power switch on? 2. Is the power out, or is the power cord unplugged? 5. English-6 The remote control can be using the remote control for about ... of the batteries with the diagram inside the compartment. 3 Replace the cover. Check the following: 1. victoryia 01-14 1/10/04 1:03 AM Page 6 YOUR NEW TV Installing Batteries in a cool, dry place if you won't be used up to match the "+" and "-" ends of the batteries reversed? 3. Remove the batteries and...
User Manual (ENGLISH)
Page 10
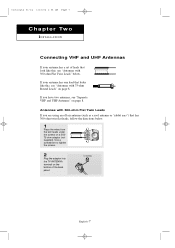
...the directions below . English-7 Use a screwdriver to tighten the screws. 2 Plug the adaptor into the TV ANTENNA terminal on page 8. Antennas with 300-ohm Flat Twin Leads If you have two antennas, see "Separate VHF and UHF Antennas" on the bottom of leads... that look like this , see "Antennas with 300-ohm Flat Twin Leads" below . 1 Place the wires from the twin leads under the screws on page 8. victoryia 01-14 1/10/04...Round Leads" on a 30075 ohm adaptor (not supplied). If your antenna has a set of the back panel.
...the directions below . English-7 Use a screwdriver to tighten the screws. 2 Plug the adaptor into the TV ANTENNA terminal on page 8. Antennas with 300-ohm Flat Twin Leads If you have two antennas, see "Separate VHF and UHF Antennas" on the bottom of leads... that look like this , see "Antennas with 300-ohm Flat Twin Leads" below . 1 Place the wires from the twin leads under the screws on page 8. victoryia 01-14 1/10/04...Round Leads" on a 30075 ohm adaptor (not supplied). If your antenna has a set of the back panel.
User Manual (ENGLISH)
Page 11
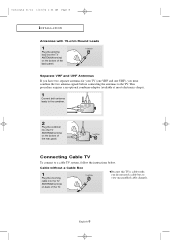
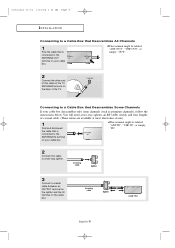
... VHF and one UHF), you do not need a cable box to the TV. Cable without a Cable Box 1 Plug the incoming cable into the TV ANTENNA terminal on the bottom of the back panel. victoryia 01-14 1/10/04 1:03 AM Page 8 I N S TA L L AT I O N Antennas with 75-ohm Round Leads 1... Plug the antenna lead into the TV ANTENNA terminal on back of the TV. This procedure requires a an optional combiner-adaptor (available at most electronics shops). 1 Connect both antenna leads to a cable TV system, follow the instructions below. Because this TV is cable-ready, you must combine the two antenna signals...
... VHF and one UHF), you do not need a cable box to the TV. Cable without a Cable Box 1 Plug the incoming cable into the TV ANTENNA terminal on the bottom of the back panel. victoryia 01-14 1/10/04 1:03 AM Page 8 I N S TA L L AT I O N Antennas with 75-ohm Round Leads 1... Plug the antenna lead into the TV ANTENNA terminal on back of the TV. This procedure requires a an optional combiner-adaptor (available at most electronics shops). 1 Connect both antenna leads to a cable TV system, follow the instructions below. Because this TV is cable-ready, you must combine the two antenna signals...
User Manual (ENGLISH)
Page 12
... terminal on your cable box. This terminal might be labeled "ANT OUT", "VHF OUT", or simply, "OUT". 2 Connect the other end of the TV. English-9 Connecting to the TV ANTENNA terminal on the back of this cable to the ANTENNA IN terminal on the cable box. victoryia 01-14 1/10/04 1:03...
... terminal on your cable box. This terminal might be labeled "ANT OUT", "VHF OUT", or simply, "OUT". 2 Connect the other end of the TV. English-9 Connecting to the TV ANTENNA terminal on the back of this cable to the ANTENNA IN terminal on the cable box. victoryia 01-14 1/10/04 1:03...
User Manual (ENGLISH)
Page 13
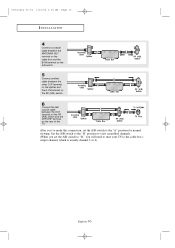
... RF (A/B) switch. 6 Connect the last coaxial cable between the OUT terminal on the RF (A/B) switch and the VHF/UHF terminal on the rear of the TV. English-10 Set the A/B switch to the "B" position to view scrambled channels. (When you set the A/B switch to "B," you 've made this connection, set the...
... RF (A/B) switch. 6 Connect the last coaxial cable between the OUT terminal on the RF (A/B) switch and the VHF/UHF terminal on the rear of the TV. English-10 Set the A/B switch to the "B" position to view scrambled channels. (When you set the A/B switch to "B," you 've made this connection, set the...
User Manual (ENGLISH)
Page 14
...to an antenna or a cable system. 1 Unplug the cable or antenna from the back of the TV. 2 Connect the cable or antenna to view your VCR tape. * Each external input source device has a different back panel configuration. If your VCR is usually included with a VCR. (If not, check your local electronics ... the VIDEO jack on pages 7-9). If you have a "mono" (non-stereo) VCR, use the Y-connector (not supplied) to hook up to the instructions on the TV. English-11 victoryia 01-14 1/12/04 1:51 AM Page 11 I N S TA L L AT I O N Connecting a VCR These instructions assume that you have already ...
...to an antenna or a cable system. 1 Unplug the cable or antenna from the back of the TV. 2 Connect the cable or antenna to view your VCR tape. * Each external input source device has a different back panel configuration. If your VCR is usually included with a VCR. (If not, check your local electronics ... the VIDEO jack on pages 7-9). If you have a "mono" (non-stereo) VCR, use the Y-connector (not supplied) to hook up to the instructions on the TV. English-11 victoryia 01-14 1/12/04 1:51 AM Page 11 I N S TA L L AT I O N Connecting a VCR These instructions assume that you have already ...
User Manual (ENGLISH)
Page 15
...is usually included with an S-VHS VCR. (If not, check your TV. 2 Connect a set of audio cables between the AUDIO OUT jacks on the VCR and the AUDIO INPUT jacks on the TV. 3 Connect an S-video cable between the S-VIDEO OUT jack on the... VCR and the S-VIDEO INPUT jack on the TV. victoryia 01-14 1/12/04 1:51 AM Page 12 I N S TA L L AT I O N Connecting an S-VHS VCR Your Samsung TV can be connected to an S-Video signal from an S-VHS VCR. (This ... your VCR and your local electronics store). * Each external input source device has a different back panel configuration.
...is usually included with an S-VHS VCR. (If not, check your TV. 2 Connect a set of audio cables between the AUDIO OUT jacks on the VCR and the AUDIO INPUT jacks on the TV. 3 Connect an S-video cable between the S-VIDEO OUT jack on the... VCR and the S-VIDEO INPUT jack on the TV. victoryia 01-14 1/12/04 1:51 AM Page 12 I N S TA L L AT I O N Connecting an S-VHS VCR Your Samsung TV can be connected to an S-Video signal from an S-VHS VCR. (This ... your VCR and your local electronics store). * Each external input source device has a different back panel configuration.


