
User Manual (user Manual) (ver.1.0) (English)
Page 3
... this equipment may also be copyrighted and any kind of contact with this appliance to the wide slot, and fully insert the plug. Samsung Electronics America, Inc. This symbol alerts you that any inside . Important: One Federal Court has held that provides guidelines for energy efficiency... to Article 820-40 of the National Electrical Code (Section 54 of Canadian Electrical Code, Part I), that unauthorized recording of copyrighted TV programs is dangerous to make any unauthorized recording in whole or in part may result in particular, specifies that this product. NO ...
... this equipment may also be copyrighted and any kind of contact with this appliance to the wide slot, and fully insert the plug. Samsung Electronics America, Inc. This symbol alerts you that any inside . Important: One Federal Court has held that provides guidelines for energy efficiency... to Article 820-40 of the National Electrical Code (Section 54 of Canadian Electrical Code, Part I), that unauthorized recording of copyrighted TV programs is dangerous to make any unauthorized recording in whole or in part may result in particular, specifies that this product. NO ...

User Manual (user Manual) (ver.1.0) (English)
Page 4
...configuration 5-15P type (parallel blades) plug cap. Warning In a domestic environ-ment this product may be required to Identify and Resolve Radio/TV Interference Problems helpful. 00.Safety+Contents 5/27/03 8:31 PM Page 3 FCC Information User Information Changes or modifications not expressly approved by... Listed detachable power cord with IEC320 style terminations. For 110 Volt applications, use only UL Listed Detachable power supply cord with Part 15 of Samsung 3351 Michelson Drive, Suite #290, Irvine, CA 92612, U.S.A Tel ) 949-975-7310 Fax) 949-975-7328 Provided with this device...
...configuration 5-15P type (parallel blades) plug cap. Warning In a domestic environ-ment this product may be required to Identify and Resolve Radio/TV Interference Problems helpful. 00.Safety+Contents 5/27/03 8:31 PM Page 3 FCC Information User Information Changes or modifications not expressly approved by... Listed detachable power cord with IEC320 style terminations. For 110 Volt applications, use only UL Listed Detachable power supply cord with Part 15 of Samsung 3351 Michelson Drive, Suite #290, Irvine, CA 92612, U.S.A Tel ) 949-975-7310 Fax) 949-975-7328 Provided with this device...
User Manual (user Manual) (ver.1.0) (English)
Page 5
... and UHF Antennas 6 Antennas with 300-ohm Flat Twin Leads 6 Antennas with 75-ohm Round Leads 7 Separate VHF and UHF Antennas 7 Connecting Cable TV 7 Cable without a Cable Box 7 Connecting to a Cable Box that Descrambles All Channels . . .7 Connecting to a Cable Box that Descrambles Some ...Channels 9 Connecting a VCR 10 Connecting an S-VHS VCR 11 Connecting a DVD Player 12 Chapter 3: Special Features Turning the TV On and Off 13 Changing Channels 13 Adjusting the Volume 14 Viewing the Display 14 Chapter 4: Operation Plug & Play Feature 15 Memorizing the ...
... and UHF Antennas 6 Antennas with 300-ohm Flat Twin Leads 6 Antennas with 75-ohm Round Leads 7 Separate VHF and UHF Antennas 7 Connecting Cable TV 7 Cable without a Cable Box 7 Connecting to a Cable Box that Descrambles All Channels . . .7 Connecting to a Cable Box that Descrambles Some ...Channels 9 Connecting a VCR 10 Connecting an S-VHS VCR 11 Connecting a DVD Player 12 Chapter 3: Special Features Turning the TV On and Off 13 Changing Channels 13 Adjusting the Volume 14 Viewing the Display 14 Chapter 4: Operation Plug & Play Feature 15 Memorizing the ...
User Manual (user Manual) (ver.1.0) (English)
Page 6
... the V-Chip 33 Setting Up Your Personal ID Number (PIN 33 How to Enable/Disable the V-Chip 34 How to Set up Restrictions Using the "TV guidelines" . . . . .34 How to Set up Restrictions using the MPAA Ratings: G, PG, PG-13, R, NC-17, X 36 How to Reset the... TV after the V-Chip Blocks a Channel ("Emergency Escape 37 Chapter 5: Troubleshooting Identifying Problems 38 Appendix Installing VESA compliant mounting devices 39 Attaching a Wall or Arm mounting ...
... the V-Chip 33 Setting Up Your Personal ID Number (PIN 33 How to Enable/Disable the V-Chip 34 How to Set up Restrictions Using the "TV guidelines" . . . . .34 How to Set up Restrictions using the MPAA Ratings: G, PG, PG-13, R, NC-17, X 36 How to Reset the... TV after the V-Chip Blocks a Channel ("Emergency Escape 37 Chapter 5: Troubleshooting Identifying Problems 38 Appendix Installing VESA compliant mounting devices 39 Attaching a Wall or Arm mounting ...

User Manual (user Manual) (ver.1.0) (English)
Page 7
...to-use remote control • Easy-to-use on-screen menu system • Automatic timer to turn the TV on and off • Adjustable picture and sound settings that can be stored in the TV's memory • Automatic channel tuning for up to 181 channels • A special filter to reduce or...-channel sound decoder for stereo and bilingual listening • Built-in, dual channel speakers • Headphone jack for private listening List of Features Your TV was designed with your dealer. If any items are included with the latest technology. 01-12 5/30/03 10:40 AM Page 1 Chapter One ...
...to-use remote control • Easy-to-use on-screen menu system • Automatic timer to turn the TV on and off • Adjustable picture and sound settings that can be stored in the TV's memory • Automatic channel tuning for up to 181 channels • A special filter to reduce or...-channel sound decoder for stereo and bilingual listening • Built-in, dual channel speakers • Headphone jack for private listening List of Features Your TV was designed with your dealer. If any items are included with the latest technology. 01-12 5/30/03 10:40 AM Page 1 Chapter One ...

User Manual (user Manual) (ver.1.0) (English)
Page 8
..., S-VIDEO, Component ). Power Indicator Lights up when you must use the more advanced features, you turn the TV on the TV. VOL + Press to change channels. English-2 Power Press to select items on the on -screen menu. SPEAKER Remote Control Sensor Aim the remote control towards ... use the remote control. MENU Press to highlight various items on the on -screen menu. 01-12 5/30/03 10:40 AM Page 2 YOUR NEW TV Familiarizing Yourself with The TV Top Buttons The buttons on the top panel control your...
..., S-VIDEO, Component ). Power Indicator Lights up when you must use the more advanced features, you turn the TV on the TV. VOL + Press to change channels. English-2 Power Press to select items on the on -screen menu. SPEAKER Remote Control Sensor Aim the remote control towards ... use the remote control. MENU Press to highlight various items on the on -screen menu. 01-12 5/30/03 10:40 AM Page 2 YOUR NEW TV Familiarizing Yourself with The TV Top Buttons The buttons on the top panel control your...

User Manual (user Manual) (ver.1.0) (English)
Page 9
... will be connected continuously, such as a VCR or a DVD player. 01-12 5/30/03 10:40 AM Page 3 YOUR NEW TV Rear Panel Jacks Use the rear panel jacks to a cable TV system. POWER INPUT VIDEO INPUT Connect a video signal from a camcorder or VCR. AUDIO INPUT Connect audio signal from a camcorder or...
... will be connected continuously, such as a VCR or a DVD player. 01-12 5/30/03 10:40 AM Page 3 YOUR NEW TV Rear Panel Jacks Use the rear panel jacks to a cable TV system. POWER INPUT VIDEO INPUT Connect a video signal from a camcorder or VCR. AUDIO INPUT Connect audio signal from a camcorder or...

User Manual (user Manual) (ver.1.0) (English)
Page 10
...CH 3 (Channel Up/Down) Press CH or CH to select channels over 100. P.MODE Adjusts the TV picture by selecting one of about 23 feet from memory. NUMBER BUTTONS Press to select channels directly on...preset factory settings PRE-CH 13 Tunes to the previous channel. POWER (See Page 13) Turns the TV on and off automatically. 9 MENU Displays the main on -screen menu items and change the screen ... to temporarily cut off 7 the sound. 8 SLEEP(See Page 32) Press to select a time for the TV to turn off . Press again to resume normal video. 19 20 P.SIZE Press to select on -screen menu...
...CH 3 (Channel Up/Down) Press CH or CH to select channels over 100. P.MODE Adjusts the TV picture by selecting one of about 23 feet from memory. NUMBER BUTTONS Press to select channels directly on...preset factory settings PRE-CH 13 Tunes to the previous channel. POWER (See Page 13) Turns the TV on and off automatically. 9 MENU Displays the main on -screen menu items and change the screen ... to temporarily cut off 7 the sound. 8 SLEEP(See Page 32) Press to select a time for the TV to turn off . Press again to resume normal video. 19 20 P.SIZE Press to select on -screen menu...
User Manual (user Manual) (ver.1.0) (English)
Page 11
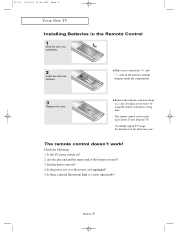
Make sure to about 23 feet from the TV. (Assuming typical TV usage, the batteries last for a long time. Is the TV power switch on? 2. Is the power out, or is the power cord unplugged? 5. Check the following: 1. Did the battery run out? 4. Are the plus end ... minus end of the batteries with the diagram inside the compartment. 3 Replace the cover. English-5 01-12 5/30/03 10:40 AM Page 5 YOUR NEW TV Installing Batteries in a cool, dry place if you won't be used up to match the "+" and "-" ends of the battery reversed? 3. The remote control can...
Make sure to about 23 feet from the TV. (Assuming typical TV usage, the batteries last for a long time. Is the TV power switch on? 2. Is the power out, or is the power cord unplugged? 5. Check the following: 1. Did the battery run out? 4. Are the plus end ... minus end of the batteries with the diagram inside the compartment. 3 Replace the cover. English-5 01-12 5/30/03 10:40 AM Page 5 YOUR NEW TV Installing Batteries in a cool, dry place if you won't be used up to match the "+" and "-" ends of the battery reversed? 3. The remote control can...

User Manual (user Manual) (ver.1.0) (English)
Page 12
... Leads", below . 1 Place the wires from the twin leads under the screws on page 7. Use a screwdriver to tighten the screws. 2 Plug the adaptor into the TV ANTENNA terminal on page 7. English-6 If you are using an off-air antenna (such as a roof antenna or "rabbit ears") that looks like this, see...
... Leads", below . 1 Place the wires from the twin leads under the screws on page 7. Use a screwdriver to tighten the screws. 2 Plug the adaptor into the TV ANTENNA terminal on page 7. English-6 If you are using an off-air antenna (such as a roof antenna or "rabbit ears") that looks like this, see...

User Manual (user Manual) (ver.1.0) (English)
Page 13
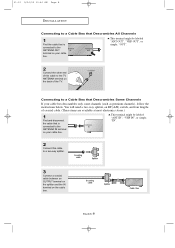
...to the combiner. 2 Plug the combiner into the TV ANTENNA terminal on back of the TV. English-7 Cable without a Cable Box 1 Plug the incoming cable into the TV ANTENNA terminal on the bottom of the back panel. Connecting Cable TV To connect to view unscrambled cable channels. Separate ...VHF and UHF Antennas If you have two separate antennas for your TV (one VHF and one UHF), you do not need a cable box to a cable TV system, follow the instructions below. This procedure requires a an optional combiner-adaptor (available at most ...
...to the combiner. 2 Plug the combiner into the TV ANTENNA terminal on back of the TV. English-7 Cable without a Cable Box 1 Plug the incoming cable into the TV ANTENNA terminal on the bottom of the back panel. Connecting Cable TV To connect to view unscrambled cable channels. Separate ...VHF and UHF Antennas If you have two separate antennas for your TV (one VHF and one UHF), you do not need a cable box to a cable TV system, follow the instructions below. This procedure requires a an optional combiner-adaptor (available at most ...
User Manual (user Manual) (ver.1.0) (English)
Page 14
This terminal might be labeled "ANT OUT", "VHF OUT", or simply, "OUT". 2 Connect the other end of the TV. You will need a two-way splitter, an RF (A/B) switch, and four lengths of coaxial cable. (These items are available at most electronics stores.) 1 Find and ...disconnect the cable that is connected to the ANTENNA OUT terminal on the back of this cable to a Cable Box that is connected to the TV ANTENNA terminal on your cable box. This terminal might be labeled "ANT IN", "VHF IN", or simply, "IN". 2 Connect this cable to the ANTENNA IN...
This terminal might be labeled "ANT OUT", "VHF OUT", or simply, "OUT". 2 Connect the other end of the TV. You will need a two-way splitter, an RF (A/B) switch, and four lengths of coaxial cable. (These items are available at most electronics stores.) 1 Find and ...disconnect the cable that is connected to the ANTENNA OUT terminal on the back of this cable to a Cable Box that is connected to the TV ANTENNA terminal on your cable box. This terminal might be labeled "ANT IN", "VHF IN", or simply, "IN". 2 Connect this cable to the ANTENNA IN...
User Manual (user Manual) (ver.1.0) (English)
Page 15
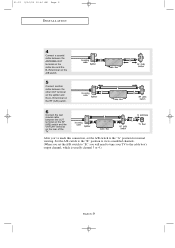
... RF (A/B) switch. 6 Connect the last coaxial cable between the OUT terminal on the RF (A/B) switch and the VHF/UHF terminal on the rear of the TV. Set the A/B switch to the "B" position to view scrambled channels. (When you set the A/B switch to "B," you 've made this connection, set the A/B switch to...
... RF (A/B) switch. 6 Connect the last coaxial cable between the OUT terminal on the RF (A/B) switch and the VHF/UHF terminal on the rear of the TV. Set the A/B switch to the "B" position to view scrambled channels. (When you set the A/B switch to "B," you 've made this connection, set the A/B switch to...
User Manual (user Manual) (ver.1.0) (English)
Page 16
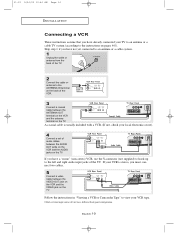
... 5 Connect a video cable between the VIDEO OUT jack on the VCR and the VIDEO jack on the TV. If your local electronics store). 4 Connect a set of audio cables between the AUDIO OUT jacks on the VCR...not yet connected to an antenna or a cable system. 1 Unplug the cable or antenna from the back of the TV. 2 Connect the cable or antenna to the ANTENNA IN terminal on the back of the VCR. 3 Connect a... coaxial cable between the ANTENNA OUT terminal on the VCR and the antenna terminal on the TV. If you have a "mono" (non-stereo) VCR, use the Y-connector (not supplied) to hook up to...
... 5 Connect a video cable between the VIDEO OUT jack on the VCR and the VIDEO jack on the TV. If your local electronics store). 4 Connect a set of audio cables between the AUDIO OUT jacks on the VCR...not yet connected to an antenna or a cable system. 1 Unplug the cable or antenna from the back of the TV. 2 Connect the cable or antenna to the ANTENNA IN terminal on the back of the VCR. 3 Connect a... coaxial cable between the ANTENNA OUT terminal on the VCR and the antenna terminal on the TV. If you have a "mono" (non-stereo) VCR, use the Y-connector (not supplied) to hook up to...

User Manual (user Manual) (ver.1.0) (English)
Page 17
An S-video cable is usually included with an S-VHS VCR. (If not, check your TV. 2 Connect a set of audio cables between the AUDIO OUT jacks on the VCR and the AUDIO INPUT jacks on the TV. 3 Connect an S-video cable between the S-VIDEO OUT jack on the VCR and the S-VIDEO INPUT jack... on the TV. 01-12 5/30/03 10:40 AM Page 11 I N S TA L L AT I O N Connecting an S-VHS VCR Your Samsung TV can be connected to an S-Video signal from an S-VHS VCR. (This connection delivers a better picture as...
An S-video cable is usually included with an S-VHS VCR. (If not, check your TV. 2 Connect a set of audio cables between the AUDIO OUT jacks on the VCR and the AUDIO INPUT jacks on the TV. 3 Connect an S-video cable between the S-VIDEO OUT jack on the VCR and the S-VIDEO INPUT jack... on the TV. 01-12 5/30/03 10:40 AM Page 11 I N S TA L L AT I O N Connecting an S-VHS VCR Your Samsung TV can be connected to an S-Video signal from an S-VHS VCR. (This connection delivers a better picture as...
User Manual (user Manual) (ver.1.0) (English)
Page 18
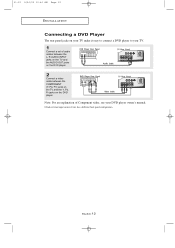
Note: For an explanation of audio cables between the L, R AUDIO INPUT jacks on the TV and the AUDIO OUT jacks on the DVD player. 2 Connect a video cable between the COMPONENT (Y, Pb, Pr) jacks on the TV and the Y, Pb, Pr jacks on your TV make it easy to connect a DVD player to your TV. 1 Connect a set of Component video, see your DVD player owner's manual. # Each external input source device has a different back panel configuration. English-12 01-12 5/30/03 10:40 AM Page 12 I N S TA L L AT I O N Connecting a DVD Player The rear panel jacks on the DVD player.
Note: For an explanation of audio cables between the L, R AUDIO INPUT jacks on the TV and the AUDIO OUT jacks on the DVD player. 2 Connect a video cable between the COMPONENT (Y, Pb, Pr) jacks on the TV and the Y, Pb, Pr jacks on your TV make it easy to connect a DVD player to your TV. 1 Connect a set of Component video, see your DVD player owner's manual. # Each external input source device has a different back panel configuration. English-12 01-12 5/30/03 10:40 AM Page 12 I N S TA L L AT I O N Connecting a DVD Player The rear panel jacks on the DVD player.
User Manual (user Manual) (ver.1.0) (English)
Page 19
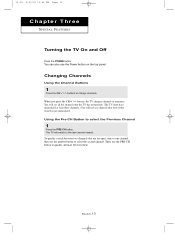
...-CH button to the last channel viewed. Using the Pre-CH Button to change channels. You will see all the channels that the TV has memorized. (The TV must have memorized at least three channels.) You will switch to quickly alternate between two channels that were either erased or not memorized. Changing... / buttons to select the Previous Channel 1 Press the PRE-CH button. 13-29 5/30/03 10:42 AM Page 13 Chapter Three S P E C I A L F E AT U R E S Turning the TV On and Off Press the POWER button. You can also use the number button to select the second channel.
...-CH button to the last channel viewed. Using the Pre-CH Button to change channels. You will see all the channels that the TV has memorized. (The TV must have memorized at least three channels.) You will switch to quickly alternate between two channels that were either erased or not memorized. Changing... / buttons to select the Previous Channel 1 Press the PRE-CH button. 13-29 5/30/03 10:42 AM Page 13 Chapter Three S P E C I A L F E AT U R E S Turning the TV On and Off Press the POWER button. You can also use the number button to select the second channel.
User Manual (user Manual) (ver.1.0) (English)
Page 20
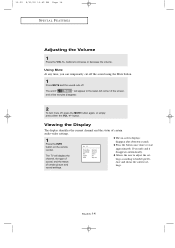
... the sound using the Mute button. 1 Press MUTE and the sound cuts off , press the MUTE button again, or simply press either the VOL +/- The TV will appear in the lower-left corner of certain picture and sound settings. button.
... the sound using the Mute button. 1 Press MUTE and the sound cuts off , press the MUTE button again, or simply press either the VOL +/- The TV will appear in the lower-left corner of certain picture and sound settings. button.
User Manual (user Manual) (ver.1.0) (English)
Page 21
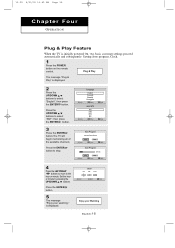
... "English", then press the ENTER button. 13-29 5/30/03 10:42 AM Page 15 Chapter Four O P E R AT I O N Plug & Play Feature When the TV is displayed. Set the hour or minute by pressing the UP/DOWN buttons. is initially powered On, two basic customer settings proceed automatically and subsequently... message "Plug & Play" is displayed. 2 Press the UP/DOWN buttons to select "ANT", then press the ENTER button. 3 Press the ENTER button.The TV will begin memorizing all of the available channels. Press the ENTER button to stop. 4 Press the LEFT/RIGHT buttons to move to the hour or...
... "English", then press the ENTER button. 13-29 5/30/03 10:42 AM Page 15 Chapter Four O P E R AT I O N Plug & Play Feature When the TV is displayed. Set the hour or minute by pressing the UP/DOWN buttons. is initially powered On, two basic customer settings proceed automatically and subsequently... message "Plug & Play" is displayed. 2 Press the UP/DOWN buttons to select "ANT", then press the ENTER button. 3 Press the ENTER button.The TV will begin memorizing all of the available channels. Press the ENTER button to stop. 4 Press the LEFT/RIGHT buttons to move to the hour or...

User Manual (user Manual) (ver.1.0) (English)
Page 22
...and adding and deleting channels (manual). Note : STD, HRC and IRC identify various types of cable TV systems. Contact your local cable company to identify the type of cable system that is connected to the TV (i.e., an antenna or a cable system). 1 Press the MENU button to display the menu. Selecting... to select "Channel", then press the ENTER button. 13-29 5/30/03 10:42 AM Page 16 O P E R AT I O N Memorizing the Channels Your TV can begin memorizing the available channels, you must specify the type of signal source that exists in Memory" (next page). Proceed to change channels by...
...and adding and deleting channels (manual). Note : STD, HRC and IRC identify various types of cable TV systems. Contact your local cable company to identify the type of cable system that is connected to the TV (i.e., an antenna or a cable system). 1 Press the MENU button to display the menu. Selecting... to select "Channel", then press the ENTER button. 13-29 5/30/03 10:42 AM Page 16 O P E R AT I O N Memorizing the Channels Your TV can begin memorizing the available channels, you must specify the type of signal source that exists in Memory" (next page). Proceed to change channels by...


