User Manual (ENGLISH)
Page 3
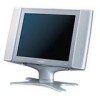
...of the best products in water is a possibility, such as near a radiator or heat register. If you place the TV receiver on -screen menus and closed captioning capabilities, making it with easy-to the appliance. This plug will provide convenient, dependable service and enjoyment for years to... TV is designed with a polarized alternating current line plug having one way. For your TV receiver only from the unit. 1 Your new Samsung TV represents the latest in the cabinet for ventilation to cords at plugs, convenience receptacles, and the point where they won't be careful when...
...of the best products in water is a possibility, such as near a radiator or heat register. If you place the TV receiver on -screen menus and closed captioning capabilities, making it with easy-to the appliance. This plug will provide convenient, dependable service and enjoyment for years to... TV is designed with a polarized alternating current line plug having one way. For your TV receiver only from the unit. 1 Your new Samsung TV represents the latest in the cabinet for ventilation to cords at plugs, convenience receptacles, and the point where they won't be careful when...
User Manual (ENGLISH)
Page 5
...Set-Top Box 2.7 Connecting a Camcorder 2.8 Installing Batteries in the Remote Control 2.9 Chapter 3: Operation 3.1 Turning the TV On and Off 3.1 Viewing the Menus and On-Screen Displays 3.1 Viewing the Menus 3.1 Viewing the Display 3.1 Selecting a Menu Language 3.2 Memorizing the Channels 3.3 Selecting the Video Signal-source 3.3 Storing Channels in Memory (Automatic ... Automatic Sound Settings 3.10 Viewing an External Signal Source 3.11 Chapter 4: Special Features 4.1 Fine Tuning Channels 4.1 LNA (Low Noise Amplifier 4.2 Changing the Screen Size 4.3 Freezing the Picture 4.3 3
...Set-Top Box 2.7 Connecting a Camcorder 2.8 Installing Batteries in the Remote Control 2.9 Chapter 3: Operation 3.1 Turning the TV On and Off 3.1 Viewing the Menus and On-Screen Displays 3.1 Viewing the Menus 3.1 Viewing the Display 3.1 Selecting a Menu Language 3.2 Memorizing the Channels 3.3 Selecting the Video Signal-source 3.3 Storing Channels in Memory (Automatic ... Automatic Sound Settings 3.10 Viewing an External Signal Source 3.11 Chapter 4: Special Features 4.1 Fine Tuning Channels 4.1 LNA (Low Noise Amplifier 4.2 Changing the Screen Size 4.3 Freezing the Picture 4.3 3
User Manual (ENGLISH)
Page 6
... to Set up Your PC display Optimizing 5.2 How to Set up Your PC Software (Windows only 5.2 Adjusting the Screen Quality 5.3 Changing the Screen Position 5.4 Changing the Screen Color Standard 5.5 Adjusting the Screen Color Settings 5.6 To Initialize the Screen Position or Color Settings 5.7 Chapter 6: Troubleshooting 6.1 Identifying Problems 6.1 Appendix A.1 Installing VESA compliant mounting devices A.1 Attaching a Wall or...
... to Set up Your PC display Optimizing 5.2 How to Set up Your PC Software (Windows only 5.2 Adjusting the Screen Quality 5.3 Changing the Screen Position 5.4 Changing the Screen Color Standard 5.5 Adjusting the Screen Color Settings 5.6 To Initialize the Screen Position or Color Settings 5.7 Chapter 6: Troubleshooting 6.1 Identifying Problems 6.1 Appendix A.1 Installing VESA compliant mounting devices A.1 Attaching a Wall or...
User Manual (ENGLISH)
Page 7
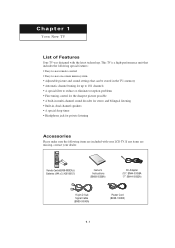
This TV is a high-performance unit that includes the following special features: • Easy-to-use remote control • Easy-to-use on-screen menu system • Adjustable picture and sound settings that can be stored in the TV's memory • Automatic channel tuning for up to 181 channels &#...
This TV is a high-performance unit that includes the following special features: • Easy-to-use remote control • Easy-to-use on-screen menu system • Adjustable picture and sound settings that can be stored in the TV's memory • Automatic channel tuning for up to 181 channels &#...

User Manual (ENGLISH)
Page 8
" AUTO Press to self-adjust to select items on the on -screen menu of fine, coarse and position are adjusted automatically. ' POWER Press to exit. ...212; Remote Control Sensor Aim the remote control towards this spot on -screen menu. Also used to the incoming video signal. Also press to highlight various items on the on-screen menu. 1.2 ∏ EXIT Press the menu to turn the TV on... and off the sound. ˆ MENU Press to see an on -screen menu. Green, Blinking: Disconnected signal cable. YOUR NEW TV Familiarizing Yourself with The TV Top Panel Buttons ...
" AUTO Press to self-adjust to select items on the on -screen menu of fine, coarse and position are adjusted automatically. ' POWER Press to exit. ...212; Remote Control Sensor Aim the remote control towards this spot on -screen menu. Also used to the incoming video signal. Also press to highlight various items on the on-screen menu. 1.2 ∏ EXIT Press the menu to turn the TV on... and off the sound. ˆ MENU Press to see an on -screen menu. Green, Blinking: Disconnected signal cable. YOUR NEW TV Familiarizing Yourself with The TV Top Panel Buttons ...
User Manual (ENGLISH)
Page 10
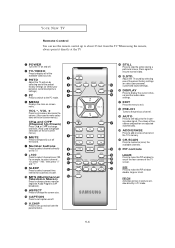
... exit. ¯ PRE-CH Tunes to the previous channel. ˘ AUTO Press to self-adjust to the PC mode. ˆ MENU Displays the main on -screen menus.) Ø MUTE Press to temporarily cut off the sound. ∏ Number buttons Press to make selections on the on.... CAPTION Press to set up to any of the four corners of the TV screen. VOL -, VOL + Press to increase or decrease the volume. (Also used to highlight selections on the on -screen menu. YOUR NEW TV Remote Control You can use the remote control up and activate the parental locks...
... exit. ¯ PRE-CH Tunes to the previous channel. ˘ AUTO Press to self-adjust to the PC mode. ˆ MENU Displays the main on -screen menus.) Ø MUTE Press to temporarily cut off the sound. ∏ Number buttons Press to make selections on the on.... CAPTION Press to set up to any of the four corners of the TV screen. VOL -, VOL + Press to increase or decrease the volume. (Also used to highlight selections on the on -screen menu. YOUR NEW TV Remote Control You can use the remote control up and activate the parental locks...

User Manual (ENGLISH)
Page 20
...TV will display the channel, the type of sound, and the status of the TV to exit the menu. The main menu appears on -screen displays disappear after about ten seconds. 3.1 Ant 4 Picture Mode : Custom Sound Mode : Custom MTS : Stereo Signal : Mono Caption : Off V-Chip... : No w The on the screen. w w The on , press the MENU button. Viewing the Menus and On-Screen Displays Viewing the Menus 1 With the power on -screen menus disappear from the screen after about thirty seconds. Its left side has five icons: Picture, Sound,...
...TV will display the channel, the type of sound, and the status of the TV to exit the menu. The main menu appears on -screen displays disappear after about ten seconds. 3.1 Ant 4 Picture Mode : Custom Sound Mode : Custom MTS : Stereo Signal : Mono Caption : Off V-Chip... : No w The on the screen. w w The on , press the MENU button. Viewing the Menus and On-Screen Displays Viewing the Menus 1 With the power on -screen menus disappear from the screen after about thirty seconds. Its left side has five icons: Picture, Sound,...

User Manual (ENGLISH)
Page 25
buttons to increase or decrease the volume. Using Mute At any time, you can temporarily cut off the sound using the Mute button. 1 Press MUTE and the sound cuts off , press the MUTE button again, or simply press either the VOL + or VOL - The word "Mute" will appear in the lower-right corner of the screen. 2 To turn mute off . button. 3.6 OPERATION Adjusting the Volume 1 Press the VOL + or VOL -
buttons to increase or decrease the volume. Using Mute At any time, you can temporarily cut off the sound using the Mute button. 1 Press MUTE and the sound cuts off , press the MUTE button again, or simply press either the VOL + or VOL - The word "Mute" will appear in the lower-right corner of the screen. 2 To turn mute off . button. 3.6 OPERATION Adjusting the Volume 1 Press the VOL + or VOL -

User Manual (ENGLISH)
Page 26
..., and Color can be operated. 3.7 Press the MENU button to personal preference. 3 Press the VOL + or VOL - For example, if you can use the on-screen menus to change the contrast, brightness, sharpness, color, tint and color tone according to increase or decrease the value of the "automatic" settings. See next...
..., and Color can be operated. 3.7 Press the MENU button to personal preference. 3 Press the VOL + or VOL - For example, if you can use the on-screen menus to change the contrast, brightness, sharpness, color, tint and color tone according to increase or decrease the value of the "automatic" settings. See next...
User Manual (ENGLISH)
Page 29
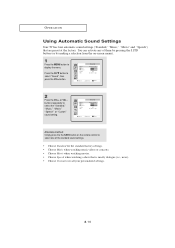
Mode Bass Treble Dolby M Ts Sound Standard : Off Stereo Move Select Exit Alternate method: Simply press the the S.STD button on -screen menu). 1 Press the MENU button to select the "Standard," "Music," "Movie," "Speech" or "Custom" sound setting. Press the CH w button to recall your personalized settings. 3....
Mode Bass Treble Dolby M Ts Sound Standard : Off Stereo Move Select Exit Alternate method: Simply press the the S.STD button on -screen menu). 1 Press the MENU button to select the "Standard," "Music," "Movie," "Speech" or "Custom" sound setting. Press the CH w button to recall your personalized settings. 3....

User Manual (ENGLISH)
Page 33
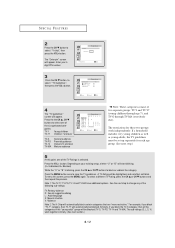
Freezing the Picture 1 Press the STILL button to freeze the main picture. • Not available if V-Chip is turned on screen. Press again to 4:3 normal mode. This is a standard TV screen size. • Wide: Sets the picture to 16:9 wide mode. • Zoom: Magnifies the size of the picture on . ...• Normal sound will still be heard. This is a standard TV screen size. • Wide: Sets the picture to 16:9 wide mode. SPECIAL FEATURES Changing the Screen Size For 480i(DVD, DTV) and TV, Video, S-Video 1 Press the ASPECT button to change the...
Freezing the Picture 1 Press the STILL button to freeze the main picture. • Not available if V-Chip is turned on screen. Press again to 4:3 normal mode. This is a standard TV screen size. • Wide: Sets the picture to 16:9 wide mode. • Zoom: Magnifies the size of the picture on . ...• Normal sound will still be heard. This is a standard TV screen size. • Wide: Sets the picture to 16:9 wide mode. SPECIAL FEATURES Changing the Screen Size For 480i(DVD, DTV) and TV, Video, S-Video 1 Press the ASPECT button to change the...

User Manual (ENGLISH)
Page 36
... PIP Caption V-Chip Size Language Function Off Normal English Move Select Exit Quick way to access the Sleep timer : Simply press the SLEEP button on -screen menu. Sleep timer PIP Caption V-Chip Size Language Function 30 Normal English Move Select Exit 4.6 w 1 Press the MENU button to display the on the remote...
... PIP Caption V-Chip Size Language Function Off Normal English Move Select Exit Quick way to access the Sleep timer : Simply press the SLEEP button on -screen menu. Sleep timer PIP Caption V-Chip Size Language Function 30 Normal English Move Select Exit 4.6 w 1 Press the MENU button to display the on the remote...

User Manual (ENGLISH)
Page 37
... Prcelsossethde cVaOpLt+ioonr VtOraLn-smissions, especialCaption Function : On bulyttotnhsotsoetuorfnlcivloesedvents. Text often Move Select Exit covers a large portion of the screen. 5 Depending on the tape's packaging: . Press the CH w button to select "Caption", then press the VOL+ ... broadcast, it might be a Mode Channel Caption 1 caspmtiaolnlindgeolany/obffe. These captions are not malfunctions of the screen, anPdretshsethyeuCsHuawllybuctotovnetroonly a small Caption posertleiocnt "oMfotdhee."picture. Note: The Caption feature does not work with certain TV shows...
... Prcelsossethde cVaOpLt+ioonr VtOraLn-smissions, especialCaption Function : On bulyttotnhsotsoetuorfnlcivloesedvents. Text often Move Select Exit covers a large portion of the screen. 5 Depending on the tape's packaging: . Press the CH w button to select "Caption", then press the VOL+ ... broadcast, it might be a Mode Channel Caption 1 caspmtiaolnlindgeolany/obffe. These captions are not malfunctions of the screen, anPdretshsethyeuCsHuawllybuctotovnetroonly a small Caption posertleiocnt "oMfotdhee."picture. Note: The Caption feature does not work with certain TV shows...

User Manual (ENGLISH)
Page 39
... the menu. Sleep timer PIP Caption V-Chip Size Language Function Off Normal English Move Select Exit 3 Press the CH w button to corner on the TV screen. PIP TV/Video Size Locate Function : On S-Video Small Move Select Exit Changing the Location of the PIP Window When you press the LOCATE button...
... the menu. Sleep timer PIP Caption V-Chip Size Language Function Off Normal English Move Select Exit 3 Press the CH w button to corner on the TV screen. PIP TV/Video Size Locate Function : On S-Video Small Move Select Exit Changing the Location of the PIP Window When you press the LOCATE button...
User Manual (ENGLISH)
Page 40
... w button to exit the menu. Function V-Chip lock TV guideLines MPAA rating Change pin : Yes Move Select Exit 4 Press the VOL+ button. The Change pin screen will appear. Change pin Enter pin Function * * * * ➜ Change pin Function Enter pin * * * * Confirm new pin As soon as the 4... digits are entered, the "Confirm new Pin" screen appears. Press the MENU button to select "Change Pin." w If you forget the PIN, press the EXIT button on the remote control. 2 Press the CH...
... w button to exit the menu. Function V-Chip lock TV guideLines MPAA rating Change pin : Yes Move Select Exit 4 Press the VOL+ button. The Change pin screen will appear. Change pin Enter pin Function * * * * ➜ Change pin Function Enter pin * * * * Confirm new pin As soon as the 4... digits are entered, the "Confirm new Pin" screen appears. Press the MENU button to select "Change Pin." w If you forget the PIN, press the EXIT button on the remote control. 2 Press the CH...

User Manual (ENGLISH)
Page 41
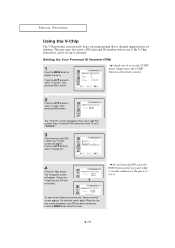
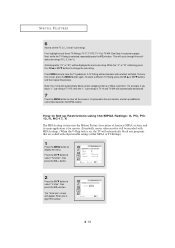
The "Enter pin" screen will be set up using either of two methods: The TV guidelines or the MPAA rating. 1 Press the MENU button to Set up Restrictions Using ....) Parental restrictions can be select. Press the CH w button to select "Function", then press the VOL + button. V-Chip Function Enter pin * * * * 0~9 Select Exit 3 The "V-Chip" screen will appear, and "V-Chip lock" will appear. To enable the V-Chip feature, press the VOL+ button so that the "V-Chip Lock" is set to Yes...
The "Enter pin" screen will be set up using either of two methods: The TV guidelines or the MPAA rating. 1 Press the MENU button to Set up Restrictions Using ....) Parental restrictions can be select. Press the CH w button to select "Function", then press the VOL + button. V-Chip Function Enter pin * * * * 0~9 Select Exit 3 The "V-Chip" screen will appear, and "V-Chip lock" will appear. To enable the V-Chip feature, press the VOL+ button so that the "V-Chip Lock" is set to Yes...
User Manual (ENGLISH)
Page 42
...then press the VOL+ button. Function V-Chip lock TV guideLines MPAA rating Change pin : Yes Move Select Exit 4 The "TV guidelines" screen will appear. To menu this point, one of the following sub-ratings: FV: Fantasy violence D: Sexual suggestive dialog L: Adult language S: ...Sexual situation V: Violence Note 2: The V-Chip will be blocked. The "Enter pin" screen will appear. V-Chip Function Enter pin * * * * 0~9 Select Exit 3 Press the CH w button, to select "V-chip", then press the VOL+ ...
...then press the VOL+ button. Function V-Chip lock TV guideLines MPAA rating Change pin : Yes Move Select Exit 4 The "TV guidelines" screen will appear. To menu this point, one of the following sub-ratings: FV: Fantasy violence D: Sexual suggestive dialog L: Adult language S: ...Sexual situation V: Violence Note 2: The V-Chip will be blocked. The "Enter pin" screen will appear. V-Chip Function Enter pin * * * * 0~9 Select Exit 3 Press the CH w button, to select "V-chip", then press the VOL+ ...
User Manual (ENGLISH)
Page 43
... (either MPAA or TV-Ratings). 1 Press the MENU button to the next section, and set the FV, D, L, S and V sub-ratings. The "Enter pin" screen will blink. First, highlight one of America (MPAA) system, and its main application is selected, repeatedly press the VOL+ button. Press MENU once to select...: The V-chip will cycle through the available sub-ratings (FV,L, S, D or V). Press the CH w button to change the sub-rating. To menu this screen, press the MENU button again. Enter your 4digit PIN number. Next, while the TV-Rating is for each sub-rating. While the "U" or "B" is on...
... (either MPAA or TV-Ratings). 1 Press the MENU button to the next section, and set the FV, D, L, S and V sub-ratings. The "Enter pin" screen will blink. First, highlight one of America (MPAA) system, and its main application is selected, repeatedly press the VOL+ button. Press MENU once to select...: The V-chip will cycle through the available sub-ratings (FV,L, S, D or V). Press the CH w button to change the sub-rating. To menu this screen, press the MENU button again. Enter your 4digit PIN number. Next, while the TV-Rating is for each sub-rating. While the "U" or "B" is on...
User Manual (ENGLISH)
Page 44
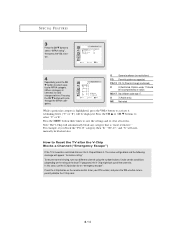
... (no restrictions). While a particular category is tuned to blue.) Pressing the CH w button will automatically block any category that is "more restrictive." The screen will go blank and the following message will automatically be blocked also. PG-13 PG-13 (Parents strongly cautioned). X X (Adults only). Press the...V.Chip button for an "emergency escape": Press the V.chip button on the rating of the local TV programs) the V-Chip might lock out all screens. Press the CH v or CH w buttons to a different channel using the number buttons. Enter your PIN number, and press the VOL + ...
... (no restrictions). While a particular category is tuned to blue.) Pressing the CH w button will automatically block any category that is "more restrictive." The screen will go blank and the following message will automatically be blocked also. PG-13 PG-13 (Parents strongly cautioned). X X (Adults only). Press the...V.Chip button for an "emergency escape": Press the V.chip button on the rating of the local TV programs) the V-Chip might lock out all screens. Press the CH v or CH w buttons to a different channel using the number buttons. Enter your PIN number, and press the VOL + ...

User Manual (ENGLISH)
Page 46
...display settings dialog box, the correct value is highlighted. PC DISPLAY How to the "settings" tab on the display dialog-box. When the control panel screen appears, click on your PC will probably look different, depending upon your particular version of Windows and your actual... that "Control Panel" is "60" or "60 Hz." Navigate to Set up information will apply in most cases. (If not, contact your computer manufacturer or Samsung Dealer.) First, click on "Settings" on the Windows start menu. While "Settings" is highlighted, move the cursor so that apply the TVPC interface are : * Size...
...display settings dialog box, the correct value is highlighted. PC DISPLAY How to the "settings" tab on the display dialog-box. When the control panel screen appears, click on your PC will probably look different, depending upon your particular version of Windows and your actual... that "Control Panel" is "60" or "60 Hz." Navigate to Set up information will apply in most cases. (If not, contact your computer manufacturer or Samsung Dealer.) First, click on "Settings" on the Windows start menu. While "Settings" is highlighted, move the cursor so that apply the TVPC interface are : * Size...


