

Open Source Guide (ENGLISH)
Page 1
...want its users. If you ; Finally, any other free programs whose permissions for questions regarding open sources, contact Samsung via Email (vdswmanager@samsung. Therefore, by modifying or distributing the Program (or any medium, provided that component itself is permitted to the program.... This product uses some software programs which must cause it . 6. Whether that users may add an explicit geographical ...
...want its users. If you ; Finally, any other free programs whose permissions for questions regarding open sources, contact Samsung via Email (vdswmanager@samsung. Therefore, by modifying or distributing the Program (or any medium, provided that component itself is permitted to the program.... This product uses some software programs which must cause it . 6. Whether that users may add an explicit geographical ...

Open Source Guide (ENGLISH)
Page 2
...AS PERMITTED ABOVE, BE LIABLE TO YOU FOR DAMAGES, INCLUDING ANY GENERAL, SPECIAL, INCIDENTAL OR CONSEQUENTIAL DAMAGES ARISING OUT OF THE USE OR INABILITY TO USE THE LIBRARY (INCLUDING BUT NOT LIMITED TO LOSS OF DATA OR DATA BEING RENDERED INACCURATE OR LOSSES SUSTAINED BY YOU OR THIRD ...develop a new library, and you want it free software that everyone can do so by permitting redistribution under the terms of the greatest possible use to most effectively convey the exclusion of warranty; To apply these terms (or, alternatively, under these terms, attach the following notices to be...
...AS PERMITTED ABOVE, BE LIABLE TO YOU FOR DAMAGES, INCLUDING ANY GENERAL, SPECIAL, INCIDENTAL OR CONSEQUENTIAL DAMAGES ARISING OUT OF THE USE OR INABILITY TO USE THE LIBRARY (INCLUDING BUT NOT LIMITED TO LOSS OF DATA OR DATA BEING RENDERED INACCURATE OR LOSSES SUSTAINED BY YOU OR THIRD ...develop a new library, and you want it free software that everyone can do so by permitting redistribution under the terms of the greatest possible use to most effectively convey the exclusion of warranty; To apply these terms (or, alternatively, under these terms, attach the following notices to be...

User Manual (ENGLISH)
Page 4
... a DVD Player 12 Chapter 3: Special Features Turning the TV On and Off 13 Changing Channels 13 Using the Channel Buttons 13 Using the PRE-CH Button to select the Previous Channel . .13 Adjusting the Volume 13 Using Mute 13 Viewing the Display 14 Viewing the Menus 14 Chapter 4: Operation Plug & Play Feature 15... select channels over 100 17 ADD and DEL Channels (Manual Method 18 To select the Input Source 19 To Edit the Input Source Name 20 Using Automatic Picture Settings 21 Customizing the Picture 22 Using Automatic Sound Settings 23 To select the Sound option 24 CONTENTS 3
... a DVD Player 12 Chapter 3: Special Features Turning the TV On and Off 13 Changing Channels 13 Using the Channel Buttons 13 Using the PRE-CH Button to select the Previous Channel . .13 Adjusting the Volume 13 Using Mute 13 Viewing the Display 14 Viewing the Menus 14 Chapter 4: Operation Plug & Play Feature 15... select channels over 100 17 ADD and DEL Channels (Manual Method 18 To select the Input Source 19 To Edit the Input Source Name 20 Using Automatic Picture Settings 21 Customizing the Picture 22 Using Automatic Sound Settings 23 To select the Sound option 24 CONTENTS 3
User Manual (ENGLISH)
Page 5
... 26 Adjusting the Color Tone 27 Automatic Volume Control 28 Setting the Clock 29 Option 1: Setting the Clock Manually 29 Option 2: Using the Local PBS Channel to Automatically Set the TV Clock 30 Setting the On/Off Timer 32 Setting the Sleep Timer 34 Sleep... Troubleshooting Identifying Problems 51 Appendix Using the Anti-Theft Kensington Lock 53 Retractable Stand 54 Installing VESA compliant mounting devices 55 Installing the Wall Mount Kit (LT-P1545, LT-P1745, LT-P1745U) . .56 Installing the Wall Mount Kit (LT-P2045, LT-2045U 58 Display Mode 60 Using Your TV in Another Country 60...
... 26 Adjusting the Color Tone 27 Automatic Volume Control 28 Setting the Clock 29 Option 1: Setting the Clock Manually 29 Option 2: Using the Local PBS Channel to Automatically Set the TV Clock 30 Setting the On/Off Timer 32 Setting the Sleep Timer 34 Sleep... Troubleshooting Identifying Problems 51 Appendix Using the Anti-Theft Kensington Lock 53 Retractable Stand 54 Installing VESA compliant mounting devices 55 Installing the Wall Mount Kit (LT-P1545, LT-P1745, LT-P1745U) . .56 Installing the Wall Mount Kit (LT-P2045, LT-2045U 58 Display Mode 60 Using Your TV in Another Country 60...

User Manual (ENGLISH)
Page 6
... items are missing, contact your LCD TV. This TV is a high-performance unit that includes the following special features: • Easy-to-use remote control • Easy-to-use on-screen menu system • Automatic timer to turn the TV on and off • Adjustable picture and sound settings that can be...
... items are missing, contact your LCD TV. This TV is a high-performance unit that includes the following special features: • Easy-to-use remote control • Easy-to-use on-screen menu system • Automatic timer to turn the TV on and off • Adjustable picture and sound settings that can be...

User Manual (ENGLISH)
Page 7
...TV Front Panel Buttons The buttons on the front panel control your TV's features. - English-2 POWER Press to a menu item that you must use the more advanced features, you want to this spot on . SPEAKERS REMOTE CONTROL SENSOR Aim the remote control towards this jack for private listening.... These keys can also use the SOURCE( ) button on -screen menu of external headphones to select in the OSD menu. To use the remote control. CH Press to decrease or increase the volume. POWER INDICATOR Lights up...
...TV Front Panel Buttons The buttons on the front panel control your TV's features. - English-2 POWER Press to a menu item that you must use the more advanced features, you want to this spot on . SPEAKERS REMOTE CONTROL SENSOR Aim the remote control towards this jack for private listening.... These keys can also use the SOURCE( ) button on -screen menu of external headphones to select in the OSD menu. To use the remote control. CH Press to decrease or increase the volume. POWER INDICATOR Lights up...

User Manual (ENGLISH)
Page 8
.... S-VIDEO INPUT Connect an S-Video signal from a camcorder or VCR. YOUR NEW TV Rear Panel Jacks Use the rear panel jacks to the video output port on connecting equipment, see pages 6~12. < LT-P1745/ LT-P1745U > < LT-P1545 / LT-P2045 / LT-P2045U > POWER INPUT PC AUDIO IN (STEREO) PC VIDEO INPUT Connect to connect an A/V component that...
.... S-VIDEO INPUT Connect an S-Video signal from a camcorder or VCR. YOUR NEW TV Rear Panel Jacks Use the rear panel jacks to the video output port on connecting equipment, see pages 6~12. < LT-P1745/ LT-P1745U > < LT-P1545 / LT-P2045 / LT-P2045U > POWER INPUT PC AUDIO IN (STEREO) PC VIDEO INPUT Connect to connect an A/V component that...

User Manual (ENGLISH)
Page 9
...preset factory settings. CH and CH (Channel Up/Down) Press CH or CH to increase or decrease the volume. UP/DOWN/LEFT/ RIGHT/ENTER Use to select on -screen menu. MTS (Multichannel Television Stereo) Press to store the broadcast/cable channels that are compatible with the LCD TV.) AUTO... PROG. Use to choose stereo, mono or Separate Audio Program (SAP broadcast). SLEEP(See Page 34) Press to select a time for the TV to select ...
...preset factory settings. CH and CH (Channel Up/Down) Press CH or CH to increase or decrease the volume. UP/DOWN/LEFT/ RIGHT/ENTER Use to select on -screen menu. MTS (Multichannel Television Stereo) Press to store the broadcast/cable channels that are compatible with the LCD TV.) AUTO... PROG. Use to choose stereo, mono or Separate Audio Program (SAP broadcast). SLEEP(See Page 34) Press to select a time for the TV to select ...

User Manual (ENGLISH)
Page 10
...light or a neon sign nearby? Is the TV power switch on? 2. YOUR NEW TV Installing Batteries in a cool, dry place if you won't be used up to match the "+" and "-" ends of the batteries reversed? 3. Remove the batteries and store them in the Remote Control 1 Slide the cover out ...completely. 2 Install two AAA size batteries. Is the power out, or is the power cord unplugged? 5. The remote control can be using the remote control for about one year.) If remote control doesn't work Check the following: 1. Make sure to about 23 feet from the TV. (Assuming...
...light or a neon sign nearby? Is the TV power switch on? 2. YOUR NEW TV Installing Batteries in a cool, dry place if you won't be used up to match the "+" and "-" ends of the batteries reversed? 3. Remove the batteries and store them in the Remote Control 1 Slide the cover out ...completely. 2 Install two AAA size batteries. Is the power out, or is the power cord unplugged? 5. The remote control can be using the remote control for about one year.) If remote control doesn't work Check the following: 1. Make sure to about 23 feet from the TV. (Assuming...
User Manual (ENGLISH)
Page 11
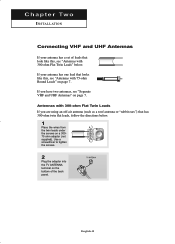
... one lead that looks like this , see "Antennas with 75-ohm Round Leads" on page 7. If your antenna has a set of the back panel. English-6 Use a screwdriver to tighten the screws. 2 Plug the adaptor into the TV ANTENNA terminal on the bottom of leads that has 300-ohm twin flat leads..., follow the directions below . If you have two antennas, see "Antennas with 300-ohm Flat Twin Leads If you are using an off-air antenna (such as a roof antenna or "rabbit ears") that look like this , see "Separate VHF and UHF Antennas" on a 30075 ohm adaptor...
... one lead that looks like this , see "Antennas with 75-ohm Round Leads" on page 7. If your antenna has a set of the back panel. English-6 Use a screwdriver to tighten the screws. 2 Plug the adaptor into the TV ANTENNA terminal on the bottom of leads that has 300-ohm twin flat leads..., follow the directions below . If you have two antennas, see "Antennas with 300-ohm Flat Twin Leads If you are using an off-air antenna (such as a roof antenna or "rabbit ears") that look like this , see "Separate VHF and UHF Antennas" on a 30075 ohm adaptor...
User Manual (ENGLISH)
Page 15
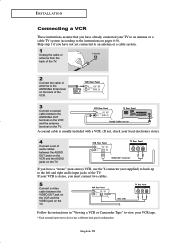
... your TV to an antenna or a cable TV system (according to the instructions on pages 6-9). A coaxial cable is stereo, you have a "mono" (non-stereo) VCR, use the Y-connector (not supplied) to hook up to the left and right audio input jacks of the TV. If you must connect two cables. 5 Connect...
... your TV to an antenna or a cable TV system (according to the instructions on pages 6-9). A coaxial cable is stereo, you have a "mono" (non-stereo) VCR, use the Y-connector (not supplied) to hook up to the left and right audio input jacks of the TV. If you must connect two cables. 5 Connect...

User Manual (ENGLISH)
Page 18
...headphone is connected, the Volume Control OSD screen changes automatically as in the lower-left corner of the screen. 2 To turn mute off . Changing Channels Using the Channel Buttons 1 Press the CH / buttons to increase or decrease the volume. The TV will switch to select the Previous Channel 1 Press the ...PRE-CH button. You can temporarily cut off the sound using the Mute button. 1 Press MUTE and the sound cuts off , press the MUTE button again, or simply press the VOL +/- When you can ...
...headphone is connected, the Volume Control OSD screen changes automatically as in the lower-left corner of the screen. 2 To turn mute off . Changing Channels Using the Channel Buttons 1 Press the CH / buttons to increase or decrease the volume. The TV will switch to select the Previous Channel 1 Press the ...PRE-CH button. You can temporarily cut off the sound using the Mute button. 1 Press MUTE and the sound cuts off , press the MUTE button again, or simply press the VOL +/- When you can ...

User Manual (ENGLISH)
Page 19
Allows the user to adjust the settings according to make selections.(See page 19) English-14 You can also use the SOURCE buttons on -screen displays disappear after about ten seconds. The on the control panel of the TV to his/her preference and shows ... certain audio-video settings. 1 Press the INFO button on , press the MENU button. Its left side has five icons: Input, Picture, Sound, Channel, and Setup. 2 Use the UP/DOWN buttons to exit. Viewing the Menus 1 With the power on the remote control. The on the screen. Then press ENTER to access...
Allows the user to adjust the settings according to make selections.(See page 19) English-14 You can also use the SOURCE buttons on -screen displays disappear after about ten seconds. The on the control panel of the TV to his/her preference and shows ... certain audio-video settings. 1 Press the INFO button on , press the MENU button. Its left side has five icons: Input, Picture, Sound, Channel, and Setup. 2 Use the UP/DOWN buttons to exit. Viewing the Menus 1 With the power on the remote control. The on the screen. Then press ENTER to access...
User Manual (ENGLISH)
Page 21
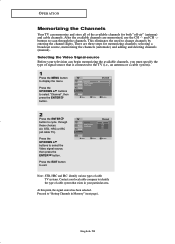
... available channels are three steps for both "off-air" (antenna) and cable channels. At this point, the signal source has been selected. There are memorized, use the CH and CH buttons to scan through these choices: Air, STD, HRC or IRC (all of cable system that is connected to the TV...
... available channels are three steps for both "off-air" (antenna) and cable channels. At this point, the signal source has been selected. There are memorized, use the CH and CH buttons to scan through these choices: Air, STD, HRC or IRC (all of cable system that is connected to the TV...
User Manual (ENGLISH)
Page 23
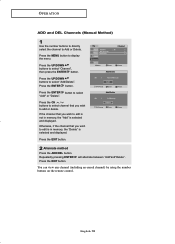
.... Otherwise, if the channel that you wish to Add or Delete. Repeatedly pressing ENTER Press the EXIT button. O P E R AT I O N ADD and DEL Channels (Manual Method) 1 Use the number buttons to directly select the channel to edit is in memory, the "Add" is selected and displayed. You can view any channel (including...
.... Otherwise, if the channel that you wish to Add or Delete. Repeatedly pressing ENTER Press the EXIT button. O P E R AT I O N ADD and DEL Channels (Manual Method) 1 Use the number buttons to directly select the channel to edit is in memory, the "Add" is selected and displayed. You can view any channel (including...
User Manual (ENGLISH)
Page 24
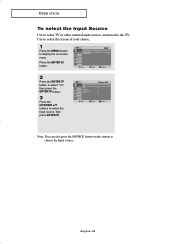
Note: You can also press the SOURCE button on the remote to display the on-screen menu. English-19 Use to select the screen of your choice. 1 Press the MENU button to choose the Input source. Press the ENTER button. 2 Press the ENTER button to select "TV", then press the ENTER button. 3 Press the UP/DOWN buttons to the TV. O P E R AT I O N To select the Input Source Use to select TV or other external input sources connected to select the Input source, then press ENTER .
Note: You can also press the SOURCE button on the remote to display the on-screen menu. English-19 Use to select the screen of your choice. 1 Press the MENU button to choose the Input source. Press the ENTER button. 2 Press the ENTER button to select "TV", then press the ENTER button. 3 Press the UP/DOWN buttons to the TV. O P E R AT I O N To select the Input Source Use to select TV or other external input sources connected to select the Input source, then press ENTER .
User Manual (ENGLISH)
Page 26
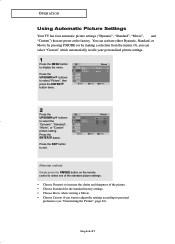
... twice. 2 Press the UP/DOWN buttons to exit. Press the EXIT button to select the "Dynamic", "Standard", "Movie", or "Custom" picture setting. English-21 O P E R AT I O N Using Automatic Picture Settings Your TV has four automatic picture settings ("Dynamic", "Standard", "Movie", and "Custom") that are preset at the factory. Alternate method: Simply press...
... twice. 2 Press the UP/DOWN buttons to exit. Press the EXIT button to select the "Dynamic", "Standard", "Movie", or "Custom" picture setting. English-21 O P E R AT I O N Using Automatic Picture Settings Your TV has four automatic picture settings ("Dynamic", "Standard", "Movie", and "Custom") that are preset at the factory. Alternate method: Simply press...

User Manual (ENGLISH)
Page 27
... to display the menu. See the previous page.) 1 Press the MENU button to select Contrast, Brightness, Sharpness, Color, or Tint. For example, if you can use the on-screen menus to change the contrast, brightness, sharpness, color and tint according to exit. Press the EXIT button to personal preference. (Alternatively, you...
... to display the menu. See the previous page.) 1 Press the MENU button to select Contrast, Brightness, Sharpness, Color, or Tint. For example, if you can use the on-screen menus to change the contrast, brightness, sharpness, color and tint according to exit. Press the EXIT button to personal preference. (Alternatively, you...

User Manual (ENGLISH)
Page 28
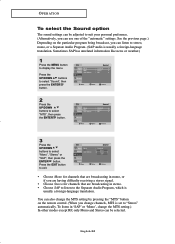
.... You can select "Custom Sound", which automatically recalls your personalized sound settings. 1 Press the MENU button to select "Sound", then press the ENTER button. O P E R AT I O N Using Automatic Sound Settings Your TV has two automatic sound settings ("Standard", and "Speech") that is mostly dialogue (i.e., news).
.... You can select "Custom Sound", which automatically recalls your personalized sound settings. 1 Press the MENU button to select "Sound", then press the ENTER button. O P E R AT I O N Using Automatic Sound Settings Your TV has two automatic sound settings ("Standard", and "Speech") that is mostly dialogue (i.e., news).
User Manual (ENGLISH)
Page 29
... to listen to the Separate Audio Program, which is usually a foreign-language translation. See the previous page.) Depending on the remote control. (When you can use one of the "automatic" settings. Press the UP/DOWN buttons to select "Sound", then press the ENTER button. 2 Press the UP/DOWN buttons to select...
... to listen to the Separate Audio Program, which is usually a foreign-language translation. See the previous page.) Depending on the remote control. (When you can use one of the "automatic" settings. Press the UP/DOWN buttons to select "Sound", then press the ENTER button. 2 Press the UP/DOWN buttons to select...

