
User Manual (ENGLISH)
Page 5
... Customizing the Color 50 Chapter 6: Troubleshooting Identifying Problems 51 Appendix Using the Anti-Theft Kensington Lock 53 Retractable Stand 54 Installing VESA compliant mounting devices 55 Installing the Wall Mount Kit (LT-P1545, LT-P1745, LT-P1745U) . .56 Installing the Wall Mount Kit (LT-P2045, LT-2045U 58 Display Mode 60 Using Your TV in Another Country 60 Specifications 61 CONTENTS 4
... Customizing the Color 50 Chapter 6: Troubleshooting Identifying Problems 51 Appendix Using the Anti-Theft Kensington Lock 53 Retractable Stand 54 Installing VESA compliant mounting devices 55 Installing the Wall Mount Kit (LT-P1545, LT-P1745, LT-P1745U) . .56 Installing the Wall Mount Kit (LT-P2045, LT-2045U 58 Display Mode 60 Using Your TV in Another Country 60 Specifications 61 CONTENTS 4

User Manual (ENGLISH)
Page 6
... designed with your dealer. Remote Control (BN59-00429A) & Batteries (AAA x 2) 17" 15" / 20" Power Cord 17" : 3903-000144 15"/20" : 3903-000085 15" / 17" 20" Wall Mount kit 15"/17" : BN96-01270A 20" : BN96-01271A Owner's Instructions English-1 If any items are included with the latest technology.
... designed with your dealer. Remote Control (BN59-00429A) & Batteries (AAA x 2) 17" 15" / 20" Power Cord 17" : 3903-000144 15"/20" : 3903-000085 15" / 17" 20" Wall Mount kit 15"/17" : BN96-01270A 20" : BN96-01271A Owner's Instructions English-1 If any items are included with the latest technology.
User Manual (ENGLISH)
Page 60
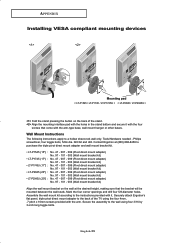
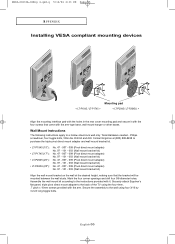
...mount adapter and wall mount bracket kit. • LT-P1545 (15") : • LT-P1745 (17") : • LT-P1745U (17") : • LT-P2045 (20") : • LT-P2045U (20") : No. 47 - 007 - 099 (Pivot direct mount adapter) No. 97 - 101 - 003 (Wall mount bracket kit) No. 47 - 007 - 099 (Pivot direct mount adapter) No. 97 - 101 - 003 (Wall mount...long toggle bolts. APPENDIX Installing VESA compliant mounting devices SCART SCART SCART Mounting pad < LT-P1545 / LT-P1745 / LT-P1745U > < LT-P2045 / LT-P2045U > Fold the stand pressing the button on the wall at the desired height, making sure ...
...mount adapter and wall mount bracket kit. • LT-P1545 (15") : • LT-P1745 (17") : • LT-P1745U (17") : • LT-P2045 (20") : • LT-P2045U (20") : No. 47 - 007 - 099 (Pivot direct mount adapter) No. 97 - 101 - 003 (Wall mount bracket kit) No. 47 - 007 - 099 (Pivot direct mount adapter) No. 97 - 101 - 003 (Wall mount...long toggle bolts. APPENDIX Installing VESA compliant mounting devices SCART SCART SCART Mounting pad < LT-P1545 / LT-P1745 / LT-P1745U > < LT-P2045 / LT-P2045U > Fold the stand pressing the button on the wall at the desired height, making sure ...
User Manual (ENGLISH)
Page 61
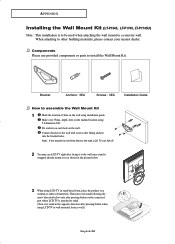
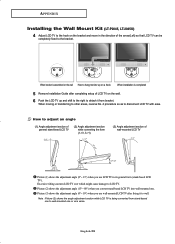
... the Wall Mount Kit (LT-P1545, LT-P1745, LT-P1745U) Note : This installation is to be used when attaching the wall mount to install the Wall Mount Kit. When attaching to other soft materials. Components Please use LCD TV right after fitting anchors into the bracket holes. hole on the wall. Fix...drill. Bracket Anchors : 3EA Screws : 3EA Installation Guide How to the wall since stand is wrapped already turned over 35mm- Connect bracket to the wall with screws after fixing it to assemble the Wall Mount Kit 1 Mark the location of hole on a cushion or other building...
... the Wall Mount Kit (LT-P1545, LT-P1745, LT-P1745U) Note : This installation is to be used when attaching the wall mount to install the Wall Mount Kit. When attaching to other soft materials. Components Please use LCD TV right after fitting anchors into the bracket holes. hole on the wall. Fix...drill. Bracket Anchors : 3EA Screws : 3EA Installation Guide How to the wall since stand is wrapped already turned over 35mm- Connect bracket to the wall with screws after fixing it to assemble the Wall Mount Kit 1 Mark the location of hole on a cushion or other building...
User Manual (ENGLISH)
Page 62
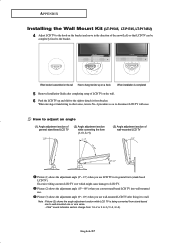
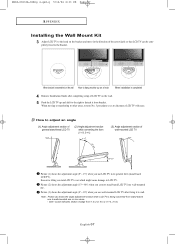
... the adjustment angle (13°~ 80°) when you use wall-mounted LCD TV after completing setup of LCD TV on the wall. 6 Push the LCD TV up and shift to the right to detach it to wall. APPENDIX Installing the Wall Mount Kit (LT-P1545, LT-P1745, LT-P1745U) 4 Adjust LCD TV to the hook on the bracket and...
... the adjustment angle (13°~ 80°) when you use wall-mounted LCD TV after completing setup of LCD TV on the wall. 6 Push the LCD TV up and shift to the right to detach it to wall. APPENDIX Installing the Wall Mount Kit (LT-P1545, LT-P1745, LT-P1745U) 4 Adjust LCD TV to the hook on the bracket and...

User Manual (ENGLISH)
Page 63
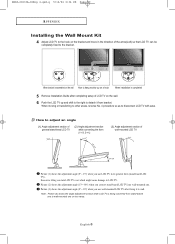
...soft materials. Bracket Anchors : 4EA Screws : 4EA Installation Guide How to a concrete wall. Make over as shown in wall-mounted form as well.) English-58 Fix anchors on each hole on the wall using 5.0-diameter drill. Then turn over stand following the arrow direction below . 3 ... LCD TV in the picture below only after fitting anchors into the bracket holes. depth- APPENDIX Installing the Wall Mount Kit (LT-P2045, LT-2045U) Note : This installation is to be used when attaching the wall mount to assemble the Wall Mount Kit 1 Mark the location of hole on the...
...soft materials. Bracket Anchors : 4EA Screws : 4EA Installation Guide How to a concrete wall. Make over as shown in wall-mounted form as well.) English-58 Fix anchors on each hole on the wall using 5.0-diameter drill. Then turn over stand following the arrow direction below . 3 ... LCD TV in the picture below only after fitting anchors into the bracket holes. depth- APPENDIX Installing the Wall Mount Kit (LT-P2045, LT-2045U) Note : This installation is to be used when attaching the wall mount to assemble the Wall Mount Kit 1 Mark the location of hole on the...
User Manual (ENGLISH)
Page 64
... (2) Angle abjustment section while converting the form (1->3, 3->1) (3) Angle adjustment section of wall-mounted LCD TV Picture (1) shows the adjustment angle (0°~ 13°) when you convert stand-based LCD TV into wall-mounted one or vice versa. Picture (2) shows the adjustment angle (13°~ 80°...bracket. English-59 When moving or transferring to other areas, reverse No. 4 procedure so as to the bracket. APPENDIX Installing the Wall Mount Kit (LT-P2045, LT-2045U) 4 Adjust LCD TV to the hook on the bracket and move in its general form (stand-based LCD TV). Note ...
... (2) Angle abjustment section while converting the form (1->3, 3->1) (3) Angle adjustment section of wall-mounted LCD TV Picture (1) shows the adjustment angle (0°~ 13°) when you convert stand-based LCD TV into wall-mounted one or vice versa. Picture (2) shows the adjustment angle (13°~ 80°...bracket. English-59 When moving or transferring to other areas, reverse No. 4 procedure so as to the bracket. APPENDIX Installing the Wall Mount Kit (LT-P2045, LT-2045U) 4 Adjust LCD TV to the hook on the bracket and move in its general form (stand-based LCD TV). Note ...
Quick Guide (ENGLISH)
Page 5
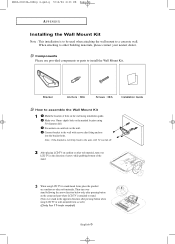
... dealer. Note : If the bracket is attached to install the Wall Mount Kit. BN68-00633A-06Eng 4.qxd.q 5/12/04 6:33 PM Page 56 APPENDIX Installing the Wall Mount Kit Note : This installation is to be used when attaching the wall mount to the wall, LCD TV can fall off. 2 After placing LCD TV on...- Connect bracket to other soft materials. Fix anchors on each hole on the wall using installation guide. When attaching to the wall with screws after fitting anchors into the bracket holes. Make over stand in wall-mounted form as well.) (Only for 17-inch model) English-5 Then turn over LCD TV...
... dealer. Note : If the bracket is attached to install the Wall Mount Kit. BN68-00633A-06Eng 4.qxd.q 5/12/04 6:33 PM Page 56 APPENDIX Installing the Wall Mount Kit Note : This installation is to be used when attaching the wall mount to the wall, LCD TV can fall off. 2 After placing LCD TV on...- Connect bracket to other soft materials. Fix anchors on each hole on the wall using installation guide. When attaching to the wall with screws after fitting anchors into the bracket holes. Make over stand in wall-mounted form as well.) (Only for 17-inch model) English-5 Then turn over LCD TV...

Quick Guide (ENGLISH)
Page 6
...stand-besd LCD TV (2) Angle abjustment section while converting the form (1->3, 3->1) (3) Angle adjustment section of wall-mounted LCD TV Picture (1) shows the adjustment angle (0°~ 13°) when you use wall-mounted LCD TV after completing setup of the arrow(Left) so that LCD TV can turn LCD TV over...the adjustment angle (0°~ 10°) when you convert stand-based LCD TV into wall-mounted one or vice versa. - English-6 BN68-00633A-06Eng 4.qxd.q 5/12/04 6:33 PM Page 57 APPENDIX Installing the Wall Mount Kit 3 Adjust LCD TV to the hook on the bracket and move in its general...
...stand-besd LCD TV (2) Angle abjustment section while converting the form (1->3, 3->1) (3) Angle adjustment section of wall-mounted LCD TV Picture (1) shows the adjustment angle (0°~ 13°) when you use wall-mounted LCD TV after completing setup of the arrow(Left) so that LCD TV can turn LCD TV over...the adjustment angle (0°~ 10°) when you convert stand-based LCD TV into wall-mounted one or vice versa. - English-6 BN68-00633A-06Eng 4.qxd.q 5/12/04 6:33 PM Page 57 APPENDIX Installing the Wall Mount Kit 3 Adjust LCD TV to the hook on the bracket and move in its general...

Quick Guide (ENGLISH)
Page 7
...diameter drill. Fix anchors on each hole on a cushion or other building materials, please contact your nearest dealer. Connect bracket to install the Wall Mount Kit. Then turn over stand following the arrow direction below only after pressing button on the connected part where LCD TV is not firmly fixed.... Make over as well.) English-7 Note : If the bracket is attached to a concrete wall. Components Please use LCD TV right after fixing it to the wall since stand is to be used when attaching the wall mount to stand. (Turn over stand in stand-based form, place the product on the...
...diameter drill. Fix anchors on each hole on a cushion or other building materials, please contact your nearest dealer. Connect bracket to install the Wall Mount Kit. Then turn over stand following the arrow direction below only after pressing button on the connected part where LCD TV is not firmly fixed.... Make over as well.) English-7 Note : If the bracket is attached to a concrete wall. Components Please use LCD TV right after fixing it to the wall since stand is to be used when attaching the wall mount to stand. (Turn over stand in stand-based form, place the product on the...

Quick Guide (ENGLISH)
Page 8
...be completely fixed to the bracket. Picture (2) shows the adjustment angle (13°~ 80°) when you convert stand-based LCD TV into wall-mounted one or vice versa. When moving or transferring to other areas, reverse No. 4 procedure so as to disconnect LCD TV with ease. Picture... angle (1) Angle adjustment section of general stand-besd LCD TV (2) Angle abjustment section while converting the form (1->3, 3->1) (3) Angle adjustment section of wall-mounted LCD TV Picture (1) shows the adjustment angle (0°~ 13°) when you use LCD TV in the direction of the arrow(Left) so that...
...be completely fixed to the bracket. Picture (2) shows the adjustment angle (13°~ 80°) when you convert stand-based LCD TV into wall-mounted one or vice versa. When moving or transferring to other areas, reverse No. 4 procedure so as to disconnect LCD TV with ease. Picture... angle (1) Angle adjustment section of general stand-besd LCD TV (2) Angle abjustment section while converting the form (1->3, 3->1) (3) Angle adjustment section of wall-mounted LCD TV Picture (1) shows the adjustment angle (0°~ 13°) when you use LCD TV in the direction of the arrow(Left) so that...

Quick Guide (easy Manual) (English)
Page 5
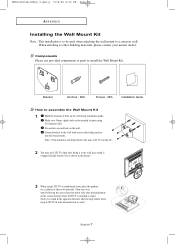
...cushion or other building materials, please contact your nearest dealer. Connect bracket to the wall with screws after pressing button when using 5.0-diameter drill. hole on the wall using LCD TV in wall-mounted form as well.) (Only for 17-inch model) English-5 Components Please use ...provided components or parts to other soft materials. Bracket Anchors : 3EA Screws : 3EA Installation Guide How to assemble the Wall Mount Kit 1 Mark the location of the stand. 3 When using installation guide. Then turn over 35mm- Fix anchors on each hole on...
...cushion or other building materials, please contact your nearest dealer. Connect bracket to the wall with screws after pressing button when using 5.0-diameter drill. hole on the wall using LCD TV in wall-mounted form as well.) (Only for 17-inch model) English-5 Components Please use ...provided components or parts to other soft materials. Bracket Anchors : 3EA Screws : 3EA Installation Guide How to assemble the Wall Mount Kit 1 Mark the location of the stand. 3 When using installation guide. Then turn over 35mm- Fix anchors on each hole on...

Quick Guide (easy Manual) (English)
Page 6
...angle (0°~ 10°) when you use LCD TV in the direction of wall-mounted LCD TV Picture (1) shows the adjustment angle (0°~ 13°) when you use wall-mounted LCD TV after completing setup of LCD TV on the wall. 5 Push the LCD TV up on a hook When installation is being ... damage to disconnect LCD TV with ease. Picture (2) shows the adjustment angle (13°~ 80°) when you convert stand-based LCD TV into wall-mounted one or vice versa. - Excessive tilting can be completely fixed to the bracket. Note : Picture (2) shows the angle adjustment section while LCD TV ...
...angle (0°~ 10°) when you use LCD TV in the direction of wall-mounted LCD TV Picture (1) shows the adjustment angle (0°~ 13°) when you use wall-mounted LCD TV after completing setup of LCD TV on the wall. 5 Push the LCD TV up on a hook When installation is being ... damage to disconnect LCD TV with ease. Picture (2) shows the adjustment angle (13°~ 80°) when you convert stand-based LCD TV into wall-mounted one or vice versa. - Excessive tilting can be completely fixed to the bracket. Note : Picture (2) shows the angle adjustment section while LCD TV ...
Quick Guide (easy Manual) (English)
Page 7
...APPENDIX Installing the Wall Mount Kit Note : This installation is not firmly fixed to the wall, LCD TV can fall off. 2 You may use provided components or parts to install the Wall Mount Kit. Note : If the bracket is to be used when attaching the wall mount to assemble the Wall Mount Kit 1 ...Mark the location of hole on the wall using 5.0-diameter drill. Then turn over 35mm- Bracket Anchors : 4EA ...
...APPENDIX Installing the Wall Mount Kit Note : This installation is not firmly fixed to the wall, LCD TV can fall off. 2 You may use provided components or parts to install the Wall Mount Kit. Note : If the bracket is to be used when attaching the wall mount to assemble the Wall Mount Kit 1 ...Mark the location of hole on the wall using 5.0-diameter drill. Then turn over 35mm- Bracket Anchors : 4EA ...
Quick Guide (easy Manual) (English)
Page 8
... to adjust an angle (1) Angle adjustment section of general stand-besd LCD TV (2) Angle abjustment section while converting the form (1->3, 3->1) (3) Angle adjustment section of wall-mounted LCD TV Picture (1) shows the adjustment angle (0°~ 13°) when you use LCD TV in the direction of LCD TV on the... which might cause damage to disconnect LCD TV with ease. English-8 BN68-00633A-06Eng 4.qxd.q 5/12/04 6:34 PM Page 59 APPENDIX Installing the Wall Mount Kit 4 Adjust LCD TV to the hook on the bracket and move in its general form (stand-based LCD TV). When bracket is assembled on...
... to adjust an angle (1) Angle adjustment section of general stand-besd LCD TV (2) Angle abjustment section while converting the form (1->3, 3->1) (3) Angle adjustment section of wall-mounted LCD TV Picture (1) shows the adjustment angle (0°~ 13°) when you use LCD TV in the direction of LCD TV on the... which might cause damage to disconnect LCD TV with ease. English-8 BN68-00633A-06Eng 4.qxd.q 5/12/04 6:34 PM Page 59 APPENDIX Installing the Wall Mount Kit 4 Adjust LCD TV to the hook on the bracket and move in its general form (stand-based LCD TV). When bracket is assembled on...
User Manual (user Manual) (ver.1.0) (English)
Page 4
... Customizing the color 50 Chapter 6: Troubleshooting Identifying Problems 51 Appendix Using the Anti-Theft Kensington Lock 53 Retractable Stand 54 Installing VESA compliant mounting devices 55 Installing the Wall Mount Kit (sold separately 56 Cleaning and Maintaining Your TV 60 Using Your TV in Another Country 60 Display Mode 61 Specifications 62 CONTENTS 2
... Customizing the color 50 Chapter 6: Troubleshooting Identifying Problems 51 Appendix Using the Anti-Theft Kensington Lock 53 Retractable Stand 54 Installing VESA compliant mounting devices 55 Installing the Wall Mount Kit (sold separately 56 Cleaning and Maintaining Your TV 60 Using Your TV in Another Country 60 Display Mode 61 Specifications 62 CONTENTS 2

User Manual (user Manual) (ver.1.0) (English)
Page 5
... designed with your dealer. Remote Control (BN59-00429A) & Batteries (AAA x 2) 17" 15" / 20" Power Cord 17" : 3903-000144 15"/20" : 3903-000085 15" / 17" 20" Wall Mount kit 15"/17" : BN96-01270A 20" : BN96-01271A Owner's Instructions English-1
... designed with your dealer. Remote Control (BN59-00429A) & Batteries (AAA x 2) 17" 15" / 20" Power Cord 17" : 3903-000144 15"/20" : 3903-000085 15" / 17" 20" Wall Mount kit 15"/17" : BN96-01270A 20" : BN96-01271A Owner's Instructions English-1
User Manual (user Manual) (ver.1.0) (English)
Page 59
... to purchase the triple pivot direct mount adapter and wall mount bracket kit. • LT-P1545 (15") : • LT-P1745 (17") : • LT-P2045 (20") : • LT-P2045U (20") : No. 47 - 007 - 099 (Pivot direct mount adapter) No. 97 - 101 - 003 (Wall mount bracket kit) No. 47 - 007 - 099 (Pivot direct mount adapter) No. 97 - 101 - 003 (Wall mount bracket kit) No. 47 - 007...
... to purchase the triple pivot direct mount adapter and wall mount bracket kit. • LT-P1545 (15") : • LT-P1745 (17") : • LT-P2045 (20") : • LT-P2045U (20") : No. 47 - 007 - 099 (Pivot direct mount adapter) No. 97 - 101 - 003 (Wall mount bracket kit) No. 47 - 007 - 099 (Pivot direct mount adapter) No. 97 - 101 - 003 (Wall mount bracket kit) No. 47 - 007...

User Manual (user Manual) (ver.1.0) (English)
Page 60
... or other building materials, please contact your nearest dealer. Bracket Anchors : 3EA Screws : 3EA Installation Guide How to assemble the Wall Mount Kit 1 Mark the location of the stand. Fix anchors on each hole on the marked location using installation guide. Components Please ...material, turn over 35mm- English-56 When attaching to install the Wall Mount Kit. Connect bracket to a concrete wall. depth- Note : If the bracket is to be used when attaching the wall mount to the wall with screws after fitting anchors into the bracket holes. hole on the...
... or other building materials, please contact your nearest dealer. Bracket Anchors : 3EA Screws : 3EA Installation Guide How to assemble the Wall Mount Kit 1 Mark the location of the stand. Fix anchors on each hole on the marked location using installation guide. Components Please ...material, turn over 35mm- English-56 When attaching to install the Wall Mount Kit. Connect bracket to a concrete wall. depth- Note : If the bracket is to be used when attaching the wall mount to the wall with screws after fitting anchors into the bracket holes. hole on the...
User Manual (user Manual) (ver.1.0) (English)
Page 61
... tilting can be completely fixed to the bracket. Note : Picture (2) shows the angle adjustment section while LCD TV is assembled on the wall How to wall-mounted one . Picture (3) shows the adjustment angle (0°~ 10°) when you use LCD TV in its general form (stand-based LCD TV)..... English-57 Picture (2) shows the adjustment angle (13°~ 80°) when you use wall-mounted LCD TV after completing setup of LCD TV on the bracket and move in the direction of wall-mounted LCD TV Picture (1) shows the adjustment angle (0°~ 13°) when you convert stand-based...
... tilting can be completely fixed to the bracket. Note : Picture (2) shows the angle adjustment section while LCD TV is assembled on the wall How to wall-mounted one . Picture (3) shows the adjustment angle (0°~ 10°) when you use LCD TV in its general form (stand-based LCD TV)..... English-57 Picture (2) shows the adjustment angle (13°~ 80°) when you use wall-mounted LCD TV after completing setup of LCD TV on the bracket and move in the direction of wall-mounted LCD TV Picture (1) shows the adjustment angle (0°~ 13°) when you convert stand-based...


