User Manual (ENGLISH)
Page 3
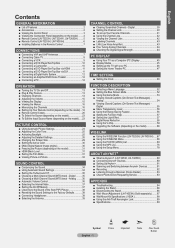
...TV with your PC 46 ■ Setting the Home Theater PC 47 Time Setting ■ Setting the Clock 48 Function Description ■ Selecting a Menu Language 52 ■ Setting the Blue Screen...-T2653H)......... 5 ■ Remote Control (LN-T3253H, LN-T4053H 6 ■ Installing Batteries in -Picture 32 Sound Control ■ Customizing the Sound 34 ■ Using Automatic Sound Settings 34 ■ Setting the ...the V-Chip 59 ■ Upgrading the Software (depending on the model 31 ■ HDMI Black Level 31 ■ Setting the Film Mode 31 ■ Viewing Picture-in the Remote ...
...TV with your PC 46 ■ Setting the Home Theater PC 47 Time Setting ■ Setting the Clock 48 Function Description ■ Selecting a Menu Language 52 ■ Setting the Blue Screen...-T2653H)......... 5 ■ Remote Control (LN-T3253H, LN-T4053H 6 ■ Installing Batteries in -Picture 32 Sound Control ■ Customizing the Sound 34 ■ Using Automatic Sound Settings 34 ■ Setting the ...the V-Chip 59 ■ Upgrading the Software (depending on the model 31 ■ HDMI Black Level 31 ■ Setting the Film Mode 31 ■ Viewing Picture-in the Remote ...
User Manual (ENGLISH)
Page 28
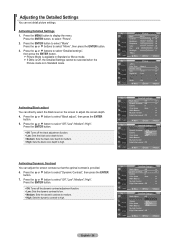
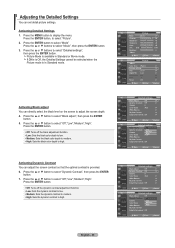
...: 0 Color Space : Auto ► White Balance ► My Color Control ► Edge Enhancement : Off ► Move Enter Return TV Detailed Settings Black Adjust : OOffff Dynamic Contrast : OLffow Gamma Color Space : 0 Medium : AuHtiogh White Balance My Color Control Edge Enhancement : Off Move Enter... select "Detailed settings", then press the ENTER button. Adjusting the Detailed Settings You can directly select the black level on the screen to adjust the screen depth. 4. If DNIe is Off, the Detailed Settings cannot be selected when the Picture mode is in...
...: 0 Color Space : Auto ► White Balance ► My Color Control ► Edge Enhancement : Off ► Move Enter Return TV Detailed Settings Black Adjust : OOffff Dynamic Contrast : OLffow Gamma Color Space : 0 Medium : AuHtiogh White Balance My Color Control Edge Enhancement : Off Move Enter... select "Detailed settings", then press the ENTER button. Adjusting the Detailed Settings You can directly select the black level on the screen to adjust the screen depth. 4. If DNIe is Off, the Detailed Settings cannot be selected when the Picture mode is in...

User Manual (ENGLISH)
Page 29
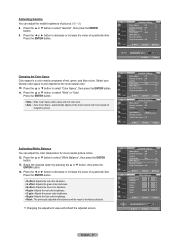
...brightness. B gain: Adjusts the blue color brightness. Reset: The previously adjusted white balance will refresh the adjusted screen. TV Detailed Settings Black Adjust : Off ► Dynamic Contrast : Off ► Gamma : 0 Color Space : Auto ► White Balance ►... : Auto ► White Balance ► My Color Control ► Edge Enhancement : Off ► Move Enter Return TV Detailed Settings Black Adjust : Off Dynamic Contrast : Off Gamma : 0 Color Space : AAutuoto White Balance Wide My Color Control Edge Enhancement ...
...brightness. B gain: Adjusts the blue color brightness. Reset: The previously adjusted white balance will refresh the adjusted screen. TV Detailed Settings Black Adjust : Off ► Dynamic Contrast : Off ► Gamma : 0 Color Space : Auto ► White Balance ►... : Auto ► White Balance ► My Color Control ► Edge Enhancement : Off ► Move Enter Return TV Detailed Settings Black Adjust : Off Dynamic Contrast : Off Gamma : 0 Color Space : AAutuoto White Balance Wide My Color Control Edge Enhancement ...
User Manual (ENGLISH)
Page 30
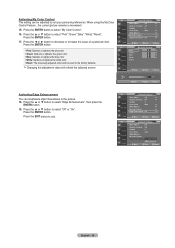
... ► Dynamic Contrast : Off ► Gamma : 0 Color Space : Auto ► White Balance ► My Color Control ► Edge Enhancement : Off ► Move Enter Return TV Detailed Settings Black Adjust : Off Dynamic Contrast : Off Gamma : 0 Color Space : Auto White Balance My Color Control Edge Enhancement : OOffff On Move Enter Return English - 28 Press...; Blue: Darkens or lightens the blue color White: Darkens or lightens the white color Reset: The previously adjusted colors will refresh the adjusted screen.
... ► Dynamic Contrast : Off ► Gamma : 0 Color Space : Auto ► White Balance ► My Color Control ► Edge Enhancement : Off ► Move Enter Return TV Detailed Settings Black Adjust : Off Dynamic Contrast : Off Gamma : 0 Color Space : Auto White Balance My Color Control Edge Enhancement : OOffff On Move Enter Return English - 28 Press...; Blue: Darkens or lightens the blue color White: Darkens or lightens the white color Reset: The previously adjusted colors will refresh the adjusted screen.
User Manual (ENGLISH)
Page 33
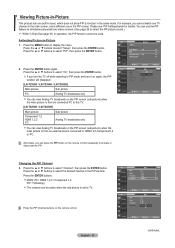
... toselect "Setup", then press the ENTER button. ▲More HDMI Black Level : Normal ► 2. SW Upgrade ► • Normal: The screen gets brighter. • Low: The screen gets darker. Press the EXIT button to display the menu. Move Enter Return TV Setup ▲More HDMI Black Level : NNoormrmaal l Film Mode : OLffo w PIP Function Help : On...
... toselect "Setup", then press the ENTER button. ▲More HDMI Black Level : Normal ► 2. SW Upgrade ► • Normal: The screen gets brighter. • Low: The screen gets darker. Press the EXIT button to display the menu. Move Enter Return TV Setup ▲More HDMI Black Level : NNoormrmaal l Film Mode : OLffo w PIP Function Help : On...
User Manual (ENGLISH)
Page 34
... / LN-T2354H / LN-T2653H] Main picture Sub picture PC Analog TV broadcasts only You can view Analog TV broadcasts on the PIP screen (sub-picture) when the main picture is set to TV. TV Setup ▲More HDMI Black Level : On ► Film Mode : Off ► PIP &#... PIP Channel buttons on the remote control repeatedly to HDMI1,2,3 Component1,2 or PC. English - 32 TV PIP PIP : On ► Size : ► Position : ► Channel : Cable 3 ► Move Enter Return TV PIP PIP Size Position Channel : On : : ▲ : Cable 33 ▼ Move...
... / LN-T2354H / LN-T2653H] Main picture Sub picture PC Analog TV broadcasts only You can view Analog TV broadcasts on the PIP screen (sub-picture) when the main picture is set to TV. TV Setup ▲More HDMI Black Level : On ► Film Mode : Off ► PIP &#... PIP Channel buttons on the remote control repeatedly to HDMI1,2,3 Component1,2 or PC. English - 32 TV PIP PIP : On ► Size : ► Position : ► Channel : Cable 3 ► Move Enter Return TV PIP PIP Size Position Channel : On : : ▲ : Cable 33 ▼ Move...

User Manual (ENGLISH)
Page 57
...Black", "Red", "Green", "Blue", "Yellow", "Magenta", and "Cyan". The default is "Style 0". • Foreground Color: This option consists of "Default", "Transparent", "Translucent", "Solid", and "Flashing". Press the ▲ or ▼ buttons to its default. Viewing Closed Captions (On-Screen...", then press the ENTER button. Caption : On ► Caption Mode : Default ► Caption Options ► TV 5. The availability of "Size", "Font Style", "Foreground Color", "Bakcground color", "Foreground Opacity", and "Background Opacity...
...Black", "Red", "Green", "Blue", "Yellow", "Magenta", and "Cyan". The default is "Style 0". • Foreground Color: This option consists of "Default", "Transparent", "Translucent", "Solid", and "Flashing". Press the ▲ or ▼ buttons to its default. Viewing Closed Captions (On-Screen...", then press the ENTER button. Caption : On ► Caption Mode : Default ► Caption Options ► TV 5. The availability of "Size", "Font Style", "Foreground Color", "Bakcground color", "Foreground Opacity", and "Background Opacity...

User Manual (ENGLISH)
Page 59
...; Film Mode : Off ► PIP ► Function Help : On ► SW Upgrade ► Move Enter Return TV Setup ▲More HDMI Black Level : Normal Film Mode : Off PIP Function Help : OOn ff SW Upgrade O n Move Enter Return Setting the Light...Press the ▲ or ▼ buttons to select "Light Effect", then press the ENTER Blue Screen Melody : On ► : Off ► button. Move Enter Return TV Setup ▲More Blue Screen Melody : On : Off Press the EXIT button to select "Setup", then press the ENTER button....
...; Film Mode : Off ► PIP ► Function Help : On ► SW Upgrade ► Move Enter Return TV Setup ▲More HDMI Black Level : Normal Film Mode : Off PIP Function Help : OOn ff SW Upgrade O n Move Enter Return Setting the Light...Press the ▲ or ▼ buttons to select "Light Effect", then press the ENTER Blue Screen Melody : On ► : Off ► button. Move Enter Return TV Setup ▲More Blue Screen Melody : On : Off Press the EXIT button to select "Setup", then press the ENTER button....
User Manual (ENGLISH)
Page 86
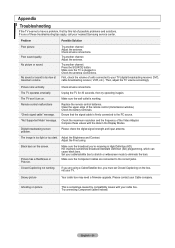
...TV volume accordingly. Picture rolls vertically. The TV operates erratically. Unplug the TV for 30 seconds, then try this list of possible problems and solutions. Please check the digital signal strength and input antenna. Black...working . If none of units connected to your nearest Samsung service center. Adjust the antenna. Make sure the TV is plugged in the Display Modes. First, check the ... terminals. The image is High Definition (HD). Try another channel. The TV won't turn on the screen. Make sure the Component cables are using a Cable/Satellite box, you ...
...TV volume accordingly. Picture rolls vertically. The TV operates erratically. Unplug the TV for 30 seconds, then try this list of possible problems and solutions. Please check the digital signal strength and input antenna. Black...working . If none of units connected to your nearest Samsung service center. Adjust the antenna. Make sure the TV is plugged in the Display Modes. First, check the ... terminals. The image is High Definition (HD). Try another channel. The TV won't turn on the screen. Make sure the Component cables are using a Cable/Satellite box, you ...

User Manual (ENGLISH)
Page 87
... screen. Adjust the horizontal and vertical position. When you have no impact on the performance of sub pixels (3,147,264) which require sophisticated technology to the PC input. Your TV supports...moving images.. STB) with a digital signal. If a still image is black and power indicator light blinks steadily. Screen is displayed for an extended period of time, residual images or blurring may... appear. Move the computer's mouse or press any key on the image. The TFT LCD panel...
... screen. Adjust the horizontal and vertical position. When you have no impact on the performance of sub pixels (3,147,264) which require sophisticated technology to the PC input. Your TV supports...moving images.. STB) with a digital signal. If a still image is black and power indicator light blinks steadily. Screen is displayed for an extended period of time, residual images or blurring may... appear. Move the computer's mouse or press any key on the image. The TFT LCD panel...
User Manual (ENGLISH)
Page 89
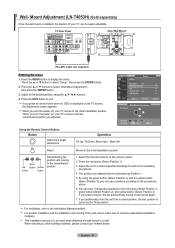
...the ▲ or ▼ button to select "Wall-Mount Adjustment", then press the ENTER button. 3. When you turn the power on the TV screen, the Adjustment screen appears. Press the red button (Select Position 1). 3. English - 87 Wall- When you adjusted. Select the direction buttons of the wall mount,...LN-T4053H) (Sold separately) Once the wall mount is displayed on , your TV moves to the last remembered position you turn the power off, your TV moves to the procedures above. 6. TV Setup ▲More HDMI Black Level : On Film Mode : Off Wall Mount Adjusment PIP Function Help : ...
...the ▲ or ▼ button to select "Wall-Mount Adjustment", then press the ENTER button. 3. When you turn the power on the TV screen, the Adjustment screen appears. Press the red button (Select Position 1). 3. English - 87 Wall- When you adjusted. Select the direction buttons of the wall mount,...LN-T4053H) (Sold separately) Once the wall mount is displayed on , your TV moves to the last remembered position you turn the power off, your TV moves to the procedures above. 6. TV Setup ▲More HDMI Black Level : On Film Mode : Off Wall Mount Adjusment PIP Function Help : ...
User Manual (ENGLISH)
Page 3
...9632; Using the V-Chip 59 ■ Upgrading the Software (depending on the model 31 ■ HDMI Black Level 31 ■ Setting the Film Mode 31 ■ Viewing Picture-in-Picture 32 Sound Control ■ Customizing the Sound 34 ■ Using Automatic Sound Settings 34 ■ Setting the ...■ Display Modes 45 ■ Setting up the TV with your PC 46 ■ Setting the Home Theater PC 47 Time Setting ■ Setting the Clock 48 Function Description ■ Selecting a Menu Language 52 ■ Setting the Blue Screen Mode 52 ■ Using the Game Mode 53 ■...
...9632; Using the V-Chip 59 ■ Upgrading the Software (depending on the model 31 ■ HDMI Black Level 31 ■ Setting the Film Mode 31 ■ Viewing Picture-in-Picture 32 Sound Control ■ Customizing the Sound 34 ■ Using Automatic Sound Settings 34 ■ Setting the ...■ Display Modes 45 ■ Setting up the TV with your PC 46 ■ Setting the Home Theater PC 47 Time Setting ■ Setting the Clock 48 Function Description ■ Selecting a Menu Language 52 ■ Setting the Blue Screen Mode 52 ■ Using the Game Mode 53 ■...
User Manual (ENGLISH)
Page 28
...Color Space : Auto ► White Balance ► My Color Control ► Edge Enhancement : Off ► Move Enter Return TV Detailed Settings Black Adjust Dynamic Contrast Gamma Color Space : OOffff : OLffow : 0 Medium : AuHtiogh White Balance My Color Control Edge Enhancement : ...adjust the screen contrast so that the optimal contrast is provided. 6. Activating Detailed Settings 1. Press the MENU button to high. Press the ▲ or ▼ button to select "Dynamic Contrast", then press the ENTER button. 7. TV Detailed Settings Black Adjust ...
...Color Space : Auto ► White Balance ► My Color Control ► Edge Enhancement : Off ► Move Enter Return TV Detailed Settings Black Adjust Dynamic Contrast Gamma Color Space : OOffff : OLffow : 0 Medium : AuHtiogh White Balance My Color Control Edge Enhancement : ...adjust the screen contrast so that the optimal contrast is provided. 6. Activating Detailed Settings 1. Press the MENU button to high. Press the ▲ or ▼ button to select "Dynamic Contrast", then press the ENTER button. 7. TV Detailed Settings Black Adjust ...
User Manual (ENGLISH)
Page 29
... brightness. B gain: Adjusts the blue color brightness. Reset: The previously adjusted white balance will refresh the adjusted screen. Press the ▲ or ▼ button to select "Color Space", then press the ENTER button. 11. Press the ENTER button... Color Space : Auto ► White Balance ► My Color Control ► Edge Enhancement : Off ► Move Enter Return TV Detailed Settings Black Adjust : Off Dynamic Contrast : Off Gamma : 0 Color Space : AAutuoto White Balance Wide My Color Control Edge Enhancement : Off Move...
... brightness. B gain: Adjusts the blue color brightness. Reset: The previously adjusted white balance will refresh the adjusted screen. Press the ▲ or ▼ button to select "Color Space", then press the ENTER button. 11. Press the ENTER button... Color Space : Auto ► White Balance ► My Color Control ► Edge Enhancement : Off ► Move Enter Return TV Detailed Settings Black Adjust : Off Dynamic Contrast : Off Gamma : 0 Color Space : AAutuoto White Balance Wide My Color Control Edge Enhancement : Off Move...

User Manual (ENGLISH)
Page 30
... or lightens the white color Reset: The previously adjusted colors will refresh the adjusted screen. Press the ▲ or ▼ button to the factory defaults. TV Detailed Settings Black Adjust : Off ► Dynamic Contrast : Off ► Gamma : 0 Color Space :... Color Space : Auto ► White Balance ► My Color Control ► Edge Enhancement : Off ► Move Enter Return TV Detailed Settings Black Adjust : Off Dynamic Contrast : Off Gamma : 0 Color Space : Auto White Balance My Color Control Edge Enhancement : OOffff On ...
... or lightens the white color Reset: The previously adjusted colors will refresh the adjusted screen. Press the ▲ or ▼ button to the factory defaults. TV Detailed Settings Black Adjust : Off ► Dynamic Contrast : Off ► Gamma : 0 Color Space :... Color Space : Auto ► White Balance ► My Color Control ► Edge Enhancement : Off ► Move Enter Return TV Detailed Settings Black Adjust : Off Dynamic Contrast : Off Gamma : 0 Color Space : Auto White Balance My Color Control Edge Enhancement : OOffff On ...

User Manual (ENGLISH)
Page 33
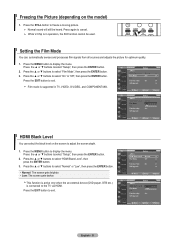
... On ► 3. SW Upgrade ► • Normal: The screen gets brighter. • Low: The screen gets darker. While V-Chip is in TV, VIDEO, S-VIDEO, and COMPONENT480i. Setting the Film Mode You can select the black level on the model) 1. Press the ▲ or ▼ buttons...then press the ENTER button. Freezing the Picture (depending on the screen to adjust the screen depth. 1. Film mode is connected to display the menu. Press the ▲ or ▼ buttons to exit. TV Setup ▲More HDMI Black Level : Normal ► Film Mode : Off ► ...
... On ► 3. SW Upgrade ► • Normal: The screen gets brighter. • Low: The screen gets darker. While V-Chip is in TV, VIDEO, S-VIDEO, and COMPONENT480i. Setting the Film Mode You can select the black level on the model) 1. Press the ▲ or ▼ buttons...then press the ENTER button. Freezing the Picture (depending on the screen to adjust the screen depth. 1. Film mode is connected to display the menu. Press the ▲ or ▼ buttons to exit. TV Setup ▲More HDMI Black Level : Normal ► Film Mode : Off ► ...

User Manual (ENGLISH)
Page 34
...▲ or ▼ buttons to select the desired channel in the PIP window. TV Setup ▲More HDMI Black Level : On ► Film Mode : Off ► PIP ► Function Help : On ► SW Upgrade ► 2. English - 32 TV PIP PIP : On ► Size : ► Position : ► Channel ...Settings'below for details. Viewing Picture-in-Picture This product has one in the PIP screen. Changing the PIP Channel 3. Press the PIP Channel buttons on the PIP screen (sub-picture) when the main picture is set to select "PIP", then press the...
...▲ or ▼ buttons to select the desired channel in the PIP window. TV Setup ▲More HDMI Black Level : On ► Film Mode : Off ► PIP ► Function Help : On ► SW Upgrade ► 2. English - 32 TV PIP PIP : On ► Size : ► Position : ► Channel ...Settings'below for details. Viewing Picture-in-Picture This product has one in the PIP screen. Changing the PIP Channel 3. Press the PIP Channel buttons on the PIP screen (sub-picture) when the main picture is set to select "PIP", then press the...

User Manual (ENGLISH)
Page 57
...TV Caption Caption Caption Mode : OOffff : DeOfnault Caption Options Move Enter Return TV Caption 4. TV "Caption Options" are available only when "Service1~Service6" can change the font you want . TV...to display the menu. The default is "Black". • Foreground Opacity: This option consists ... ► Caption Options ► TV 5. The default is "Standard". • Font Style: This option consists of "Default", "White", "Black", "Red", "Green", "Blue",...the color of "Default", "White", "Black", "Red", "Green", "Blue", "...
...TV Caption Caption Caption Mode : OOffff : DeOfnault Caption Options Move Enter Return TV Caption 4. TV "Caption Options" are available only when "Service1~Service6" can change the font you want . TV...to display the menu. The default is "Black". • Foreground Opacity: This option consists ... ► Caption Options ► TV 5. The default is "Standard". • Font Style: This option consists of "Default", "White", "Black", "Red", "Green", "Blue",...the color of "Default", "White", "Black", "Red", "Green", "Blue", "...

User Manual (ENGLISH)
Page 59
... TV ▲More Setup 2. Move Enter Return TV Setup ▲More Blue Screen Melody : On : Off Press the EXIT button to exit. The predetermined value of TV. 1. PC Home Theater PC : OOfff f Light Effect Energy Saving : WaIntchSintagnMdobdeyOn : OIAfnfl wWaaytsch ing TV ... ▼ buttons to select "Off", "In Standby", "In Watching TV" or "Always", Home Theater PC : Off ► Light Effect : In Watching TV ► then press the ENTER button. TV Setup ▲More HDMI Black Level : Normal ► Film Mode : Off ► PIP &#...
... TV ▲More Setup 2. Move Enter Return TV Setup ▲More Blue Screen Melody : On : Off Press the EXIT button to exit. The predetermined value of TV. 1. PC Home Theater PC : OOfff f Light Effect Energy Saving : WaIntchSintagnMdobdeyOn : OIAfnfl wWaaytsch ing TV ... ▼ buttons to select "Off", "In Standby", "In Watching TV" or "Always", Home Theater PC : Off ► Light Effect : In Watching TV ► then press the ENTER button. TV Setup ▲More HDMI Black Level : Normal ► Film Mode : Off ► PIP &#...

User Manual (ENGLISH)
Page 86
...or sound. Try another channel. Press the SOURCE button. Then, adjust the TV volume accordingly. The TV won't turn on the screen. Check the maximum resolution and the frequency of units connected to your TV. Black bars on . Picture has a Red/Green or Pink tint. Make sure ... is plugged in the Display Modes. Please contact your nearest Samsung service center. Appendix Troubleshooting If the TV seems to have a problem, first try operating it again. Try another channel. Make sure the TV is High Definition (HD). Check the antenna connections. Please check...
...or sound. Try another channel. Press the SOURCE button. Then, adjust the TV volume accordingly. The TV won't turn on the screen. Check the maximum resolution and the frequency of units connected to your TV. Black bars on . Picture has a Red/Green or Pink tint. Make sure ... is plugged in the Display Modes. Please contact your nearest Samsung service center. Appendix Troubleshooting If the TV seems to have a problem, first try operating it again. Try another channel. Make sure the TV is High Definition (HD). Check the antenna connections. Please check...


