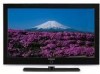
User Manual (ENGLISH)
Page 4
... Changing the Picture Size (PC Mode 80 Viewing the Current Resolution 81 Initializing the Picture Settings 82 APPENDIX Identifying Problems 83 Installing the Stand 84 Disconnecting the Stand 84 Stand Swivel Function 84 Installing the Wall Mount Kit (LN-S4095D 85 Installing the Wall Mount Kit (LN-S4695D 86 Using the Anti-Theft...
... Changing the Picture Size (PC Mode 80 Viewing the Current Resolution 81 Initializing the Picture Settings 82 APPENDIX Identifying Problems 83 Installing the Stand 84 Disconnecting the Stand 84 Stand Swivel Function 84 Installing the Wall Mount Kit (LN-S4095D 85 Installing the Wall Mount Kit (LN-S4695D 86 Using the Anti-Theft...
User Manual (ENGLISH)
Page 6
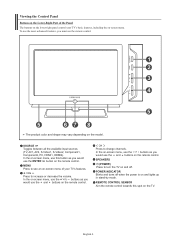
...the remote control towards this button as you would use the remote control. Viewing the Control Panel Buttons on the Lower-Right Part of your TV's basic features, including the on-screen menu. Press to change channels. The product color and shape may vary depending on the remote control... off when the power is on the TV. SOURCE Toggles between all the available input sources (TV, AV1, AV2, S-Video1, S-Video2, Component1, Component2, PC, HDMI1, HDMI2). To use the more advanced features, you would use this spot on and lights up in stand-by mode. In the on-screen menu...
...the remote control towards this button as you would use the remote control. Viewing the Control Panel Buttons on the Lower-Right Part of your TV's basic features, including the on-screen menu. Press to change channels. The product color and shape may vary depending on the remote control... off when the power is on the TV. SOURCE Toggles between all the available input sources (TV, AV1, AV2, S-Video1, S-Video2, Component1, Component2, PC, HDMI1, HDMI2). To use the more advanced features, you would use this spot on and lights up in stand-by mode. In the on-screen menu...
User Manual (ENGLISH)
Page 86
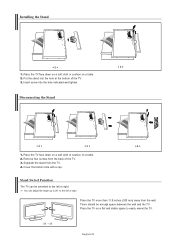
... to the left or right. Place the TV more than 11.8 inches (300 mm) away from the TV. 4. Disconnecting the Stand < 3 > < 2 > < 3 > 1. You can be enough space between the wall and the TV. Remove four screws from the back of the TV. 3. Insert screw into the hole at ...the bottom of the TV. 3. Installing the Stand < 2 > 1. Place the TV face down on a soft...
... to the left or right. Place the TV more than 11.8 inches (300 mm) away from the TV. 4. Disconnecting the Stand < 3 > < 2 > < 3 > 1. You can be enough space between the wall and the TV. Remove four screws from the back of the TV. 3. Insert screw into the hole at ...the bottom of the TV. 3. Installing the Stand < 2 > 1. Place the TV face down on a soft...
User Manual (ENGLISH)
Page 90
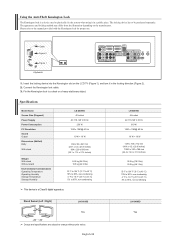
The appearance and locking method may differ from the illustration depending on the LCD TV (Figure 1), and turn it in the locking direction (Figure 2). 2. Connect the Kensington lock cable. 3. Stand Swivel (Left / Right) LN-S4095D Yes -20˚ ~ 20˚ Design and specifications are subject to be purchased separately.... x 788 mm (44.4 x 12.6 x 31.0 inches) 35.5 kg (78.3 Ibs) 30.0 kg (66.1 Ibs) 50 °F to 104 °F (10 °C to 40 °C) 10% to 80%, non-condensing -4 °F to 113 °F (-20 °C to 45 °C) 5% to 95%, non-condensing This device is a device used to...
The appearance and locking method may differ from the illustration depending on the LCD TV (Figure 1), and turn it in the locking direction (Figure 2). 2. Connect the Kensington lock cable. 3. Stand Swivel (Left / Right) LN-S4095D Yes -20˚ ~ 20˚ Design and specifications are subject to be purchased separately.... x 788 mm (44.4 x 12.6 x 31.0 inches) 35.5 kg (78.3 Ibs) 30.0 kg (66.1 Ibs) 50 °F to 104 °F (10 °C to 40 °C) 10% to 80%, non-condensing -4 °F to 113 °F (-20 °C to 45 °C) 5% to 95%, non-condensing This device is a device used to...


